mongodb4.0.2分片集群部署
一、分片集群简介
在之前有说过关于MongoDB的复制集,复制集主要用来实现自动故障转移从而达到高可用的目的,然而,随着业务规模的增长和时间的推移,业务数据量会越来越大,当前业务数据可能只有几百GB不到,一台DB服务器足以搞定所有的工作,而一旦业务数据量扩充大几个TB几百个TB时,就会产生一台服务器无法存储的情况,此时,需要将数据按照一定的规则分配到不同的服务器进行存储、查询等,即为分片集群。分片集群要做到的事情就是数据分布式存储。
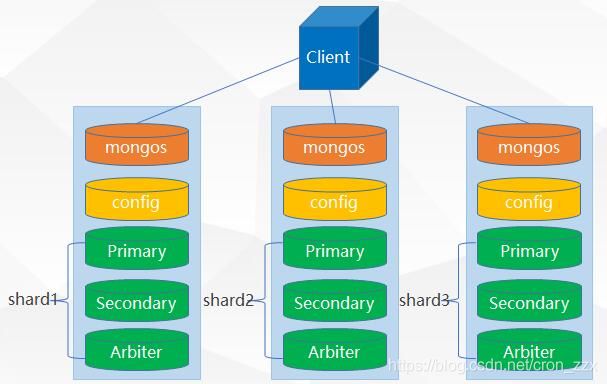
集群组建示意图:
MongoDB分片群集主要有如下三个组件:
- Shard:分片服务器,用于存储实际的数据块,实际生产环境中一个shard server 角色可以由几台服务器组成一个Peplica Set 承担,防止主机单点故障。
- Config Server:配置服务器,主要是记录shard的配置信息(元信息metadata),如数据存储目录,日志目录,端口号,是否开启了journal等信息,其中包括chunk信息。为了保证config服务器的可用性,也做了复制集处理,注意,一旦配置服务器无法使用,则整个集群就不能使用了,一般是独立的三台服务器实现冗余备份,这三台可能每一台是独立的复制集架构。
- Routers:前端路由,负责数据的分片写入。客户端由此接入,且让整个群集看上去像单一数据库,前端应用可以透明使用。应用程序通过驱动程序直接连接router,router启动时从配置服务器复制集中读取shared信息,然后将数据实际写入或读取(路由)到具体的shard中。
二、集群部署
环境准备:
mongodb4.0.2压缩包官网地址 https://fastdl.mongodb.org/linux/mongodb-linux-x86_64-4.0.2.tgz
mongo1:192.168.247.141 shard1:27001 shard2:27002 shard3:27003 configs:27018 mongos:27017
mongo2:192.168.247.142 shard1:27001 shard2:27002 shard3:27003 configs:27018 mongos:27017
mongo3:192.168.247.143 shard1:27001 shard2:27002 shard3:27003 configs:27018 mongos:27017
说明:
1、启动顺序:configs---》shard(1,2,3)---》mongos
2、configs和shard1、shard2、shard3由mongod启动和管理,mongos:27017 由mongos启动管理。
部署(在mongo1上安装,然后将安装目录拷贝到其他主机):
tar -xf mongodb-linux-x86_64-4.0.2.tgz
mkdir /usr/local/mongo
mv mongodb-linux-x86_64-4.0.2/* /usr/local/mongo/
echo 'export PATH=$PATH:/usr/local/mongo/bin' >> /etc/profile
source /etc/profile
cd /usr/local/mongo/
mkdir conf log
mkdir -p data/config
mkdir -p data/shard1
mkdir -p data/shard2
mkdir -p data/shard3
touch log/config.log
touch log/mongos.log
touch log/shard1.log
touch log/shard2.log
touch log/shard3.log
touch conf/config.conf
touch conf/mongos.conf
touch conf/shard1.conf
touch conf/shard2.conf
touch conf/shard3.conf
vim conf/config.conf
dbpath=/usr/local/mongo/data/config
logpath=/usr/local/mongo/log/config.log
port=27018
logappend=true
fork=true
maxConns=5000
#复制集名称
replSet=configs
#置参数为true
configsvr=true
#允许任意机器连接
bind_ip=0.0.0.0
vim conf/shard1.conf
dbpath=/usr/local/mongo/data/shard1 #其他2个分片对应修改为shard2、shard3文件夹
logpath=/usr/local/mongo/log/shard1.log #其他2个分片对应修改为shard2.log、shard3.log
port=27001 #其他2个分片对应修改为27002、27003
logappend=true
fork=true
maxConns=5000
storageEngine=mmapv1
shardsvr=true
replSet=shard1 #其他2个分片对应修改为shard2、shard3
bind_ip=0.0.0.0
vim conf/shard2.conf
dbpath=/usr/local/mongo/data/shard2
logpath=/usr/local/mongo/log/shard2.log
port=27002
logappend=true
fork=true
maxConns=5000
storageEngine=mmapv1
shardsvr=true
replSet=shard2
bind_ip=0.0.0.0
vim conf/shard3.conf
dbpath=/usr/local/mongo/data/shard3
logpath=/usr/local/mongo/log/shard3.log
port=27003
logappend=true
fork=true
maxConns=5000
storageEngine=mmapv1
shardsvr=true
replSet=shard3
bind_ip=0.0.0.0
vim conf/mongos.conf
systemLog:
  destination: file
  logAppend: true
  path: /usr/local/mongo/log/mongos.log
processManagement:
  fork: true
#  pidFilePath: /var/log/nginx/mongodbmongos.pid

# network interfaces
net:
  port: 27017
  bindIp: 0.0.0.0
#监听的配置服务器,只能有1个或者3个 configs为配置服务器的副本集名字
sharding:
   configDB: configs/mongo1:27018,mongo2:27018,mongo3:27018
scp /usr/local/mongo/* mongo2:/usr/local/mongo/
scp /usr/local/mongo/* mongo3:/usr/local/mongo/
启动服务(所有主机):
启动配置服务器副本集:mongod -f /usr/local/mongo/conf/config.conf
mongo --port 27018
配置副本集:
config = {
    _id : "configs",
     members : [
         {_id : 0, host : "192.168.247.141:27018" },
         {_id : 1, host : "192.168.247.142:27018" },
         {_id : 2, host : "192.168.247.143:27018" }
     ]
 }
初始化命令:
rs.initiate(config);
rs.status()
启动3个分片副本集:
mongod -f /usr/local/mongo/conf/shard1.conf
mongo --port 27001
配置副本集:
config = {
    _id : "shard1",
     members : [
         {_id : 0, host : "192.168.247.141:27001" },
         {_id : 1, host : "192.168.247.142:27001" },
         {_id : 2, host : "192.168.247.143:27001" }
     ]
 }
mongod -f /usr/local/mongo/conf/shard2.conf
mongo --port 27002
配置副本集:
config = {
    _id : "shard2",
     members : [
         {_id : 0, host : "192.168.247.141:27002" },
         {_id : 1, host : "192.168.247.142:27002" },
         {_id : 2, host : "192.168.247.143:27002" }
     ]
 }
mongod -f /usr/local/mongo/conf/shard3.conf
mongo --port 27003
配置副本集:
config = {
    _id : "shard3",
     members : [
         {_id : 0, host : "192.168.247.141:27003" },
         {_id : 1, host : "192.168.247.142:27003" },
         {_id : 2, host : "192.168.247.143:27003" }
     ]
 }
启动路由服务器副本集:
mongos -f /usr/local/mongo/conf/mongos.conf
mongo --port 27017
启用分片(只需在任意一台执行即可):
use admin
sh.addShard("shard1/192.168.247.141:27001,192.168.247.142:27001,192.168.247.143:27001")
sh.addShard("shard2/192.168.247.141:27002,192.168.247.142:27002,192.168.247.143:27002")
sh.addShard("shard3/192.168.247.141:27003,192.168.247.142:27003,192.168.247.143:27003")
----------------------------------------------------------
分片功能测试:
设置分片chunk大小
use config
db.setting.save({"_id":"chunksize","value":1}) # 设置块大小为1M是方便实验,不然需要插入海量数据
模拟写入数据
use mytest
for(i=1;i<=50000;i++){db.user.insert({"id":i,"name":"zzx"+i})} #模拟往mytest数据库的user表写入5万数据
7、启用数据库分片
sh.enableSharding("mytest")
8、创建索引,对表进行分片
db.user.createIndex({"id":1}) # 以"id"作为索引
sh.shardCollection(mytest.user",{"id":1}) # 根据"id"对user表进行分片
sh.status() # 查看分片情况
到此,MongoDB分布式集群就搭建完毕。
