Python Matplotlib
Python matplotlib library helps us to plot data on graphs in its simplest terms. If you are familiar with MATLAB plotting, then Matplotlib will be easy to use for basic plotting.
Python matplotlib库帮助我们以最简单的方式在图形上绘制数据。 如果您熟悉MATLAB绘图,那么Matplotlib将很容易用于基本绘图。
Python Matplotlib (Python Matplotlib)
To start understanding how Matplotlib helps us building graphs and visualisation figures to represent data, we will need to know some of the basic terms we will use a lot in this post. Let’s study these terms first.
为了开始理解Matplotlib如何帮助我们构建图形和可视化图形来表示数据,我们需要了解一些将在本文中大量使用的基本术语。 让我们先研究这些术语。
Python Matplotlib术语 (Python Matplotlib Terminology)
- The Figure is complete window or the page the graph is drawn upon. “ 图形完成”窗口或绘制图形的页面。
- The Axes is the area on which data is plotted. This can be X-Axis or Y-Axis etc. 轴是绘制数据的区域。 可以是X轴或Y轴等。
- The Spines are the lines which connects Axes points. 脊是连接轴点的线。
安装Matplotlib (Install Matplotlib)
It is easy to install python matplotlib library with pip:
使用pip安装python matplotlib库很容易:
pip install matplotlibThat’s it! Now we are ready to build some cool examples using this data visualisation library.
而已! 现在,我们准备使用此数据可视化库构建一些很酷的示例。
Matplotlib入门 (Getting started with Matplotlib)
In this section, we will get started with the plot construction and start feeding data to python matplotlib functions.
在本节中,我们将开始绘制图并开始将数据馈送到python matplotlib函数。
Matplotlib线图 (Matplotlib Line Plot)
We will start with a very basic example of plotting. We will just use two Python lists as the data source for points of a graph. Let’s write a code snippet for this:
我们将从一个非常基本的绘图示例开始。 我们将仅使用两个Python列表作为图形点的数据源。 让我们为此编写一个代码段:
import matplotlib.pyplot as plt

year = [1950, 1975, 2000, 2018]
population = [2.12, 3.681, 5.312, 6.981]

plt.plot(year, population)
plt.show()
Note the last line with the show() function. It is important to call it otherwise, the plot won’t be shown on the screen. When we run this code, we can see the following figure appear:
Note that we can also provide a title to this figure and labels to our Axes by using this snippet:
注意show()函数的最后一行。 重要的是要以其他方式进行调用,否则该图将不会显示在屏幕上。 运行此代码时,我们可以看到如下图所示:
请注意,我们还可以使用以下代码段为该图提供标题并为我们的轴提供标签:
...
plt.xlabel('Year')
plt.ylabel('Population')
plt.title('World Population')
Matplotlib散点图 (Matplotlib Scatter Plot)
Above plot was very much indicative of the points which were actually not passed in the array as it showed a line. What if we only want to see the actual points on the plot? Scatter plot achieves this:
上面的曲线非常表明阵列中实际上没有通过的点,因为它显示了一条线。 如果我们只想查看图中的实际点怎么办? 散点图可实现以下目的:
import matplotlib.pyplot as plt

year = [1950, 1975, 2000, 2018]
population = [2.12, 3.681, 5.312, 6.981]

plt.scatter(year, population)
plt.show()
When we run this code, we can see the following figure appear:
运行此代码时,我们可以看到如下图所示:
Matplotlib历史图 (Matplotlib Historgrams)
In this section, we introduce you to Histograms. While graphs inform us how our data vary, histogram describes how our data is distributed. More the values in a range, higher the bar for a range.
在本节中,我们向您介绍直方图。 当图表告诉我们数据如何变化时,直方图描述了我们数据的分布方式。 范围中的值越多,范围的条形越高。
We use hist() function to make a Histogram. It has 2 important parameters:
我们使用hist()函数制作直方图。 它具有两个重要参数:
- List of values to plot 要绘制的值列表
- Number of ranges to distribute these points into 将这些点分布到的范围数
Let’s demonstrate this with a code snippet:
让我们用一个代码片段来演示这一点:
import matplotlib.pyplot as plt

values = [0, 1.2, 1.3, 1.9, 4.3, 2.5, 2.7, 4.3, 1.3, 3.9]
plt.hist(values, bins = 4)
plt.show()
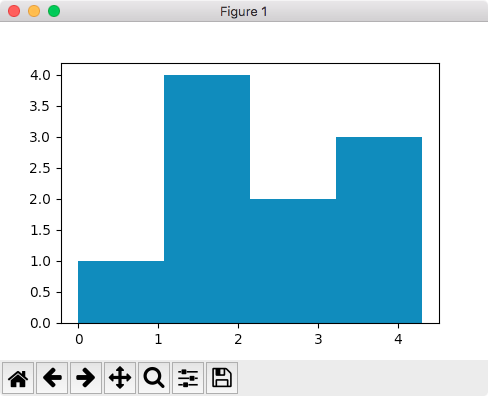
When we run this code, we can see the following figure appear:
The default value for number of bins is 10. The number of bins is important to set. Smaller number of bins can hide reality of data distribution and too many bins can overcomplicate reality.
运行此代码时,我们可以看到如下图所示:
箱数的默认值为10。箱数的设置很重要。 较少数量的存储箱可以隐藏数据分发的真实性,而过多的存储箱会使真实性过于复杂。
Matplotlib图中的自定义 (Customisation in Matplotlib Plot)
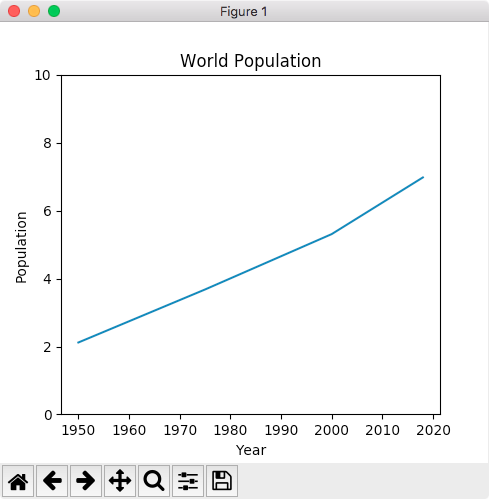
If you notice the first Line plot, we see that Y-axis didn’t started from 0. We can modify this:
如果您注意到第一个Line图,我们会看到Y轴不是从0开始的。我们可以对此进行修改:
...
plt.yticks([0, 2, 4, 6, 8, 10])
When we run this code, we can see the following figure appear:
运行此代码时,我们可以看到如下图所示:
在Matplotlib中绘制多条曲线 (Drawing multiple curves in Matplotlib)
It is utterly common to draw multiple curves on a single graph to make a comparison. Let’s try this here:
在单个图形上绘制多条曲线进行比较是非常普遍的。 让我们在这里尝试一下:
import numpy as np
import matplotlib.pyplot as plt

X = np.linspace(-np.pi, np.pi, 256, endpoint=True)
cos, sin = np.cos(X), np.sin(X)

plt.plot(X, cos)
plt.plot(X, sin)

plt.show()
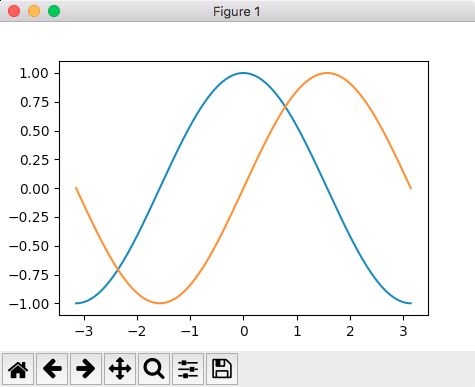
When we run this code, we can see the following figure appear:
So, it was just a matter of calling plot multiple times. To add, we used numpy to create a non-linear curve!
运行此代码时,我们可以看到如下图所示:
因此,这只是多次调用图的问题。 要添加的是,我们使用numpy创建了一条非线性曲线!
在Matplotlib绘图中更改颜色并添加图例 (Changing color and Adding Legends in Matplotlib Plot)
As we saw, curves look nice but aren’t they all look so, similar? What if we want to change their color and show what each color represents? Let’s try drawing the sine and cosine curves together:
如我们所见,曲线看起来不错,但不是都一样吗? 如果我们想更改其颜色并显示每种颜色代表什么,该怎么办? 让我们尝试一起绘制正弦和余弦曲线:
import numpy as np
import matplotlib.pyplot as plt

X = np.linspace(-np.pi, np.pi, 256, endpoint=True)
cos, sin = np.cos(X), np.sin(X)

plt.plot(X, cos, color='blue', label="cosine")
plt.plot(X, sin, color='red', label="sine")
plt.legend(loc='upper left', frameon=False)

plt.show()
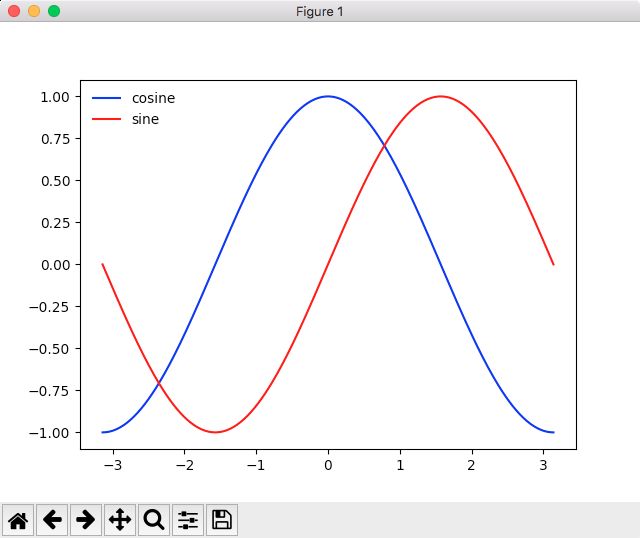
When we run this code, we can see the following figure appear:
If you notice, we actually did two things in this figure:
运行此代码时,我们可以看到如下图所示:
如果您注意到,我们实际上在该图中做了两件事:
- Modified the color for the curves to make the comparison easier 修改曲线的颜色以使比较更容易
- Added a legend frame which introduces which colour represents what. This makes the metadata on the graph very easy to read. 添加了图例框架,其中介绍了哪种颜色代表什么。 这使得图上的元数据非常易于阅读。
在Matplotlib中创建条形图 (Creating Bar chart in Matplotlib)
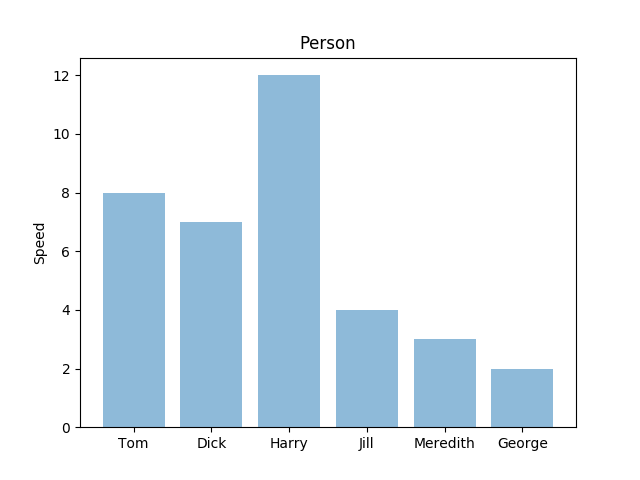
We can create appealing bar charts with Matplotlib with simple code snippet:
我们可以使用带有简单代码段的Matplotlib创建吸引人的条形图:
import matplotlib.pyplot as plt; plt.rcdefaults()
import numpy as np
import matplotlib.pyplot as plt

names = ('Tom', 'Dick', 'Harry', 'Jill', 'Meredith', 'George')
y_pos = np.arange(len(names))
speed = [8, 7, 12, 4, 3, 2]

plt.bar(y_pos, speed, align='center', alpha=0.5)
plt.xticks(y_pos, names)
plt.ylabel('Speed')
plt.title('Person')

plt.show()
When we run this code, we can see the following figure appear:
运行此代码时,我们可以看到如下图所示:
在Matplotlib中创建饼图 (Creating Pie chart in Matplotlib)
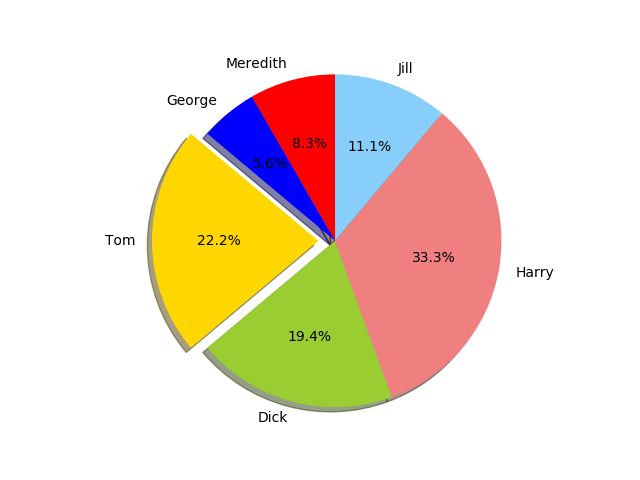
We can create appealing pie charts with Matplotlib with simple code snippet:
我们可以使用Matplotlib通过简单的代码片段创建吸引人的饼图:
import matplotlib.pyplot as plt

# Data to plot
names = 'Tom', 'Dick', 'Harry', 'Jill', 'Meredith', 'George'
speed = [8, 7, 12, 4, 3, 2]
colors = ['gold', 'yellowgreen', 'lightcoral', 'lightskyblue', 'red', 'blue']
explode = (0.1, 0, 0, 0, 0, 0)  # explode 1st slice

# Plot
plt.pie(speed, explode=explode, labels=names, colors=colors,
        autopct='%1.1f%%', shadow=True, startangle=140)

plt.axis('equal')
plt.show()
When we run this code, we can see the following figure appear:
See how we elevated one of the slice in the pie chart to differentiate it from the rest!
运行此代码时,我们可以看到如下图所示:
看看我们如何提升饼图中的一个切片,以区别于其他切片!
在Matplotlib中创建热图 (Creating Heat Maps in Matplotlib)
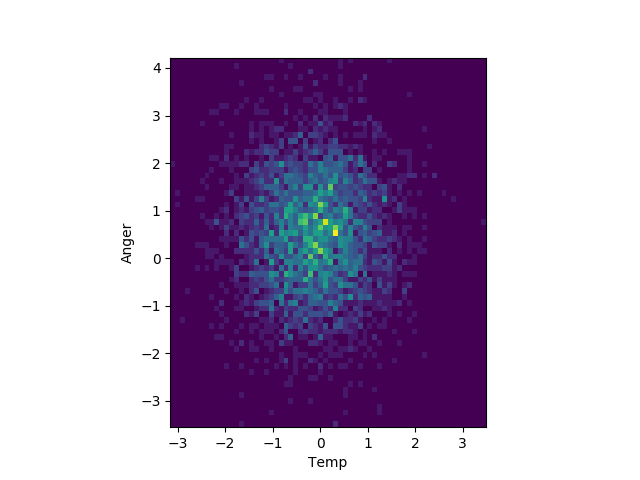
Charts are cool but when it comes to visualising geographical information, nothing works better than a heat map:
图表很酷,但是在可视化地理信息方面,没有什么比热图更好的了:
import numpy as np
import numpy.random
import matplotlib.pyplot as plt

# Create data
temperature = np.random.randn(4096)
anger = np.random.randn(4096)

# Create heatmap
heatmap, xedges, yedges = np.histogram2d(temperature, anger, bins=(64,64))
extent = [xedges[0], xedges[-1], yedges[0], yedges[-1]]

# Plot heatmap
plt.clf()
plt.ylabel('Anger')
plt.xlabel('Temp')
plt.imshow(heatmap, extent=extent)
plt.show()
When we run this code, we can see the following figure appear:
Note that we created the data by just random values and output figure can vary depending on the values.
运行此代码时,我们可以看到如下图所示:
请注意,我们仅通过随机值创建了数据,并且输出值可能会根据值而有所不同。
That’s all for python matplotlib plotting tutorial.
这就是python matplotlib绘图教程的全部内容。
Reference: Website
参考: 网站
翻译自: https://www.journaldev.com/17780/python-matplotlib


