从0到1,使用proxy手把手带你实现一个vue框架
一、写在开头
vue3.0通过proxy对vue进行了重构,那么今天我们就来通过proxy来实现一版自己的vue框架吧
看完该文,您将学到
- proxy与Object.defineProperty的区别
- 通过proxy进行数据劫持的方法
- esModule的模块化思想
- Map数据类型的使用
- 通过正则进行匹配渲染视图
- 实现vue的数据双向绑定
- 实现vue的v-module
- 实现vue中的v-bind
- 实现vue中的v-if
- 实现vue中的v-on
ok ! 打开电脑,跟我一起一步步将他实现出来吧!!!

二、关于proxy
proxy和Object.definedproperty都可以对数据进行劫持,那么vue3.0中为什么会弃用
Object.definedproperty转而使用proxy呢?这是因为Object.definedproperty有一些弊端,如下:
- 无法很好的监听数组变化
- Object.definedproperty只能劫持对象的属性,对新增属性需要手动进行 Observe, 但是proxy是直接代理对象,无论是写法还是复杂度或者性能方面考虑,都是选择proxy的理由
下面我们先简单的学习一下proxy的用法:
    let object = {
      num: 0, name: 'liming' };
      // 根据observed包装后,在get的时候获取值,set的时候修改值
      function reactive(obj) {

        let observed = new Proxy(obj, {

          get: function (obj, prop) {

            // obj代表所以对象 {name: "张三", age:12}  props 代表获取谁
            console.log(obj, prop);
            return obj[prop];
          },
          set: function (obj, prop, value) {

            // obj代表所以对象 {name: "张三", age:12} props 代表替换谁 value 代表要替换的值
            console.log(obj, prop, value);
            obj[prop] = value;
            return true;
          },
        });
        return observed;
      }
      let result = reactive(object);
      console.log(result.num, '///');
      result.name = 'xiaohua';
      console.log(object, 'object');
解释一下上面的代码,我们封装来一个reactive方法,在里面new了一个Proxy对象,这是我们创建的变量object会被这个对象劫持,那么当我们获取这个对象的属性值的时候会触发get方法,当我们修改对象中的属性值的时候就会触发set方法。 有了这个方法后我们就离劫持数据进行绑定不远了。
三、 实现模版的渲染
学习了双向绑定的核心之后,我们回过头来,创建一个html文件,先将数据渲染到页面上,看一下效果。
html代码如下:
  <html lang="en">
    <head>
      <meta charset="UTF-8" />
      <meta name="viewport" content="width=device-width, initial-scale=1.0" />
      <title>Documenttitle>
    head>
    <body>
        <div id="app">
          {
    { message }}
          <input v-model="message" />
        div>
    body>
        <script type="module">
          import {
       RockVue as Vue } from './rockvue.js';
          new Vue({

            el: '#app',
            data: {

              message: 'Hellow Vue!',
            },
          });
    script>
  html>
这里我们创建了一个html文件,并且通过esModule的方式引入了一个js文件,然后我们取了一个别名,然后实例化这个Vue,将当前根元素的id和数据data传入
js代码如下:
  export class RockVue {

    constructor(config) {

      this.template = document.querySelector(config.el);
      this.data = config.data;
      this.renderDom(this.template);
    }
    // html模版的渲染
    renderDom(node) {

      console.log(node, 'node');
      let text = node.textContent;
      if (text.trim().match(/^{
     {([\s\S]+)}}$/)) {

        let key = RegExp.$1.trim();
        node.textContent = this.data[key];
      }
    }
  }
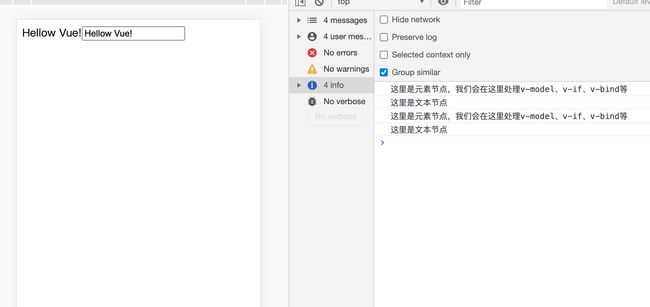
到了这一步,我们已经可以看到视图中渲染出了数据,并且打印了node

解释一下,上面的代码,我们现在粗糙的对node中的 message进行了匹配,并且通过node.textContent的方式,将它添加到了页面上,这时我们会发现我们,过于简单的处理了
 因为根元素下不仅仅只有一个节点,我们需要遍历node,对他下面的所有元素和文本节点进行处理。
这时我们需要循环, Node这个对象中为我们预设了一些常量,可以通过dir(Node)查看
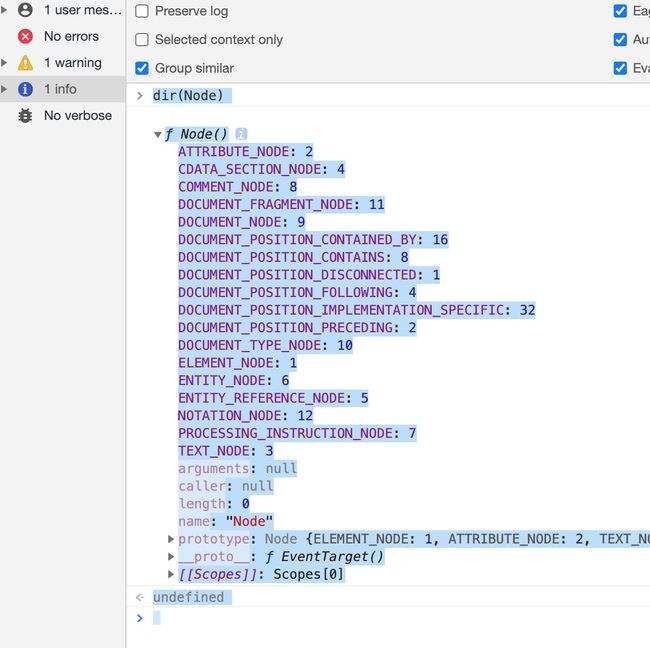
从上图我们可以看出,文本节点的数值是3、元素节点的数值是1,
我们可以通过node.nodeType 与 Node中的变量比较,确认是否是文本节点或者其他,于是我们重新整理上面的模版渲染的js代码
  export class RockVue {

    constructor(config) {

      this.template = document.querySelector(config.el);
      this.data = config.data;
      this.renderDom(this.template);
    }
    // html模版的渲染
    renderDom(node) {

      if (node.nodeType === Node.TEXT_NODE) {

        console.log('这里是文本节点');
        if (node.textContent.trim().match(/^{
     {([\s\S]+)}}$/)) {

          let name = RegExp.$1.trim();
          node.textContent = this.data[name];
        }
      }
      if (node.nodeType === Node.ELEMENT_NODE) {

        console.log('这里是元素节点,我们会在这里处理v-model、v-if、v-bind等');
        let attributes = node.attributes;
        for (let attribute of attributes) {

          let name = attribute.value;
          node.value = this.data[name];
          // 监听元素值的改变触发修改当前值
          node.addEventListener('input', (event) => {

              this.data[name] = node.value;
          });
        }
      }
      if (node.childNodes && node.childNodes.length) {

        for (let child of node.childNodes) {

          this.renderDom(child);
        }
      }
    }
  }
当完成到这里的时候,我们的视图渲染已经完成了,但是输入框输入值还不具备数据响应能力,接下来我们需要完成更重要的数据的响应了

四、 实现数据的劫持,增加响应能力
先讲思路这里比较难理解:

这里我们首先需要用proxy对data进行劫持,让data具有响应能力,当我们读属性的时候调用get方法这时候我们可以将该属性以及后续的操作一起存一下,然后我们执行一下对应操作。然后将这个操作结束。比如上文中的message 这个字段要渲染到视图中我们进行的操作是 node.textContent = this.data[name];这行代码中this.data[name] 就是读的动作会触发Proxy中的get方法,那么node.textContent就是后续需要干的事。 那么存上这个动作的意义是什么呢? 其实就是方便我们在数据发生改变的时候,仍然可以触发该动作,比如message这个属性发生了变化,不仅他的值要发生变化,视图也需要同步发生变化,所以我们接下来做的事情其实就很简单了。
这里的存取属性与方法我们可以使用ES6中新增的数据结构Map,他会已键值对的形式进行存储,而且更方便我们的读取操作,下面先写一个小demo,大家感受一下Map结构的魅力
  let obj = {
     name:'lisi'}
  let m = new Map()
  m.set(obj, new Map())
  m.get(obj).set('name',new Array)
  console.log(m.has(obj)) // true
  console.log(m.get(obj).has('name'))  // true
  function fn(){
     console.log('我是李四')}
  m.get(obj).get('name').push(fn);
  let lisiFn = m.get(obj).get('name')
  lisiFn[0]()  // 我是李四
上面的一小段代码,意思是我们将对象通过Map的形式进行了处理,该对象对应了一个Map, 这个Map中以属性为key又对应了一个数组的映射,我们可以通过m.get(obj).get(‘name’) 获取到当前属性的所有存好的方法,这些方法就是我前面说的后续的操作。

OK! 有了这些铺垫,我们可以写接下来的代码了!!!
 export class RockVue {

  constructor(config) {

    this.template = document.querySelector(config.el);
    this.data = reactive(config.data);
    // 处理method的方法
    for (const name in config.methods) {

      this[name] = () => {

        config.methods[name].apply(this.data);
      };
    }
    this.renderDom(this.template);
  }
  renderDom(node) {

    if (node.nodeType === Node.TEXT_NODE) {

      if (node.textContent.trim().match(/^{
     {([\s\S]+)}}$/)) {

        let name = RegExp.$1.trim();
        effect(() => (node.textContent = this.data[name]));
      }
    }
    if (node.nodeType === Node.ELEMENT_NODE) {

      let attributes = node.attributes;
      console.log(attributes, 'attributes');
      for (let attribute of attributes) {

        // v-model
        if (attribute.name === 'v-model') {

          let name = attribute.value;
          effect(() => (node.value = this.data[name]));
          node.addEventListener('input', (event) => {

            this.data[name] = node.value;
          });
        }
    if (node.childNodes && node.childNodes.length) {

      for (let child of node.childNodes) {

        this.renderDom(child);
      }
    }
  }
}

let effects = new Map();
let currentEffect = null;

function effect(fn) {

  currentEffect = fn;
  fn();
  currentEffect = null;
}

function reactive(obj) {

  let observed = new Proxy(obj, {

    get: function (obj, prop) {

      // obj代表所以对象 {name: "张三", age:12}  props 代表获取谁
      // console.log(obj, prop);
      if (currentEffect) {

        if (!effects.has(obj)) effects.set(obj, new Map());
        if (!effects.get(obj).has(prop))
          effects.get(obj).set(prop, new Array());
        effects.get(obj).get(prop).push(currentEffect);
      }
      return obj[prop];
    },
    set: function (obj, prop, value) {

      // obj代表所以对象 {name: "张三", age:12} props 代表替换谁 value 代表要替换的值
      // console.log(obj, prop, value);
      window.obj = obj;
      obj[prop] = value;
      if (effects.has(obj) && effects.get(obj).has(prop)) {

        for (let effect of effects.get(obj).get(prop)) {

          effect();
        }
      }
      return true;
    },
  });
  return observed;
}
有了前置方法我们在看这段代码,应该就很容易了,每次匹配成功去获取属性的时候我们都回去调effect这个方法, 通过currentEffect 控制只调用一次get方法,将方法存到对象对应的属性上,当每次值发生变化,触发set方法的时候在从对象的该属性中遍历执行对应的操作。这个时候就基本完成了数据劫持到数据响应到视图的变化,这一系列的操作。大家可以通过debugger走一遍,基本就能理解了。

五、 实现v-bind、v-if、v-on
有个数据的响应能力,接下来的操作就很简单了,我们只需要在判断元素节点的时候判断属性并操作dom和对应的相关属性即可。在renderDom方法的判断元素节点中添加下面的代码即可实现v-on、v-bind、v-if
  // v-bind title
      if (attribute.name.match(/^v\-bind:([\s\S]+)$/)) {

        let attrname = RegExp.$1;
        let name = attribute.value;
        effect(() => node.setAttribute(attrname, this.data[name]));
      }

      // v-on 事件处理
      if (attribute.name.match(/^v\-on:([\s\S]+)$/)) {

        let eventName = RegExp.$1;
        let fnname = attribute.value;
        node.addEventListener(eventName, this[fnname]);
      }

      // v-if 条件处理
      if (attribute.name === 'v-if') {

        let value = attribute.value;
        effect(() => {

          node.style.display = this.data[value] ? 'block' : 'none';
        });
      }
最后
大家可以关注我的公众号,回复vue源码,可以得到完整的代码,也可以不懂的地方在下面留言!
码字不易,给个关注吧!!