Linux高级篇--运维自动化之系统安装基础知识
Linux高级篇–运维自动化之系统安装基础知识
一、 系统安装过程
系统安装程序
-
CentOS系统安装
系统启动流程:
1、post加电自检
2、寻找启动设备:硬盘,寻找启动程序grub
1阶段:mbr 446字节
1.5:mbr后续的27个扇区
2阶段:
3、进入grub目录下,寻找grub.conf文件,该文件指定内核文件、initramfs文件位置
4、加载内核文件,寻找系统的根,读取initramfs文件加载驱动程序,才能挂在根
5、运行系统中第一个进程init1或systemd,读取系统中的配置文件/etc/inittab,该文件定义了启动模式(3为字符界面或5为图形界面)
6、运行初始化脚本/etc/rc.d/rc.sysinit,对系统中的swap分区,主机名,raid,逻辑卷等进行初始化
7、初始化完毕,根据定义的启动模式,运行/etc/rc.d/rcN.d下的服务脚本,先启动以K开头的服务脚本,后启动以S开头的服务脚本
8、运行/etc/rc.d/rc.local,启动自定义的服务
9、在用户登录界面,用户登录 -
anaconda: 系统安装程序
gui:图形窗口
tui: 基于图形库curses的文本窗口
安装程序启动过程
- MBR:isolinux/boot.cat
- stage2: isolinux/isolinux.bin
- 配置文件:isolinux/isolinux.cfg
每个对应的菜单选项:
加载内核:isolinuz/vmlinuz
向内核传递参数:append initrd=initrd.img … - 装载根文件系统,并启动anaconda
默认启动GUI接口
若是显式指定使用TUI接口:向内核传递text参数即可
(1)按tab键,在后面增加text
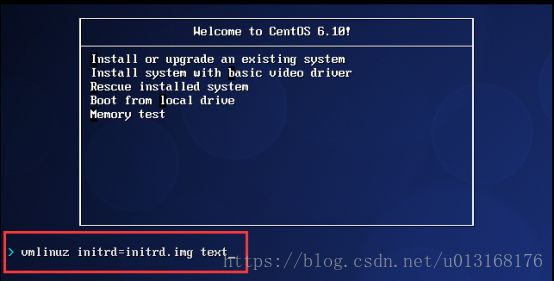
(2)按ESC键:boot: linux text

anaconda工作过程
- Anaconda安装系统分成三个阶段:
(1)安装前配置阶段
安装过程使用的语言
键盘类型
安装目标存储设备
Basic Storage:本地磁盘
特殊设备:iSCSI
设定主机名
配置网络接口
时区
管理员密码
设定分区方式及MBR的安装位置
创建一个普通用户
选定要安装的程序包
(2)安装阶段
在目标磁盘创建分区,执行格式化操作等
将选定的程序包安装至目标位置
安装bootloader和initramfs
(3)图形模式首次启动
iptables
selinux
core dump
[root@centos6 ~]#cat anaconda-ks.cfg
# Kickstart file automatically generated by anaconda.

#version=DEVEL
install
cdrom      光盘安装
lang en_US.UTF-8        语言为英语
keyboard us                 键盘布局为美式键盘布局
network --onboot no --device eth0 --bootproto dhcp --noipv6
rootpw  --iscrypted                   $6$e2ilz7V.IJ4CBJmG$FGhwOFgVtw2kXuIdjGVE//kRVcx58NJpjUOg/6ex68vShxQmSNFKO2qDShUXf30beEbz1zJSa.uC6ji3bOIBx0        口令为sha512加密
firewall --service=ssh                   防火墙
authconfig --enableshadow --passalgo=sha512
selinux --enforcing                      selinux为开启模式
timezone Asia/Shanghai              时区
bootloader --location=mbr --driveorder=sda --append="crashkernel=auto rhgb quiet"     启动时第一阶段的mbr分区表
# The following is the partition information you requested
# Note that any partitions you deleted are not expressed
# here so unless you clear all partitions first, this is
# not guaranteed to work
#clearpart --none

#part /boot --fstype=ext4 --size=1024               系统分区
#part / --fstype=ext4 --size=51200
#part /data --fstype=ext4 --size=30720

#part swap --size=3072


repo --name="CentOS"  --baseurl=cdrom:sr0 --cost=100

%packages            安装时选择的软件包
@base
@core
@debugging
@basic-desktop
@desktop-debugging
@desktop-platform
@directory-client
@fonts
@general-desktop
@graphical-admin-tools
@input-methods
@internet-applications
@internet-browser
@java-platform
@kde-desktop
@legacy-x
@network-file-system-client
@office-suite
@print-client
@remote-desktop-clients
@server-platform
@server-policy
@workstation-policy
@x11
mtools
pax
python-dmidecode
oddjob
wodim
sgpio
genisoimage
device-mapper-persistent-data
abrt-gui
qt-mysql
samba-winbind
certmonger
pam_krb5
krb5-workstation
xterm
xorg-x11-xdm
libXmu
rdesktop
%end
系统安装
-
启动安装过程一般应位于引导设备之后;后续的anaconda及其安装用到的程序包等可来自下面几种方式:
本地光盘
本地硬盘
NFS
URL(通过网络安装系统):
ftp server: yum repository 通过ftp服务器使用yum仓库安装
http server: yum repostory 通过http服务器使用yum仓库安装

-
指定安装源的格式如下:
(1)centos6
DVD drive repo=cdrom :device
Hard Drive repo=hd:device/path
HTTP Server repo=http://host/path
HTTPS Server repo=https://host/path
FTP Server repo=ftp://username:password@ host/path
NFS Server repo=nfs:server:/path
ISO images on an NFS Server repo=nfsiso:server:/path
(2)centos7
Any CD/DVD drive inst.repo=cdrom
Hard Drive inst.repo=hd:device:/path
HTTP Server inst.repo=http://host/path
HTTPS Server inst.repo=https://host/path
FTP Server inst.repo=ftp://username:password@ host/path
NFS Server inst.repo=nfs:[options:]server:/path -
anaconda的配置方式:
(1) 交互式配置方式
(2) 通过读取事先给定的配置文件自动完成配置
按特定语法给出的配置选项
kickstart文件 -
安装boot引导选项:boot:
-
text: 文本安装方式(字符界面安装)
在boot:界面,通过命令行键入命令指定系统安装方式
(1)通过指定yum源安装系统

注意:必须要先配置好yum源,这里通过http服务配置网络yum源,地址为:http://192.168.32.128/centos/6
(2)通过指定kickstart应答文件安装系统

注意:这里可以把kickstart应答文件放入yum仓库所在的http服务器中:http://192.168.32.128/ks/ks6.cfg
网络相关的引导选项:
ip=IPADDR
netmask=MASK
gateway=GW
dns=DNS_SERVER_IP
ifname=NAME:MAC_ADDR
远程访问功能相关的引导选项:
vnc
vncpassword=‘PASSWORD’
指明kickstart文件的位置: ks=
DVD drive: ks=cdrom:/PATH/TO/KICKSTART_FILE
Hard drive: ks=hd:device:/directory/KICKSTART_FILE
HTTP server: ks=http://host:port/path/to/KICKSTART_FILE
FTP server: ks=ftp://host:port/path/to/KICKSTART_FILE
HTTPS server: ks=https://host:port/path/to/KICKSTART_FILE
NFS server:ks=nfs:host:/path/to/KICKSTART_FILE -
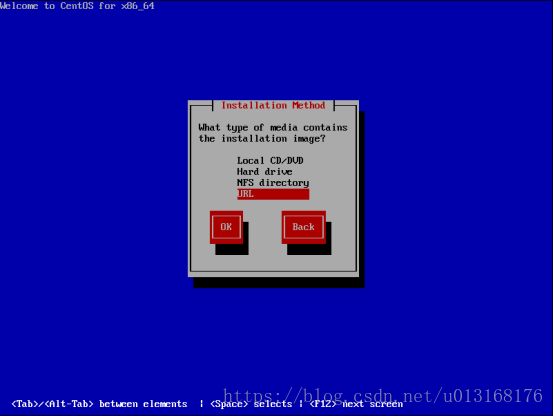
askmethod: 手动指定使用的安装方法
即boot:linux askmethod,后续出现图形界面选择安装方式

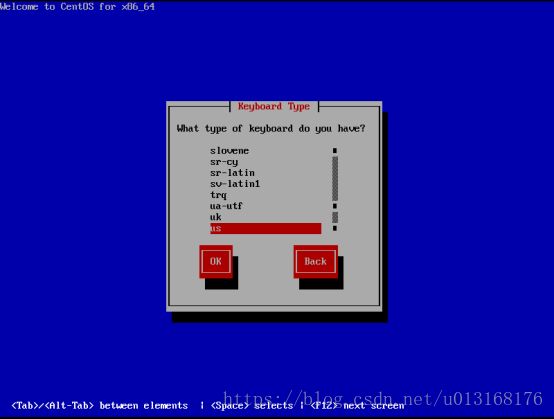
语言默认选择英语

键盘布局选择默认美式布局
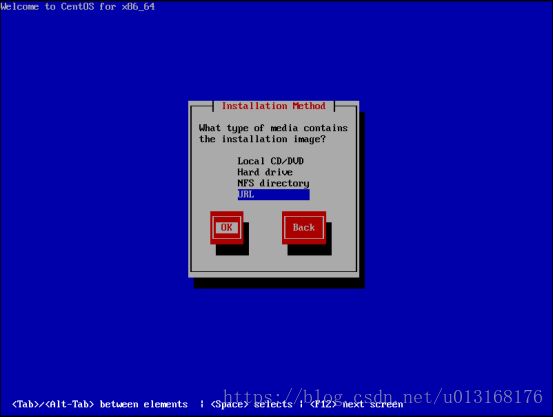
系统镜像安装选择URL方式
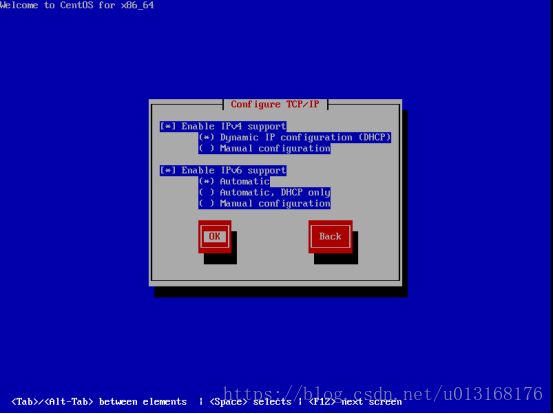
默认通过dhcp获取地址
指定基于http服务的yum仓库路径:http://192.168.32.128/centos/6
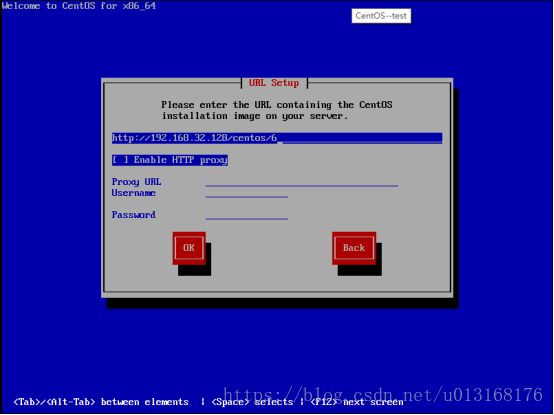
注意:以上两种方式都需要输入系统源文件的路径或者kickstart应答文件的路径
kickstart文件的格式
- 参考/root/anaconda-ks.cfg
- 命令段:指明各种安装前配置,如键盘类型等
- 程序包段:指明要安装的程序包组或程序包,不安装的程序包等
%packages
@group_name
package
-package
%end - 脚本段:
%pre: 安装前脚本
运行环境:运行于安装介质上的微型Linux环境
%post: 安装后脚本
运行环境:安装完成的系统 - 命令段中的命令:
(1)必备命令
authconfig: 认证方式配置
authconfig --useshadow --passalgo=sha512
bootloader:bootloader的安装位置及相关配置
bootloader --location=mbr --driveorder=sda –
append=“crashkernel=auto rhgb quiet”
keyboard: 设定键盘类型
lang: 语言类型
part: 创建分区
rootpw: 指明root的密码
timezone: 时区
(2)可选命令
install OR upgrade
text: 文本安装界面
network
firewall
selinux
halt
poweroff
reboot
repo
user:安装完成后为系统创建新用户
url: 指明安装源
key –skip 跳过安装号码,适用于rhel版本
kickstart文件创建
- 创建kickstart文件的方式
(1)直接手动编辑
依据某模板(模板文件为/root/anaconda-ks.cfg)修改
[root@centos6 ksdir]#vim  ks6.cfg         ks6.cfg为重命名后的模板文件
# Kickstart file automatically generated by anaconda.

#version=DEVEL
install
text                           字符界面启动
reboot                         安装完系统自动重启
url --url=http://192.168.32.128/centos/6           指定基于http的yum仓库
lang en_US.UTF-8
keyboard us
network --onboot yes --device eth0 --bootproto static --ip 192.168.32.135 --netmask 255.255.255.0 --noipv6
rootpw  --iscrypted $6$ZSTExTIY28Nb3jiu$l6v9C13TQMfREV2sDvq5u6W6o2ibGfpB5AexWZHfggE5EoKqQrQE3VduGF/d8mllDpZUVOo4/nxi5/hpFK/Vc0
firewall --disabled                               关闭防火墙
authconfig --enableshadow --passalgo=sha512
selinux --disabled                                关闭selinux
timezone Asia/Shanghai
bootloader --location=mbr --driveorder=sda --append="crashkernel=auto rhgb quiet"
# The following is the partition information you requested
# Note that any partitions you deleted are not expressed
# here so unless you clear all partitions first, this is
# not guaranteed to work
zerombr
clearpart --all  --initlabel

part /boot --fstype=ext4 --size=1024                  启用分区,这里采用标准分区方式进行分区
part / --fstype=ext4 --size=51200
part /data --fstype=ext4 --size=30720

part swap --size=3072


repo --name="CentOS"  --baseurl=http://192.168.32.128/centos/6 --cost=100

%packages
@core
@server-policy
@workstation-policy
autofs
vim-enhanced
%end

#创建用户,设置密码,设置yum仓库,创建基于key验证
%post
useradd yuan
echo centos123456 |passwd --stdin yuan &>/dev/null
mkdir /etc/yum.repos.d/bak
mv /etc/yum.repos.d/*  /etc/yum.repos.d/bak
cat > /etc/yum.repos.d/centos.repo < /root/.ssh/authorized_keys <
(2)可使用创建工具:system-config-kickstart
依据某模板修改并生成新配置(具体实现请查看博客:使用system-config-kickstart工具制作kickstart文件)
参考/root/anaconda-ks.cfg文件制作kickstart文件
注意:使用图形工具system-config-kickstart制作kickstart文件,centos6和centos7系统选项大致相同,但是在package selection选项,centos7系统中无法显示可选的软件包
解决方法:
只需对本地yum源稍作更改即可:把yum源中[]内的内容更改为development,然后重新打开该工具即可
Vim /etc/yum.repos.d/base.repo
[devplopment]
name=yum-bendi
baseurl=file:///mnt/cdrom
gpgcheck=1
- 检查ks文件的语法错误:ksvalidator
ksvalidator /PATH/TO/KICKSTART_FILE
[root@centos6 ~]#ksvalidator /root/ks6.cfg
系统光盘中isolinux目录列表
- isolinux.bin:光盘引导程序,在mkisofs的选项中需要明确给出文件路径,这个文件属于SYSLINUX项目
- isolinux.cfg:isolinux.bin的配置文件,当光盘启动后(即运行isolinux.bin),会自动去找isolinux.cfg文件
- vesamenu.c32:是光盘启动后的安装图形界面,也属于SYSLINUX项目,menu.c32版本是纯文本的菜单
- Memtest:内存检测,这是一个独立的程序
- splash.jgp:光盘启动界面的背景图
- vmlinuz是内核映像
- initrd.img是ramfs (先cpio,再gzip压缩)
[root@centos6 ~]#ls /mnt/cdrom/isolinux/
boot.cat  grub.conf   isolinux.bin  memtest     TRANS.TBL     vmlinuz
boot.msg  initrd.img  isolinux.cfg  splash.jpg  vesamenu.c32
19.2 制作引导光盘和U盘
- 创建引导光盘:
mkdir –pv /data/boot                创建存放光盘文件的临时目录
cp -r /misc/cd/isolinux/ /data/boot             把制作光盘所需的文件复制到临时目录中
vim  /mnt/cdrom/isolinux/isolinux.cfg           修改启动文件,自定义启动菜单

default vesamenu.c32
#prompt 1
timeout 600      超时时长,为600的十分之一秒,即60秒

display boot.msg

label mini        制作迷你最小化系统安装菜单项
  menu label Auto Install an ^Mini  system      ^是指快捷键,该符号放在哪个字母前,该字母就是该项系统菜单的选择快捷键,如按m键是指选择最小化安装
  kernel vmlinuz
  append initrd=initrd.img ks=cdrom:/ksdir/ks_centos6.cfg    指定kickstart应答文件路径
label desktop    制作带有桌面的系统按菜单项
  menu label Auto Install an ^Desktop system    ^是指快捷键,该符号放在哪个字母前,该字母就是该项系统菜单的选择快捷键,如按d键是指选择带有桌面的系统安装
  kernel vmlinuz
  append initrd=initrd.img ks=cdrom:/ksdir/ks_centos_desktop.cfg   指定kickstart应答文件路径
label local
  menu default      系统菜单默认启动项为本地启动,如果放在其他两项后,如果系统已经安装完毕,则会把系统重装,这样是不安全的
  menu label Boot from ^local drive       ^是指快捷键,该符号放在哪个字母前,该字母就是该项系统菜单的选择快捷键,如按l键是指选择从本地启动安装
  localboot 0xffff

mkisofs -R -J -T -v --no-emul-boot --boot-load-size 4 --boot-info-table -V "CentOS 6.10 x86_64 boot" -b isolinux/isolinux.bin -c isolinux/boot.cat -o /root/boot.iso /data/boot/
注意:使用该命令,要写对制作光盘的目录,另外,以上相对路径都是相对于光盘的根,和工作目录无关
-
创建U盘启动盘,使用dd命令把准备好的文件写入u盘即可
dd if=/dev/sr0 of=/dev/sdb -
mkisofs选项
-o 指定映像文件的名称。
-b 指定在制作可开机光盘时所需的开机映像文件。
-c 制作可开机光盘时,会将开机映像文件中的 no-eltorito-catalog 全部内容作成一个文件。
-no-emul-boot 非模拟模式启动。
-boot-load-size 4 设置载入部分的数量
-boot-info-table 在启动的图像中现实信息
-R 或 -rock 使用 Rock RidgeExtensions
-J 或 -joliet 使用 Joliet 格式的目录与文件名称
-v 或 -verbose 执行时显示详细的信息
-T 或 -translation-table 建立文件名的转换表,适用于不支持 Rock Ridge Extensions 的系统上

