3-SSM框架整合Redis做MyBatis二级缓存
什么是Redis?
“Redis是一个开源的使用ANSI C语言编写、支持网络、可基于内存亦可持久化的日志型、Key-Value数据库,并提供多种语言的API。从2010年3月15日起,Redis的开发工作由VMware主持。从2013年5月开始,Redis的开发由Pivotal赞助。”
上面的这段对redis的描述来自百度词条。个人理解,redis就是一个键值对类型的数据库,暂时先理解这点就够。至于redis原理实现,那些后续我们慢慢一起探究,我们先从实战的角度来看,SSM框架本身就引入了MyBatis作为架构的持久层,redis整合到ssm框架后要承担什么角色?下面我们从一个实际案例来一起讨论redis整合到ssm框架中的意义:
一个接口日常的访问次数是每日10万次左右,而这个接口主要的功能是从数据库获取用户需要的数据(更新频率较低)拼装成一定格式返回给客户端。这正常流程是:用户请求接口→接口调用数据库查询→数据库返回结果→接口返回响应结果。这样的话对数据库的读取操作就很频繁,对数据库的压力就会很大,这时我们就需要引入缓存。将已经查询到结果交给redis去管理,没有的数据再去数据库读取出来交给redis管理,而新增、更新或删除的依旧交给Mybatis操作,必要的时候刷新redis。当然,这部分的功能很多spring-data-redis都帮我们封装好了,下面我们就自己来实践一遍吧。
Redis安装
使用redis首先要先安装个redis的服务器,可以从https://redis.io/下载,目前redis的最新版本是4.0.6版本。
下载下来的是一个redis-4.0.6.tar.gz的压缩包,解压它得到一个文件夹,里面有17个文件或文件夹。
但这还没完,你可以把这个文件夹拷贝到你想放的位置,然后打开terminal切换到你刚放的文件夹的那个路径下,输入:make
然后等待即可了,下面熟悉下redis常用的几个指令
1)启动redissrc/redis-server
2)进入命令行客户端src/redis-cli
3)设置一个键值redis> set key value
4)获取一个键值redis> get key
下面我们就将redis服务器打开src/redis-server,继续我们的整合吧。
SSM整合Redis
首先,还是基于上一篇文章最后的成果上进行整合。在pom.xml声明依赖的jar包。
<dependency>
    <groupId>redis.clientsgroupId>
    <artifactId>jedisartifactId>
    <version>2.4.2version>
dependency>
<dependency>
    <groupId>org.springframework.datagroupId>
    <artifactId>spring-data-redisartifactId>
    <version>1.4.0.RELEASEversion>
dependency>
然后在src/main/resources目录下配置redis连接信息redis.properties。
redis.host={redis服务器地址}
redis.port={redis服务器端口号}
redis.maxIdle=2000
redis.maxActive=60000
redis.maxWait=1000
redis.testOnBorrow=true
redis.timeout=100000
redis.password={redis服务器密码}
defaultCacheExpireTime=60
接着在spring-context.xml中添加redis的配置,但是这边会用到2个类,用来解决RedisCache.jedisConnectionFactory静态注入的问题,这里先实现下,建议在原本的目录结构下新建个utils的package存放这类文件。
public class RedisCache implements Cache {
private static final Logger logger = LoggerFactory.getLogger(RedisCache.class);
private static JedisConnectionFactory jedisConnectionFactory;
private final String id;
private final ReadWriteLock readWriteLock = new ReentrantReadWriteLock();
public RedisCache(final String id) {
if (id == null) {
throw new IllegalArgumentException("require an ID");
}
logger.debug("RedisCache:id=" + id);
this.id = id;
}
@Override
public void clear() {
RedisConnection connection = null;
try {
connection = jedisConnectionFactory.getConnection();
connection.flushDb();
connection.flushAll();
} catch (JedisConnectionException e) {
e.printStackTrace();
} finally {
if (connection != null) {
connection.close();
}
}
}
@Override
public String getId() {
return this.id;
}
@Override
public Object getObject(Object key) {
Object result = null;
RedisConnection connection = null;
try {
connection = jedisConnectionFactory.getConnection();
RedisSerializerpublic class RedisCacheTransfer {
@Autowired
public void setJedisConnectionFactory(JedisConnectionFactory jedisConnectionFactory) {
RedisCache.setJedisConnectionFactory(jedisConnectionFactory);
}
}
然后,在spring-context.xml中添加redis的配置。
    <context:property-placeholder location="classpath*:/redis.properties" ignore-unresolvable="true"  />

    <bean id="poolConfig" class="redis.clients.jedis.JedisPoolConfig">

        <property name="maxIdle" value="${redis.maxIdle}" />

        <property name="maxTotal" value="${redis.maxActive}" />

        <property name="maxWaitMillis" value="${redis.maxWait}" />

        <property name="testOnBorrow" value="${redis.testOnBorrow}" />
    bean>

    <bean id="jedisConnectionFactory" class="org.springframework.data.redis.connection.jedis.JedisConnectionFactory">

        <property name="hostName" value="${redis.host}" />

        <property name="port" value="${redis.port}" />

        <property name="timeout" value="${redis.timeout}" />
        <property name="poolConfig" ref="poolConfig" />
    bean>

    <bean id="redisTemplate" class="org.springframework.data.redis.core.RedisTemplate">
        <property name="connectionFactory" ref="jedisConnectionFactory" />
        <property name="keySerializer">
            <bean class="org.springframework.data.redis.serializer.StringRedisSerializer" />
        property>
        <property name="valueSerializer">
            <bean class="org.springframework.data.redis.serializer.JdkSerializationRedisSerializer" />
        property>
        <property name="hashKeySerializer">
            <bean class="org.springframework.data.redis.serializer.StringRedisSerializer" />
        property>

        <property name="enableTransactionSupport" value="true">property>
    bean>

    <bean id="redisCacheTransfer" class="com.maven4web.utils.RedisCacheTransfer">
        <property name="jedisConnectionFactory" ref="jedisConnectionFactory"/>
    bean>


    <bean id="cacheManager" class="org.springframework.data.redis.cache.RedisCacheManager">
        <constructor-arg index="0" ref="redisTemplate" />
    bean>
然后在mybatis-config.xml中开启mybatis的全局缓存,配置相关参数。
<configuration>
    <settings>

        <setting name="logImpl" value="STDOUT_LOGGING" />

        <setting name="cacheEnabled" value="true" />

        <setting name="lazyLoadingEnabled" value="false"/>

        <setting name="multipleResultSetsEnabled" value="true"/>

        <setting name="aggressiveLazyLoading" value="true"/>
    settings>

    <typeAliases>
    typeAliases>
configuration>
其次,拿上次的TestMapper.xml做测试,需在其中添加
配置。
<cache type="com.maven4web.utils.RedisCache" />
接着修改下我们的TestController的方法吧。
@Controller
public class TestController {
    @Autowired
    private TestService testService;
    @RequestMapping("/test.action")
    @ResponseBody
    public List test(){
        List tests = testService.getAll();
        return tests;
    }
}
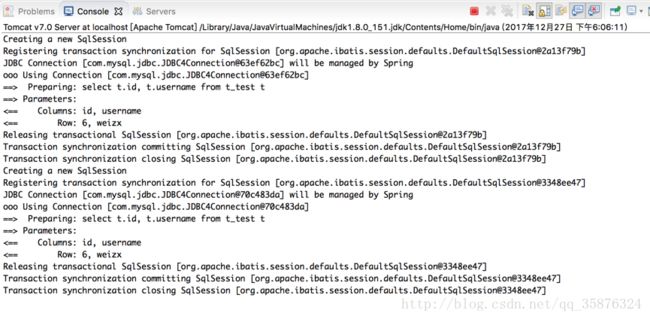
部署下项目,启动tomcat看看效果,可选结果就让人失望的,redis根本没有缓存数据,还是去数据库取数据了。
那问题出在哪里呢?回顾下redis是什么?键值型的数据库,但貌似我们的实体没有序列化,无法满足使用的要求,那就改造下我们的实体Test。
public class Test implements Serializable{
    private static final long serialVersionUID = -5366358304131939882L;
    private Integer id;
    private String username;
    public Integer getId() {
        return id;
    }

    public void setId(Integer id) {
        this.id = id;
    }
    public String getUsername() {
        return username;
    }
    public void setUsername(String username) {
        this.username = username;
    }
}
ok,现在再次启动服务试试效果,可以看到执行两次接口的情况不一样了,第一次缓存没有数据去查询了一次数据库,第一次直接从缓存获取数据,没查数据库了。

