实战springmodules common validator
首先说spring modules, 它是为spring定制的一些工具组件,官方地址在https://springmodules.dev.java.net/, 官网上是这样介绍的:Spring Modules is a collection of tools, add-ons and modules to extend the Spring Framework. The core goal of Spring Modules is to facilitate integration between Spring and other projects without cluttering or expanding the Spring core. 里面有很多子项目。其中commons validator是一个可配置的验证框架,使用方式和工作原理都和struts用的ValidatorPlugIn一样。它可以通过配置生成js在客户端验证, 也可以配合具有验证功能的spring controller实现server端验证. 下面是我的使用经验, 我的sample工程放在我的资源里面可以下载:http://download.csdn.net/source/1736205
1 从https://springmodules.dev.java.net/下载jar包,我们将使用里面的spring-modules-validation.jar;
2 新建一个web project名字叫做:springmodules, 拷贝spring,jakarta-commons等相关的必要jar文件包括spring-modules-validation.jar到WEB-INF/lib/,拷贝c-rt.tld, spring.tld, spring-form.tld到WEB-INF/tld/;做好spring的基础配置工作,包括web.xml, applicationContext.xml, xxx-servlet.xml; 配置好log4j.properties;
3 在src下新建包web.controller, web.model; 在model下新建域对象Book, 将作为我们的表单对象;
public class Book { private String id; private String name; private String author; private String isbn; private float price; //getters and setters ignored }
4 在controller包下新建一个BookController,因为要使用验证功能, 所以要使用具有验证功能的controller, SimpleFormController是最好的选择;
public class BookController extends SimpleFormController{ protected ModelAndView onSubmit(HttpServletRequest request, HttpServletResponse response, Object command, BindException errors) throws Exception { Book book = (Book)command; //测试看是否可以获得表单数据; System.out.println(book.toString()); return super.onSubmit(request, response, command, errors); } }
在DispatcherServlet上下文配置文件中为该controller作配置:
解释一下:
commandClass是表单对象的类名;
commandName验证的表单名, 这个名字会被common validator使用;
formView是使用get方式请求book.do的时候显示的页面;
successView是表单提交成功之后显示的页面;
需要注意的是本例使用了viewResolver,formView和successView使用的是视图逻辑名. 他们对应addbook.jsp, bookdetail.jsp; validator是验证器,也是我们今天讲解的重头戏;下面会讲怎么配置他们。
5 从springmodules下载包的sample中找validator-rules.xml, validation.xml拷贝到WEB-INF目录下, 打开观察一下这两个文件,你会发现他们和struts的validatorPlugin需要的两个配置文件一模一样 , 你甚至可以从你的struts项目中拷贝这两个文件拿过来修改修改即可工作.
validator-rules.xml预定义了一些验证器,比如required(必填项),minlength(最短长度), maxlength(最大长度), float(可输入小数),integer(可输入整数),mask(输入值要满足正则表达式要求), 这个文件大多数时候都不需要我们更改他们,除非为了拓展功能或者发现bug;
validation.xml定义了一些表单的验证规则,我们需要一个表单的验证功能就要在这个文件中配置一条验证信息. 这两个文件拷贝过来之后就可以配置验证器工厂和验证器了.
在applicationContext.xml中配置validatorFactory和beanValidator(为什么要在applicationContext中配置: 因为验证器可作为应用程序公用的组件,可以被所有的servlet共享):
6 打开validation.xml,在里面添加一个form,
本例演示了maxlength, required, float, mask的用法,下面用图说明一下这些参数的意思:

7 既然说到了需要message, 不得不说一下,为了在验证没通过时显示出错信息, 需要把示例文件validator-rules.xml最上面注释掉的Validator Error Messages拷贝到message.properties中,并且把它放在classpath下.同时需要在applicationContext.xml中配置messageSource,
同时在message.properties中添加form字段的显示名称, 则本例的messages.properties全文如下:
#english message file errors.required={0} is required. errors.minlength={0} can not be less than {1} characters. errors.maxlength={0} can not be greater than {1} characters. errors.invalid={0} is invalid. errors.byte={0} must be a byte. errors.short={0} must be a short. errors.integer={0} must be an integer. errors.long={0} must be a long. errors.float={0} must be a float. errors.double={0} must be a double. errors.date={0} is not a date. errors.range={0} is not in the range {1} through {2}. errors.creditcard={0} is an invalid credit card number. errors.email={0} is an invalid e-mail address. book.id.displayName=id book.name.displayName=name book.author.displayName=author book.price.displayName=price
当然如果你的系统做给只懂中文的人看,你需要把所有的等号(=)右边的内容换成中文提示内容.同时使用工具native2ascii把它转换成unicode码, 关于native2ascii, 请自行baidu一下.
8 编辑jsp表单页面addbook.jsp,
上面的写法是把出错的消息显示在每个字段的后面,当然你也可以让出错的消息集中显示在一个位置:
如果要启动javascript客户端验证, 需要在页面上加入:
9 编写表单提交成功之后的跳转页面bookdetail.jsp:
| id: | ${book.id} |
| name: | ${book.name} |
| author: | ${book.author} |
| price: | ${book.price} |
| isbn: | ${book.isbn} |
10 配置viewResolver:
部署到tomcat并测试:http://localhost:8080/springmodules/book.do .
最后需要说明的是:客户端验证和服务端验证都是可选的。
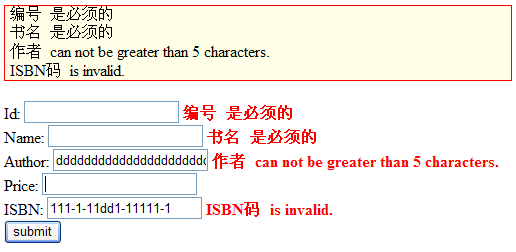
服务器端验证的出错消息提示如下(你会发现出错的提示消息有中文也有英文,这是因为“汉化”不完整造成的,把messages_zh_CN.properties的message都换成中文即可):
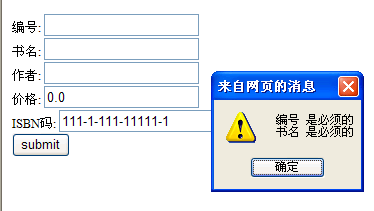
客户端验证的提示效果:
我的资源里面的sample是个完整的spring project: http://download.csdn.net/source/1736205, 包含所有jar包和配置文件 直接拿下来即可在myeclipse中运行, 如果工程导入有错, 也可以新建一个web project然后把src和webRoot的内容都拷贝过来即可.

