Springboot源码分析(一)
阅读源码有助于项目中问题原因的查找,也方便我们对在项目中的程序的拓展。然而阅读源码是一个痛苦的过程,记录一下自己的学习过程吧。
1、Main方法开始
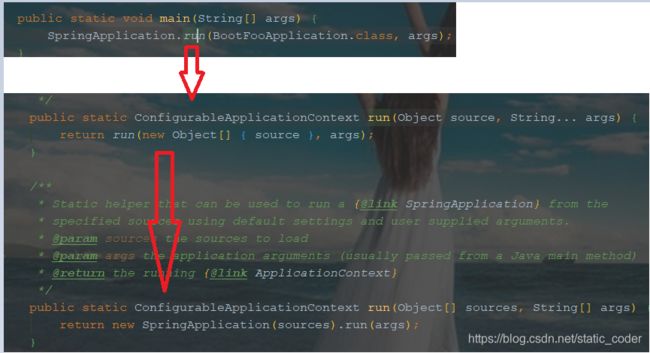
再进去看看SpringApplication实例化过程
// SpringApplication 实例化过程
public SpringApplication(ResourceLoader resourceLoader, Class... primarySources) {
	this.resourceLoader = resourceLoader;
	Assert.notNull(primarySources, "PrimarySources must not be null");
	this.primarySources = new LinkedHashSet<>(Arrays.asList(primarySources));
	// 根据classpath,获取WEB环境类型[NONE, SERVLET, REACTIVE--响应式web application]
	// 默认是基于servlet的web application
	this.webApplicationType = WebApplicationType.deduceFromClasspath(); //SERVLET
	// 获取一个上下文的的实例
	setInitializers((Collection) getSpringFactoriesInstances(ApplicationContextInitializer.class));
	// 设置一个ApplicationListener监听器,里面包含了spring的核心监听器(org.springframework.web.context.ContextLoaderListener)
	setListeners((Collection) getSpringFactoriesInstances(ApplicationListener.class));
	// 追踪看是不是"main"方法启动
	this.mainApplicationClass = deduceMainApplicationClass();
}

private  Collection getSpringFactoriesInstances(Class type, Class[] parameterTypes, Object... args) {
	ClassLoader classLoader = getClassLoader();
	// Use names and ensure unique to protect against duplicates
	// 加载 spring-boot-autoconfig下面的META-INF/spring.factories
	Set names = new LinkedHashSet<>(SpringFactoriesLoader.loadFactoryNames(type, classLoader));
	// 实例化加载的数据(包名),该数据都是springboot整合第三方工具提供的配置文件包等
	List instances = createSpringFactoriesInstances(type, parameterTypes, classLoader, args, names);
	AnnotationAwareOrderComparator.sort(instances);
	return instances;
}

public static List loadFactoryNames(Class factoryType, @Nullable ClassLoader classLoader) {
	String factoryTypeName = factoryType.getName();
	return loadSpringFactories(classLoader).getOrDefault(factoryTypeName, Collections.emptyList());
}

private static Map> loadSpringFactories(@Nullable ClassLoader classLoader) {
	MultiValueMap result = cache.get(classLoader);
	if (result != null) {
		return result;
	}

	try {
		// 加载 spring-boot-autoconfig下面的META-INF/spring.factories
		Enumeration urls = (classLoader != null ?
				classLoader.getResources(FACTORIES_RESOURCE_LOCATION) :
				ClassLoader.getSystemResources(FACTORIES_RESOURCE_LOCATION));
		result = new LinkedMultiValueMap<>();
		while (urls.hasMoreElements()) {
			URL url = urls.nextElement();
			UrlResource resource = new UrlResource(url);
			Properties properties = PropertiesLoaderUtils.loadProperties(resource);
			for (Map.Entry entry : properties.entrySet()) {
				String factoryTypeName = ((String) entry.getKey()).trim();
				for (String factoryImplementationName : StringUtils.commaDelimitedListToStringArray((String) entry.getValue())) {
					result.add(factoryTypeName, factoryImplementationName.trim());
				}
			}
		}
		cache.put(classLoader, result);
		return result;
	}
	catch (IOException ex) {
		throw new IllegalArgumentException("Unable to load factories from location [" +
				FACTORIES_RESOURCE_LOCATION + "]", ex);
	}
}
通过实例化SpringApplication的过程我们可以看出:
①:获取web环境,这里返回的是基于servlet的web环境
②:获取一个上下文的实例
③:监听上下文
这里只是为启动Spring容器做好准备。
2、Run方法
public ConfigurableApplicationContext run(String... args) {
	StopWatch stopWatch = new StopWatch();
	stopWatch.start();
	ConfigurableApplicationContext context = null;
	Collection exceptionReporters = new ArrayList<>();
	configureHeadlessProperty();
	// 获取监听器
	SpringApplicationRunListeners listeners = getRunListeners(args);
	listeners.starting();
	try {
		ApplicationArguments applicationArguments = new DefaultApplicationArguments(args);
		// 初始化一个可配置的环境[NONE, SERVLET, REACTIVE--响应式web application]
		// 这里的ConfigurableEnvironment是StandardServletEnvironment
		ConfigurableEnvironment environment = prepareEnvironment(listeners, applicationArguments);
		configureIgnoreBeanInfo(environment);
		// 打印Banner
		Banner printedBanner = printBanner(environment);
		// 创建一个上下文环境ApplicationContext-- sevelet环境
		context = createApplicationContext();
		// 创建异常回调的方法
		exceptionReporters = getSpringFactoriesInstances(SpringBootExceptionReporter.class,
				new Class[] { ConfigurableApplicationContext.class }, context);
		// 初始化上下文的环境
		prepareContext(context, environment, listeners, applicationArguments, printedBanner);
		refreshContext(context);
		afterRefresh(context, applicationArguments);
		stopWatch.stop();
		if (this.logStartupInfo) {
			new StartupInfoLogger(this.mainApplicationClass).logStarted(getApplicationLog(), stopWatch);
		}
		listeners.started(context);
		callRunners(context, applicationArguments);
	}
	catch (Throwable ex) {
		handleRunFailure(context, ex, exceptionReporters, listeners);
		throw new IllegalStateException(ex);
	}

	try {
		listeners.running(context);
	}
	catch (Throwable ex) {
		handleRunFailure(context, ex, exceptionReporters, null);
		throw new IllegalStateException(ex);
	}
	return context;
}
其他的都比较简单,我们主要看一下
prepareContext(context, environment, listeners, applicationArguments, printedBanner);这个方法是用来初始化上文环境的
private void prepareContext(ConfigurableApplicationContext context, ConfigurableEnvironment environment,
SpringApplicationRunListeners listeners, ApplicationArguments applicationArguments, Banner printedBanner) {
// 设置环境
context.setEnvironment(environment);
// 上下文环境的后置处理:加载转化器,以保证数据传输的可靠性
postProcessApplicationContext(context);
// 初始化环境
applyInitializers(context);
// 监听上下文环境
listeners.contextPrepared(context);
// 开始打印日志,并加载运行环境(dev,test)
if (this.logStartupInfo) {
logStartupInfo(context.getParent() == null);
logStartupProfileInfo(context);
}
// Add boot specific singleton beans
// 加载一个特殊Bean到spring容器中
ConfigurableListableBeanFactory beanFactory = context.getBeanFactory();
beanFactory.registerSingleton("springApplicationArguments", applicationArguments);
if (printedBanner != null) {
beanFactory.registerSingleton("springBootBanner", printedBanner);
}
if (beanFactory instanceof DefaultListableBeanFactory) {
((DefaultListableBeanFactory) beanFactory)
.setAllowBeanDefinitionOverriding(this.allowBeanDefinitionOverriding);
}
if (this.lazyInitialization) {
context.addBeanFactoryPostProcessor(new LazyInitializationBeanFactoryPostProcessor());
}
// Load the sources
Set在这里我们要注意这个方法:上下文后置处理方法
postProcessApplicationContext(context);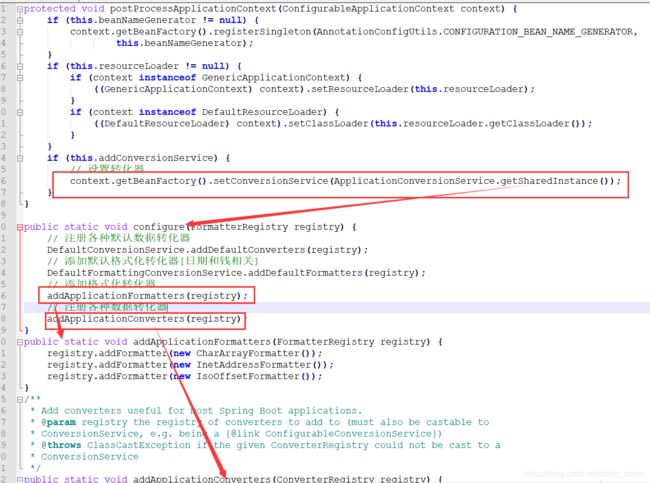

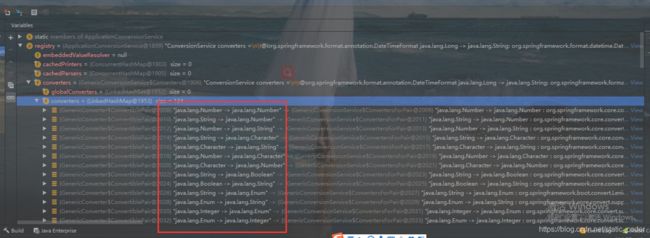
这里面注册是大量的默认基础数据的转化器,以保证我们数据的传输:
这个时候上下文环境就已经初始化完成了,下面就会交给Spring去管理,完成后续操作