Elasticsearch-5.4.0集群搭建
1、Elasticsearch-5.4.0 安装包下载地址:https://www.elastic.co/downloads/past-releases/elasticsearch-5-4-0
2、解压文件:tar -zxvf /home/elasticsearch-5.4.0.tar.gz -C /usr/local/
3、设置系统参数:vi /etc/sysctl.conf
vm.max_map_count = 262144
执行 sysctl -p 后生效
4、设置系统参数:vi /etc/security/limits.conf
添加:
* soft nofile 65536
* hard nofile 65536
* soft nproc 2048
* hard nproc 4096
5、vi /etc/security/limits.d/90-nproc.conf
#修改如下内容:
* soft nproc 1024
#修改为
* soft nproc 2048
6、编写ES Master节点配置文件:
cluster.name: hy-es
node.name: es-1
network.host: 192.168.96.119
http.port: 9200
transport.tcp.port: 9300
discovery.zen.ping.unicast.hosts: ["192.168.96.119","192.168.96.118","192.168.96.117"]
discovery.zen.minimum_master_nodes: 2
#避免出现跨域问题
http.cors.enabled: true
http.cors.allow-origin: "*"
注意:配置文件上方需要更改两个参数,在Memory下更改:
bootstrap.memory_lock: false
bootstrap.system_call_filter: false
7、创建一个用户,因为启动es不能在root下启动,执行以下操作:
useradd elasticsearch
#为elasticsearch用户添加密码:
echo 123456 | passwd --stdin elasticsearch
#将elasticsearch添加到sudoers
echo "elasticsearch ALL = (root) NOPASSWD:ALL" | tee /etc/sudoers.d/elasticsearch
chmod 0440 /etc/sudoers.d/elasticsearch
#解决sudo: sorry, you must have a tty to run sudo问题,在/etc/sudoers注释掉 Default requiretty 一行,若未出现问题,可忽略
sudo sed -i 's/Defaults requiretty/Defaults:elasticsearch !requiretty/' /etc/sudoers
#切换用户
su - elasticsearch
8、将文件分发到其他机器上,注意修改 network.host 和 node.name,其他机器上也需要创建用户
9、更改elasticsearch-5.4.0的权限:
chown -R elasticsearch:elasticsearch /usr/local/elasticsearch-5.4.0/
10、启动Elasticsearch:
usr/local/elasticsearch-5.4.0/bin/elasticsearch -d
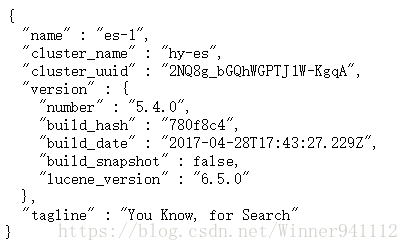
11、查看IP地址,若出现如下则启动成功: