实战贴:开源GUI LittlevGL在MCU上的移植
前几天看见正点原子发布了LittlevGL的教程,这个GUI貌似又火了,于是应读者要求,我也来移植一下,将正点原子的这个GUI移植到小熊派上,不到一会功夫就搞定了,总的来说挺简单,没遇到什么特别的障碍,因为正点原子把坑都帮我们绕过了,直接改下一些基本配置就可以成功显示,但是从头开始移植一个可不简单噢,要详细看官方文档和说明。
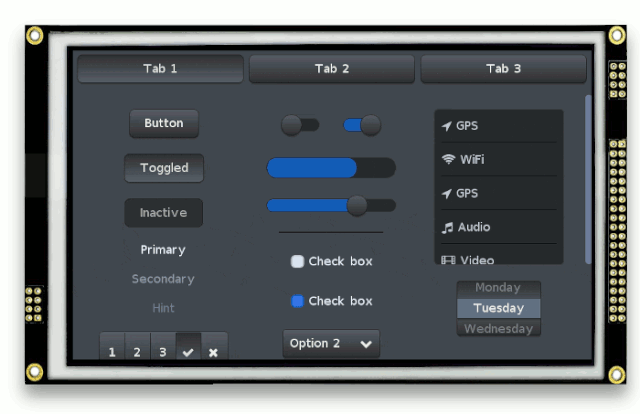
先上直接移植正点原子例程成功后的效果,下载例程文末。
这节我们不借助正点原子的例程,直接编写一个最简单的demo:显示一个标签。
1、简单介绍GUI框架LittlevGL
LittlevGL是一款免费开源的图形库,具有易于使用的图形元素,简洁美观的视觉效果;同时内存占用低,可在小型嵌入式设备上使用。
LittlevGL中文网站:
https://littlevgl.cn/LittlevGL源码:
https://github.com/littlevgl/lvglLittlevGL演示例程:
https://github.com/lvgl/lv_examples
2、移植LittlevGL到小熊派
首先,得有一个最基本的OLED驱动例程,实现初始化、打点等基础功能,之前有写过小熊派上的LCD相关介绍的文章。
基于小熊派光强传感器BH1750状态机驱动项目升级(带LCD屏显示)
当然如果你手上有小熊派的话,也可以直接拷贝小熊派的OLED例程,如果没有的话,你也可以用你手上开发板的LCD例程,这里我直接用小熊派的例程。
接下来正式进入移植流程。
2.1 在Github或者码云上下载LittlevGL源代码
Github上下载可能比较慢,如果遇到比较慢的情况下,可以去码云上建一个同步Github仓库,然后在码云上下载就会快很多。

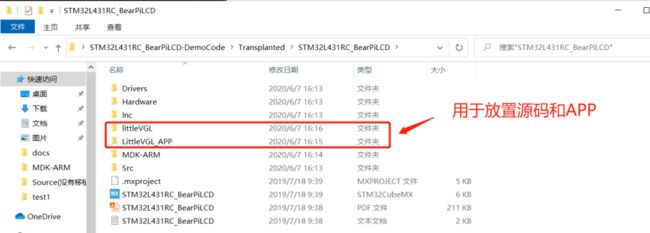
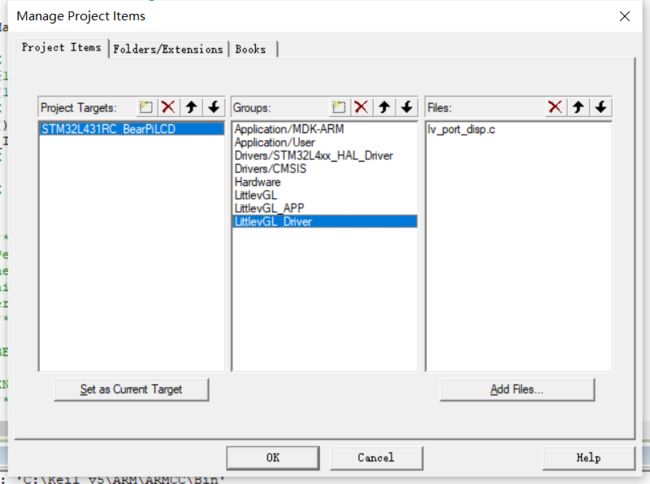
 2.2 将LittlevGL添加到小熊派基础工程中
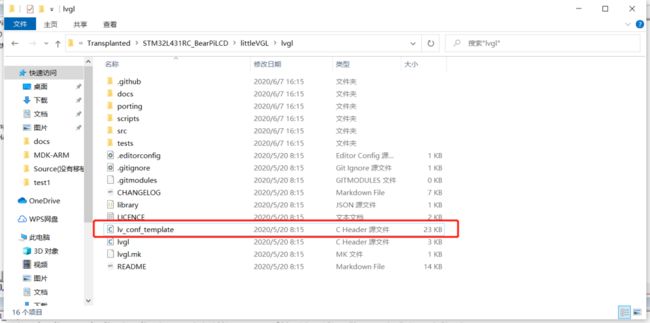
新建文件夹用于放置源码包
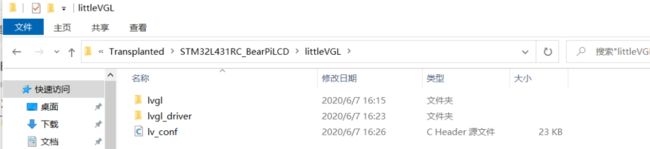
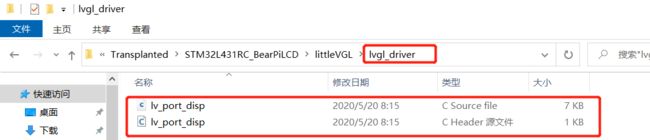
新建lvgl_driver目录用于放置显示驱动配置模板以及其它模板:
将lvgl源码包下的lv_conf_template.h拷贝到littleVGL目录下,然后改名为lvgl_conf.h
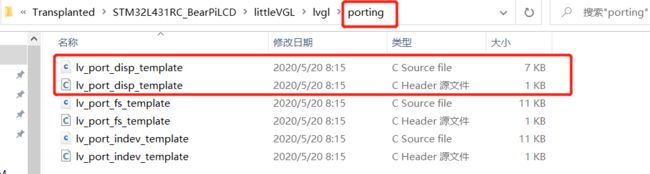
将lvgl源码包下porting文件夹中与LCD相关的配置模板拷贝出来放到lvgl_driver下,并分别更名为lv_port_disp.c和lv_port_disp.h:
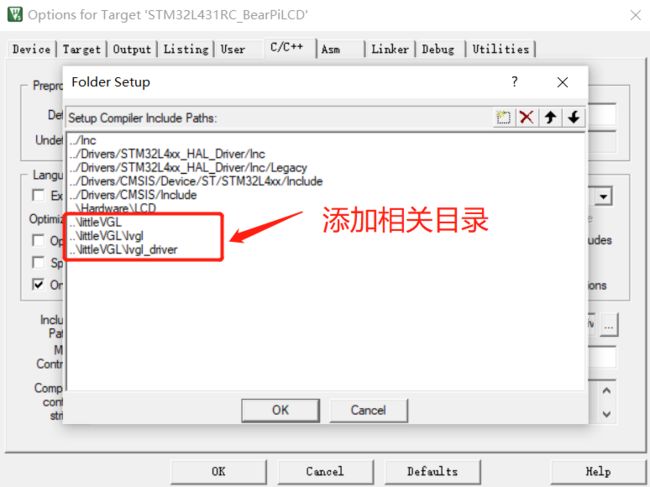
在Keil MDK中将文件包含进来:

接下来对工程进行编译:
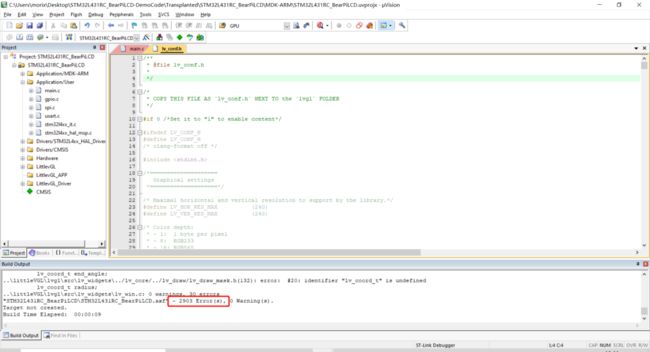
然后会发现竟然有2903个Error,如果是小白这一看就是摸不着头脑,估计连继续用下去的心情都没有了吧??还没用就跑了!不急,待我分析:
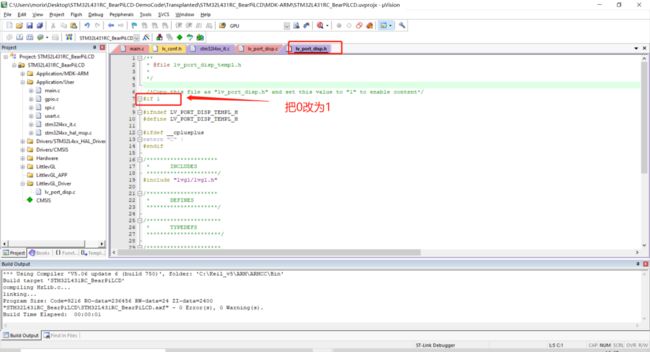
错误的原因是找不到lv_conf.h这个文件,我们来看看官网文档是怎么说的:


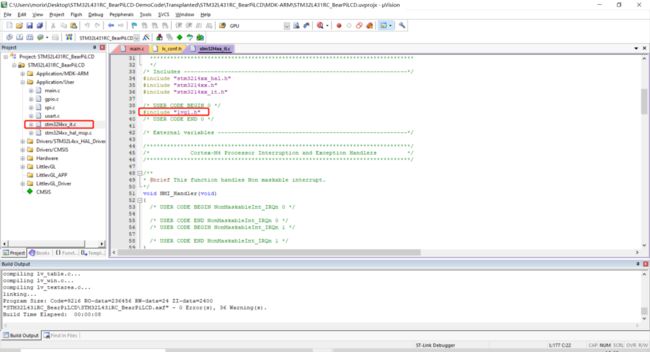
然后按照文档描述,到lv_conf.h中将宏改为1。

继续编译发现没有错误了,以下警告可以忽略。

2.3 LittlevGL配置
在lv_conf.h中做如下修改:
2.3.1 分辨率大小设置
小熊派LCD分辨率是240*240
#define LV_HOR_RES_MAX          (240)
#define LV_VER_RES_MAX          (240)
2.3.2 颜色深度设置
小熊派上对应的16位的,也就是RGB565
/* Color depth:
 * - 1:  1 byte per pixel
 * - 8:  RGB233
 * - 16: RGB565
 * - 32: ARGB8888
 */
#define LV_COLOR_DEPTH     16
2.2.3 界面伸缩比例调节
参考正点原子文档:用来调节界面缩放比例的,此值越大,控件分布的就越散,控件自身的间隔也会变大,这里设置为60。
/* Dot Per Inch: used to initialize default sizes.
 * E.g. a button with width = LV_DPI / 2 -> half inch wide
 * (Not so important, you can adjust it to modify default sizes and spaces)*/
#define LV_DPI              60     /*[px]*/
2.2.4 动态数据堆大小设置
这个参数是用于控制 littleVGL 中所谓的动态数据堆的大小,是用来给控件的创建动态分配空间的,这里我们设置为16KB。
/* Size of the memory used by `lv_mem_alloc` in bytes (>= 2kB)*/
#  define LV_MEM_SIZE    (16U * 1024U)
2.2.5 GPU接口设置
如果MCU支持GPU,那么配置该项为1,否则为0,小熊派上没有,所以该项设置为0,即不支持GPU。
/* 1: Enable GPU interface*/
#define LV_USE_GPU              0   /*Only enables `gpu_fill_cb` and `gpu_blend_cb` in the disp. drv- */
#define LV_USE_GPU_STM32_DMA2D  0
2.2.6 文件系统功能设置
这里我们不需要使用lvgl的文件系统功能,将该项配置为0。
/* 1: Enable file system (might be required for images */
#define LV_USE_FILESYSTEM       0
2.2.7 根据需求打开与LittlevGL主题相关的配置
官方会有一些自带的演示demo,所以这里我默认将所有配置全部配置,但是实际使用过程中,根据需求配置,以节省FLASH和RAM。
/*================
 *  THEME USAGE
 *================*/

/*Always enable at least on theme*/

/* No theme, you can apply your styles as you need
 * No flags. Set LV_THEME_DEFAULT_FLAG 0 */
 #define LV_USE_THEME_EMPTY       1

/*Simple to the create your theme based on it
 * No flags. Set LV_THEME_DEFAULT_FLAG 0 */
 #define LV_USE_THEME_TEMPLATE    1

/* A fast and impressive theme.
 * Flags:
 * LV_THEME_MATERIAL_FLAG_LIGHT: light theme
 * LV_THEME_MATERIAL_FLAG_DARK: dark theme*/
 #define LV_USE_THEME_MATERIAL    1

/* Mono-color theme for monochrome displays.
 * If LV_THEME_DEFAULT_COLOR_PRIMARY is LV_COLOR_BLACK the
 * texts and borders will be black and the background will be
 * white. Else the colors are inverted.
 * No flags. Set LV_THEME_DEFAULT_FLAG 0 */
 #define LV_USE_THEME_MONO        1
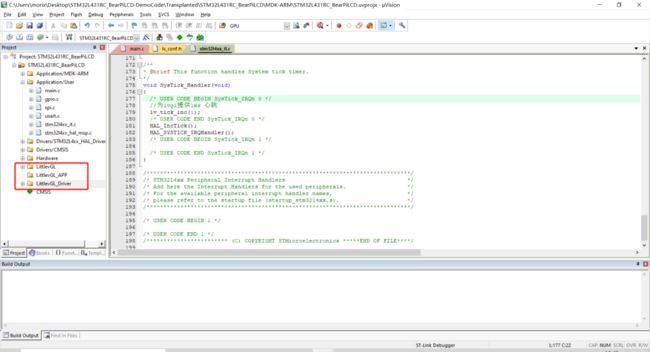
2.2.8 为LittlevGL提供心跳节拍
这个心跳节拍可以采用Systick提供,也可以自己配置一个定时器来提供,这里我是直接用Systick来提供:
/**
* @brief This function handles System tick timer.
*/
void SysTick_Handler(void)
{
  /* USER CODE BEGIN SysTick_IRQn 0 */
  //为lvgl提供1ms 心跳
  lv_tick_inc(1);
  /* USER CODE END SysTick_IRQn 0 */
  HAL_IncTick();
  HAL_SYSTICK_IRQHandler();
  /* USER CODE BEGIN SysTick_IRQn 1 */

  /* USER CODE END SysTick_IRQn 1 */
}
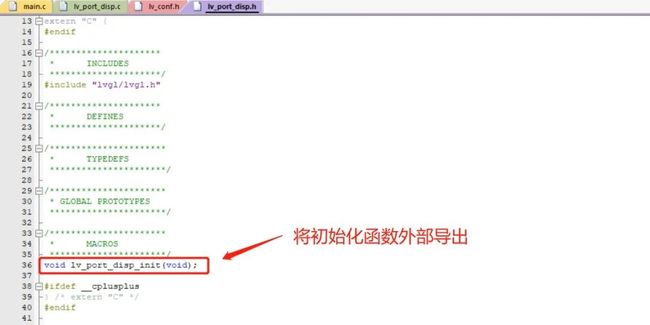
2.2.9 移植显示驱动
主要在lv_port_disp.h和lv_port_disp.c这两个文件里做修改:
先看看lv_port_disp.h:
再看看lv_port_disp.c:
(1)选择一种方式写缓存
//选择其中一种方式写缓存,这里选择的是1
    /*-----------------------------
     * Create a buffer for drawing
     *----------------------------*/

    /* LVGL requires a buffer where it draws the objects. The buffer's has to be greater than 1 display row
     *
     * There are three buffering configurations:
     * 1. Create ONE buffer with some rows:
     *      LVGL will draw the display's content here and writes it to your display
     *
     * 2. Create TWO buffer with some rows:
     *      LVGL will draw the display's content to a buffer and writes it your display.
     *      You should use DMA to write the buffer's content to the display.
     *      It will enable LVGL to draw the next part of the screen to the other buffer while
     *      the data is being sent form the first buffer. It makes rendering and flushing parallel.
     *
     * 3. Create TWO screen-sized buffer:
     *      Similar to 2) but the buffer have to be screen sized. When LVGL is ready it will give the
     *      whole frame to display. This way you only need to change the frame buffer's address instead of
     *      copying the pixels.
     * */

    /* Example for 1) */
    static lv_disp_buf_t disp_buf_1;
    static lv_color_t buf1_1[LV_HOR_RES_MAX * 10];                      /*A buffer for 10 rows*/
    lv_disp_buf_init(&disp_buf_1, buf1_1, NULL, LV_HOR_RES_MAX * 10);   /*Initialize the display buffer*/

    /* Example for 2) */
    //static lv_disp_buf_t disp_buf_2;
    //static lv_color_t buf2_1[LV_HOR_RES_MAX * 10];                        /*A buffer for 10 rows*/
    //static lv_color_t buf2_2[LV_HOR_RES_MAX * 10];                        /*An other buffer for 10 rows*/
    //lv_disp_buf_init(&disp_buf_2, buf2_1, buf2_2, LV_HOR_RES_MAX * 10);   /*Initialize the display buffer*/

    /* Example for 3) */
    //static lv_disp_buf_t disp_buf_3;
    //static lv_color_t buf3_1[LV_HOR_RES_MAX * LV_VER_RES_MAX];            /*A screen sized buffer*/
    //static lv_color_t buf3_2[LV_HOR_RES_MAX * LV_VER_RES_MAX];            /*An other screen sized buffer*/
    //lv_disp_buf_init(&disp_buf_3, buf3_1, buf3_2, LV_HOR_RES_MAX * LV_VER_RES_MAX);   /*Initialize the display buffer*/
(2)修改LCD显示大小
在lv_port_disp_init函数中:
LCD_Width和LCD_Height为240*240,需要包含lcd.h头文件
//修改LCD显示大小,这里配置为240*240
/*Set the resolution of the display*/
//disp_drv.hor_res = 480;
//disp_drv.ver_res = 320;
disp_drv.hor_res = LCD_Width;
disp_drv.ver_res = LCD_Height;
(3)添加LCD初始化函数
在lv_port_disp_init函数中:
/* Initialize your display and the required peripherals. */
static void disp_init(void)
{
    /*You code here*/
    //初始化LCD
    LCD_Init();
}
(4)添加带颜色的打点函数
/* Flush the content of the internal buffer the specific area on the display
 * You can use DMA or any hardware acceleration to do this operation in the background but
 * 'lv_disp_flush_ready()' has to be called when finished. */
static void disp_flush(lv_disp_drv_t * disp_drv, const lv_area_t * area, lv_color_t * color_p)
{
  /*The most simple case (but also the slowest) to put all pixels to the screen one-by-one*/
    int32_t x;
    int32_t y;
    for(y = area->y1; y <= area->y2; y++) {
        for(x = area->x1; x <= area->x2; x++) {
            /* Put a pixel to the display. For example: */
            /* put_px(x, y, *color_p)*/
            //添加一个带颜色的打点函数
            LCD_Draw_ColorPoint(x,y,color_p->full);
            color_p++;
        }
    }

    /* IMPORTANT!!!
     * Inform the graphics library that you are ready with the flushing*/
    lv_disp_flush_ready(disp_drv);
}
2.2.10 修改栈大小

2.4 测试LittlevGL是否移植成功
main.c 包含头文件:
#include "lvgl.h"
#include "lv_port_disp.h"
在main函数中编写显示逻辑:
int main(void)
{
  /* USER CODE BEGIN 1 */

  /* USER CODE END 1 */

  /* MCU Configuration----------------------------------------------------------*/

  /* Reset of all peripherals, Initializes the Flash interface and the Systick. */
  HAL_Init();

  /* USER CODE BEGIN Init */

  /* USER CODE END Init */

  /* Configure the system clock */
  SystemClock_Config();

  /* USER CODE BEGIN SysInit */

  /* USER CODE END SysInit */

  /* Initialize all configured peripherals */
  MX_GPIO_Init();
  MX_SPI2_Init();
  MX_USART1_UART_Init();
  /* USER CODE BEGIN 2 */
  lv_init();
  lv_port_disp_init();
  printf("Welcome to LVGL\r\n");
  //建立一个label
  lv_obj_t * label;
  lv_obj_t * btn1 = lv_btn_create(lv_scr_act(), NULL);
  lv_obj_align(btn1, NULL, LV_ALIGN_CENTER, 0, 0);
  label = lv_label_create(btn1, NULL);
  lv_label_set_text(label, "Button");
  /* USER CODE END 2 */

  /* Infinite loop */
  /* USER CODE BEGIN WHILE */
  while (1)
  {

  /* USER CODE END WHILE */

  /* USER CODE BEGIN 3 */
    //循环调用lv_task处理句柄
    lv_task_handler();
  }
  /* USER CODE END 3 */

}
运行效果:

littlevGL要学习的知识还有很多很多,把它移植起来了,后面就没什么阻碍了!如果想要深入学习这个GUI,推荐直接学习正点原子的教程就可以了。
3、案例下载
公众号后台回复:lvgl 即可获取本节所有案例的下载链接。
往期精彩
MCU SPI屏也能跑这么炫酷的特效?来,移植起来秀一秀
最近收集的开源项目专栏(持续更新,收好车轮,方便造车)
代码写得很牛逼但UI界面却搞得很丑?来,杨工带你!
觉得本次分享的文章对您有帮助,随手点[在看]并转发分享,也是对我的支持。