SpringCloud学习笔记(一):构建SpringBoot项目
SpringCloud学习笔记(一):构建SpringBoot项目
- 快速搭建一个SpringBoot项目
-
- 搭建过程
- 代码
快速搭建一个SpringBoot项目
SpringCloud是一个微服务治理框架,而SpringBoot可以用于快速构建一个微服务应用程序,在学习SpringCloud的道路上,SpringBoot是必经之路。
搭建过程
使用IDEA创建一个MAVEN项目

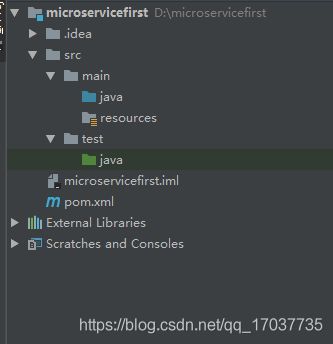
一路Next之后,新建的项目结构如下所示,我们要使用maven,来快速构建SpringBoot所需要的依赖文件。

打开pom.xml,在
    <parent>
        <groupId>org.springframework.bootgroupId>
        <artifactId>spring-boot-starter-parentartifactId>
        <version>2.0.6.RELEASEversion>
    parent>
    <dependencyManagement>
        <dependencies>
            <dependency>
                <groupId>org.springframework.cloudgroupId>
                <artifactId>spring-cloud-dependenciesartifactId>
                <version>Finchley.SR1version>
                <type>pomtype>
                <scope>importscope>
            dependency>
        dependencies>
    dependencyManagement>

    <dependencies>
        <dependency>
            <groupId>org.springframework.bootgroupId>
            <artifactId>spring-boot-starter-webartifactId>
        dependency>
    dependencies>

    <build>
        <finalName>${project.artifactId}finalName>
        <plugins>

            <plugin>
                <groupId>org.apache.maven.pluginsgroupId>
                <artifactId>maven-resources-pluginartifactId>
                <configuration>
                    <encoding>UTF-8encoding>
                configuration>
            plugin>

            <plugin>
                <groupId>org.apache.maven.pluginsgroupId>
                <artifactId>maven-compiler-pluginartifactId>
                <configuration>
                    <source>1.8source>
                    <target>1.8target>
                    <encoding>UTF-8encoding>
                configuration>
            plugin>
        plugins>
    build>
此时SpringBoot所需要的依赖已经准备就绪了,接下来就要着手开始编写SpringBoot的启动器、控制器等部分了。
代码
首先,我们需要先在src/main/resource目录下面新建一个springboot内置容器启动需要的yml配置文件,名字可以随便起,我这里使用application.yml,内容如下
server:
  port: 8090
  ##该服务将通过8090端口访问

spring:
  application:
    name: app-cargo
  ##暂时用不到,后续在注册中心中将使用到这一部分
然后,在java目录下新建controller、service、entity、runner四个包,对应控制器、服务层、实体、启动器,我们先在entity包下新建一个实体类,命名为Cargo
package entity;

public class Cargo {

    private Long id;
    private String name;
    private String price;

//...省略Getter/Setter

    @Override
    public String toString() {

        final StringBuffer sb = new StringBuffer("Cargo{");
        sb.append("id=").append(id);
        sb.append(", name='").append(name).append('\'');
        sb.append(", price='").append(price).append('\'');
        sb.append('}');
        return sb.toString();
    }
}
然后,在Service包下创建一个CargoService类,用于查询货物
package service;

import entity.Cargo;
import org.springframework.stereotype.Service;

import java.util.HashMap;
import java.util.Map;

@Service
public class CargoService {

    private static final Map<Long, Cargo> MAP = new HashMap<>();
    static {
     // 准备一些静态数据,模拟数据库
        MAP.put(1L,new Cargo(1L, "货物A", "10000"));
        MAP.put(2L,new Cargo(2L, "货物B", "11000"));
        MAP.put(3L,new Cargo(3L, "货物C", "11100"));

    }

    public Cargo queryCargoById(Long id) {

        return MAP.get(id);//实际应该做一些DAO之类的操作,这里方便演示,所以这样写
    }

}
接下来需要在Controller包下新建一个CargoController类,控制器应该将请求的参数传给Service层,然后从Service层处理并返回数据,最终返回到浏览器。代码如下
package controller;

import org.springframework.beans.factory.annotation.Autowired;
import org.springframework.web.bind.annotation.GetMapping;
import org.springframework.web.bind.annotation.PathVariable;
import org.springframework.web.bind.annotation.RestController;
import service.CargoService;

@RestController //RestController注解的类中的方法返回的值均默认采用了@ResponseBody注解
public class CargoController {

    @Autowired
    private CargoService cargoService;

    @GetMapping("cargo/{id}")//简化了@RequestMapping(value,method)的写法
    public Cargo getCargo(@PathVariable("id") Long id){

        return cargoService.queryCargoById(id);
    }
}
最后在Runner包下编写程序入口,代码如下
package runner;

import org.springframework.boot.SpringApplication;
import org.springframework.boot.autoconfigure.SpringBootApplication;
import org.springframework.context.annotation.ComponentScan;

@SpringBootApplication
@ComponentScan({
     "service","controller"})//配置包扫描,不写会找不到Bean报404
public class MyFirstSpringBootApp {

    public static void main(String[] args) {

        SpringApplication.run(MyFirstSpringBootApp.class, args);
    }
}
执行main方法,看到控制台输出
INFO 11012 --- [ main] runner.MyFirstSpringBootApp : Started MyFirstSpringBootApp in 3.497 seconds (JVM running for 6.539)
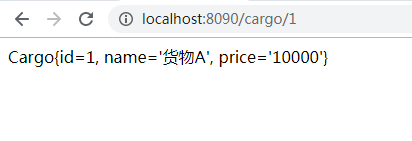
此时你编写的第一个SpringBoot项目就启动完成了,访问localhost:8090/cargo/1查看结果。

大功告成啦,我们的第一个简单的SpringBoot应用程序就构建完成了。