Activity的工作过程(三) : Activity生命周期回调是如何被回调的
本文,将从源码角度分析Activity生命周期回调是如何被调用的。
若无特殊说明,源码分析部分采用api为: 21.0.3.
像java程序有main方法作为入口一样,Android程序也有入口,ActivityThread的main方法就是Android程序的入口。
当Zygote启动时,会分裂出system_server并进行不断地ipc轮询,system_server会创建AMS等服务。当你在桌面点击一个app图标时,并且这个app在内存中是无实例的。AMS会通知system_server,由system_server通知Zygote去fork出子进程并执行ActivityThread的main方法。main方法的调用是在子进程的主线程中。
ActivityThread的main方法如下所示:
ActivityThread.class
代码片1
public static void main(String[] args) {

       // 省略无关代码

        Looper.prepareMainLooper();

        ActivityThread thread = new ActivityThread();     // --->这里是关键,创建了ActivityThread
        thread.attach(false);      // ---->调用其attach()方法  ---->分析1A

        if (sMainThreadHandler == null) {
            sMainThreadHandler = thread.getHandler();
        }

        AsyncTask.init();

        if (false) {
            Looper.myLooper().setMessageLogging(new
                    LogPrinter(Log.DEBUG, "ActivityThread"));
        }

        Looper.loop();

        throw new RuntimeException("Main thread loop unexpectedly exited");
    }
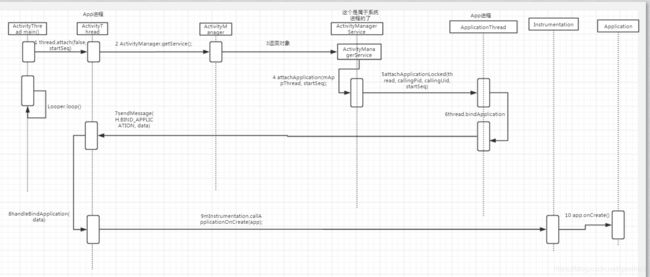
先创建ActivityThread对象,再attach()。attach()的分析如下(即代码片1的分析1A):
ActivityThread.class
代码片2
 private void attach(boolean system) {
        sCurrentActivityThread = this;

        // 省略无关代码
            //mgr实际是系统服务注意是系统服务 ActivityManager
            //在此Android程序这里的本地代理,mgr可以与系统服务ActivityManager通信
            final IActivityManager mgr = ActivityManagerNative.getDefault();   --->分析2A
            try {
                mgr.attachApplication(mAppThread);     ---->分析2B
            } catch (RemoteException ex) {
                // Ignore
            }

            //省略无关代码
    }
代码片2分析2B中,mAppThread对象究竟是什么类型呢?如下:
private class ApplicationThread extends ApplicationThreadNative {
public abstract class ApplicationThreadNative extends Binder implements IApplicationThread {
public interface IApplicationThread extends IInterface {
通过上面3个继承或实现接口关系,我们可以看出:
(1) mAppThread的类型是ApplicationThread
(2) 看到Binder、IInterface .就知道原来这ApplicationThread是想对外提供远程服务
(3) 也就是说在某是远端会持有ApplicationThread的本地代理
(4) 说白了,这里又是Binder通信而已.
分析2A即 IActivityManager mgr = ActivityManagerNative.getDefault()
点击 ActivityManagerNative.getDefault() 部分,代码如下:
ActivityManagerNative.class
代码片3
 static public IActivityManager getDefault() {
        return gDefault.get();
 }

private static final Singleton<IActivityManager> gDefault = new Singleton<IActivityManager>() {
        protected IActivityManager create() {
            IBinder b = ServiceManager.getService("activity");      --->分析3A
            if (false) {
                Log.v("ActivityManager", "default service binder = " + b);
            }
            IActivityManager am = asInterface(b);   --->分析3B
            if (false) {
                Log.v("ActivityManager", "default service = " + am);
            }
            return am;
        }
    };
分析3A: 中获取到的时候一个IBinder类型的对象,
分析3B: 绑定到IActivityManager.Stub.asInterface(b)这是AIDL客户端获取服务端的对象,返回的对象是ActivityManagerService属于(system_server进程)的binder进程
代码片3和代码片2中的2B结合起来看,调用如下方法:
ActivityManagerNative.class
代码片4
 public void attachApplication(IApplicationThread app) throws RemoteException
    {
        Parcel data = Parcel.obtain();      //发送给远程服务的数据装载在这里
        Parcel reply = Parcel.obtain();
        data.writeInterfaceToken(IActivityManager.descriptor);
        data.writeStrongBinder(app.asBinder());     //--->分析4A
        mRemote.transact(ATTACH_APPLICATION_TRANSACTION, data, reply, 0);   //--->分析4A
        reply.readException();
        data.recycle();
        reply.recycle();
    }
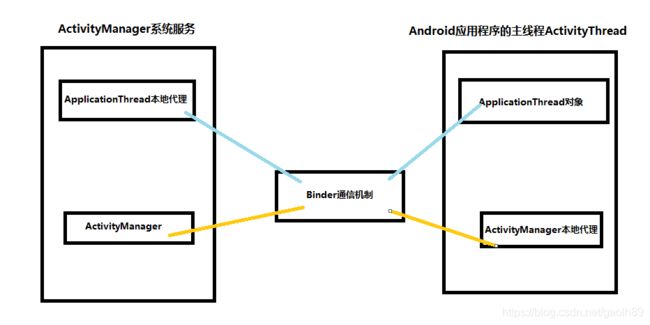
分析4A: 将ApplicationThread传给ActivityManager,这样ActivityManager系统服务那边则会拥有ApplicationThread的本地代理,别忘了这个app参数是主线程ActivityThread创建的一个对外提供远程服务的对象,系统服务ActivityManager有了它的本地代理,则意味着可以控制主线程了,这样诸如对Activity的生命周期等等控制就不在话下了.
如果 mgr.attachApplication(mAppThread)调用完成了之后,Android与系统服务ActivityManager之间“双工”通信信道就建立完毕了,为了方便你理解我画一个图,如下:
ApplicationThreadNative.class
代码片5
@Override
    public boolean onTransact(int code, Parcel data, Parcel reply, int flags)
            throws RemoteException {
        switch (code) {
        // 删除其他几个case情况

        case SCHEDULE_LAUNCH_ACTIVITY_TRANSACTION:
        {
            data.enforceInterface(IApplicationThread.descriptor);
            Intent intent = Intent.CREATOR.createFromParcel(data);
            IBinder b = data.readStrongBinder();
            int ident = data.readInt();
            ActivityInfo info = ActivityInfo.CREATOR.createFromParcel(data);
            Configuration curConfig = Configuration.CREATOR.createFromParcel(data);
            CompatibilityInfo compatInfo = CompatibilityInfo.CREATOR.createFromParcel(data);
            IVoiceInteractor voiceInteractor = IVoiceInteractor.Stub.asInterface(
                    data.readStrongBinder());
            int procState = data.readInt();
            Bundle state = data.readBundle();
            PersistableBundle persistentState = data.readPersistableBundle();
            List<ResultInfo> ri = data.createTypedArrayList(ResultInfo.CREATOR);
            List<Intent> pi = data.createTypedArrayList(Intent.CREATOR);
            boolean notResumed = data.readInt() != 0;
            boolean isForward = data.readInt() != 0;
            ProfilerInfo profilerInfo = data.readInt() != 0
                    ? ProfilerInfo.CREATOR.createFromParcel(data) : null;

             //重点代码    分析5A
            scheduleLaunchActivity(intent, b, ident, info, curConfig, compatInfo, voiceInteractor,
                    procState, state, persistentState, ri, pi, notResumed, isForward, profilerInfo);
            return true;
        }
onTransact方法中有很多种情况,通过命名我们找到了case SCHEDULE_LAUNCH_ACTIVITY_TRANSACTION: 并且发现了第12行代码,即重点代码 分析5A. 我们看一下scheduleLaunchActivity。
ActivityThread.class
代码片6
public final void scheduleLaunchActivity(Intent intent, IBinder token, int ident,
                ActivityInfo info, Configuration curConfig, CompatibilityInfo compatInfo,
                IVoiceInteractor voiceInteractor, int procState, Bundle state,
                PersistableBundle persistentState, List<ResultInfo> pendingResults,
                List<Intent> pendingNewIntents, boolean notResumed, boolean isForward,
                ProfilerInfo profilerInfo) {

            //删除无关代码

            ActivityClientRecord r = new ActivityClientRecord();

            r.token = token;
            r.ident = ident;
            r.intent = intent;
            r.voiceInteractor = voiceInteractor;
            r.activityInfo = info;
            r.compatInfo = compatInfo;
            r.state = state;
            r.persistentState = persistentState;

            r.pendingResults = pendingResults;
            r.pendingIntents = pendingNewIntents;

            r.startsNotResumed = notResumed;
            r.isForward = isForward;

            r.profilerInfo = profilerInfo;

            updatePendingConfiguration(curConfig);

            //关键代码:  发送消息
            sendMessage(H.LAUNCH_ACTIVITY, r);
        }
代码片7
   private void sendMessage(int what, Object obj) {
        sendMessage(what, obj, 0, 0, false);
    }

    private void sendMessage(int what, Object obj, int arg1) {
        sendMessage(what, obj, arg1, 0, false);
    }

    private void sendMessage(int what, Object obj, int arg1, int arg2) {
        sendMessage(what, obj, arg1, arg2, false);
    }

    private void sendMessage(int what, Object obj, int arg1, int arg2, boolean async) {
        if (DEBUG_MESSAGES) Slog.v(
            TAG, "SCHEDULE " + what + " " + mH.codeToString(what)
            + ": " + arg1 + " / " + obj);
        Message msg = Message.obtain();
        msg.what = what;
        msg.obj = obj;
        msg.arg1 = arg1;
        msg.arg2 = arg2;
        if (async) {
            msg.setAsynchronous(true);
        }

       //这个mH是ActivityThread.H的对象.H继承自Handler
       //mH.sendMessage(msg); 会导致ActivityThread.H 的handleMessage被调用
        mH.sendMessage(msg);
    }
mH.sendMessage(msg); 会导致ActivityThread.H的handleMessage被调用如下:
ActivityThread.class
代码片8
public void handleMessage(Message msg) {
            if (DEBUG_MESSAGES) Slog.v(TAG, ">>> handling: " + codeToString(msg.what));
            switch (msg.what) {
                case LAUNCH_ACTIVITY: {
                    Trace.traceBegin(Trace.TRACE_TAG_ACTIVITY_MANAGER, "activityStart");
                    final ActivityClientRecord r = (ActivityClientRecord) msg.obj;

                    r.packageInfo = getPackageInfoNoCheck(
                            r.activityInfo.applicationInfo, r.compatInfo);

                     //逻辑很简单,跳转执行handleLaunchActivity
                    handleLaunchActivity(r, null);
                    Trace.traceEnd(Trace.TRACE_TAG_ACTIVITY_MANAGER);
                }
                break;
               // 下面都是大量类似case break的代码.

            }
            if (DEBUG_MESSAGES) Slog.v(TAG, "<<< done: " + codeToString(msg.what));
        }
ActivityThread.class
代码片9
 private void handleLaunchActivity(ActivityClientRecord r, Intent customIntent) {
        // If we are getting ready to gc after going to the background, well
        // we are back active so skip it.


        Activity a = performLaunchActivity(r, customIntent);   --->分析9A

        if (a != null) {
            r.createdConfig = new Configuration(mConfiguration);
            Bundle oldState = r.state;
            handleResumeActivity(r.token, false, r.isForward,
                    !r.activity.mFinished && !r.startsNotResumed);    --->分析9B

           //删除无关代码
    }
分析9A的跳转如下:
代码片10
private Activity performLaunchActivity(ActivityClientRecord r, Intent customIntent) {
        // System.out.println("##### [" + System.currentTimeMillis() + "] ActivityThread.performLaunchActivity(" + r + ")");

        ActivityInfo aInfo = r.activityInfo;

        //删除无关代码

        //关键代码,在这里创建Activity
        Activity activity = null;

        //删除多行代码

        try {
            Application app = r.packageInfo.makeApplication(false, mInstrumentation);

            if (activity != null) {
                //此处删除多行代码
                activity.mCalled = false;
                if (r.isPersistable()) {
                    //关键 看名字是要去调用Activity的onCreate方法
                    mInstrumentation.callActivityOnCreate(activity, r.state, r.persistentState);      ---分析10A
                } else {
                    //关键
                    mInstrumentation.callActivityOnCreate(activity, r.state);     --->分析10B
                }

                //删除多行代码
        return activity;
    }
可以看到在performLaunchActivity中首先是创建了一个Activity,然后调用
mInstrumentation.callActivityOnCreate(activity, r.state, r.persistentState);准备调用Activity的onCreat函数,我们进入这个方法看看是不是如此,如下:
Instrumenttation.class
代码片11
 public void callActivityOnCreate(Activity activity, Bundle icicle,
            PersistableBundle persistentState) {
        prePerformCreate(activity);
        activity.performCreate(icicle, persistentState);    --->分析11A
        postPerformCreate(activity);
    }
看分析11A部分:
Activity.class
代码片12
   final void performCreate(Bundle icicle) {
        onCreate(icicle);     ---分析12A
        mActivityTransitionState.readState(icicle);
        performCreateCommon();
    }

    final void performCreate(Bundle icicle, PersistableBundle persistentState) {
        onCreate(icicle, persistentState);     ---->分析12B
        mActivityTransitionState.readState(icicle);
        performCreateCommon();
    }
看代码片10中2个方法的onCreate方法(即分析10A、10B):
分析7对应的代码如下:
Activity.class
代码片13
   public void onCreate(@Nullable Bundle savedInstanceState,
            @Nullable PersistableBundle persistentState) {
        onCreate(savedInstanceState);   ---分析13A
    }
分析12A和分析13A都调用如下代码
  protected void onCreate(@Nullable Bundle savedInstanceState) {
       //省略代码
    }
如上述代码看到的performCreat里面就是回调了Activity的onCreat方法,至此onCreate的回调流程就分析清楚了.
接着回到代码片9标记9A的地方还记得吗,不记得往上翻,是调用了 handleResumeActivity方法,看名字就知道这是Activity 的onResume相关的,onCreat都被调用了,接下来是OnResume,这和我们以前学习的Activity的生命周期很符合呀,嗯,不多说进去看看是什么情况:
 final void handleResumeActivity(IBinder token,
            boolean clearHide, boolean isForward, boolean reallyResume) {
        // If we are getting ready to gc after going to the background, well
        // we are back active so skip it.
        unscheduleGcIdler();
        mSomeActivitiesChanged = true;

        // TODO Push resumeArgs into the activity for consideration
        //重点分析代码 performResumeActivity
        ActivityClientRecord r = performResumeActivity(token, clearHide);

        if (r != null) {
            final Activity a = r.activity;
             //删除多行代码
        }
    }
看到没,接下去的跳转和onCreate部分很相似,不再分析了,至此你应该知道Activity的生命周期是怎么被调用的吧,或许你还是有点模糊,那我下面帮你总结一下吧:
1.首先在ActivityThread的主线程,生成一个ApplicationThread对象,这个对象式能够对外提供远程服务的,换句话说别的进程可以通过这个对象的本地代理与我这个ActivityThread的主线程(ApplicationThread对象)通信
2.获取系统服务ActivityManager的本地代理对象
3.将生成的ApplicationThread对象通过ActivityManager的本地代理对象“发送”给系统服务ActivityManager,这样系统服务ActivityManager会"生成"ApplicationThread对象的本地代理,到此主线程与系统服务ActivityManager之间的“双工”通信信道就建立了
4.当你想要启动一个Activity的时候,系统服务ActivityManager就会调用ApplicationThread对象的本地代理的scheduleLaunchActivity方法,这样主线程的scheduleLaunchActivity也会相应的被调用,至此开始了Activity生命周期函数的回调。