10 Flask mega-tutorial 第10章 QQ邮箱 电子邮件支持 Email Support
如需转载请注明出处。
win10 64位、Python 3.6.3、Notepad++、Chrome 67.0.3396.99(正式版本)(64 位)
注:作者编写时间2018-02-06,linux、python 3.5.2
以下内容均是加入自己的理解与增删,以记录学习过程。不限于翻译,部分不完全照搬作者Miguel Grinberg的博客,版权属于作者,感谢他提供免费学习的资料。
| 传送门 | |||
|---|---|---|---|
| 00 开篇 | 01 Hello world | 02 模板 | 03 Web表单 |
| 04 数据库 | 05 用户登录 | 06 个人资料和头像 | 07 错误处理 |
| 08 关注 | 09 分页 | 10 支持QQ邮箱 | 11 美化页面 |
| 12 时间和日期 | 13 I18n和L10n 翻译成中文 zh-CN | 14 Ajax(百度翻译API | 15 更好的App结构(蓝图) |
| 16 全文搜索 | 17 部署到腾讯云Ubuntu | 18 部署到Heroku | 19 部署到Docker容器 |
| 20 JavaScript魔法 | 21 用户通知 | 22 后台工作(Redis) | 23 应用程序编程接口(API) |
目前在数据库方面做得很好了,所以在本章将脱离该主题并添加大多数Web应用程序需要另一个重要部分,即 发送电子邮件。
为何需要向用户发送电子邮件?原因很多,一个常见的原因是解决与身份验证相关的问题。在本章中,将为忘记密码的用户添加密码重置功能。当用户请求重置密码时,应用程序将发送包含特制链接的电子邮件。然后用户需要单击该链接以访问用于设置密新密码的表单。
Flask-Mail简介
在发送电子邮件方面,Flask有一个流行扩展,名为Flask-Mail,可让这个任务变得很简单。安装:pip install flask-mail,版本0.9.1
附带安装blinker,版本1.4,它提供一个快速的调度系统,允许任何数量的相关方订阅事件,或“信号”。
(venv) D:\microblog>pip install flask-mail
Collecting flask-mail
  Downloading https://files.pythonhosted.org/packages/05/2f/6a545452040c2556559779db87148d2a85e78a26f90326647b51dc5e81e9/Flask-Mail-0.9.1.tar.gz (45kB)
    100% |████████████████████████████████| 51kB 41kB/s
Requirement already satisfied: Flask in d:\microblog\venv\lib\site-packages (from flask-mail)
Collecting blinker (from flask-mail)
  Downloading https://files.pythonhosted.org/packages/1b/51/e2a9f3b757eb802f61dc1f2b09c8c99f6eb01cf06416c0671253536517b6/blinker-1.4.tar.gz (111kB)
    100% |████████████████████████████████| 112kB 26kB/s
Requirement already satisfied: Werkzeug>=0.14 in d:\microblog\venv\lib\site-packages (from Flask->flask-mail)
Requirement already satisfied: itsdangerous>=0.24 in d:\microblog\venv\lib\site-packages (from Flask->flask-mail)
Requirement already satisfied: Jinja2>=2.10 in d:\microblog\venv\lib\site-packages (from Flask->flask-mail)
Requirement already satisfied: click>=5.1 in d:\microblog\venv\lib\site-packages (from Flask->flask-mail)
Requirement already satisfied: MarkupSafe>=0.23 in d:\microblog\venv\lib\site-packages (from Jinja2>=2.10->Flask->flask-mail)
Installing collected packages: blinker, flask-mail
  Running setup.py install for blinker ... done
  Running setup.py install for flask-mail ... done
Successfully installed blinker-1.4 flask-mail-0.9.1
密码重置链接中将包含安全令牌。为生成这些令牌,得使用JSON Web令牌,它有一个流行的Python包 pyjwt:
(venv) D:\microblog>pip install pyjwt
Collecting pyjwt
  Downloading https://files.pythonhosted.org/packages/93/d1/3378cc8184a6524dc92993090ee8b4c03847c567e298305d6cf86987e005/PyJWT-1.6.4-py2.py3-none-any.whl
Installing collected packages: pyjwt
Successfully installed pyjwt-1.6.4
Flask-Mail扩展是从app.config对象配置。还记得在第7章中添加了电子邮件配置,以便在发生错误时向自己发送电子邮件?当时并未告知,选择的配置变量是根据Flask-Mail的要求建模的,因此实际上没有任何额外的工作需要,配置变量已经在应用程序中了。
和大多数Flask扩展一样,需要在创建Flask应用程序之后立即创建实例。下方是创建一个Mail类对象:
#...
from flask_login import LoginManager
from flask_mail import Mail

app = Flask(__name__)
#...
login.login_view = 'login'

mail = Mail(app)
#...
如果打算测试 发送电子邮件,可使用在第7章提供的相同的两个选项。如果想使用模拟的电子邮件服务器,Python提供了一个非常方便的,可在第二个终端中使用如下命令启动:
C:\WINDOWS\system32>d:

D:\>cd D:\microblog\venv\Scripts

D:\microblog\venv\Scripts>activate
(venv) D:\microblog\venv\Scripts>cd D:\microblog

(venv) D:\microblog>python -m smtpd -n -c DebuggingServer localhost:8025
要配置此服务器,还需设置两个环节变量(第一个终端):
(venv) D:\microblog>set MAIL_SERVER=localhost

(venv) D:\microblog>set MAIL_PORT=8025
如果要发送真实的电子邮件,则需要使用真实的电子邮件服务器。还需配置这些环境变量,如MAIL_SERVER,MAIL_PORT,MAIL_USE_TLS,MAIL_USERNAME和MAIL_PASSWORD。使用Gmail账户发送电子邮件,设置如下:
(venv) D:\microblog>set MAIL_SERVER=smtp.googlemail.com

(venv) D:\microblog>set MAIL_PORT=587

(venv) D:\microblog>set MAIL_USE_TLS=1

(venv) D:\microblog>set MAIL_USERNAME=

(venv) D:\microblog>set MAIL_PASSWORD=
Flask-Mail用法
为了解 Flask-Mail是如何工作的,下方将展示在Python shell发送电子邮件,用`flask shell`启动Python,运行如下命令:(venv) D:\microblog>flask shell
[2018-08-20 11:40:14,298] INFO in __init__: Microblog startup
Python 3.6.3 (v3.6.3:2c5fed8, Oct 3 2017, 18:11:49) [MSC v.1900 64 bit (AMD64)] on win32
App: app [production]
Instance: D:\microblog\instance
>>> from flask_mail import Message
>>> from app import mail
>>> msg = Message('test subject',sender=app.config['ADMINS'][0],recipients=['[email protected]'])
>>> msg.body = 'text body'
>>> msg.html = 'HTML body
'
>>> mail.send(msg)
上述代码将发送电子邮件到recipients参数的电子邮件地址列表。将发送者作为第一个配置的管理员(即在第7章中添加的配置变量)。电子邮件包含纯文本和HTML版本,因此根据电子邮件客户端的配置方式,可能会看到其中一个。
如上所见,很简单。现在将电子邮件集成到应用程序中。
简单的电子邮件架构
首先,编写一个发送电子邮件的 辅助函数,它是上一节shell中的通用版本。 app/email.py:发送电子邮件的封装函数from flask_mail import Message
from app import mail
def send_email(subject, sender, recipients, text_body, html_body):
msg = Message(subject, sender=sender, recipients=recipients)
msg.body = text_body
msg.html = html_body
mail.send(msg)
Flask-Mail还支持一些在此没有使用到的功能,如抄送(Cc) 和密件抄送(Bcc)列表。更多详情可查看Flask-Mail文档。
请求重置密码
用户可以选择 重置密码。为此,在登录页面中添加一个链接: app/templates/login.html:登录表单中的密码重置链接#...
New User? Click to Register!
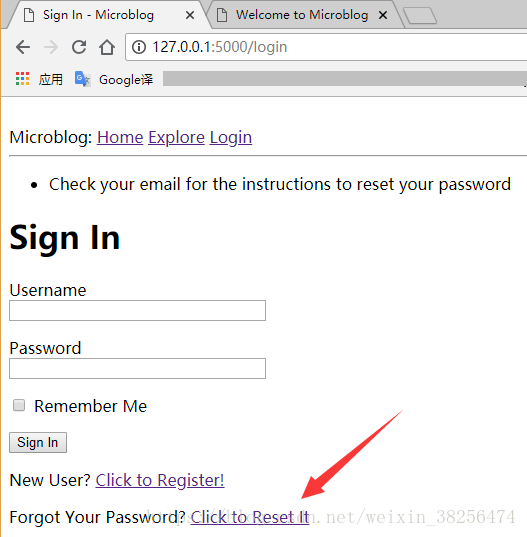
Forgot Your Password?
Click to Reset It
{% endblock %}
当用户单击这个链接时,将出现一个新的Web表单,用于请求用户的电子邮件地址作为启动密码重置过程的方法。这个表单类如下:
app/forms.py:重置密码 表单
#...
class RegistrationForm(FlaskForm):
	#...
class ResetPasswordRequestForm(FlaskForm):
	email = StringField('Email', validators=[DataRequired(), Email()])
	submit = SubmitField('Request Password Reset')
#...
对应的HTML模板如下:
app/templates/reset_password_request.html:重置密码请求的模板
{% extends "base.html" %}
{% block content %}
Reset Password
{% endblock %}
当然,还需要一个视图函数来处理这个表单:
app/routes.py:重置密码请求的视图函数
#...
from app.forms import ResetPasswordRequestForm
from app.email import send_password_reset_email

#...
def register():
	#...
@app.route('/reset_password_request', methods=['GET','POST'])
def reset_password_request():
    if current_user.is_authenticated:
        return redirect(url_for('index'))
    form = ResetPasswordRequestForm()
    if form.validate_on_submit():
        user = User.query.filter_by(email=form.email.data).first()
        if user:
            send_password_reset_email(user)
        flash('Check your email for the instructions to reset your password')
        return redirect(url_for('login'))
    return render_template('reset_password_request.html', title='Reset Password', form=form)
#...
这个视图函数 与处理表单的其他函数非常相似。首先,确保用户没有登录。如果用户已经登录,那么使用密码重置功能没有意义了,因此重定向到/index页面。
当表单提交并有效时,将通过表单中用户提供的电子邮件来查找用户。如果找到用户,就发送一封密码重置电子邮件。执行这个操作使用的是send_password_reset_email()辅助函数,稍后展示。
发送电子邮件后,会闪烁一条消息,指示用户查找电子邮件以获取进一步说明,然后重定向回 /login页面。注意到,即使用户提供的电子邮件未知,也会显示闪烁消息。这样的话,客户端将无法使用这个表单来确定给定用户是否为成员。
密码重置令牌
在实现`send_password_reset_email()`函数之前,我们需要有一种方法来 生成密码请求链接。这是提供电子邮件发送给用户的链接。点击链接时,将向用户显示可以设置新密码的页面。这个计划棘手的部分是 确保只有有效的重置链接才可以用来重置账户的密码。生成的链接中会包含令牌,它将在允许密码变更之前被验证,以证明请求重置密码的用户是通过访问重置密码邮件中的链接而来的。JSON Web Token(JWT)是这类令牌处理的流行标准。它的好处是本身是自成一体的,不仅可以生成令牌,还可以提供对应的验证方法。
JWT是如何工作的?通过Python shell会话将很容易理解:
C:\Users\Administrator>d:

D:\>cd d:\microblog\venv\scripts

d:\microblog\venv\Scripts>activate
(venv) d:\microblog\venv\Scripts>cd d:\microblog

(venv) d:\microblog>python
Python 3.6.3 (v3.6.3:2c5fed8, Oct  3 2017, 18:11:49) [MSC v.1900 64 bit (AMD64)] on win32
Type "help", "copyright", "credits" or "license" for more information.
>>> import jwt
>>> token = jwt.encode({'a':'b'},'my-secret',algorithm='HS256')
>>> token
b'eyJ0eXAiOiJKV1QiLCJhbGciOiJIUzI1NiJ9.eyJhIjoiYiJ9.dvOo58OBDHiuSHD4uW88nfJikhYAXc_sfUHq1mDi4G0'
>>> jwt.decode(token,'my-secret',algorithms=['HS256'])
{'a': 'b'}
>>> quit()

(venv) d:\microblog>
上述{'a':'b'}字典是一个将要被写入这个令牌的实例有效负载。为了令牌安全,需要提供一个密钥用于创建加密签名。对于这个例子,用了字符串'my-secret',但是在应用程序中将使用配置中的SECRET_KEY。algorithm参数指定令牌如何被生成,HS256算法是最常用的。
如上所见,生成的令牌是一个长串字符。但不要认为这是一个加密令牌。令牌的内容,包括有效载荷,可被任何人轻松解码(复制上述令牌,然后在JWT调试器中输入它以查看其内容)。使令牌安全的是:有效载荷是签名的。假如有人试图在一个令牌中伪造或篡改有效载荷,那么这个签名将无效,并且为了生成一个新签名,需要密钥。验证令牌时,有效载荷的内容被解码并返回给调用者。如果验证了令牌的签名,那么可以将有效载荷视为可信。

将用于密码重置令牌的有效载荷格式为{'reset_password': user_id, 'exp': token_expiration}。exp字段是JWT的标准字段,如果存在,则表示令牌的到期时间。如果令牌具有有效签名,但它已超过其到期时间戳,则它也将被视为无效。对于密码重置功能,将给这些令牌提供10分钟的有效期。
当用户点击通过电子邮件发送的链接时,这个令牌将作为URL的一部分发送会应用程序,处理这个URL的视图函数首先要做的就是验证它。如果签名有效,则可以通过存储在有效载荷中的ID来识别用户。一旦知道了用户的身份,应用程序就可以要求输入新密码并将其设置在用户的账户上。
由于这些令牌属于用户,因此将在User模型中编写令牌生成和验证的方法:
app/models.py:重置密码令牌方法
#...
from time import time
import jwt
from app import app
#...
class User(UserMixin, db.Model):
    # ...
	def followed_posts(self):
		#...
    def get_reset_password_token(self, expires_in=600):
        return jwt.encode(
            {'reset_password': self.id, 'exp': time() + expires_in},
            app.config['SECRET_KEY'], algorithm='HS256').decode('utf-8')

    @staticmethod
    def verify_reset_password_token(token):
        try:
            id = jwt.decode(token, app.config['SECRET_KEY'],
                            algorithms=['HS256'])['reset_password']
        except:
            return
        return User.query.get(id)
#...
上述get_reset_password_token()函数以字符串形式生成一个JWT令牌。注意,decode('utf-8')是必需的,因为jwt.encode()函数以一个字节序列返回令牌,但在应用程序中将令牌以字符串形式更方便。
verify_reset_password_token()是一个静态方法,意味着它可以直接从类中调用。静态方法类似于 类方法,唯一区别是静态方法不接收类作为第一个参数。这个方法接受一个令牌并尝试通过调用PyJWT的jwt.decode()函数对其进行解码。如果令牌无法验证或过期,则会引发异常,在这种情况下,我们会捕获它以防止错误,然后返回None给调用者。如果令牌有效,则来自令牌的有效载荷的reset_password键的值是用户的ID,因此我能加载用户并返回它。
发送密码重置电子邮件
现在有了令牌,就可以生成密码重置电子邮件。`send_password_reset_email()`函数依赖`send_mail()`方法(上述email.py模块中写的)。 app/email.py:发送密码重置电子邮件函数from flask import render_template
from app import app
# ...
def send_password_reset_email(user):
token = user.get_reset_password_token()
send_email('[Microblog] Reset Your Password',
sender=app.config['ADMINS'][0],
recipients=[user.email],
text_body=render_template('email/reset_password.txt',
user=user, token=token),
html_body=render_template('email/reset_password.html',
user=user, token=token))
这个函数中有趣部分是电子邮件的文本和HTML内容是使用熟悉的render_template()函数从模板生成的。模板接收用户和令牌作为参数,以便可以生成个性化电子邮件消息。以下是重置密码电子邮件的文本模板:
app/templates/email/reset_password.txt:密码重置电子邮件的文本
Dear {{ user.username }},

To reset your password click on the following link:

{{ url_for('reset_password', token=token, _external=True) }}

If you have not requested a password reset simply ignore this message.

Sincerely,

The Microblog Team
下方是相同的电子邮件的HTML版本:
app/templates/email/reset_password.html:密码重置电子邮件的HTML
Dear {{ user.username }},

	To reset your password
	click here.

Alternatively, you can paste the following link in your browser's address bar:
{{ url_for('reset_password', token=token, _external=True) }}
If you have not requested a password reset simply ignore this message.
Sincerely,
The Microblog Team
在上述两个电子邮件模板中,在url_for()调用中引用的reset_password路由还不存在,这将在下一节中添加。在两个模板中调用url_for()包含的_external=True参数也是新的。默认情况下,由url_for()生成的URL是相对URL,因此,例如url_for('user', username='susan')调用将返回 /user/susan。对于在web页面中生成链接这通常足够了,因为web浏览器从当前页面中获取URL的其余部分。但是,当通过电子邮件发送一个URL时,该上下文不存在,因此需要使用完全限定的URL。当_external=True作为参数传递时,会生成完整的URL,因此前面的示例将返回http://localhost:5000/user/susan,或在域名上部署应用程序时的相应URL。
重置用户密码
当用户点击电子邮件链接时,将触发与此功能关联的第二个路由。这是密码请求的视图函数: app/routes.py:密码重置的视图函数#...
from app.forms import ResetPasswordForm
#...
def reset_password_request():
#...
@app.route('/reset_password/', methods=['GET', 'POST'])
def reset_password(token):
if current_user.is_authenticated:
return redirect(url_for('index'))
user = User.verify_reset_password_token(token)
if not user:
return redirect(url_for('index'))
form = ResetPasswordForm()
if form.validate_on_submit():
user.set_password(form.password.data)
db.session.commit()
flash('Your password has been reset.')
return redirect(url_for('login'))
return render_template('reset_password.html', form=form)
#...
在上述视图函数中,首先确保用户未登录,然后通过在User类中调用令牌验证方法来确定用户是谁。如果令牌有效,或如果没有的话是None,那么这个方法返回用户。如果令牌无效,会重定向到/index。
如果令牌有效,那么我将向用户显示第二个表单,其中会请求新密码。这个表单的处理方式与之前的表单类似,并且作为有效表单提交的结果,我调用User的set_password()方法去更改密码,然后重定向到用户现在可以登录的登录页面。
下方是ResetPasswordForm类:
app/forms.py:密码重置表单
#...
class ResetPasswordRequestForm(FlaskForm):
	email = StringField('Email', validators=[DataRequired(), Email()])
	submit = SubmitField('Request Password Reset')

class ResetPasswordForm(FlaskForm):
	password = PasswordField('Password', validators=[DataRequired()])
	password2 = PasswordField('Repeat Password', validators=[DataRequired(), EqualTo('password')])
	submit = SubmitField('Request Password Reset')
#...
下方是相应的HTML模板:
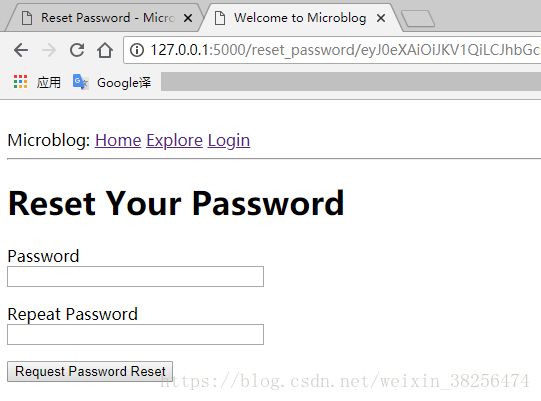
app/templates/reset_password.html:密码重置表单模板
{% extends "base.html" %}
{% block content %}
Reset Your Password
{% endblock %}
密码重置功能现在已经完成,因此得尝试运行一下。
异步电子邮件
如果使用 Python提供的模拟电子邮件服务器,不过,发送电子邮件会大大减慢应用程序的速度。发送电子邮件时,需进行的所有交互都会导致任务变慢,通常需要几秒钟才能收到电子邮件,如果收件人的电子邮件服务速度很慢,或者有多个收件人,可能会更多。真正要实现的send_email()函数是异步的。这意味着当调用这个函数时,发送电子邮件的任务计划在后台发生,释放send_email()后立即返回,以便应用程序可以继续与发送的电子邮件同时运行。
Python支持以不止一种方式运行异步任务。threading 和 multiprocessing模块 都可以做到这一点。为发送电子邮件启动后台线程 比开始一个全新的流程要少得多,因此我采用如下方法:
app/email.py:异步发送电子邮件
from threading import Thread
# ...

def send_async_email(app, msg):
    with app.app_context():
        mail.send(msg)


def send_email(subject, sender, recipients, text_body, html_body):
    msg = Message(subject, sender=sender, recipients=recipients)
    msg.body = text_body
    msg.html = html_body
    Thread(target=send_async_email, args=(app, msg)).start()
这个send_async_email()函数现在后台线程中运行,在send_email()的最后一行通过Thread()类调用。通过这个更改,电子邮件的发送将在线程中运行,并且当进程完成时,线程将结束并自行清理。如果配置了一个真实的电子邮件服务器,当按密码重置请求表单上的提交按钮时,会注意到速度的提高。
你可能希望只将msg参数发送到线程,但是正如在代码中看到的那样,我也发送了应用程序实例 app。使用线程时,需牢记Flask的一个重要设计方面。Flask使用上下文来 避免跨函数传递参数。在此不详说,但要知道有两种类型的上下文,即 应用程序上下文、请求上下文。在大多数情况下,这些上下文由框架自动管理,但当应用程序启动自定义线程时,可能需要手动创建这些线程的上下文。
有许多扩展需要应用程序上下文才能工作,因为这允许它们找到Flask应用程序实例而不将其作为参数传递。许多扩展需要知道应用程序实例的原因是 因为它们的配置存储在app.config对象中。这正是Flask-Mail的情况。mail.send()方法需要访问电子邮件服务器的配置值,而这只能通过应用程序是什么来完成。with app.app_context()调用创建的应用程序上下文 使得应用程序实例可以通过来自Flask的current_app变量 可访问。
效果,使用模拟的电子邮件服务器,首先在第一个终端配置如下两个环境变量:
(venv) d:\microblog>set MAIL_SERVER=localhost

(venv) d:\microblog>set MAIL_PORT=8025
其次,在第二个终端中启动:
C:\WINDOWS\system32>d:

D:\>cd D:\microblog\venv\Scripts

D:\microblog\venv\Scripts>activate
(venv) D:\microblog\venv\Scripts>cd D:\microblog

(venv) D:\microblog>python -m smtpd -n -c DebuggingServer localhost:8025
接着在第一个终端运行程序:
(venv) d:\microblog>flask run
 * Environment: production
   WARNING: Do not use the development server in a production environment.
   Use a production WSGI server instead.
 * Debug mode: off
[2018-08-21 19:26:44,028] INFO in __init__: Microblog startup
 * Running on http://127.0.0.1:5000/ (Press CTRL+C to quit)
点击“Click to Reset It”按钮,看到第二个终端:
(venv) D:\microblog>python -m smtpd -n -c DebuggingServer localhost:8025
---------- MESSAGE FOLLOWS ----------
b'Content-Type: multipart/mixed; boundary="===============4263779243150113428=="'
b'MIME-Version: 1.0'
b'Subject: [Microblog] Reset Your Password'
b'From: 发送者QQ邮箱号@qq.com'
b'To: 用户邮箱号@qq.com'
b'Date: Tue, 21 Aug 2018 20:43:56 +0800'
b'Message-ID: <[email protected]>'
b'X-Peer: ::1'
b''
b'--===============4263779243150113428=='
b'Content-Type: multipart/alternative;'
b' boundary="===============7570365343512876917=="'
b'MIME-Version: 1.0'
b''
b'--===============7570365343512876917=='
b'Content-Type: text/plain; charset="utf-8"'
b'MIME-Version: 1.0'
b'Content-Transfer-Encoding: 8bit'
b''
b'\xef\xbb\xbfDear oldiron,'
b''
b'To reset your password click on the following link:'
b''
b'http://127.0.0.1:5000/reset_password/eyJ0eXAiOiJKV1QiLCJhbGciOiJIUzI1NiJ9.eyJyZXNldF9wYXNzd29yZCI6NiwiZXhwIjoxNTM0ODU2MDM2Ljg3ODIxNjd9.SYz1ktqeaZLFPLrvgF7d45e4oZGfzVO020yymvA8yIU'
b''
b'If you have not requested a password reset simply ignore this message.'
b''
b'Sincerely,'
b''
b'The Microblog Team'
b'--===============7570365343512876917=='
b'Content-Type: text/html; charset="utf-8"'
b'MIME-Version: 1.0'
b'Content-Transfer-Encoding: 8bit'
b''
b'\xef\xbb\xbfDear oldiron,
'
b''
b'\tTo reset your password'
b'\tclick here.'
b'
'
b"Alternatively, you can paste the following link in your browser's address bar:
"
b'http://127.0.0.1:5000/reset_password/eyJ0eXAiOiJKV1QiLCJhbGciOiJIUzI1NiJ9.eyJyZXNldF9wYXNzd29yZCI6NiwiZXhwIjoxNTM0ODU2MDM2Ljg3ODIxNjd9.SYz1ktqeaZLFPLrvgF7d45e4oZGfzVO020yymvA8yIU
'
b'If you have not requested a password reset simply ignore this message.
'
b'Sincerely,
'
b'The Microblog Team
'
b'--===============7570365343512876917==--'
b''
b'--===============4263779243150113428==--'
------------ END MESSAGE ------------

将其中的邮件地址复制到浏览器,回车:
将用户oldiron,密码重置为 a123456(原密码为123456)。
接下来使用QQ邮箱进行测试。
1)、修改config.py中的配置项:
microblog/config.py:
#...

class Config:
	#...

	MAIL_SERVER = os.environ.get('MAIL_SERVER')#smtp.qq.com
	MAIL_PORT = int(os.environ.get('MAIL_PORT'))#465
	MAIL_USE_SSL = os.environ.get('MAIL_USE_SSL')#重要,QQ邮箱需要使用SSL。True
	MAIL_USERNAME = os.environ.get('MAIL_USERNAME')#邮箱地址
	MAIL_PASSWORD = os.environ.get('MAIL_PASSWORD')#授权码
	ADMINS = ['[email protected]']
	#...
2)、修改app/__init__.py中关于配置`MAIL_USE_SSL`的代码:
#...
if not app.debug:
	if app.config['MAIL_SERVER']:
		auth = None
		if app.config['MAIL_USERNAME'] or app.config['MAIL_PASSWORD']:
			auth = (app.config['MAIL_USERNAME'],app.config['MAIL_PASSWORD'])
		secure = None
		if app.config['MAIL_USE_SSL']:
			secure = ()
		mail_handler = SMTPHandler(
			#...
3)、打开cmd,进入虚拟环境,配置环境变量:
C:\Users\Administrator>d:

D:\>cd D:\microblog\venv\Scripts

D:\microblog\venv\Scripts>activate
(venv) D:\microblog\venv\Scripts>cd D:\microblog

(venv) D:\microblog>set MAIL_SERVER=smtp.qq.com

(venv) D:\microblog>set MAIL_PORT=465

(venv) D:\microblog>set MAIL_USE_SSL=True

(venv) D:\microblog>set [email protected]#不用引号

(venv) D:\microblog>set MAIL_PASSWORD=IMAP/SMTP服务授权码#不用引号
4)、flask run 运行程序,效果:
(venv) D:\microblog>flask run
 * Environment: production
   WARNING: Do not use the development server in a production environment.
   Use a production WSGI server instead.
 * Debug mode: off
[2018-08-22 12:07:18,392] INFO in __init__: Microblog startup
 * Running on http://127.0.0.1:5000/ (Press CTRL+C to quit)
127.0.0.1 - - [22/Aug/2018 12:07:24] "GET /login HTTP/1.1" 200 -
127.0.0.1 - - [22/Aug/2018 12:07:24] "GET /favicon.ico HTTP/1.1" 404 -
127.0.0.1 - - [22/Aug/2018 12:07:28] "GET /reset_password_request HTTP/1.1" 200 -
127.0.0.1 - - [22/Aug/2018 12:07:36] "POST /reset_password_request HTTP/1.1" 302 -
127.0.0.1 - - [22/Aug/2018 12:07:36] "GET /login HTTP/1.1" 200 -
127.0.0.1 - - [22/Aug/2018 12:07:56] "GET /reset_password/eyJ0eXAiOiJKV1QiLCJhbGciOiJIUzI1NiJ9.eyJyZXNldF9wYXNzd29yZCI6NiwiZXhwIjoxNTM0OTExNDU2LjM1NDI0MDd9.AczmZ5WjKX1Lu6Iv6w3a0tL9LtHs7HbXETbSZ5nqJuY HTTP/1.1" 200 -
127.0.0.1 - - [22/Aug/2018 12:09:26] "POST /reset_password/eyJ0eXAiOiJKV1QiLCJhbGciOiJIUzI1NiJ9.eyJyZXNldF9wYXNzd29yZCI6NiwiZXhwIjoxNTM0OTExNDU2LjM1NDI0MDd9.AczmZ5WjKX1Lu6Iv6w3a0tL9LtHs7HbXETbSZ5nqJuY HTTP/1.1" 302 -
127.0.0.1 - - [22/Aug/2018 12:09:26] "GET /login HTTP/1.1" 200 -
在/login页面点击 Click to Reset It按钮,

点击 Request Password Reset提交按钮,用户注册时的QQ电子邮箱将收到一封电子邮件,示例如下:
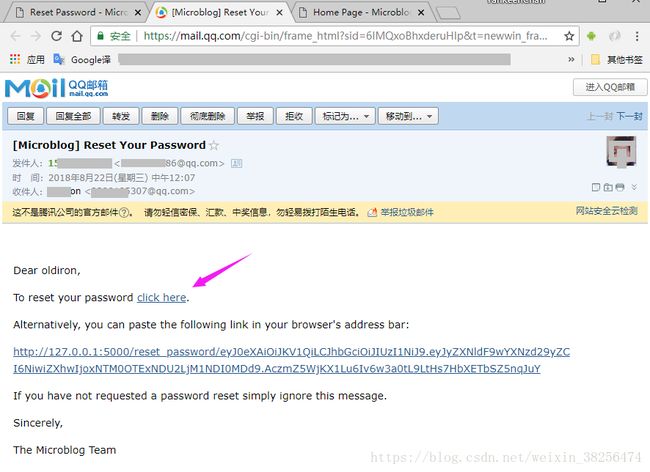
点击 click here链接,或把链接复制到浏览器:

重置密码成功(用户 oldiron,b123456(原密码a123456))。
目前为止,项目结构:
microblog/
    app/
        templates/
	        email/
		        reset_password.html
		        reset_password.txt
	        _post.html
	        404.html
	        500.html
            base.html
            edit_profile.html
            index.html
            login.html
            register.html
            reset_password.html
            reset_password_request.html
            user.html
        __init__.py
        email.py
        errors.py
        forms.py
        models.py
        routes.py
    logs/
        microblog.log
    migrations/
    venv/
    app.db
    config.py
    microblog.py
    tests.py
参考:
作者博客
如需转载请注明出处。