Android如何在账户设置中添加App的账户
Android系统为外部服务提供了账号登录的机制,用于同步数据等作用。
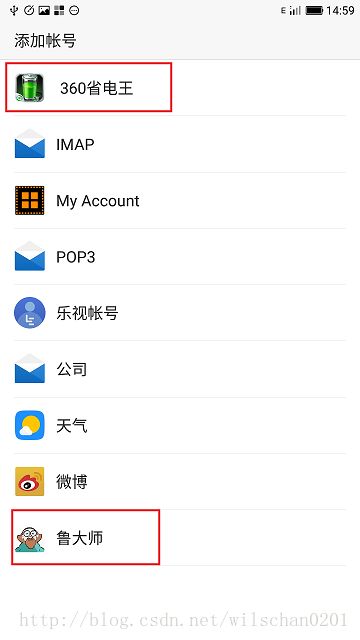
进入设置->账户->添加账户,即可看到目前手机上有哪些App提供了同步服务。

接下来将会演示如何在App中定义登录服务并添加一个登录选项到这里。
账户的授权和同步
账户功能主要有2个:授权和同步。
授权:即账户登录怎么把关,可以通过验证账户密码的形式,也允许直接通过AccountManager的addAcount接口直接添加账户。
需要继承AbstractAccountAuthenticator来实现我们自己的授权机制。
同步:以邮箱账户为例,在添加一个Exchange邮箱账户后,我们可以看到它提供了联系人,日历,邮件等同步功能,这些同步服务每一项都需要App来继承实现AbstractThreadedSyncAdapter,用于该项的同步。

简单的演示
如何添加登录入口
第一步:实现AbstractAccountAuthenticator
在res/xml下添加一个xml,用于定义account-authenticator的以下属性:
sample_authenticator.xml
"http://schemas.android.com/apk/res/android"
    android:accountType="com.android.test"
    android:icon="@drawable/ic_account_icon"
    android:smallIcon="@drawable/ic_account_icon"
    android:label="@string/account_title"/>
accountType -> 自定义的一个串,一般为包名
icon -> 图标
smallIcon -> 小图标,可能用于显示在状态栏等空间较小的地方
label -> 显示的账户名
接下来实现一个实现一个AbstractAccountAuthenticator,重点是实现addAccount方法的行为,现在先忽略具体实现。
public class TestAuthenticator extends AbstractAccountAuthenticator {

    Context mContext;
    AccountManager mManager;

    public TestAuthenticator(Context context) {
        super(context);
        mContext = context;
        mManager = AccountManager.get(context);
    }

    @Override
    public Bundle editProperties(AccountAuthenticatorResponse accountAuthenticatorResponse, String s) {
        throw new UnsupportedOperationException();
    }

    @Override
    public Bundle addAccount(AccountAuthenticatorResponse accountAuthenticatorResponse, String s, String s1, String[] strings, Bundle bundle) throws NetworkErrorException {
        //这里可以返回包含Login界面Intent的Bunble,在点击添加这个账户后就能进入我们自定义的登录界面
        return null;
    }

    @Override
    public Bundle confirmCredentials(AccountAuthenticatorResponse accountAuthenticatorResponse, Account account, Bundle bundle) throws NetworkErrorException {
        return null;
    }

    @Override
    public Bundle getAuthToken(AccountAuthenticatorResponse accountAuthenticatorResponse, Account account, String s, Bundle bundle) throws NetworkErrorException {
        return null;
    }

    @Override
    public String getAuthTokenLabel(String s) {
        return null;
    }

    @Override
    public Bundle updateCredentials(AccountAuthenticatorResponse accountAuthenticatorResponse, Account account, String s, Bundle bundle) throws NetworkErrorException {
        return null;
    }

    @Override
    public Bundle hasFeatures(AccountAuthenticatorResponse accountAuthenticatorResponse, Account account, String[] strings) throws NetworkErrorException {
        return null;
    }
}
第二步:实现Service和声明权限
实现一个Service,AccountManagerService需要通过Service来获取Authenticator中的的Binder,通过Binder回调来获取到我们自定义的登录行为。
在onBind中,我们需要返回TestAuthenticator中的IBinder:
public class TestAuthenticateService extends Service {
    TestAuthenticator mAuthenticator;

    @Override
    public void onCreate() {
        super.onCreate();
        mAuthenticator = new TestAuthenticator(this.getApplicationContext());
    }

    @Override
    public IBinder onBind(Intent intent) {
        //限制了只有在AccountManagerService绑定service时才返回Authenticator的binder
        if (AccountManager.ACTION_AUTHENTICATOR_INTENT.equals(intent.getAction())) {
            return mAuthenticator.getIBinder();
        } else {
            return null;
        }
    }
}
第三步:添加声明和权限到Manifest
既然实现了Service,就需要在Manifest中添加声明,顺便也将账户相关的权限添加进来:
        <service android:name=".TestAuthenticateService"
            android:exported="true">
        <intent-filter>
            <action android:name="android.accounts.AccountAuthenticator"/>
        intent-filter>

        <meta-data android:name="android.accounts.AccountAuthenticator"
            android:resource="@xml/sample_authenticator" />
        service>
权限:
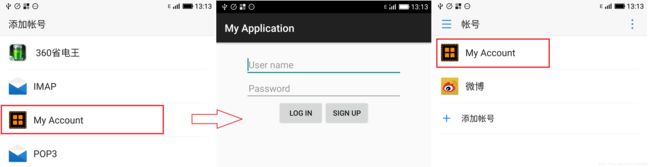
<uses-permission android:name="android.permission.AUTHENTICATE_ACCOUNTS" />现在进入账号设置界面,就能看到效果了:

但是现在还没有实现登录功能,并没有什么用。
第四步:实现登录界面
先实现一个普通的Activity,包含账号密码输入框和登录按钮。(这是普通的Activity,别忘了在Manifest中声明)
因为这里只是示例,所以点击登录按钮后,直接调用AccountManager的接口将账户添加进来。
//LoginActivity.java
mBtnLogin.setOnClickListener(new View.OnClickListener() {
            @Override
            public void onClick(View view) {
                //指定Account的type和name
                Account account = new Account("TestAccount", "com.android.test");
                //添加账户
                AccountManager.get(getApplicationContext()).addAccountExplicitly(account, "", null);
            }
        });
那么这个Activity启动条件是什么呢?
回顾第一步,在我们实现的AbstractAccountAuthenticator中有一个addAccount方法还没有具体实现,在addAccount中返回包含启动LoginActivity Intent的Bundle,就可以启动我们的登录界面了:
@Override
    public Bundle addAccount(AccountAuthenticatorResponse accountAuthenticatorResponse, String s, String s1, String[] strings, Bundle bundle) throws NetworkErrorException {
        Bundle b = new Bundle();
        Intent i = new Intent(mContext, LoginActivity.class);
        b.putParcelable(AccountManager.KEY_ACCOUNT_AUTHENTICATOR_RESPONSE, accountAuthenticatorResponse);//回调
        b.putParcelable(AccountManager.KEY_INTENT, i);
        return b;
    }
最终效果:
添加同步功能
有了登录功能,如何添加同步功能呢?
与上面的步骤类似,这次我们需要继承实现AbstractThreadedSyncAdapter,
第一步:实现AbstractThreadedSyncAdapter
在xml目录下新建文件并写入sync-adapter的描述:
sync-adapter.xml
<sync-adapter xmlns:android="http://schemas.android.com/apk/res/android"
    android:accountType="com.android.test"
    android:contentAuthority="com.android.contacts"
    />
accountType ->账户的type,需要与前面定义的一致
contentAuthority ->需要同步的数据,必须是有提供Provider供外部访问的模块,如联系人(com.android.contacts),浏览器(”com.android.browser”),日历(”com.android.calendar”)等,也可以是自己实现的provider。
还有以下属性,此处不一一深究。
     android:userVisible="true|false"
     android:supportsUploading="true|false"
     android:allowParallelSyncs="true|false"
     android:isAlwaysSyncable="true|false"
     android:syncAdapterSettingsAction="ACTION_OF_SETTINGS_ACTIVITY"
public class SyncAdapter extends AbstractThreadedSyncAdapter {
private static final String TAG = "SyncAdapter";
public SyncAdapter(Context context, boolean autoInitialize) {
super(context, autoInitialize);
}
@Override
public void onPerformSync(Account account, Bundle extras, String authority,
ContentProviderClient provider, SyncResult syncResult) {
//实现同步的具体处理
}
}第二步:实现Service
实现一个普通的Service,负责创建SyncAdapter,并在onBind时返回Ibinder给AccountManagerService。
public class TestSyncService extends Service {

        private static final Object sLock = new Object();
        private static SyncAdapter sSyncAdapter = null;

        @Override
        public void onCreate() {
            Log.d(TAG, "onCreate");
            synchronized (sLock) {
                if (null == sSyncAdapter) {
                    sSyncAdapter = new SyncAdapter(this, true);
                }
            }
        }

        @Override
        public IBinder onBind(Intent intent) {
            return sSyncAdapter.getSyncAdapterBinder();
        }

}
第三部:Manifest声明和权限
声明Service,固定格式:
        <service
            android:name=".TestSyncService"
            android:exported="true">
            <intent-filter>
                <action
                    android:name="android.content.SyncAdapter" />
            intent-filter>

            <meta-data
                android:name="android.content.SyncAdapter"
                android:resource="@xml/sync_adapter" />
        service>
添加读取同步数据的权限,本例为联系人:
    <uses-permission
            android:name="android.permission.READ_SYNC_SETTINGS" />
    <uses-permission
            android:name="android.permission.WRITE_SYNC_SETTINGS" />
效果如下:

至于如何实现同步的具体功能,此处不再铺开。
如何获取Account
判断是否已经添加了本APP的Account
    private boolean queryAccountStatus(){
        if(findAccount("TestAccount", "com.android.test") != null){
            return true;
        }
        return false;
    }


    private Account findAccount(String accountName, String accountType) {
        for (Account account : AccountManager.get(this).getAccounts()) {
            return account;
        }
        return null;
    }
查询有哪些SyncAdapter
        final AccountManager am = AccountManager.get(this);
        final SyncAdapterType[] syncs = ContentResolver.getSyncAdapterTypes();

        for (SyncAdapterType sync : syncs) {
            Log.d(LOG_TAG, "syncs account:" + sync.accountType);

        }
AccountManager部分源码分析
Account信息存在哪?
Account和SyncAdapter信息都是以xml的形式,分别存放到/data/system/users/[user_id]/registered_services 目录下面:
x0:/data/system/users/0/registered_services # ls
android.accounts.AccountAuthenticator.xml
android.content.SyncAdapter.xml android.accounts.AccountAuthenticator.xml文件用于存储可登录的账户:
x0:/data/system/users/0/registered_services # cat android.accounts.AccountAuthenticator.xml


<services>
    <service uid="10063" type="com.android.exchange" />
    <service uid="10140" type="com.sina.weibo.account" />
    <service uid="10063" type="com.android.email" />
    <service uid="10162" type="com.qihoo.pctrl.keepalive.account" />
    <service uid="10152" type="ludashi.daemon" />
    <service uid="10159" type="com.icoolme.weather.authaccount" />
    <service uid="10063" type="com.android.email.pop3" />
services>而android.content.SyncAdapter.xml保存的是有声明Sync Adatper的服务:
le_x10:/data/system/users/0/registered_services # cat android.content.SyncAdapter.xml


<services>
    <service uid="10063" authority="com.android.calendar" accountType="com.android.exchange" />
    <service uid="10063" authority="com.android.contacts" accountType="com.android.exchange" />
    <service uid="10162" authority="com.qihoo.pctrl.keepalive.account.SyncProvider" accountType="com.qihoo.pctrl.keepalive.account" />
   ...
services>这些数据由实现了抽象类RegisteredServicesCache的AccountAuthenticatorCache和SyncAdaptersCache来管理:
public abstract class RegisteredServicesCache<V>

public class SyncAdaptersCache extends RegisteredServicesCache<SyncAdapterType>

class AccountAuthenticatorCache extends RegisteredServicesCache<AuthenticatorDescription> implements IAccountAuthenticatorCache来看下RegisteredServicesCache中实现读写和解析xml的接口。
外部通过接口获取SyncAdapters 或AccountAuthenticator服务时,RegisteredServicesCache内部都会调用findOrCreateUserLocked接口获取xml中的Service记录。
//RegisteredServicesCache.java
public abstract class RegisteredServicesCache {
    //指定目录名
    protected static final String REGISTERED_SERVICES_DIR = "registered_services";
    private final XmlSerializerAndParser mSerializerAndParser;
    ...
    //获取所有Service的接口
    private UserServices findOrCreateUserLocked(int userId, boolean loadFromFileIfNew) {
        //从Cache中获取
        UserServices services = mUserServices.get(userId);
        if (services == null) { //如没有Cache,则从xml文件中获取
            services = new UserServices();
            mUserServices.put(userId, services);
            if (loadFromFileIfNew && mSerializerAndParser != null) {
                UserInfo user = getUser(userId);
                if (user != null) {
                    //1. 获取xml文件
                    AtomicFile file = createFileForUser(user.id);
                    if (file.getBaseFile().exists()) {
                        InputStream is = null;
                        try {
                            is = file.openRead();
                            //2. 读取并解析xml文件,将结果写入UserServices Map中
                            readPersistentServicesLocked(is);
                        } catch (Exception e) {
                        } finally {
                            IoUtils.closeQuietly(is);
                        }
                    }
                }
            }
        }
        return services;
    }
}
来展开代码注释中的第一点。
createFileForUser方法里做了文件路径组装并返回对应的File,可以注意到文件名mInterfaceName是变量,这个变量对应的就是xml的文件名,它由RegisteredServicesCache的子类AccountAuthenticatorCache和SyncAdaptersCache来决定,xml的名字也就是上面adb shell演示中的2个文件。
    //RegisteredServicesCache.java
    private AtomicFile createFileForUser(int userId) {
        File userDir = getUserSystemDirectory(userId);
        //mInterfaceName 是变量
        File userFile = new File(userDir, REGISTERED_SERVICES_DIR + "/" + mInterfaceName + ".xml");
        return new AtomicFile(userFile);
    }

    protected File getUserSystemDirectory(int userId) {
        return Environment.getUserSystemDirectory(userId);
}SyncAdaptersCache对应的xml文件名为android.content.SyncAdapter
//SyncAdaptersCache.java
    private static final String SERVICE_INTERFACE = "android.content.SyncAdapter";
    private static final String SERVICE_META_DATA = "android.content.SyncAdapter";
    private static final String ATTRIBUTES_NAME = "sync-adapter";

    public SyncAdaptersCache(Context context) {
        super(context, SERVICE_INTERFACE, SERVICE_META_DATA, ATTRIBUTES_NAME, sSerializer);
}而AccountAuthenticatorCache则为android.accounts.AccountAuthenticator。
    //AccountAuthenticatorCache.java
    public static final String ACTION_AUTHENTICATOR_INTENT =
            "android.accounts.AccountAuthenticator";
    public static final String AUTHENTICATOR_META_DATA_NAME =
            "android.accounts.AccountAuthenticator";
    public static final String AUTHENTICATOR_ATTRIBUTES_NAME = "account-authenticator";

    public AccountAuthenticatorCache(Context context) {
        super(context, AccountManager.ACTION_AUTHENTICATOR_INTENT,
                AccountManager.AUTHENTICATOR_META_DATA_NAME,
                AccountManager.AUTHENTICATOR_ATTRIBUTES_NAME, sSerializer);
    }
xml文件拿到之后,接下来就是xml的解析过程,因为xml本身标签并不多,就不贴代码了,主要就是将uid和service name拿出来,组成UserServices对象的Map返回给调用者。
Account的其他“妙用”——提高进程存活率
利用Android进程回收策略对Account同步进程的“照顾”,可以通过添加Account使用同步机制来提高进程的存活率。(可能在AndroidN之后不再有用)
提高进程存活率,详情可以参考这篇文章:
《一种提高Android应用进程存活率新方法》
一直纳闷这两兄弟躲在系统账号里的目的,现在猜到个大概了。。。