DPDK: Getting Started Guide for Linux(Linux入门指南) 中英对照
1. Introduction(介绍)
This document contains instructions for installing and configuring the Data Plane Development Kit (DPDK) software. It is designed to get customers up and running quickly. The document describes how to compile and run a DPDK application in a Linux application (linuxapp) environment, without going deeply into detail.
本文档包含安装和配置Data Plane Development Kit (DPDK)软件的说明。它的设计目的是让客户能够快速启动和运行。该文档描述了如何在Linux应用程序(linuxapp)环境中编译和运行DPDK应用程序,但没有深入讨论细节。
2. System Requirements(系统要求)
This chapter describes the packages required to compile the DPDK.
本章描述编译DPDK所需的包。
备注:If the DPDK is being used on an Intel® Communications Chipset 89xx Series platform, please consult the Intel® Communications Chipset 89xx Series Software for Linux Getting Started Guide.
如果使用DPDK Intel®通信芯片89 xx系列平台,请查阅英特尔®通信芯片为Linux入门指南89 xx系列软件
2.1. BIOS Setting Prerequisite on x86 (BIOS在x86上设置先决条件)
For the majority of platforms, no special BIOS settings are needed to use basic DPDK functionality. However, for additional HPET timer and power management functionality, and high performance of small packets, BIOS setting changes may be needed. Consult the section on Enabling Additional Functionality for more information on the required changes.
对于大多数平台,使用基本的DPDK功能不需要特殊的BIOS设置。但是,对于额外的功能比如HPET计时器和电源管理功能,以及小数据包的高性能,可能需要更改BIOS设置。有关所需更改的更多信息,请参阅启用附加功能一节。
备注:If UEFI secure boot is enabled, the Linux kernel may disallow the use of UIO on the system. Therefore, devices for use by DPDK should be bound to the vfio-pci kernel module rather than igb_uio or uio_pci_generic. For more details see Binding and Unbinding Network Ports to/from the Kernel Modules.
如果启用UEFI安全引导,Linux内核可能不允许在系统上使用UIO。因此,DPDK使用的设备应该绑定到vfio-pci内核模块,而不是igb_uio或uio_pci_generic。有关详细信息,请参见从**内核模块到内核模块的绑定和解除绑定网络端口。
2.2. Compilation of the DPDK(DPDK的编译)
Required Tools and Libraries:(需要的工具和库)
备注:The setup commands and installed packages needed on various systems
may be different. For details on Linux distributions and the versions
tested, please consult the DPDK Release Notes.
不同系统上所需的安装命令和安装包可能不同。有关Linux发行版和测试版本的详细信息,请参考DPDK发行说明。
- GNU make.
- coreutils: cmp, sed, grep, arch, etc.
- gcc: versions 4.9 or later is recommended for all platforms. On some distributions, some specific compiler flags and linker flags are enabled by default and affect performance (-fstack-protector, for example). Please refer to the documentation of your distribution and to gcc -dumpspecs.所有平台都建议使用4.9或更高版本。在某些发行版中,某些特定的编译器标志和链接器标志在默认情况下是启用的,并且会影响性能(例如:–fstack-protector)。请参阅您的发行版文档和gcc -dumpspecs。
- libc headers, often packaged as gcc-multilib (glibc-devel.i686 / libc6-dev-i386; glibc-devel.x86_64 / libc6-dev for 64-bit compilation on Intel architecture; glibc-devel.ppc64 for 64 bit IBM Power architecture;)
libc头文件,通常打包为gcc-multilib (glibc-devel.i686 / libc6-dev-i386;glibc-devel。用于Intel架构上64位编译的x86_64 / libc6-dev;glibc-devel。用于64位IBM Power体系结构的ppc64;) - Linux kernel headers or sources required to build kernel modules. (kernel - devel.x86_64; kernel - devel.ppc64) 构建内核模块所需的Linux内核头文件或源文件。(内核——devel.x86_64;内核- devel.ppc64)
- Additional packages required for 32-bit compilation on 64-bit systems are(在64位系统上进行32位编译所需的额外包包括:):
glibc.i686, libgcc.i686, libstdc++.i686 and glibc-devel.i686 for Intel i686/x86_64;
glibc.ppc64, libgcc.ppc64, libstdc++.ppc64 and glibc-devel.ppc64 for IBM ppc_64
备注:x86_x32 ABI is currently supported with distribution packages only on Ubuntu higher than 13.10 or recent Debian distribution. The only supported compiler is gcc 4.9+. x86_x32
ABI目前只支持Ubuntu上高于13.10或最近的Debian发行版的发行包。唯一支持的编译器是gcc 4.9+。
- Library for handling NUMA (Non Uniform Memory Access).用于处理NUMA(非统一内存访问)的库。
numactl-devel in Red Hat/Fedora;
libnuma-dev in Debian/Ubuntu; - On systems with NUMA support, libnuma-dev (aka numactl-devel) is a recommended dependency when –legacy-mem switch is used, and a required dependency if default memory mode is used. While DPDK will compile and run without libnuma even on NUMA-enabled systems, both usability and performance will be degraded.
在支持NUMA的系统上,当使用-legacy-mem开关时,建议使用libnuma-dev(又名numactl-devel),如果使用默认内存模式,则需要依赖项。即使在支持numa的系统上DPDK在没有libnuma的情况下也可以编译和运行,但这将降低可用性和性能。 - Python, version 2.7+ or 3.2+, to use various helper scripts included in the DPDK package.
Python,版本2.7+或3.2+,使用DPDK包中包含的各种帮助脚本。
Optional Tools:
- Intel® C++ Compiler (icc). For installation, additional libraries may be required. See the icc Installation Guide found in the Documentation directory under the compiler installation.
英特尔®c++编译器(icc)。对于安装,可能需要额外的库。请参阅编译器安装下的文档目录中的icc安装指南。 - IBM® Advance ToolChain for Powerlinux. This is a set of open source development tools and runtime libraries which allows users to take leading edge advantage of IBM’s latest POWER hardware features on Linux. To install it, see the IBM official installation document.
IBM®Powerlinux推进工具链。这是一组开放源码开发工具和运行时库,允许用户利用Linux上IBM最新的POWER硬件特性的领先优势。要安装它,请参阅IBM官方安装文档。 - libpcap headers and libraries (libpcap-devel) to compile and use the libpcap-based poll-mode driver. This driver is disabled by default and can be enabled by setting CONFIG_RTE_LIBRTE_PMD_PCAP=y in the build time config file.
libpcap头文件和库(libpcap-devel)来编译和使用基于libpcap的poll模式驱动程序。默认情况下禁用此驱动程序,可以通过在构建时配置文件中设置CONFIG_RTE_LIBRTE_PMD_PCAP=y来启用该驱动程序。
-libarchive headers and library are needed for some unit tests using tar to get their resources.
一些使用tar获取资源的单元测试需要libarchive头文件和库。
2.3. Running DPDK Applications(运行DPDK应用程序)
To run an DPDK application, some customization may be required on the target machine.
要运行DPDK应用程序,可能需要在目标计算机上进行一些定制。
2.3.1. System Software(系统软件)
Required:
-
Kernel version >= 3.16
The kernel version required is based on the oldest long term stable kernel available at kernel.org when the DPDK version is in development. Compatibility for recent distribution kernels will be kept, notably RHEL/CentOS 7.
所需的内核版本是在开发DPDK版本时基于kernel.org上可用的最旧的长期稳定内核。但是会保持对最近发行的内核的兼容性,特别是RHEL/CentOS 7。
The kernel version in use can be checked using the command:uname -r -
glibc >= 2.7 (for features related to cpuset)
The version can be checked using the ldd --version command. -
Kernel configuration
In the Fedora OS and other common distributions, such as Ubuntu, or Red Hat Enterprise Linux, the vendor supplied kernel configurations can be used to run most DPDK applications.
在Fedora OS和其他常见发行版(如Ubuntu或Red Hat Enterprise Linux)中,供应商提供的内核配置可用于运行大多数DPDK应用程序。
For other kernel builds, options which should be enabled for DPDK include: -
HUGETLBFS -
PROC_PAGE_MONITOR support -
HPET and HPET_MMAP configurationoptions should also be enabled if HPET support is required. See the section on **High Precision Event Timer (HPET) Functionality** for more details.
2.3.2. Use of Hugepages in the Linux Environment(在Linux环境中使用大页面)
Hugepage support is required for the large memory pool allocation used for packet buffers (the HUGETLBFS option must be enabled in the running kernel as indicated the previous section). By using hugepage allocations, performance is increased since fewer pages are needed, and therefore less Translation Lookaside Buffers (TLBs, high speed translation caches), which reduce the time it takes to translate a virtual page address to a physical page address. Without hugepages, high TLB miss rates would occur with the standard 4k page size, slowing performance.
对于用于包缓冲区的大内存池分配,需要使用Hugepage支持(如前一节所示,必须在运行的内核中启用HUGETLBFS选项)。通过使用大页面分配,性能得到了提高,因为需要的页面更少,因此需要更少的地址变换高速缓存(TLBs,地址变换高速缓存),这减少了将虚拟页面地址转换为物理页面地址所需的时间。如果没有大页面,在标准4k页面大小下,TLB的失败率会很高,从而降低性能。
2.3.2.1. Reserving Hugepages for DPDK Use (为了使用DPDK保留大页面)
The allocation of hugepages should be done at boot time or as soon as possible after system boot to prevent memory from being fragmented in physical memory. To reserve hugepages at boot time, a parameter is passed to the Linux kernel on the kernel command line.
大页面的分配应该在引导时完成,或者在系统引导之后尽快完成,以防止内存在物理内存中被分割。为了在引导时保留大页面,在内核命令行中将一个参数传递给Linux内核。
For 2 MB pages, just pass the hugepages option to the kernel. For example, to reserve 1024 pages of 2 MB, use:hugepages=1024
For other hugepage sizes, for example 1G pages, the size must be specified explicitly and can also be optionally set as the default hugepage size for the system. For example, to reserve 4G of hugepage memory in the form of four 1G pages, the following options should be passed to the kernel:
对于其他大页面大小(例如1G页面),必须显式指定大小,还可以选择将其设置为系统的默认大页面大小。例如,要以4个1G页面的形式保留4G的大分页内存,需要向内核传递以下选项:
default_hugepagesz=1G hugepagesz=1G hugepages=4
备注:The hugepage sizes that a CPU supports can be determined from the CPU flags on Intel architecture. If pse exists, 2M hugepages are supported; if pdpe1gb exists, 1G hugepages are supported. On IBM Powerarchitecture, the supported hugepage sizes are 16MB and 16GB.
CPU支持的大页面大小可以通过Intel架构上的CPU标志确定。如果存在pse,则支持2M大页面;如果存在pdpe1gb,则支持1G大页面。在IBMPower体系结构中,支持的大页面大小为16MB和16GB。
译者注: cat /proc/cpuinfo | grep pse 应该可以确定CPU是支持多大的大页面
注:For 64-bit applications, it is recommended to use 1 GB hugepages if the platform supports them.
对于64位应用程序,如果平台支持,建议使用1gb的hugepages。
In the case of a dual-socket NUMA system, the number of hugepages reserved at boot time is generally divided equally between the two sockets (on the assumption that sufficient memory is present on both sockets).
在双套接字NUMA系统的情况下,在引导时保留的大分页数通常在两个套接字之间平均分配(假设两个套接字上都有足够的内存)。
See the Documentation/kernel-parameters.txt file in your Linux source tree for further details of these and other kernel options.
有关这些和其他内核选项的详细信息,请参阅Linux源代码树中的文档/kernel-parameters.txt文件。
Alternative:(可选)
For 2 MB pages, there is also the option of allocating hugepages after the system has booted. This is done by echoing the number of hugepages required to a nr_hugepages file in the /sys/devices/ directory. For a single-node system, the command to use is as follows (assuming that 1024 pages are required):
对于2mb的页面,还可以在系统启动后分配大页面。这是通过回显/sys/devices/目录中的nr_hugepages文件所需的hugepages数量来实现的。对于单节点系统,使用的命令如下(假设需要1024页):
echo 1024 > /sys/kernel/mm/hugepages/hugepages-2048kB/nr_hugepages
On a NUMA machine, pages should be allocated explicitly on separate nodes:
在NUMA机器上,页面应该显式地分配在不同的节点上:
echo 1024 > /sys/devices/system/node/node0/hugepages/hugepages-2048kB/nr_hugepages
echo 1024 > /sys/devices/system/node/node1/hugepages/hugepages-2048kB/nr_hugepages
2.3.2.2. Using Hugepages with the DPDK 使用大页面
Once the hugepage memory is reserved, to make the memory available for DPDK use, perform the following steps:
保留了大分页内存后,要使DPDK可以使用该内存,请执行以下步骤:
mkdir /mnt/huge
mount -t hugetlbfs nodev /mnt/huge
The mount point can be made permanent across reboots, by adding the following line to the /etc/fstab file:
通过在/etc/fstab文件中添加以下行,可以使重新引导时的挂载点成为永久性的:
nodev /mnt/huge hugetlbfs defaults 0 0
For 1GB pages, the page size must be specified as a mount option:
nodev /mnt/huge_1GB hugetlbfs pagesize=1GB 0 0
3. Compiling the DPDK Target from Source(源码编译DPDK)
注:Parts of this process can also be done using the setup script described in the Quick Start Setup Script section of this document.
这个过程的一部分也可以使用本文快速启动安装脚本部分中描述的安装脚本来完成。
3.1. Install the DPDK and Browse Sources
First, uncompress the archive and move to the uncompressed DPDK source directory:
tar xJf dpdk-version.tar.xz
cd dpdk-version
The DPDK is composed of several directories:
lib: Source code of DPDK libraries
drivers: Source code of DPDKpoll-mode drivers
app: Source code of DPDK applications (automatic
tests)
examples: Source code of DPDK application examples config,
buildtools, mk: Framework-related makefiles, scripts and configuration
3.2. Installation of DPDK Target Environments
The format of a DPDK target is:
ARCH-MACHINE-EXECENV-TOOLCHAIN
where:
ARCH can be: i686, x86_64, ppc_64, arm64
MACHINE can be: native, power8, armv8a
EXECENV can be: linuxapp, bsdapp
TOOLCHAIN can be: gcc, icc
The targets to be installed depend on the 32-bit and/or 64-bit packages and compilers installed on the host. Available targets can be found in the DPDK/config directory. The defconfig_ prefix should not be used.
要安装的目标级取决于主机上安装的32位和/或64位包和编译器。可用的目标可以在DPDK/config目录中找到。不应该使用defconfig_前缀。
注:Configuration files are provided with the RTE_MACHINE optimization level set. Within the configuration files, the RTE_MACHINE configuration value is set to native, which means that the compiled software is tuned for the platform on which it is built. For more information on this setting, and its possible values, see the DPDK Programmers Guide.
配置文件由RTE_MACHINE优化层级的集合提供。在配置文件中,RTE_MACHINE配置值设置为native,这意味着构建软件的平台将针对软件在编译阶段进行优化。有关此设置及其可能值的更多信息,请参阅DPDK程序员指南。
When using the Intel® C++ Compiler (icc), one of the following commands should be invoked for 64-bit or 32-bit use respectively. Notice that the shell scripts update the KaTeX parse error: Can't use function '\textcircled' in math mode at position 14: \html@mathml{\̲t̲e̲x̲t̲c̲i̲r̲c̲l̲e̲d̲{\scriptsize R}…PATH变量,因此不应该在同一个会话中执行。此外,验证编译器的安装目录,因为路径可能不同:
source /opt/intel/bin/iccvars.sh intel64
source /opt/intel/bin/iccvars.sh ia32
To install and make targets, use the make install T= command in the top-level DPDK directory.
For example, to compile a 64-bit target using icc, run:
make install T=x86_64-native-linuxapp-icc
To compile a 32-bit build using gcc, the make command should be:
make install T=i686-native-linuxapp-gcc
To prepare a target without building it, for example, if the configuration changes need to be made before compilation, use the make config T= command:
例如,如果在编译之前需要进行配置更改,则在不构建目标的情况下准备目标,使用make config T=命令:
make config T=x86_64-native-linuxapp-gcc
注意:Any kernel modules to be used, e.g. igb_uio, kni, must be compiled with the same kernel as the one running on the target. If the DPDK is not being built on the target machine, the RTE_KERNELDIR environment variable should be used to point the compilation at a copy of the kernel version to be used on the target machine.
任何要使用的内核模块,例如igb_uio、kni,都必须使用与目标机上运行的内核保持一致,如果DPDK不是在目标机器上构建的,那么应该使用RTE_KERNELDIR环境变量将编译指向目标机器上使用的内核版本的副本。
Once the target environment is created, the user may move to the target environment directory and continue to make code changes and re-compile. The user may also make modifications to the compile-time DPDK configuration by editing the .config file in the build directory. (This is a build-local copy of the defconfig file from the top- level config directory).
一旦创建了目标环境,用户就可以移动到目标环境目录,并继续进行代码更改和重新编译。用户还可以通过在构建目录中编辑.config文件来修改编译时DPDK配置。(这是来自顶层配置目录的defconfig文件的构建本地副本)。
3.3. Browsing the Installed DPDK Environment Target(浏览DPDK目标安装环境)
Once a target is created it contains all libraries, including poll-mode drivers, and header files for the DPDK environment that are required to build customer applications. In addition, the test and testpmd applications are built under the build/app directory, which may be used for testing. A kmod directory is also present that contains kernel modules which may be loaded if needed.
创建目标环境后,它包含构建客户应用程序所需的所有库,包括轮询模式驱动程序(PMD)和DPDK环境的头文件。此外,测试和testpmd应用程序是在build/app目录下构建的,该目录可用于测试。还提供了一个kmod目录,其中包含可能在需要时加载的内核模块。
4.Cross compile DPDK for ARM64(此章没有翻译,略过)
5. Linux Drivers
Different PMDs may require different kernel drivers in order to work properly. Depends on the PMD being used, a corresponding kernel driver should be load and bind to the network ports.
为了正常工作,不同的pmd可能需要不同的内核驱动程序。根据所使用的PMD,应该加载相应的内核驱动程序并将其绑定到网络端口。
5.1. UIO
A small kernel module to set up the device, map device memory to user-space and register interrupts. In many cases, the standard uio_pci_generic module included in the Linux kernel can provide the uio capability. This module can be loaded using the command:
一个用于设置设备、将设备内存映射到用户空间和注册中断的小内核模块。在许多情况下,Linux内核中包含的标准uio_pci_generic模块可以提供uio功能。此模块可使用以下命令加载:
注:uio_pci_generic module doesn’t support the creation of virtual functions.uio_pci_generic模块不支持创建虚函数。
sudo modprobe uio_pci_generic
As an alternative to the uio_pci_generic, the DPDK also includes the igb_uio module which can be found in the kmod subdirectory referred to above. It can be loaded as shown below:
作为uio_pci_generic的替代,DPDK还包括igb_uio模块,可以在上面提到的kmod子目录中找到该模块。可以加载如下图所示:
sudo modprobe uio
sudo insmod kmod/igb_uio.ko
备注:For some devices which lack support for legacy interrupts, e.g. virtual function (VF) devices, the igb_uio module may be needed in place of uio_pci_generic.
对于一些不支持传统中断的设备,例如虚拟函数(VF)设备,可能需要igb_uio模块来代替uio_pci_generic。
备注:If UEFI secure boot is enabled, the Linux kernel may disallow the use of UIO on the system. Therefore, devices for use by DPDK should be bound to the vfio-pci kernel module rather than igb_uio or uio_pci_generic. For more details see Binding and Unbinding Network Ports to/from the Kernel Modules below.
如果启用UEFI安全引导,Linux内核可能不允许在系统上使用UIO。因此,DPDK使用的设备应该绑定到vfi-pci内核模块,而不是igb_uio或uio_pci_generic。有关更多细节,请参见下面与内核模块之间的绑定和解除绑定网络端口(Binding and Unbinding Network Ports to/from the Kernel Modules)。
注:If the devices used for DPDK are bound to the uio_pci_generic kernel module, please make sure that the IOMMU is disabled or passthrough. One can add intel_iommu=off or amd_iommu=off or intel_iommu=on iommu=pt in GRUB command line on x86_64 systems, or add iommu.passthrough=1 on arm64 system.
如果用于DPDK的设备绑定到uio_pci_generic内核模块,请确保禁用或传递IOMMU。可以在x86_64系统的GRUB命令行中添加intel_iommu=off或amd_iommu=off或在arm64 系统上intel_iommu=on iommu=pt in GRUB command line on x86_64 systems, or add iommu.passthrough=1
Since DPDK release 1.7 onward provides VFIO support, use of UIO is optional for platforms that support using VFIO.
由于DPDK 1.7版本提供了VFIO支持,对于支持VFIO的平台,UIO是可选的。
5.2. VFIO
A more robust and secure driver in compare to the UIO, relying on IOMMU protection. To make use of VFIO, the vfio-pci module must be loaded:
一个比UIO更健壮和安全的驱动程序,依靠IOMMU保护。要使用VFIO,必须加载VFIO -pci模块:
sudo modprobe vfio-pci
Note that in order to use VFIO, your kernel must support it. VFIO kernel modules have been included in the Linux kernel since version 3.6.0 and are usually present by default, however please consult your distributions documentation to make sure that is the case.
注意,要使用VFIO,内核必须支持它。VFIO内核模块从3.6.0版开始就包含在Linux内核中,并且通常是默认的,但是请参考发行版文档以确保情况确实如此。使用VFIO,内核和BIOS支持,必须配置为使用IO虚拟化(如英特尔®VT-d)。
注:vfio-pci module doesn’t support the creation of virtual functions.
vfio-pci模块不支持创建虚拟函数。
For proper operation of VFIO when running DPDK applications as a non-privileged user, correct permissions should also be set up. This can be done by using the DPDK setup script (called dpdk-setup.sh and located in the usertools directory).
在以非特权用户身份运行DPDK应用程序时,要正确地操作VFIO,还应该设置正确的权限。这可以通过使用DPDK设置脚本(称为DPDK -setup.sh,位于usertools目录中)来完成。
备注:VFIO can be used without IOMMU. While this is just as unsafe as using UIO, it does make it possible for the user to keep the degree of device access and programming that VFIO has, in situations where IOMMU is not available.
VFIO可以在没有IOMMU的情况下使用。虽然这和使用UIO一样不安全,但它确实使用户能够在IOMMU不可用时保持VFIO所具有的设备访问和编程的程度。
译者注:
VFIO是一套用户态驱动框架,它提供两种基本服务:
向用户态提供访问硬件设备的接口
向用户态提供配置IOMMU的接口
5.3. Bifurcated Driver(双向驱动)
PMDs which use the bifurcated driver co-exists with the device kernel driver. On such model the NIC is controlled by the kernel, while the data path is performed by the PMD directly on top of the device.
使用双驱动程序的PMDs与设备内核驱动程序共存。在这种模型中,NIC由内核控制,而数据路径由直接在设备上的PMD执行。
Such model has the following benefits(该模型有如下好处):
-
It is secure and robust, as the memory management and isolation is done by the kernel.
它是安全且健壮的,因为内存管理和隔离是由内核完成的。 -
It enables the user to use legacy linux tools such as ethtool or ifconfig while running DPDK application on the same network ports.
它允许用户在相同的网络端口上运行DPDK应用程序时使用遗留的linux工具,如ethtool或ifconfig。 -
It enables the DPDK application to filter only part of the traffic, while the rest will be directed and handled by the kernel driver. The flow bifurcation is performed by the NIC hardware. As an example, using Flow isolated mode allows to choose strictly what is received in DPDK.
它允许DPDK应用程序只过滤部分流量,而其他流量将由内核驱动程序进行定向和处理。流的分流由NIC硬件实现。例如,使用流隔离模式可以严格选择在DPDK中接收的内容。
More about the bifurcated driver can be found in Mellanox Bifurcated DPDK PMD.
关于双向驱动程序的更多信息可以在Mellanox Bifurcated DPDK PMD。
5.4. Binding and Unbinding Network Ports to/from the Kernel Modules(将网络端口与内核模块绑定和解除绑定)
备注:PMDs Which use the bifurcated driver should not be unbind from their kernel drivers. this section is for PMDs which use the UIO or VFIO drivers.
使用双向驱动程序的pmd不应该与其内核驱动程序解除绑定。本节针对使用UIO或VFIO驱动程序的PMDs。
As of release 1.4, DPDK applications no longer automatically unbind all supported network ports from the kernel driver in use. Instead, in case the PMD being used use the UIO or VFIO drivers, all ports that are to be used by an DPDK application must be bound to the uio_pci_generic, igb_uio or vfio-pci module before the application is run. For such PMDs, any network ports under Linux* control will be ignored and cannot be used by the application.
从1.4版开始,DPDK应用程序不再从正在使用的内核驱动程序中自动解除对所有支持的网络端口的绑定。相反,如果使用的是UIO或VFIO驱动程序的PMD,那么在运行应用程序之前,DPDK应用程序使用的所有端口必须绑定到uio_pci_generic、igb_uio或VFIO -pci模块。对于这样的pmd, Linux或是类Linux控制下的任何网络端口都将被忽略,其他应用程序不能使用它们。
To bind ports to the uio_pci_generic, igb_uio or vfio-pci module for DPDK use, and then subsequently return ports to Linux control, a utility script called dpdk-devbind.py is provided in the usertools subdirectory. This utility can be used to provide a view of the current state of the network ports on the system, and to bind and unbind those ports from the different kernel modules, including the uio and vfio modules. The following are some examples of how the script can be used. A full description of the script and its parameters can be obtained by calling the script with the --help or --usage options. Note that the uio or vfio kernel modules to be used, should be loaded into the kernel before running the dpdk-devbind.py script.
要将端口绑定到uio_pci_generic、igb_uio或vfi -pci模块以供DPDK使用,然后将端口返回到Linux或是类Linux去控制,在usertools子目录中提供了一个名为DPDK -devbin .py的实用程序脚本。此实用程序可用于提供系统上网络端口的当前状态的视图,并从不同的内核模块(包括uio和vfio模块)绑定和解除这些端口的绑定。下面是如何使用该脚本的一些示例。通过使用—help或—usage选项调用脚本,可以获得脚本及其参数的完整描述。注意,在运行dpdk-dev .py脚本之前,应该将所使用的uio或vfio内核模块加载到内核中。
注意:Due to the way VFIO works, there are certain limitations to which devices can be used with VFIO. Mainly it comes down to how IOMMU groups work. Any Virtual Function device can be used with VFIO on its own, but physical devices will require either all ports bound to VFIO, or some of them bound to VFIO while others not being bound to anything at all.
由于VFIO的工作方式,对于与VFIO一起使用的设备有一定的限制。这主要归结于IOMMU组是如何工作的。任何虚拟功能设备都可以单独与VFIO一起使用,但是物理设备将需要绑定到VFIO的所有端口,或者其中一些端口绑定到VFIO,而另一些则完全不绑定到任何端口。
If your device is behind a PCI-to-PCI bridge, the bridge will then be part of the IOMMU group in which your device is in. Therefore, the bridge driver should also be unbound from the bridge PCI device for VFIO to work with devices behind the bridge.
如果您的设备位于PCI-to-PCI桥接器的后面,那么桥接器将成为您的设备所在的IOMMU组的一部分。因此,网桥驱动程序也应该与网桥PCI设备解除绑定,以便VFIO与网桥后面的设备一起工作。
While any user can run the dpdk-devbind.py script to view the status of the network ports, binding or unbinding network ports requires root privileges.
虽然任何用户都可以运行dpdp -devbin.py脚本来查看网络端口的状态,但是绑定或取消绑定网络端口都需要根权限。
To see the status of all network ports on the system:
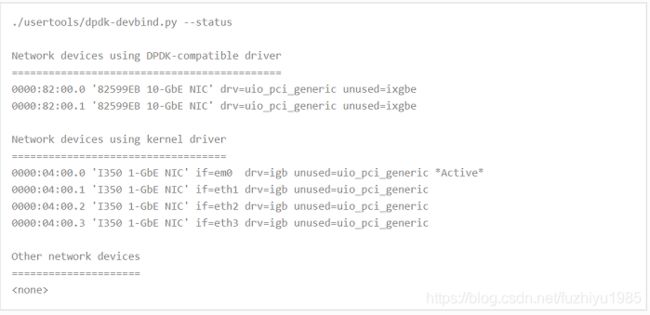
To bind device eth1,04:00.1, to the uio_pci_generic driver:
./usertools/dpdk-devbind.py --bind=uio_pci_generic 04:00.1
or, alternatively,
./usertools/dpdk-devbind.py --bind=uio_pci_generic eth1
To restore device 82:00.0 to its original kernel binding:
./usertools/dpdk-devbind.py --bind=ixgbe 82:00.0
6. Compiling and Running Sample Applications(编译和运行示例应用程序)
The chapter describes how to compile and run applications in an DPDK environment. It also provides a pointer to where sample applications are stored.
本章描述如何在DPDK环境中编译和运行应用程序。它还提供了一个指向示例应用程序存储位置的指针。
注:Parts of this process can also be done using the setup script described the Quick Start Setup Script section of this document.
这个过程的一部分也可以使用安装脚本来解决,该脚本在本文档的快速启动安装脚本部分有描述。
6.1. Compiling a Sample Application
Once an DPDK target environment directory has been created (such as x86_64-native-linuxapp-gcc), it contains all libraries and header files required to build an application.
一旦创建了DPDK目标环境目录(例如x86_64 native-linuxapp-gcc),它就包含构建应用程序所需的所有库和头文件。
When compiling an application in the Linux* environment on the DPDK, the following variables must be exported:
在DPDK上的Linux*环境中编译应用程序时,必须导出以下变量:
-
RTE_SDK - Points to the DPDK installation directory.
RTE_SDK -指向DPDK安装目录。 -
RTE_TARGET - Points to the DPDK target environment directory.
RTE_TARGET -指向DPDK目标环境目录。
The following is an example of creating the helloworld application, which runs in the DPDK Linux environment. This example may be found in the “{RTE_SDK}/examples directory”.
下面是一个创建helloworld应用程序的示例,该应用程序在DPDK Linux环境中运行。这个例子可以在${RTE_SDK}/examples目录中找到。
The directory contains the main.c file. This file, when combined with the libraries in the DPDK target environment, calls the various functions to initialize the DPDK environment, then launches an entry point (dispatch application) for each core to be utilized. By default, the binary is generated in the build directory.
该目录包含main.c文件。当这个文件与DPDK目标环境中的库结合时,调用各种函数来初始化DPDK环境,然后为要使用的每个核心启动一个入口点(分派应用程序)。默认情况下,二进制文件是在build directory.directory中生成的。

备注:
In the above example, helloworld was in the directory structure of the DPDK. However, it could have been located outside the directory structure to keep the DPDK structure intact. In the following case, the helloworld application is copied to a new directory as a new starting point.
在上面的示例中,helloworld位于DPDK的目录结构中。但是,它可能位于目录结构之外,以保持DPDK结构的完整性。在下面的示例中,helloworld应用程序被复制到一个新目录作为新的起点。

6.2. Running a Sample Application
注意
Before running the application make sure:
- Hugepages setup is done.大页面设置安装配置完毕
- Any kernel driver being used is loaded.任何要被使用的内核驱动已经加载完毕
- In case needed, ports being used by the application should be bound to the corresponding kernel driver.
如果需要,应用程序使用的端口应该绑定到相应的内核驱动程序。
有关更多细节,请参考第五章Linux驱动程序。
The application is linked with the DPDK target environment’s Environmental Abstraction Layer (EAL) library, which provides some options that are generic to every DPDK application.
应用程序与DPDK目标环境的环境抽象层(EAL)库相链接,后者提供了对每个DPDK应用程序通用的一些选项。
The following is the list of options that can be given to the EAL:
以下是EAL可提供的选择:

The EAL options are as follows:
-
-c COREMASK or -l CORELIST: An hexadecimal bit mask of the cores to run on. Note that core numbering can change between platforms and should be determined beforehand. The corelist is a set of core numbers instead of a bitmap core mask.
要运行的内核的十六进制位掩码。请注意,不同平台之间的核心编号可能会发生变化,应该事先确定。corelist是一组核心数字,而不是位图核心掩码。 -
-n NUM: Number of memory channels per processor socket.
每个处理器套接字的内存通道数。 -
-b domain:bus:devid.func: Blacklisting of ports; prevent EAL from using specified PCI device (multiple -b options are allowed).
黑名单的端口;防止EAL使用指定的PCI设备(允许多个-b选项) -
–use-device: use the specified Ethernet device(s) only. Use comma-separate
只使用指定的以太网设备。使用逗号分隔 -
–socket-mem: Memory to allocate from hugepages on specific sockets. In dynamic memory mode, this memory will also be pinned (i.e. not released back to the system until application closes).
在特定socket上从大页面中分配内存。在动态内存模式下,该内存也将被固定(即在应用程序关闭之前不会释放回系统)。 -
–socket-limit: Limit maximum memory available for allocation on each socket. Does not support legacy memory mode.
限制每个套接字上可分配的最大内存。不支持遗留内存模式。 -
-d: Add a driver or driver directory to be loaded. The application should use this option to load the pmd drivers that are built as shared libraries.
添加一个或多个要加载的驱动程序目录。应用程序应该使用此选项加载作为共享库构建的pmd驱动程序。 -
-m MB: Memory to allocate from hugepages, regardless of processor socket. It is recommended that --socket-mem be used instead of this option.
内存分配从大页,无论处理器套接字。建议使用-socket-mem代替这个选项。 -
-r NUM: Number of memory ranks.内存等级的个数。
-
-v: Display version information on startup.在启动时显示版本信息。
-
–huge-dir: The directory where hugetlbfs is mounted. mbuf-pool-ops-name: Pool ops name for mbuf to use.
挂载hugetlbfs的目录。mbuf- Pool -op -name:要使用的mbuf的池操作名称。 -
–file-prefix: The prefix text used for hugepage filenames.
用于大页文件名的前缀文本。 -
–proc-type: The type of process instance.流程实例的类型。
-
–vmware-tsc-map: Use VMware TSC map instead of native RDTSC. 使用VMware TSC map代替本地RDTSC。
-
–base-virtaddr: Specify base virtual address. 指定基本虚拟地址。
-
–vfio-intr: Specify interrupt type to be used by VFIO (has no effect if VFIO is not used).指定要由VFIO使用的中断类型(如果不使用VFIO则没有效果)。
-
–legacy-mem: Run DPDK in legacy memory mode (disable memory reserve/unreserve at runtime, but provide more IOVA-contiguous memory).以遗留内存模式运行DPDK(在运行时禁用内存保留/取消保留,但提供更多iova连续内存)。
-
–single-file-segments: Store memory segments in fewer files (dynamic memory mode only - does not affect legacy memory mode).
将内存段存储在更少的文件中(仅动态内存模式—不影响遗留内存模式)。
-c或-l选项是强制性的;其他都是可选的。
Copy the DPDK application binary to your target, then run the application as follows (assuming the platform has four memory channels per processor socket, and that cores 0-3 are present and are to be used for running the application):
将DPDK应用程序二进制文件复制到目标,然后按如下方式运行应用程序(假设平台每个处理器套接字有四个内存通道,并且存在内核0-3,用于运行应用程序):
./helloworld -l 0-3 -n 4注:The --proc-type and --file-prefix EAL options are used for running multiple DPDK processes. See the “Multi-process Sample Application” chapter in the DPDK Sample Applications User Guide and the DPDK Programmers Guide for more details.
–proc-type和–file-prefix的EAL选项用于运行多个DPDK进程。有关详细信息,请参阅DPDK示例应用程序用户指南和DPDK程序员指南中的“多进程示例应用程序”一章。
6.2.1. Logical Core Use by Applications(应用程序使用CPU逻辑内核)
The coremask (-c 0x0f) or corelist (-l 0-3) parameter is always mandatory for DPDK applications. Each bit of the mask corresponds to he equivalent logical core number as reported by Linux. The preferred corelist option is a cleaner method to define cores to be used. Since these logical core numbers, and their mapping to specific cores on specific NUMA sockets, can vary from platform to platform, it is recommended that the core layout for each platform be considered when choosing the coremask/corelist to use in each case.
对于DPDK应用程序,coremask (-c 0x0f)或corelist (-l 0-3)参数总是必须的。掩码的每个位对应于Linux报告的等效逻辑内核号。首选的corelist选项是定义要使用的核心的更简洁的方法。由于这些逻辑核心数及其到特定NUMA套接字上的特定核的映射在不同的平台上可能有所不同,因此建议在选择在每种情况下使用的coremask/corelist时考虑每个平台的核心布局。
On initialization of the EAL layer by an DPDK application, the logical cores to be used and their socket location are displayed. This information can also be determined for all cores on the system by examining the /proc/cpuinfo file, for example, by running cat /proc/cpuinfo. The physical id attribute listed for each processor indicates the CPU socket to which it belongs. This can be useful when using other processors to understand the mapping of the logical cores to the sockets.
当DPDK应用程序初始化EAL层时,将显示要使用的逻辑内核及其套接字位置。还可以通过检查/proc/cpuinfo文件(例如,通过运行cat /proc/cpuinfo)为系统上的所有内核确定此信息。为每个处理器列出的物理id属性指示它所属的CPU套接字。当使用其他处理器理解逻辑内核到套接字的映射时,这一点非常有用。
注:A more graphical view of the logical core layout may be obtained using the lstopo Linux utility. On Fedora Linux, this may be installed and run using the following command:
可以使用lstopo Linux实用程序获得逻辑核心布局的更图形化视图。在Fedora Linux上,可以使用以下命令安装和运行:

注意:The logical core layout can change between different board layouts and should be checked before selecting an application coremask/corelist.
逻辑核心布局可以在不同的板布局之间改变,应该在选择应用程序coremask/corelist之前进行检查。
6.2.2. Hugepage Memory Use by Applications(应用程序使用大页面内存)
When running an application, it is recommended to use the same amount of memory as that allocated for hugepages. This is done automatically by the DPDK application at startup, if no -m or --socket-mem parameter is passed to it when run.
在运行应用程序时,建议使用与为大型页面分配的内存相同的内存量。
这是由DPDK应用程序在启动时自动完成的,如果在运行时没有传递-m或–socket-mem参数。
If more memory is requested by explicitly passing a -m or --socket-mem value, the application fails. However, the application itself can also fail if the user requests less memory than the reserved amount of hugepage-memory, particularly if using the -m option. The reason is as follows. Suppose the system has 1024 reserved 2 MB pages in socket 0 and 1024 in socket 1. If the user requests 128 MB of memory, the 64 pages may not match the constraints:
如果显式传递-m或-socket-mem值请求更多内存,则应用程序失败。但是,如果用户请求的内存少于大页面内存的保留量,特别是使用-m选项时,应用程序本身也可能失败。原因如下。假设系统在套接字0中保留了1024个2mb页面,在套接字1中保留了1024个页面。如果用户请求128 MB内存,那么64个页面可能不符合以下限制:
-
The hugepage memory by be given to the application by the kernel in socket 1 only. In this case, if the application attempts to create an object, such as a ring or memory pool in socket 0, it fails. To avoid this issue, it is recommended that the --socket-mem option be used instead of the -m option.
内核仅在套接字1中为应用程序提供大量内存。在这种情况下,如果应用程序试图创建一个对象,例如套接字0中的一个环或内存池,则会失败。为了避免这个问题,建议使用–socket-mem选项而不是-m选项。 -
These pages can be located anywhere in physical memory, and, although the DPDK EAL will attempt to allocate memory in contiguous blocks, it is possible that the pages will not be contiguous. In this case, the application is not able to allocate big memory pools.
这些页可以位于物理内存中的任何位置,并且,尽管EAL将尝试在连续块中分配内存,但是这些页可能不是连续的。在这种情况下,应用程序无法分配大内存池。
The socket-mem option can be used to request specific amounts of memory for specific sockets. This is accomplished by supplying the --socket-mem flag followed by amounts of memory requested on each socket, for example, supply --socket-mem=0,512 to try and reserve 512 MB for socket 1 only. Similarly, on a four socket system, to allocate 1 GB memory on each of sockets 0 and 2 only, the parameter --socket-mem=1024,0,1024 can be used. No memory will be reserved on any CPU socket that is not explicitly referenced, for example, socket 3 in this case. If the DPDK cannot allocate enough memory on each socket, the EAL initialization fails.
socket-mem选项可用于请求特定套接字的特定内存数量。这是通过提–socket-mem标志以及每个套接字上请求的内存数量来实现的,例如,执行 --socket-mem=0,512来尝试仅为套接字1保留512 MB的内存。类似地,在一个四套接字系统上,要在每个套接字0和2上分配1GB内存,可以使用参数:–socket-mem=1024,0,1024。任何没有显式引用的CPU套接字上都不会保留内存,例如,在本例中是套接字3。如果DPDK不能在每个套接字上分配足够的内存,则EAL初始化失败。
6.3. Additional Sample Applications
Additional sample applications are included in the ${RTE_SDK}/examples directory. These sample applications may be built and run in a manner similar to that described in earlier sections in this manual. In addition, see the DPDK Sample Applications User Guide for a description of the application, specific instructions on compilation and execution and some explanation of the code.
${RTE_SDK}/examples目录中包含其他示例应用程序。这些示例应用程序的构建和运行方式与本手册前面部分中描述的方式类似。此外,有关应用程序的描述、编译和执行的具体说明以及代码的一些解释,请参阅DPDK示例应用程序用户指南。
6.4. Additional Test Applications
In addition, there are two other applications that are built when the libraries are created. The source files for these are in the DPDK/app directory and are called test and testpmd. Once the libraries are created, they can be found in the build/app directory.
此外,在创建库时还构建了另外两个应用程序。这些文件的源文件位于DPDK/app目录中,称为test和testpmd。创建库之后,可以在build/app目录中找到它们。
-
The test application provides a variety of specific tests for the various functions in the DPDK.
测试应用程序为DPDK中的各种功能提供了各种特定的测试。 -
The testpmd application provides a number of different packet throughput tests and examples of features such as how to use the Flow Director found in the Intel® 82599 10 Gigabit Ethernet Controller.
testpmd应用程序提供了许多不同的数据包吞吐量测试和特性,比如如何在英特尔®8259910千兆以太网控制器去发现the Flow Director
7. EAL parameters(忽略)
This document contains a list of all EAL parameters. These parameters can be used by any DPDK application running on Linux.
本文档包含所有EAL参数的列表。在Linux上运行的任何DPDK应用程序都可以使用这些参数。
此章节请读者自行阅读,链接如下:
http://doc.dpdk.org/guides/linux_gsg/linux_eal_parameters.html#common-eal-parameters
8. Enabling Additional Functionality(使能额外功能)
8.1. High Precision Event Timer (HPET) Functionality(高精度事件计时器(HPET)功能)
8.1.1. BIOS Support
The High Precision Timer (HPET) must be enabled in the platform BIOS if the HPET is to be used. Otherwise, the Time Stamp Counter (TSC) is used by default. The BIOS is typically accessed by pressing F2 while the platform is starting up. The user can then navigate to the HPET option. On the Crystal Forest platform BIOS, the path is: Advanced -> PCH-IO Configuration -> High Precision Timer -> (Change from Disabled to Enabled if necessary).
如果要使用高精度计时器,必须在平台BIOS中启用该计时器。否则,默认情况下使用时间戳计数器(TSC)。BIOS通常在平台启动时按F2来访问。然后用户可以导航到HPET选项。在Crystal Forest平台BIOS上,路径是:Advanced -> PCH-IO配置->高精度定时器->(必要时从Disabled改为Enabled)。
On a system that has already booted, the following command can be issued to check if HPET is enabled:
在已经启动的系统上,可以发出以下命令检查HPET是否启用:
grep hpet /proc/timer_list
If no entries are returned, HPET must be enabled in the BIOS (as per the instructions above) and the system rebooted.
如果没有返回任何条目,则必须在BIOS中启用HPET(按照上面的说明)并重新启动系统。
8.1.2. Linux Kernel Support
The DPDK makes use of the platform HPET timer by mapping the timer counter into the process address space, and as such, requires that the HPET_MMAP kernel configuration option be enabled.
DPDK通过将计时器计数器映射到进程地址空间来使用平台HPET计时器,因此需要启用HPET_MMAP内核配置选项。
注意:On Fedora, and other common distributions such as Ubuntu, the HPET_MMAP kernel option is not enabled by default. To recompile the Linux kernel with this option enabled, please consult the distributions documentation for the relevant instructions.
在Fedora和其他常用发行版(如Ubuntu)上,HPET_MMAP内核选项在默认情况下不启用。要重新编译启用此选项的Linux内核,请参阅发行版文档以获得相关说明。
8.1.3. Enabling HPET in the DPDK
By default, HPET support is disabled in the DPDK build configuration files. To use HPET, the CONFIG_RTE_LIBEAL_USE_HPET setting should be changed to y, which will enable the HPET settings at compile time.
默认情况下,在DPDK构建配置文件中禁用HPET支持。要使用HPET, CONFIG_RTE_LIBEAL_USE_HPET设置应该更改为y,这将在编译时启用HPET设置。
For an application to use the rte_get_hpet_cycles() and rte_get_hpet_hz() API calls, and optionally to make the HPET the default time source for the rte_timer library, the new rte_eal_hpet_init() API call should be called at application initialization. This API call will ensure that the HPET is accessible, returning an error to the application if it is not, for example, if HPET_MMAP is not enabled in the kernel. The application can then determine what action to take, if any, if the HPET is not available at run-time.
如果应用程序要使用rte_get_hpet_cycles()和rte_get_hpet_hz() API调用,并且可以选择将HPET作为rte_timer库的默认时间源,那么应该在应用程序初始化时调用新的rte_eal_hpet_init() API调用。这个API调用将确保HPET是可访问的,如果HPET_MMAP在内核中没有启用,则返回一个错误给应用程序。然后,如果HPET在运行时不可用,应用程序可以决定采取什么操作(如果有的话)。
备注:For applications that require timing APIs, but not the HPET timer specifically, it is recommended that the rte_get_timer_cycles() and rte_get_timer_hz() API calls be used instead of the HPET-specific APIs. These generic APIs can work with either TSC or HPET time sources, depending on what is requested by an application call to rte_eal_hpet_init(), if any, and on what is available on the system at runtime.
对于需要计时API而不是HPET计时器的应用程序,建议使 rte_get_timer_cycles()和rte_get_timer_hz() API调用,而不是使用特定于HPET的API。这些通用api可以使用TSC或HPET时间源,这取决于对rte_eal_hpet_init()(如果有的话)的应用程序调用所请求的内容,以及运行时系统上可用的内容。
8.2. Running DPDK Applications Without Root Privileges
备注:The instructions below will allow running DPDK as non-root with older Linux kernel versions. However, since version 4.0, the kernel does not allow unprivileged processes to read the physical address information from the pagemaps file, making it impossible for thoseprocesses to use HW devices which require physical addresses
下面的说明将允许在较旧的Linux内核版本中以非根用户的身份运行DPDK。但是,由于4.0版本,内核不允许非特权进程从pagemaps文件中读取物理地址信息,因此这些进程不可能使用需要物理地址的HW设备
Although applications using the DPDK use network ports and other hardware resources directly, with a number of small permission adjustments it is possible to run these applications as a user other than “root”. To do so, the ownership, or permissions, on the following Linux file system objects should be adjusted to ensure that the Linux user account being used to run the DPDK application has access to them:
虽然使用DPDK的应用程序直接使用网络端口和其他硬件资源,但是通过一些小的权限调整,可以将这些应用程序作为“根”之外的用户运行。为此,应调整以下Linux文件系统对象的所有权或权限,以确保用于运行DPDK应用程序的Linux用户帐户能够访问这些对象:
- All directories which serve as hugepage mount points, for example,
/mnt/huge
所有用作大页面挂载点的目录,例如/mnt/huge - The userspace-io device files in /dev, for example, /dev/uio0,
/dev/uio1, and so on
例如/dev中的用户空间-io设备文件,/dev/uio0, /dev/uio1,等等 - The userspace-io sysfs config and resource files, for example for
uio0
userspace-io sysfs配置和资源文件,例如uio0:

- If the HPET is to be used, /dev/hpet
备注:On some Linux installations, /dev/hugepages is also a hugepagemount point created by default.
在一些Linux安装中,/dev/hugepages也是默认创建的一个hugepage挂载点。
8.3. Power Management and Power Saving Functionality(电源管理管理和省电功能)
Enhanced Intel SpeedStep® Technology must be enabled in the platform BIOS if the power management feature of DPDK is to be used. Otherwise, the sys file folder /sys/devices/system/cpu/cpu0/cpufreq will not exist, and the CPU frequency- based power management cannot be used. Consult the relevant BIOS documentation to determine how these settings can be accessed.
增强英特尔SpeedStep®技术平台中必须启用BIOS如果DPDK电源管理功能的使用。否则,sys文件文件夹/sys/devices/system/cpu/cpu0/cpufreq将不存在,无法使用基于cpu频率的电源管理。请参阅相关的BIOS文档,以确定如何访问这些设置。
For example, on some Intel reference platform BIOS variants, the path to Enhanced Intel SpeedStep® Technology is:
例如,在一些英特尔参考平台BIOS变量,加强电源管理英特尔SpeedStep®技术是:

In addition, C3 and C6 should be enabled as well for power management. The path of C3 and C6 on the same platform BIOS is:
此外,C3和C6也应该启用电源管理。C3和C6在同一平台BIOS上的路径为:

8.4. Using Linux Core Isolation to Reduce Context Switches(使用Linux内核隔离来减少上下文切换)
While the threads used by an DPDK application are pinned to logical cores on the system, it is possible for the Linux scheduler to run other tasks on those cores also. To help prevent additional workloads from running on those cores, it is possible to use the isolcpus Linux kernel parameter to isolate them from the general Linux scheduler.
虽然DPDK应用程序使用的线程被固定在系统上的逻辑内核上,但是Linux调度器也可以在这些内核上运行其他任务。为了防止额外的工作负载在这些内核上运行,可以使用isolcpus Linux内核参数将它们与一般的Linux调度程序隔离开来。
For example, if DPDK applications are to run on logical cores 2, 4 and 6, the following should be added to the kernel parameter list:
例如,如果DPDK应用程序要在逻辑内核2、4和6上运行,那么应该在内核参数列表中添加以下内容:
![]()
8.5. Loading the DPDK KNI Kernel Module(加载DPDK KNI内核模块)
To run the DPDK Kernel NIC Interface (KNI) sample application, an extra kernel module (the kni module) must be loaded into the running kernel. The module is found in the kmod sub-directory of the DPDK target directory. Similar to the loading of the igb_uio module, this module should be loaded using the insmod command as shown below (assuming that the current directory is the DPDK target directory):
要运行DPDK内核NIC接口(KNI)示例应用程序,必须将一个额外的内核模块(KNI模块)加载到正在运行的内核中。该模块位于DPDK目标目录的kmod子目录中。与加载igb_uio模块类似,应该使用insmod命令加载该模块,如下所示(假设当前目录是DPDK目标目录):

备注:See the “Kernel NIC Interface Sample Application” chapter in the DPDK Sample Applications User Guide for more details.
有关详细信息,请参阅DPDK示例应用程序用户指南中的“内核NIC接口示例应用程序”一章。
8.6. Using Linux IOMMU Pass-Through to Run DPDK with Intel® VT-d(在英特尔®VT-d上面, 使用Linux IOMMU直接DPDK运行)
使英特尔®VT-d Linux内核,内核配置选项必须设置。这些措施包括:
- IOMMU_SUPPORT
- IOMMU_API
- INTEL_IOMMU
In addition, to run the DPDK with Intel® VT-d, the iommu=pt kernel parameter must be used when using igb_uio driver. This results in pass-through of the DMAR (DMA Remapping) lookup in the host. Also, if INTEL_IOMMU_DEFAULT_ON is not set in the kernel, the intel_iommu=on kernel parameter must be used too. This ensures that the Intel IOMMU is being initialized as expected.
此外,在英特尔®VT-d上运行DPDK, iommu = pt内核参数必须使用igb_uio驱动程序时使用。这导致在主机中透传DMAR (DMA映射)查找。另外,如果内核中没有设置INTEL_IOMMU_DEFAULT_ON,那么也必须使用intel_iommu=on内核参数。这可以确保Intel IOMMU按预期初始化
Please note that while using iommu=pt is compulsory for igb_uio driver, the vfio-pci driver can actually work with both iommu=pt and iommu=on.
请注意,虽然iommu=pt对于igb_uio驱动程序是必需的,但是vfio-pci驱动程序实际上可以同时使用iommu=pt和iommu=on。
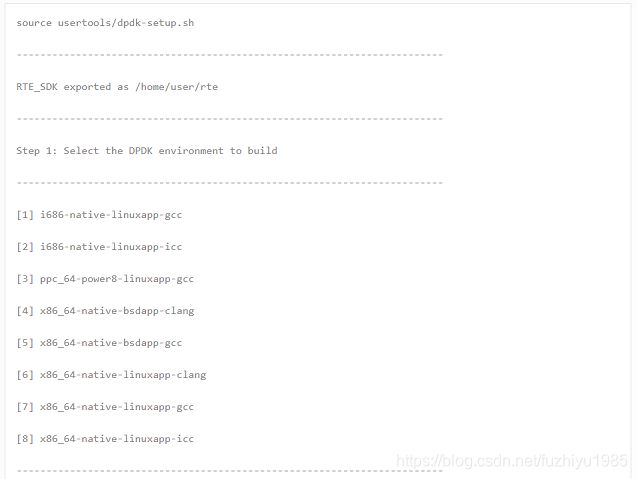
9. Quick Start Setup Script
The dpdk-setup.sh script, found in the usertools subdirectory, allows the user to perform the following tasks:
在usertools子目录中找到的dpdp -setup.sh脚本允许用户执行以下任务:
- Build the DPDK libraries
- Insert and remove the DPDK IGB_UIO kernel module
- Insert and remove VFIO kernel modules
- Insert and remove the DPDK KNI kernel module
- Create and delete hugepages for NUMA and non-NUMA cases
- View network port status and reserve ports for DPDK application use
- Set up permissions for using VFIO as a non-privileged user
- Run the test and testpmd applications
- Look at hugepages in the meminfo
- List hugepages in /mnt/huge
- Remove built
DPDK librariesOnce these steps have been completed for one of the EAL targets, the user may compile their own application that links in the EAL libraries to create the DPDK image.
dpdk-setup.sh脚本逻辑上组织成一系列用户按顺序执行的步骤。每个步骤都提供许多选项,指导用户完成所需的任务。下面是每个步骤的简要概述。
Step 1: Build DPDK Libraries
Initially, the user must select a DPDK target to choose the correct target type and compiler options to use when building the libraries.
最初,用户必须选择一个DPDK目标,以便在构建库时选择正确的目标类型和编译器选项。在此之前,用户必须在系统中安装所有库、模块、更新和编译器,如本入门指南的前几章所述。
The user must have all libraries, modules, updates and compilers installed in the system prior to this, as described in the earlier chapters in this Getting Started Guide.每个步骤都提供许多选项,指导用户完成所需的任务。
The following is a brief synopsis of each step:
Step 1: Build DPDK Libraries
Initially, the user must select a DPDK target to choose the correct target type and compiler options to use when building the libraries.
最初,用户必须选择一个DPDK目标,以便在构建库时选择正确的目标类型和编译器选项。
The user must have all libraries, modules, updates and compilers installed in the system prior to this, as described in the earlier chapters in this Getting Started Guide.
在此之前,用户必须在系统中安装所有库、模块、更新和编译器,如本入门指南的前几章所述。
Step 2: Setup Environment
The user configures the Linux* environment to support the running of DPDK applications. Hugepages can be set up for NUMA or non-NUMA systems. Any existing hugepages will be removed. The DPDK kernel module that is needed can also be inserted in this step, and network ports may be bound to this module for DPDK application use.
用户配置Linux*环境以支持DPDK应用程序的运行。可以为NUMA或非NUMA系统设置大型页面。所有现有的大页面将被删除。还可以在此步骤中插入所需的DPDK内核模块,并且可以将网络端口绑定到该模块,以供DPDK应用程序使用。
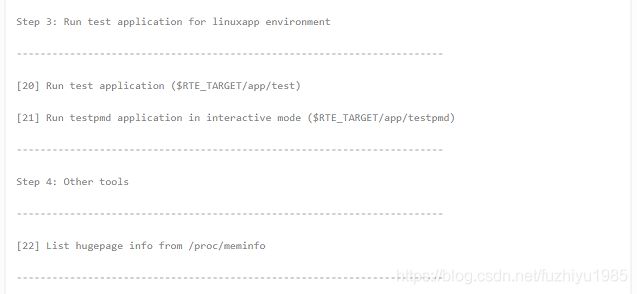
Step 3: Run an Application
The user may run the test application once the other steps have been performed. The test application allows the user to run a series of functional tests for the DPDK. The testpmd application, which supports the receiving and sending of packets, can also be run.
在执行了其他步骤之后,用户可以运行测试应用程序。测试应用程序允许用户为DPDK运行一系列功能测试。testpmd应用程序支持数据包的接收和发送,它也可以运行。
Step 4: Examining the System
This step provides some tools for examining the status of hugepage mappings.
这个步骤提供了一些工具来检查大型页面映射的状态。
Step 5: System Cleanup
The final step has options for restoring the system to its original state.
最后一步是将系统恢复到原来的状态。
9.2. Use Cases
The following are some example of how to use the dpdk-setup.sh script. The script should be run using the source command. Some options in the script prompt the user for further data before proceeding.
下面是一些如何使用dpdp -setup.sh脚本的示例。脚本应该使用源命令运行。脚本中的一些选项在继续之前会提示用户获取进一步的数据。
注意:The dpdk-setup.sh script should be run with root privileges.
dpdk-setup.sh脚本应该使用根权限运行。


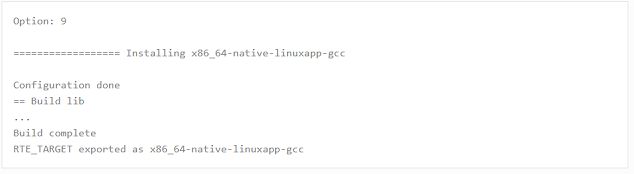
Option:(可选)
The following selection demonstrates the creation of the x86_64-native-linuxapp-gcc DPDK library.
下面的选择演示了x86_64本机linuxapp-gcc DPDK库的创建。
The following selection demonstrates the starting of the DPDK UIO driver.
下面的选择演示了DPDK UIO驱动程序的启动。

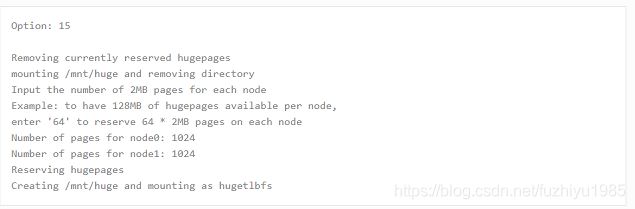
The following selection demonstrates the creation of hugepages in a NUMA system. 1024 2 MByte pages are assigned to each node. The result is that the application should use -m 4096 for starting the application to access both memory areas (this is done automatically if the -m option is not provided).
下面的选择演示了在NUMA系统中创建大型页面。为每个节点分配1024个2兆字节的页。结果是,应用程序应该使用-m 4096启动应用程序来访问这两个内存区域(如果没有提供-m选项,这将自动完成)。
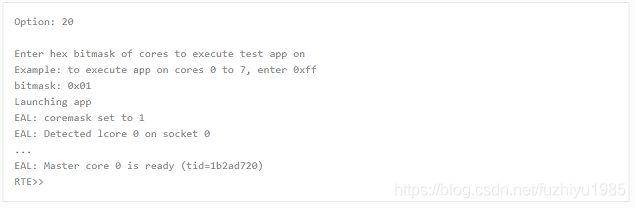
The following selection demonstrates the launch of the test application to run on a single core.
下面的选择演示了在单个核心上运行测试应用程序的启动。
9.3. Applications
Once the user has run the dpdk-setup.sh script, built one of the EAL targets and set up hugepages (if using one of the Linux EAL targets), the user can then move on to building and running their application or one of the examples provided.
一旦用户运行了dpdp -setup.sh脚本,构建了一个EAL目标并设置了大型页面(如果使用的是Linux EAL目标之一),那么用户就可以继续构建和运行他们的应用程序或提供的示例之一。
The examples in the /examples directory provide a good starting point to gain an understanding of the operation of the DPDK. The following command sequence shows how the helloworld sample application is built and run. As recommended in Section 4.2.1 , “Logical Core Use by Applications”, the logical core layout of the platform should be determined when selecting a core mask to use for an application.
示例目录/examples中的示例为理解DPDK的操作提供了一个良好的起点。下面的命令序列显示了helloworld示例应用程序是如何构建和运行的。如4.2.1节“应用程序的逻辑内核使用”所建议的,在为应用程序选择要使用的内核掩码时,应该确定平台的逻辑内核布局。
cd helloworld/
make
CC main.o
LD helloworld
INSTALL-APP helloworld
INSTALL-MAP helloworld.map
sudo ./build/app/helloworld -l 0-3 -n 3
[sudo] password for rte:
EAL: coremask set to f
EAL: Detected lcore 0 as core 0 on socket 0
EAL: Detected lcore 1 as core 0 on socket 1
EAL: Detected lcore 2 as core 1 on socket 0
EAL: Detected lcore 3 as core 1 on socket 1
EAL: Setting up hugepage memory…
EAL: Ask a virtual area of 0x200000 bytes
EAL: Virtual area found at 0x7f0add800000 (size = 0x200000)
EAL: Ask a virtual area of 0x3d400000 bytes
EAL: Virtual area found at 0x7f0aa0200000 (size = 0x3d400000)
EAL: Ask a virtual area of 0x400000 bytes
EAL: Virtual area found at 0x7f0a9fc00000 (size = 0x400000)
EAL: Ask a virtual area of 0x400000 bytes
EAL: Virtual area found at 0x7f0a9f600000 (size = 0x400000)
EAL: Ask a virtual area of 0x400000 bytes
EAL: Virtual area found at 0x7f0a9f000000 (size = 0x400000)
EAL: Ask a virtual area of 0x800000 bytes
EAL: Virtual area found at 0x7f0a9e600000 (size = 0x800000)
EAL:Ask a virtual area of 0x800000 bytes
EAL: Virtual area found at 0x7f0a9dc00000 (size = 0x800000)
EAL: Ask a virtual area of 0x400000 bytes
EAL: Virtual area found at 0x7f0a9d600000 (size = 0x400000)
EAL: Ask a virtual area of 0x400000 bytes
EAL: Virtual area found at 0x7f0a9d000000 (size = 0x400000)
EAL: Ask a virtual area of 0x400000 bytes
EAL: Virtual area found at 0x7f0a9ca00000 (size = 0x400000)
EAL: Ask a virtual area of 0x200000 bytes
EAL: Virtual area found at 0x7f0a9c600000 (size = 0x200000)
EAL: Ask a virtual area of 0x200000 bytes
EAL: Virtual area found at 0x7f0a9c200000 (size = 0x200000)
EAL:Ask a virtual area of 0x3fc00000 bytes
EAL: Virtual area found at 0x7f0a5c400000 (size = 0x3fc00000)
EAL: Ask a virtual area of 0x200000 bytes
EAL: Virtual area found at 0x7f0a5c000000 (size = 0x200000)
EAL: Requesting 1024 pages of size 2MB from socket 0
EAL: Requesting 1024 pages of size 2MB from socket 1
EAL: Master core 0 is ready (tid=de25b700)
EAL: Core 1 is ready (tid=5b7fe700)
EAL: Core 3 is ready (tid=5a7fc700)
EAL: Core 2 is ready (tid=5affd700)
hello from core 1
hello from core 2
hello from core 3
hello from core 0
10. How to get best performance with NICs on Intel platforms
(如何在Intel平台上使用nic获得最佳性能)(请读者自行阅读)
This document is a step-by-step guide for getting high performance from DPDK applications on Intel platforms.
本文档是一个循序渐进的指南,旨在从Intel平台上的DPDK应用程序获得高性能。
链接如下:
http://doc.dpdk.org/guides/linux_gsg/nic_perf_intel_platform.html