Vue源码之生命周期细节
前言
Vue实例被创建过程中会经历一系列的初始化过程,同时在这个过程中也会运行一些叫做生命周期钩子的函数,这给了用户在不同阶段添加自己的代码的机会。Vue官网的生命周期流程图有着非常重要的参考意义,基本上概括了整个vue实例创建过程中重要点。
本文内容分为2块:
- 以生命周期为标志去分析Vue实例被创建的过程
- 父子组件生命周期执行顺序
Vue初始化过程

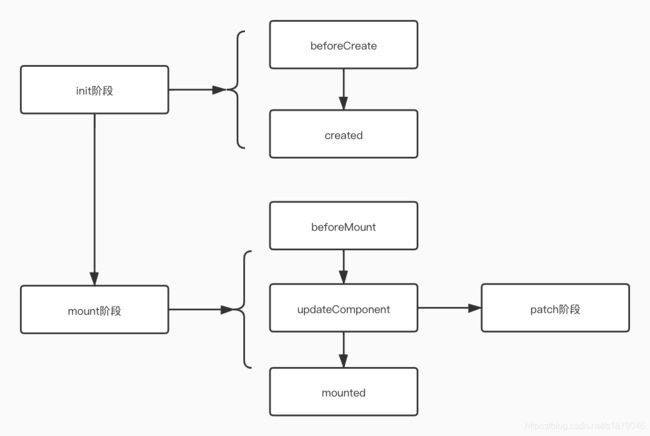
上图是依据生命周期的简要流程图,可以很清晰的知道相关生命周期执行顺序:
beforeCreate、created、beforeMount、mounted
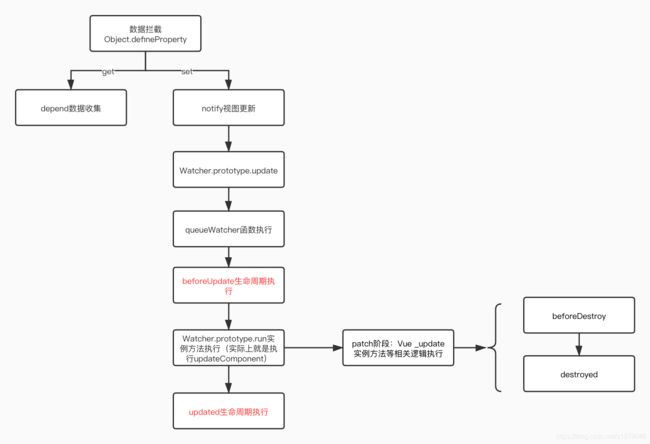
实际上beforeUpdate、updated、beforeDestroy、destroyed生命周期是在非初次渲染过程才会执行到,具体的执行逻辑如下:

数据拦截之后对相关对象再次赋值就会触发视图更新,上图就是视图更新的相关逻辑流程。
父子组件的生命周期执行顺序
实际上父子组件的生命周期执行顺序的本质还是父子组件的构建的先后顺序的问题,实际上这边的逻辑核心在于patch之后createElm函数执行逻辑(创建真实DOM相关逻辑)。
createElm函数的核心逻辑如下:
function createElm() {

	// 相关代码
	if (createComponent(vnode, insertedVnodeQueue, parentElm, refElm)) {

		return
    }
    // 相关代码
    createChildren(vnode, children, insertedVnodeQueue);
}
其中createChildren就是迭代对children进行处理,实际上就是调用createElm形成递归,而createComponet函数就会负责对应组件的实例化动作即调用Vue.Prototype._init实例方法。由此可以得到父子组件的生命周期调用:
- 父组件的beforeCreate、created、beforeMount
- update阶段执行patch操作等触发createElm触发子组件的实例化过程,这样就形成递归
- 子组件的beforeCreate、created、beforeMount
- 只有子组件完成整个处理后会触发其自身的生命周期函数mounted
- 之后父组件完成整个处理后会触发其自身的生命周期函数mounted
简单总结就是:
父beforeCreate -> 父created -> 父beforeMount -> 子beforeCreate -> 子created -> 子beforeMount -> 子mounted -> 父mounted
父子组件beforeUpdate、updated生命周期
首先要明确beforeUpdate和updated生命周期函数的执行时间点,这两个生命周期函数触发都是通过notify视图更新来触发的。怎么触发视图更新呢?答案就是通过更改已被数据拦截的属性。
Vue中拦截的数据分类有:data、computed、props等,任何被拦截的数据的更改操作都会导致相关视图更新的逻辑,这就导致父子组件渲染流程就非常复杂。
这里也只能就特定的情况来查看相关的处理逻辑,实例如下:
<div id="app">
	{
    { isShow }}
    <component1 :is-show.sync="isShow">component1>
div>
Vue.component('component1', {

	template: '{
     { isShow }}',
    props: {

    	isShow: Boolean
    },
    beforeUpdate() {

    	console.log('child');
    },
    methods: {

    	handleClick() {

        	this.$emit('update:isShow', !this.isShow);
        }
    }
})
从上面的实例查看这样一种场景:
父子组件传递props isShow,子组件点击更改对应isShow。
当点击触发isShow,直接改变的父组件的isShow属性,此时触发对应视图更新,之后的逻辑就是之前的beforeUpdate相关的逻辑了。
这里的具体逻辑如下:
- 父组件的isShow触发set逻辑中视图更新
- 执行父组件的生命周期函数beforeUpdate
- 执行updateComponent逻辑即patch逻辑,尽可能的复用组件,这个过程会触发component1组件的复用,会调用其虚拟节点的hook prepatch钩子函数
- 之后会执行updateChildComponent逻辑
- updateChildComponent逻辑中会对于component1组件的props进行更改,继而触发component1 prop对应的视图更新
- 执行子组件的生命周期函数beforeUpdate
- 其他逻辑执行,执行到最后就是子组件的updated、父组件的updated执行了
上面实例通过源码分析其大概的执行流程,继而得到父子组件的相应生命周期函数执行:
父beforeUpdate -> 子beforeUpdate -> 子updated -> 父uodated
实际上这只是一种场景下的处理逻辑,其他场景可能会存在相应的逻辑差别。不过有一个逻辑可以很明显的表明父子组件的处理:
// Sort queue before flush.
// This ensures that:
// 1. Components are updated from parent to child. (because parent is always
//    created before the child)
// 2. A component's user watchers are run before its render watcher (because
//    user watchers are created before the render watcher)
// 3. If a component is destroyed during a parent component's watcher run,
//    its watchers can be skipped.
queue.sort(function (a, b) {
      return a.id - b.id; });
对队列中watcher对象进行排序,保证组件从父到子这样的更新顺序,这里就涉及到一些复杂场景的处理进而保证整体update顺序问题。
父子组件beforeDestroy、destroyed生命周期
组件的销毁过程会执行beforeDestroy、destroyed生命周期,而这个过程会调用Vue的$destroy实例方法,而$destroy的就是通过虚拟节点的hook destroy钩子函数触发的,具体逻辑如下:
destroy: function destroy (vnode) {

	var componentInstance = vnode.componentInstance;
    if (!componentInstance._isDestroyed) {

    	if (!vnode.data.keepAlive) {

        	componentInstance.$destroy();
        } else {

        	deactivateChildComponent(componentInstance, true /* direct */);
        }
    }
}
而虚拟节点的hook destroy钩子函数的执行都是在patch阶段的处理,这个阶段实际上与渲染过程父子节点相同的逻辑,只是存在不同的处理逻辑但是主流程基本相似都是递归处理,这里就不具体展开了。
总结
渲染加载过程:
父组件beforeCreate -> 父组件created -> 父组件beforeMount -> 子组件beforeCreate ->子组件created -> 子组件beforeMount -> 子组件mounted -> 父组件mounted
视图更新过程:
父组件beforeUpdate -> 子组件beforeUpdate -> 子组件updated -> 父组件updated
销毁过程:
父组件beforeDestroy -> 子组件beforeDestroy -> 子组件destroyed -> 父组件destroyed