Uploadfile 控件上传文件的使用方法(js+jsp+后台)
Jquery.Uploadify是JQuery的一个上传插件,实现的效果非常不错,支持多文件上传、带进度显示。不过官方提供的实例时php版本的,本文将详细介绍Uploadify在js中的使用,您也可以点击下面的链接进行演示或下载。
官方下载:http://www.uploadify.com/download/
官方文档:http://www.uploadify.com/documentation/
官方演示:http://www.uploadify.com/demo
首先按下面的步骤来实现一个简单的上传功能。
创建Web项目,从官网上下载最新的版本解压后添加到项目中。
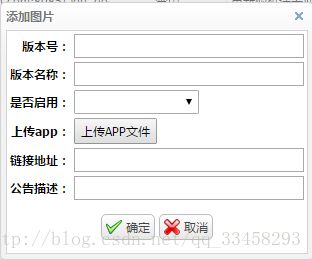
        <div id="addRollpic" class="easyui-window" title="添加APP" style="margin:0 auto;" data-options="resizable:false,minimizable:false,maximizable:false,collapsible:false,modal:true,closed:true">
            <table align="center">
                <tr>
                    <th align="right">版本号:th>
                    <td align="left"><input type="text" id="addcode" style="width:230px;" />td>
                tr>
                <tr>
                    <th align="right">版本名称:th>
                    <td align="left"><input type="text" id="addpicname" style="width:230px;" />td>
                tr>
                <tr>
                    <th align="right">是否启用:th>
                    <td align="left"><select id="upde" style="width:125px;">
                            <option value="">option>
                            <option value="0">禁用option>
                            <option value="1">启用option>
                        select>td>
                tr>
                <tr>
                    **<th align="right">上传app:th>
                    <td align="left"><input type="button" value="上传APP文件"      onclick="$('#pic').dialog('open');"  />td>**
                tr>
                <tr>
                    <th align="right">链接地址:th>
                    <td align="left"><input type="text" id="addpicurl" style="width:230px;" readonly/>td>
                tr>
                <tr>
                    <th align="right">公告描述:th>
                    <td align="left"><input type="text" id="version_vesc" style="width:230px;"/>td>
                tr>
                <tr height="18px">
                    <td colspan="2" align="center">
                        <div style="padding-top: 10px;padding-bottom: 10px;text-align:center;">
                              <a href="javascript:void(0)"  class="easyui-linkbutton" iconCls="icon-ok" onclick="addRollpic();">确定a>
                            <a href="javascript:void(0)"  class="easyui-linkbutton" iconCls="icon-cancel" onclick="closeWindow()">取消a>
                        div>
                    td>
                tr>
            table>
div>代码如下:
    <div id="pic" class="easyui-window" title="选择文件" style="width:400px;height: 200px;margin:0 auto;" data-options="resizable:false,minimizable:false,maximizable:false,collapsible:false,modal:true,closed:true">
                    <table width="100%" align="center" border="0" cellpadding="4" class="bordered"
                        cellspacing="1">
                        <tr height="30">
                            <td width="35%" bgcolor="#F4F4F4">请选择上传的app文件<font color='red'>(提示:单个文件不超过10M)font>:
                            td>

                        tr>
                        <tr align="center">
                        <td width="98%" height="81px"><input type=file name="myFile"
                                id="strutsUploadFile" />td>
                        tr>
                        <tr>
                            <td colspan="4"><span id="full">span> <span id="warnInfo">span>
                                <span id="show">span>td>
                        tr>
                        <tr align="center">
                        <td width="20%">  <a href="javascript:$('#strutsUploadFile').uploadifyUpload()" class="easyui-linkbutton">上传a>
                                          <a href="javascript:void(0)" class="easyui-linkbutton" onclick="$('#strutsUploadFile').uploadifyClearQueue();$('#pic').dialog('close');">关闭a>td>
                        tr>

        table>
div>上传成功之后,就可以在上传的页面找到该文件了!
后台Action代码:
/**
     * 图片上传
     */
    private File myFile;

    private String myFileFileName;

    private String myFileFileType;
    private String path;
    public File getMyFile() {
        return myFile;
    }


    public String getPath() {
        return path;
    }

    public void setPath(String path) {
        this.path = path;
    }

    public void setMyFile(File myFile) {
        this.myFile = myFile;
    }

    public String getMyFileFileName() {
        return myFileFileName;
    }

    public void setMyFileFileName(String myFileFileName) {
        this.myFileFileName = myFileFileName;
    }

    public String getMyFileFileType() {
        return myFileFileType;
    }

    public void setMyFileFileType(String myFileFileType) {
        this.myFileFileType = myFileFileType;
    }

    public SimpleDateFormat format = new SimpleDateFormat("yyyyMMddHHmmss");
    public String contractUpLoad() throws Exception {
        String extName = ""; // 保存文件拓展名
        String newFileName = ""; // 保存新的文件名
        String nowTimeStr = ""; // 保存当前时间
        //String imgurl = request.getParameter("imgurl");
        Random r = new Random();
    //  String ftppath = request.getParameter("ftppath");
        // String savePath =
        // ServletActionContext.getServletContext().getRealPath(
        // ""); // 获取项目根路径
        // savePath = savePath +images/upload+ imgurl + "/"; // 拼串组成要上传保存文件的路径
        // System.out.println(savePath);
        response = ServletActionContext.getResponse();
        response.setCharacterEncoding("utf-8"); // 务必,防止返回文件名是乱码
        // 生成随机文件名:当前年月日时分秒+五位随机数(为了在实际项目中防止文件同名而进行的处理)
        int rannum = (int) (r.nextDouble() * (99999 - 10000 + 1)) + 10000; // 获取随机数
        nowTimeStr = format.format(new Date()); // 当前时间

        // 获取拓展名
        if (myFileFileName.lastIndexOf(".") >= 0) {
            extName = myFileFileName.substring(myFileFileName.lastIndexOf("."));
        }
        newFileName = nowTimeStr + rannum + extName; // 文件重命名后的名字
         String savePath =
         ServletActionContext.getServletContext().getRealPath(
         ""); // 获取项目根路径
         savePath = savePath +"/advertimg"; // 拼串组成要上传保存文件的路径
//      File dir = new File("F:/photo");//文件夹的URL地址
        // Move file to new directory
        myFile.renameTo(new File(savePath, newFileName));

        path = "/advertimg/"+newFileName;
        /*
         * File f = new File(savePath); if (!f.exists()) { f.mkdir(); } if
         * (".doc".equals(extName) || ".docx".equals(extName)) { File f2 = new
         * File(savePath + myFileFileName); if (f2.exists()) { f2.delete(); }
         * myFile.renameTo(f2); // 保存附件 } myFile.renameTo(new File(savePath +
         * newFileName)); // 保存图片
         */
        PrintWriter out = response.getWriter();

        out.print(path);// 向页面端返回结果信息

        out.flush();

        out.close();

        return SUCCESS;
    }
主要就是js了,这里先上代码:
/**
* 图片上传方法
*/
function contractUpLoad() {
$('#strutsUploadFile')
.uploadify(
{
uploader : 'static/js/uploadify.swf',// uploadify.swf
// 文件的相对路径,该swf文件是一个带有文字BROWSE的按钮,点击后淡出打开文件对话框
script : 'AppVersionAction!contractUpLoad.action', // 后台处理程序的相对路径
cancelImg : 'images/uploadify-cancel.png', // 取消按钮图片
fileDataName : 'myFile',// 设置一个名字,在服务器处理程序中根据该名字来取上传文件的数据
buttonImg : 'images/upimg.gif',
//解决中文按钮名的好方式 换背景图片
height : 25, //可选 设置浏览按钮高度
width : 80, //可选 设置浏览按钮宽度
method : 'post',//提交方式Post 或Get 默认为Post
fileExt : '*.apk',// 设置允许上传的文件格式
fileDesc : '请选择*.apk文件',//设置允许上传的文件格式后,必须加上下面这行代码才能帮你过滤
removeCompleted :false,// 该属性默认值为 true,表示自动移除上传成功的文件
multi : false, // 允许连续上传多个文件 默认为false
// queueSizeLimit : 50, // 一次性最多允许上传多少个,不设置的话默认为999个
auto : false,// 设置为true当选择文件后就直接上传了,为false需要点击上传按钮才上传
sizeLimit : 10240*1024, // 每个文件允许上传的大小(字节B)
// queueID : '',//与下面的id对应
// 显示上传文件队列用
simUploadLimit : 1,// 允许同时上传的个数 默认值:1 。
// rollover :'true',
// //值为true和false,设置为true时当鼠标移到浏览按钮上时有反转效果。
buttonText : "我Browse...",
onSelect : function(e, queueId, fileObj) {
var result =/\.[^\.]+/.exec(fileObj.name);//获取文件后缀名
if(result == ".apk" ){
if(fileObj.size > 10240*1024){
$.messager.alert('系统提示', "当前选择的文件超过了设置的大小,请重新选择文件!", 'warning');
onCancel(e,queueId,fileObj);
}
$('#strutsUploadFile').uploadifySettings('scriptData', {
'imgurl' : $('#imgurl').val(),
'ftppath' : 'gl_pictures'
});
$('#strutsUploadFile').uploadifyUpload();
}else{
$.messager.alert('系统提示', "当前选择的文件不是.apk文件,请重新选择文件!", 'warning');
onCancel(e,queueId,fileObj);
}
},
onComplete : function(event, ID, fileObj, response,
data) {
// $("#full").hide();
//var a = response;
//map.put(ID, a);
// alert(response);
$("#addpicurl").val(response);
$("#edit_picurl").val(response);
},
onAllComplete : function(event, data) {
// 当所有文件上传完成后的操作
$.messager.alert('系统提示', "成功上传图片!", 'warning');
},
onOpen : function(event, ID, fileObj) {
// 点击上传时触发,如果auto设置为true则是选择文件时触发,如果有多个文件上传则遍历整个文件队列。
// $("#cancelBtn").show();
},
onQueueFull : function(event, queueSizeLimit) {
// 当添加待上传的文件数量达到设置的上限时的操作
return false;
},
onCancel : function(event, ID, fileObj, data) {
// 当取消所有正在上传文件后的操作
// deleteFiles(map.get(ID),"gl_pictures/"+$('#path1').val());
// map.remove(ID);
}
});
相关参数介绍:
上面简单地实现了一个上传的功能,依靠函数uploadify实现,uploadify函数的参数为json格式,可以对json对象的key值的修改来进行自定义的设置,如multi设置为true或false来控制是否可以进行多文件上传,下面就来介绍下这些key值的意思:
uploader : uploadify.swf 文件的相对路径,该swf文件是一个带有文字BROWSE的按钮,点击后淡出打开文件对话框,默认值:uploadify.swf。
script : 后台处理程序的相对路径 。默认值:uploadify.php
checkScript :用来判断上传选择的文件在服务器是否存在的后台处理程序的相对路径
fileDataName :设置一个名字,在服务器处理程序中根据该名字来取上传文件的数据。默认为Filedata
method : 提交方式Post 或Get 默认为Post
scriptAccess :flash脚本文件的访问模式,如果在本地测试设置为always,默认值:sameDomain
folder : 上传文件存放的目录 。
queueID : 文件队列的ID,该ID与存放文件队列的div的ID一致。
queueSizeLimit : 当允许多文件生成时,设置选择文件的个数,默认值:999 。
multi : 设置为true时可以上传多个文件。
auto : 设置为true当选择文件后就直接上传了,为false需要点击上传按钮才上传 。
fileDesc : 这个属性值必须设置fileExt属性后才有效,用来设置选择文件对话框中的提示文本,如设置fileDesc为“Andro 程序安装包(.apk)”,打开文件选择框效果如下图:

fileExt : 设置可以选择的文件的类型,格式如:’.doc;.pdf;*.rar’ 。
sizeLimit : 上传文件的大小限制 。
simUploadLimit : 允许同时上传的个数 默认值:1 ,若此项设置为大于1时,multi 要设置为True。
buttonText : 浏览按钮的文本,默认值:BROWSE,若修改为中文,可能会出现乱码的问题,参考解决方案见下文 。
buttonImg : 浏览按钮的图片的路径 。
hideButton : 设置为true则隐藏浏览按钮的图片 。
rollover : 值为true和false,设置为true时当鼠标移到浏览按钮上时有反转效果。
width : 设置浏览按钮的宽度 ,默认值:110。
height : 设置浏览按钮的高度 ,默认值:30。
wmode : 设置该项为transparent 可以使浏览按钮的flash背景文件透明,并且flash文件会被置为页面的最高层。 默认值:opaque 。
cancelImg :选择文件到文件队列中后的每一个文件上的关闭按钮图标,如下图:
上面介绍的key值的value都为字符串或是布尔类型,比较简单,接下来要介绍的key值的value为一个函数,可以在选择文件、出错或其他一些操作的时候返回一些信息给用户。
onInit : 做一些初始化的工作。
onSelect :选择文件时触发,该函数有三个参数
event:事件对象。
queueID:文件的唯一标识,由6为随机字符组成。
fileObj:选择的文件对象,有name、size、creationDate、modificationDate、type 5个属性。
代码如下:
$(document).ready(function()
{
$("#uploadify").uploadify({
'uploader': 'JS/jquery.uploadify-v2.1.0/uploadify.swf',
'script': 'UploadHandler.ashx',
'cancelImg': 'JS/jquery.uploadify-v2.1.0/cancel.png',
'folder': 'UploadFile',
'queueID': 'fileQueue',
'auto': false,
'multi': true,
'onInit':function(){alert("1");},
'onSelect': function(e, queueId, fileObj)
{
alert("唯一标识:" + queueId + "\r\n" +
"文件名:" + fileObj.name + "\r\n" +
"文件大小:" + fileObj.size + "\r\n" +
"创建时间:" + fileObj.creationDate + "\r\n" +
"最后修改时间:" + fileObj.modificationDate + "\r\n" +
"文件类型:" + fileObj.type
);
}
});
});
onSelectOnce :在单文件或多文件上传时,选择文件时触发。该函数有两个参数event,data,data对象有以下几个属性:
fileCount:选择文件的总数。
filesSelected:同时选择文件的个数,如果一次选择了3个文件该属性值为3。
filesReplaced:如果文件队列中已经存在A和B两个文件,再次选择文件时又选择了A和B,该属性值为2。
allBytesTotal:所有选择的文件的总大小。
onCancel : 当点击文件队列中文件的关闭按钮或点击取消上传时触发。该函数有event、queueId、fileObj、data四个参数,前三个参数同onSelect 中的三个参数,data对象有两个属性fileCount和allBytesTotal。
fileCount:取消一个文件后,文件队列中剩余文件的个数。
allBytesTotal:取消一个文件后,文件队列中剩余文件的大小。
onClearQueue :当调用函数fileUploadClearQueue时触发。有event和data两个参数,同onCancel 中的两个对应参数。
onQueueFull :当设置了queueSizeLimit并且选择的文件个数超出了queueSizeLimit的值时触发。该函数有两个参数event和queueSizeLimit。
onError :当上传过程中发生错误时触发。该函数有event、queueId、fileObj、errorObj四个参数,其中前三个参数同上,errorObj对象有type和info两个属性。
type:错误的类型,有三种‘HTTP’, ‘IO’, or ‘Security’
info:错误的描述
onOpen :点击上传时触发,如果auto设置为true则是选择文件时触发,如果有多个文件上传则遍历整个文件队列。该函数有event、queueId、fileObj三个参数,参数的解释同上。
onProgress :点击上传时触发,如果auto设置为true则是选择文件时触发,如果有多个文件上传则遍历整个文件队列,在onOpen之后触发。该函数有event、queueId、fileObj、data四个参数,前三个参数的解释同上。data对象有四个属性percentage、bytesLoaded、allBytesLoaded、speed:
percentage:当前完成的百分比
bytesLoaded:当前上传的大小
allBytesLoaded:文件队列中已经上传完的大小
speed:上传速率 kb/s
onComplete:文件上传完成后触发。该函数有四个参数event、queueId、fileObj、response、data五个参数,前三个参数同上。response为后台处理程序返回的值,在上面的例子中为1或0,data有两个属性fileCount和speed
fileCount:剩余没有上传完成的文件的个数。
speed:文件上传的平均速率 kb/s
注:fileObj对象和上面讲到的有些不太一样,onComplete 的fileObj对象有个filePath属性可以取出上传文件的路径。
onAllComplete:文件队列中所有的文件上传完成后触发。该函数有event和data两个参数,data有四个属性,分别为:
filesUploaded :上传的所有文件个数。
errors :出现错误的个数。
allBytesLoaded :所有上传文件的总大小。
speed :平均上传速率 kb/s
相关函数介绍
在上面的例子中已经用了uploadifyUpload和uploadifyClearQueue两个函数,除此之外还有几个函数:
uploadifySettings:可以动态修改上面介绍的那些key值,如下面代码
$(‘#uploadify’).uploadifySettings(‘folder’,’JS’);
如果上传按钮的事件写成下面这样,文件将会上传到uploadifySettings定义的目录中


