Ubuntu16.04系统中配置ParaviewWeb5.3+Apache2
Ubuntu16.04系统中配置ParaviewWeb5.3+Apache2
本文基于Linux的Ubuntu系统安装ParaviewWeb,Linux系统的用户名为peng, 主机名为ubuntu, Paraview所选用版本为5.3.0
- 1. 下载和安装Paraivew5.3
- 2. 配置Paraview5.3
- 3. 下载和安装Apache2
- 4. 配置Apache2
- 5. 在远程客户机的浏览器中测试ParaviewWeb
1. 下载Paraview5.3
- 1) 下载Linux版本的Binary文件如图,官方下载网站: https://www.paraview.org/download/
2)将所下载的文件进行解压,解压后的默认目录名称为: ParaView-5.3.0-236-g091ca1c-Qt5-OpenGL2-MPI-Linux-64bit
3)修改环境变量
peng@ubuntu:~$ gedit ~/.bashrc
在所打开的文件结尾输入:
#Paraview
export PATH=/home/peng/ParaView-5.3.0-236-g091ca1c-Qt5-OpenGL2-MPI-Linux-64bit/bin:$PATH
- 4) 测试环境变量是否配置成功
peng@ubuntu:~$ paraview
若成功打开Paraview的界面,则代表配置成功:
2. 配置Paraview5.3
2.1 单用户配置
- 1) 进入Paraview根目录,并在其中创建一个文件命名为start.sh:
peng@ubuntu:~/ParaView-5.3.0-236-g091ca1c-Qt5-OpenGL2-MPI-Linux-64bit$ touch start.sh
peng@ubuntu:~/ParaView-5.3.0-236-g091ca1c-Qt5-OpenGL2-MPI-Linux-64bit$ gdit start.sh
- 2) 在start.sh中添加如下内容:
./bin/pvpython share/paraview-5.3/web/visualizer/server/pvw-visualizer.py –content ./share/paraview-5.3/web/visualizer/www –data ~/ParaView-5.3.0-236-g091ca1c-Qt5-OpenGL2-MPI-Linux-64bit/ParaView-v5.3.0 –port 9000
- 3) 执行start.sh文件,启动pvwserver:
peng@ubuntu:~/ParaView-5.3.0-236-g091ca1c-Qt5-OpenGL2-MPI-Linux-64bit$ ./start.sh
- 4) 在本地机上打开浏览器,输入:http://localhost:9000:
2.2 多用户配置
- 多用户配置建议打开3个控制台,并且全程不要关闭任何一个控制台,且均以root身份登录(sudo su);
- 虚拟机的网络连接模式改为桥接模式
-1) 打开控制台1,进入目录/home/peng(即/Home),创建一个目录“Paraview”作为Paraview的配置目录,进入该目录,并在该目录中创建4个子目录:
Logs: 包含为ParaviewWeb虚拟主机服务的Apache日志文件
pv: 包含Paraview安装的二进制文件
pvw: 包含Paraview process launcher文件
www:包含构成网站的html/css/js等文件
- 2) 返回/home/peng,拷贝Paraview的binary文件中的全部内容,为其创建一个软连接,更改pv文件夹的用户权限:
root@ubuntu:/home/peng/Paraview# cd ..
root@ubuntu:/home/peng# cp -r ParaView-5.3.0-236-g091ca1c-Qt5-OpenGL2-MPI-Linux-64bit Paraview/pv/pv-5.3.0
root@ubuntu:/home/peng# ln -s /home/peng/Paraview/pv/pv-5.3.0 /home/peng/Paraview/pv/pv-current
root@ubuntu:/home/peng# cd Paraview
root@ubuntu:/home/peng/Paraview# chown -R peng pv
root@ubuntu:/home/peng/Paraview# chgrp -R peng pv- 3) 返回pvw目录,在其中创建4个子文件夹:
bin: 包含启动pvpython服务器的脚本文件
conf:包含Paraview process launcher文件
data: 包含从官网下载的数据文件
logs: 包含访问服务器的日志文件
4) 打开控制台2,执行ifconfig命令查看主机ip地址,如:192.168.1.187 ;
5) 修改hosts文件为该ip添加域名:
root@ubuntu:/home/peng# gedit /etc/hosts在hosts文件中加入如下一行内容:
192.168.1.187 www.paraview-peng.com
“www.paraview-peng.com”为我们给ip地址192.168.1.187所起的域名。
- 6) 回到控制台1,在目录pvw/conf中创建launcher.json文件:
root@ubuntu:/home/peng/Paraview/pvw# cd conf
root@ubuntu:/home/peng/Paraview/pvw/conf# touch launcher.json
root@ubuntu:/home/peng/Paraview/pvw/conf# gedit launcher.json
在文件中写入如下内容:
{
“resources”: [ {“port_range”: [9001, 9103], “host”: “localhost”} ],
“sessionData”: {
“updir”: “/home/peng”
},“configuration”: {
“log_dir”: “/home/peng/Paraview/pvw/logs”,
“host”: “localhost”,
“endpoint”: “paraview”,
“sessionURL”: “ws://192.168.1.187/proxy?sessionId=${id}&path=ws”,
“timeout”: 25,
“upload_dir”: “/home/peng/Paraview/pvw/upload”,
“fields”: [“file”, “host”, “port”, “updir”],
“port”: 8080,
“proxy_file”: “/home/peng/Paraview/proxy.txt”
},“properties”: {
“web_path”: “/home/peng/Paraview/pv/pv-current/share/paraview-5.3/web”,
“dataDir”: “/home/peng/Paraview/pvw/data”,
“python_exec”: “/home/peng/Paraview/pv/pv-current/bin/pvpython”
},“apps”: {
“visualizer”: {
“cmd”: [
“${python_exec}”,
“-dr”,
“${web_path}/visualizer/server/pvw-visualizer.py”,
“–port”, “${port}”,
“–data”, “${dataDir}”,
“-f”,
“–authKey”, “${secret}”
],
“ready_line” : “Starting factory”
},
“lightviz”: {
“cmd”: [
“${python_exec}”,
“-dr”,
“${web_path}/lightviz/server/pvw-light-viz.py”,
“–port”, “${port}”,
“–data”, “${dataDir}”,
“-f”,
“–authKey”, “${secret}”
],
“ready_line” : “Starting factory”
}
}
}
- 7) 在目录pvw/bin中创建start.sh文件:
root@ubuntu:/home/peng/Paraview/pvw/conf# cd ../bin
root@ubuntu:/home/peng/Paraview/pvw/bin# touch start.sh
root@ubuntu:/home/peng/Paraview/pvw/bin# gedit start.sh
在文件中写入如下内容:
/home/peng/Paraview/pv/pv-current/bin/pvpython /home/peng/Paraview/pv/pv-current/lib/python2.7/site-packages/vtk/web/launcher.py /home/peng/Paraview/pvw/conf/launcher.json &
若不想关闭控制台后服务器仍然启动,可删除上面内容结尾处的“&”。
8)返回Paraview的根目录,在其中创建proxy.txt,该文件下不用填写内容,以后多用户访问时会自动填写内容。
当多用户访问服务器时,我们所创建的虚拟主机会自动为不同的用户设定一个id,将此id记录在该文件中,然后去launcher.conf中匹配,从设定好的端口范围中(如在launcher.json中设定9001-9003)选取一个,以ws://${host}/proxy?sessionId=${id}组合成的sessionURL去访问pvw,从而为该用户启动一个后台应用。
每次服务器重启后,proxy.txt文件会被清空。
root@ubuntu:/home/peng/Paraview/pvw/bin# cd ../..
root@ubuntu:/home/peng/Paraview# touch proxy.txt
root@ubuntu:/home/peng/Paraview# chown peng proxy.txt
root@ubuntu:/home/peng/Paraview# chgrp peng proxy.txt
root@ubuntu:/home/peng/Paraview# chmod 660 proxy.txt- 9) 拷贝一些自带的数据文件至pvw/data中:
root@ubuntu:/home/peng/Paraview# cp -r /home/peng/pv/pv-current/share/paraview-5.3/data/* pvw/data拷贝后的数据文件如图:
- 10) 更改pvw文件夹的用户权限:
root@ubuntu:/home/peng/Paraview# chown -R peng pvw
root@ubuntu:/home/peng/Paraview# chgrp -R peng pvw
root@ubuntu:/home/peng/Paraview# chmod u+x pvw/bin/start.sh
- 11) 拷贝网页文件至Paraview/www/visualizer,并更改www目录的用户权限:
root@ubuntu:/home/peng/Paraview# cd pv/pv-5.3.0/share/paraview-5.3/web
root@ubuntu:/home/peng/Paraview/pv/pv-5.3.0/share/paraview-5.3/web# cp -r visualizer/www /home/peng/Paraview/www/visualizer
root@ubuntu:/home/peng/Paraview/pv/pv-5.3.0/share/paraview-5.3/web# cd ../../../../..
root@ubuntu:/home/peng/Paraview# chown -R peng www
root@ubuntu:/home/peng/Paraview# chgrp -R peng www
多用户Paraview这端已经配置完毕,要想其他客户机也能在他们的浏览器中开大ParaviewWeb, 还需安装和配置Aapche。
3. 下载和安装Apache2
- 1) 打开控制台3,安装apache2和apache web server:
root@ubuntu:/home/peng# apt-get install apache2-dev apache2 libapr1-dev apache2-utils- 2) 进入目录/etc/apahce2,激活一些虚拟主机所需要使用的模,结束后重启apache2服务:
root@ubuntu:/etc/apache2# a2enmod vhost_alias
root@ubuntu:/etc/apache2# a2enmod proxy
root@ubuntu:/etc/apache2# a2enmod proxy_http
root@ubuntu:/etc/apache2# a2enmod proxy_wstunnel
root@ubuntu:/etc/apache2# a2enmod rewrite
root@ubuntu:/etc/apache2# service apache2 restart
4. 配置Apache2
- 1) 进入sites-availiable目录,创建文件001-pvw.conf:
root@ubuntu:/etc/apache2# cd sites-available
root@ubuntu:/etc/apache2/sites-available# touch 001-pvw.conf
root@ubuntu:/etc/apache2/sites-available# gedit 001-pvw.conf
在文件中写入如下内容(粗体处为之前在hosts文件中所设定的与当前主机ip地址对应的域名):
ServerName www.paraview-peng.com
ServerAdmin [email protected]
DocumentRoot /home/peng/Paraview/www
ErrorLog /home/peng/Paraview/logs/error.log
CustomLog /home/peng/Paraview/logs/access.log combined
Options Indexes FollowSymLinks
Order allow,deny
Allow from all
AllowOverride None
Require all granted
# Handle launcher forwarding
ProxyPass /paraview http://localhost:8080/paraview
# Handle WebSocket forwarding
RewriteEngine On
RewriteMap session-to-port txt:/home/peng/Paraview/proxy.txt
RewriteCond %{QUERY_STRING} ^sessionId=(.)&path=(.)$ [NC]
RewriteRule ^/proxy.*$ ws://${session-to-port:%1}/%2 [P]
“ServerAdmin [email protected]” 可就保持这样不用修改。
- 2) 激活001-pvw虚拟主机,同时禁用000-default默认主机,重启apache服务器:
root@ubuntu:/etc/apache2# a2ensite 001-pvw.conf
root@ubuntu:/etc/apache2/sites-available# service apache2 restart
root@ubuntu:/etc/apache2/sites-available# a2dissite 000-default.conf
至此,ParaviewWeb和Apache全部配置完毕。
5. 在远程客户机的浏览器中测试ParaviewWeb
- 1) 回到控制台1,进入Paraview的pvw/bin文件夹,执行start.sh文件,启动pvwserver:
root@ubuntu:/home/peng/Paraview# cd pvw/bin
root@ubuntu:/home/peng/Paraview# ./start.sh- 2) 在其他主机上(如一台windows系统的主机)打开浏览器,输入http://192.168.1.187/visualizer,即可打开ParaviewWeb的网页。 (其他主机必须与该主机在同一局域网中)。
也可通过http://www.paraview-peng.com/visualizer打开网页,但须在客户机上进行域名解析:例如,该主机为主机A,同一局域网中的一台windows系统的主机B和一台linux系统的主机C均要通过域名访问该网页,则需在B和C机器上进行域名解析,主要修改hosts文件:
——– hosts文件的位置:
| 系统类型 | host文件路径 |
|---|---|
| Windows客户机 | C:\Windows\System32\drivers\etc\hosts |
| Linux客户机 | /etc/hosts |
在hosts文件中加入如下一行内容:
192.168.1.187 www.paraview-peng.com
用“ping+域名”检验是否ping通,若通,则可通过域名直接访问。
注:每次启动服务器时,都需检查hosts文件中的ip地址是否为当前服务器主机的ip地址。
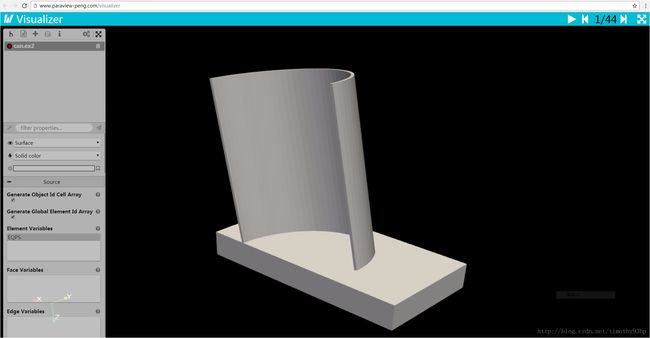
3) 经测试,目前仅支持谷歌浏览器和火狐浏览器, 在浏览器中打开如图:
点击第二个图标可显示数据文件列表(我们刚才导入data目录中的那三个文件),可选择一个数据文件打开3D图像:


