Linux(CentOS)安装、配置、设置密码、设置远程登录Redis
安装
- 我们可以通过在官网下载tar.gz的安装包,或者通过wget的方式下载
[root@localhost data]# pwd
/usr/local/data
[root@localhost data]# wget http://download.redis.io/releases/redis-4.0.1.tar.gz
- 解压
[root@localhost data]# ll
总用量 1672
-rw-r--r--. 1 root root 1711660 7月  24 2017 redis-4.0.1.tar.gz
[root@localhost data]# tar -zxvf redis-4.0.1.tar.gz
……
[root@localhost data]# ll
总用量 1676
drwxrwxr-x. 6 root root    4096 7月  24 2017 redis-4.0.1
-rw-r--r--. 1 root root 1711660 7月  24 2017 redis-4.0.1.tar.gz
- 移动到/local/usr/redis目录下去,这个纯属个人爱好
[root@localhost data]# mv redis-4.0.1 ../redis
[root@localhost data]# cd ..
[root@localhost local]# ll
总用量 4
drwxr-xr-x. 2 root root    6 4月  11 2018 bin
drwxr-xr-x. 2 root root   32 5月  14 10:58 data
drwxr-xr-x. 2 root root    6 4月  11 2018 etc
drwxr-xr-x. 2 root root    6 4月  11 2018 games
drwxr-xr-x. 2 root root    6 4月  11 2018 include
drwxr-xr-x. 2 root root    6 4月  11 2018 lib
drwxr-xr-x. 2 root root    6 4月  11 2018 lib64
drwxr-xr-x. 2 root root    6 4月  11 2018 libexec
drwxrwxr-x. 2 root root   47 12月 11 14:17 python3
drwxrwxr-x. 6 root root 4096 7月  24 2017 redis
drwxr-xr-x. 2 root root    6 4月  11 2018 sbin
drwxr-xr-x. 5 root root   49 11月  7 2018 share
drwxr-xr-x. 2 root root    6 4月  11 2018 src
[root@localhost local]# cd redis/
[root@localhost redis]# ll
总用量 268
-rw-rw-r--.  1 root root 127778 7月  24 2017 00-RELEASENOTES
-rw-rw-r--.  1 root root     53 7月  24 2017 BUGS
-rw-rw-r--.  1 root root   1815 7月  24 2017 CONTRIBUTING
-rw-rw-r--.  1 root root   1487 7月  24 2017 COPYING
drwxrwxr-x.  6 root root    124 7月  24 2017 deps
-rw-rw-r--.  1 root root     11 7月  24 2017 INSTALL
-rw-rw-r--.  1 root root    151 7月  24 2017 Makefile
-rw-rw-r--.  1 root root   4223 7月  24 2017 MANIFESTO
-rw-rw-r--.  1 root root  20530 7月  24 2017 README.md
-rw-rw-r--.  1 root root  57764 7月  24 2017 redis.conf
-rwxrwxr-x.  1 root root    271 7月  24 2017 runtest
-rwxrwxr-x.  1 root root    280 7月  24 2017 runtest-cluster
-rwxrwxr-x.  1 root root    281 7月  24 2017 runtest-sentinel
-rw-rw-r--.  1 root root   7606 7月  24 2017 sentinel.conf
drwxrwxr-x.  3 root root   4096 7月  24 2017 src
drwxrwxr-x. 10 root root    167 7月  24 2017 tests
drwxrwxr-x.  8 root root   4096 7月  24 2017 utils
[root@localhost redis]# cd ..
[root@localhost local]#
- 接下来就是编译了,通过make命令,如果编译的时候报gcc命令找不到的话,可以通过下面的命令安装gcc命令,gcc是c的编译命令
[root@localhost local]# yum install gcc-c++
下面就通过make来编译,make是自动编译,会根据Makefile中描述的内容来进行编译。
[root@localhost local]# cd redis/
[root@localhost redis]# make
cd src && make all
make[1]: 进入目录“/usr/local/redis/src”
    CC Makefile.dep
……
Hint: It's a good idea to run 'make test' ;)
make[1]: 离开目录“/usr/local/redis/src”
[root@localhost redis]#
- 可以看到在src目录下生成了几个新的文件。
[root@localhost redis]# ll -tr src
总用量 37104
-rw-rw-r--. 1 root root    3779 7月  24 2017 zmalloc.h
……
-rwxr-xr-x. 1 root root 5741144 5月  14 11:07 redis-check-aof
[root@localhost redis]#
为了使用方便,我们需要将这个几个文件加到/usr/local/bin目录下去。这个目录在Path下面的话,就可以直接执行这几个命令了。
[root@localhost redis]# make install
cd src && make install
make[1]: 进入目录“/usr/local/redis/src”
    CC Makefile.dep
make[1]: 离开目录“/usr/local/redis/src”
make[1]: 进入目录“/usr/local/redis/src”

Hint: It's a good idea to run 'make test' ;)

    INSTALL install
    INSTALL install
    INSTALL install
    INSTALL install
    INSTALL install
make[1]: 离开目录“/usr/local/redis/src”
[root@localhost redis]# cd ..
[root@localhost local]# ll
总用量 4
drwxr-xr-x. 2 root root  134 5月  14 11:12 bin
drwxr-xr-x. 2 root root   32 5月  14 10:58 data
drwxr-xr-x. 2 root root    6 4月  11 2018 etc
drwxr-xr-x. 2 root root    6 4月  11 2018 games
drwxr-xr-x. 2 root root    6 4月  11 2018 include
drwxr-xr-x. 2 root root    6 4月  11 2018 lib
drwxr-xr-x. 2 root root    6 4月  11 2018 lib64
drwxr-xr-x. 2 root root    6 4月  11 2018 libexec
drwxrwxr-x. 2 root root   47 12月 11 14:17 python3
drwxrwxr-x. 6 root root 4096 7月  24 2017 redis
drwxr-xr-x. 2 root root    6 4月  11 2018 sbin
drwxr-xr-x. 5 root root   49 11月  7 2018 share
drwxr-xr-x. 2 root root    6 4月  11 2018 src
[root@localhost local]# ll bin
总用量 21768
-rwxr-xr-x. 1 root root 2451928 5月  14 11:12 redis-benchmark
-rwxr-xr-x. 1 root root 5741144 5月  14 11:12 redis-check-aof
-rwxr-xr-x. 1 root root 5741144 5月  14 11:12 redis-check-rdb
-rwxr-xr-x. 1 root root 2606144 5月  14 11:12 redis-cli
lrwxrwxrwx. 1 root root      12 5月  14 11:12 redis-sentinel -> redis-server
-rwxr-xr-x. 1 root root 5741144 5月  14 11:12 redis-server
[root@localhost local]#
可以看到,这几个文件就已经被加载到bin目录下了
6. 下面启动服务器,来看看安装是否成功。使用redis-server命令。
[root@localhost local]# redis-server
4763:C 14 May 11:23:16.886 # oO0OoO0OoO0Oo Redis is starting oO0OoO0OoO0Oo
4763:C 14 May 11:23:16.886 # Redis version=4.0.1, bits=64, commit=00000000, modified=0, pid=4763, just started
4763:C 14 May 11:23:16.886 # Warning: no config file specified, using the default config. In order to specify a config file use redis-server /path/to/redis.conf
4763:M 14 May 11:23:16.887 * Increased maximum number of open files to 10032 (it was originally set to 1024).
                _._
           _.-``__ ''-._
      _.-``    `.  `_.  ''-._           Redis 4.0.1 (00000000/0) 64 bit
  .-`` .-```.  ```\/    _.,_ ''-._
 (    '      ,       .-`  | `,    )     Running in standalone mode
 |`-._`-...-` __...-.``-._|'` _.-'|     Port: 6379
 |    `-._   `._    /     _.-'    |     PID: 4763
  `-._    `-._  `-./  _.-'    _.-'
 |`-._`-._    `-.__.-'    _.-'_.-'|
 |    `-._`-._        _.-'_.-'    |           http://redis.io
  `-._    `-._`-.__.-'_.-'    _.-'
 |`-._`-._    `-.__.-'    _.-'_.-'|
 |    `-._`-._        _.-'_.-'    |
  `-._    `-._`-.__.-'_.-'    _.-'
      `-._    `-.__.-'    _.-'
          `-._        _.-'
              `-.__.-'

4763:M 14 May 11:23:16.888 # WARNING: The TCP backlog setting of 511 cannot be enforced because /proc/sys/net/core/somaxconn is set to the lower value of 128.
4763:M 14 May 11:23:16.888 # Server initialized
4763:M 14 May 11:23:16.888 # WARNING overcommit_memory is set to 0! Background save may fail under low memory condition. To fix this issue add 'vm.overcommit_memory = 1' to /etc/sysctl.conf and then reboot or run the command 'sysctl vm.overcommit_memory=1' for this to take effect.
4763:M 14 May 11:23:16.888 # WARNING you have Transparent Huge Pages (THP) support enabled in your kernel. This will create latency and memory usage issues with Redis. To fix this issue run the command 'echo never > /sys/kernel/mm/transparent_hugepage/enabled' as root, and add it to your /etc/rc.local in order to retain the setting after a reboot. Redis must be restarted after THP is disabled.
4763:M 14 May 11:23:16.888 * Ready to accept connections
看到这个界面的话,就表示安装成功了。
下面通过再启动一个linux客户端,通过server-cli shutdown来关闭服务器。
[root@localhost ~]# redis-cli shutdown
[root@localhost ~]#

# 下面是刚刚服务器启动的客户端的log
4763:M 14 May 11:25:20.808 # User requested shutdown...
4763:M 14 May 11:25:20.808 * Saving the final RDB snapshot before exiting.
4763:M 14 May 11:25:20.818 * DB saved on disk
4763:M 14 May 11:25:20.818 # Redis is now ready to exit, bye bye...
[root@localhost local]#
配置
可以看到,前面在启动redis服务器后,都是在前台启动的,需要重新启动一个客户端来进行登陆操作。这样非常不方便,所以,我们需要设置后台启动。
在redis.conf的配置文件里面。做如下的修改:
[root@localhost local]# cd redis/
[root@localhost redis]# vi redis.conf

# 进去之后输入  set nu  显示出来行号
# 下面是修改内容
135 # Note that Redis will write a pid file in /var/run/redis.pid when daemonized.
136 daemonize no
修改为:
136 daemonize yes
下面需要设置redis服务器开机自动启动:
要先让redis服务自动启动的话,首先需要在/etc/init.d目录下创建redis的启动脚本。
将redis安装目录下的utils/redis_init_script复制到/etc/init.d目录下,命名为redis(名字简单,使用方便)
[root@localhost redis]# cd utils/
[root@localhost utils]# cp redis_init_script /etc/init.d/redis
[root@localhost utils]# ll /etc/init.d/redis
-rwxr-xr-x. 1 root root 1098 5月  14 11:41 /etc/init.d/redis
[root@localhost utils]#
继续编辑启动文件,修改其中指定的pid和配置文件。
[root@localhost utils]# vi redis_init_script

# 修改
10 PIDFILE=/var/run/redis_${REDISPORT}.pid
11 CONF="/etc/redis/${REDISPORT}.conf"
# 修改为:
10 PIDFILE=/var/redis/run/redis_${REDISPORT}.pid
11 CONF="/etc/redis/redis.conf"
首先创建存放pid的目录为/var/redis/run
[root@localhost utils]# cd /var/
[root@localhost var]# pwd
/var
[root@localhost var]# mkdir redis
[root@localhost var]# cd redis/
[root@localhost redis]# mkdir run
[root@localhost redis]# ls
run
[root@localhost redis]# pwd
/var/redis
[root@localhost redis]#
接下来,我们需要把配置文件复制一份到/etc/redis这个目录下面去
[root@localhost redis]# cd /etc/
[root@localhost etc]# mkdir redis
[root@localhost etc]# cd redis
[root@localhost redis]# ll
总用量 0
[root@localhost redis]# cp /usr/local/redis/redis.conf ./
[root@localhost redis]# ll
总用量 60
-rw-r--r--. 1 root root 57765 5月  14 11:52 redis.conf
[root@localhost redis]# pwd
/etc/redis
[root@localhost redis]#
修改配置文件中的pid为前面配置的pid。
[root@localhost redis]# vi redis.conf

# 修改
158 pidfile /var/run/redis_6379.pid
# 修改为:
158 pidfile /var/redis/run/redis_6379.pid
至此为止,我们已经可以通过service redis start/stop来启动和关闭redis服务了。
如果出现这种错误
[root@localhost ~]# service redis start
Starting Redis server...
5253:C 14 May 13:35:59.954 # Fatal error, can't open config file '/etc/redis/6379.conf'
这是由于配置的文件名称不一致所导致,将文件名称进行更改一下就OK了
[root@localhost ~]# cd /etc/redis/
[root@localhost redis]# ls
redis.conf
[root@localhost redis]# cp redis.conf 6379.conf
[root@wzf redis]# ls
6379.conf  redis.conf
[root@localhost redis]# rm -rf redis.conf
[root@localhost redis]# service redis start
Starting Redis server...
5302:C 14 May 13:39:52.309 # oO0OoO0OoO0Oo Redis is starting oO0OoO0OoO0Oo
5302:C 14 May 13:39:52.309 # Redis version=4.0.1, bits=64, commit=00000000, modified=0, pid=5302, just started
到这里就正常运行了。
最后只需要通过chkconfig redis on命令来设置开机启动即可。
如果提示redis 服务不支持 chkconfig的话
[root@localhost ~]# chkconfig redis on
服务 redis 不支持 chkconfig
只需要在/etc/init.d/redis这个启动脚本的第二行后面加上下面的内容即可。
添加如下内容
# chkconfig:2345 90 10
#
# description:Redis is a persistent key-value database

[root@localhost ~]# vi /etc/init.d/redis
[root@localhost ~]# chkconfig redis on
[root@localhost ~]#
OK,搞定
接下来,我们来设置一下Redis的密码
连接Redis之后,通过如下命令设置密码
127.0.0.1:6379> config set requirepass 123456
这样就将密码设置成了123456
设置之后,可通过以下指令查看密码
127.0.0.1:6379> config get requirepass
1) "requirepass"
2) "123456"
127.0.0.1:6379>
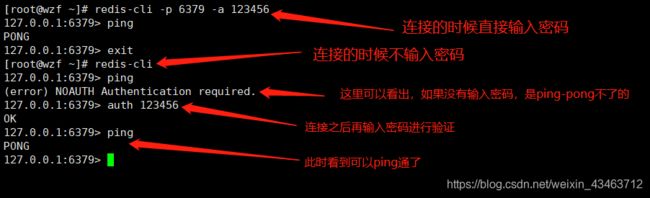
密码设置之后,当你退出再次连上redis的时候,就需要输入密码了,不然是无法操作的。这里有两种方式输入密码,一是连接的时候直接输入密码,而是连接上之后再输入密码,分别如下所示:
设置远程连接
将redis.conf配置文件进行如下修改
[root@localhost ~]# vi /usr/local/redis/redis.conf

# 将内容进行如下修改
69 # bind 127.0.0.1
88 protected-mode no
重启Redis服务再次进行开启
redis-cli shutdown
service redis start
再次检查Redis进程
[root@localhost ~]# ps aux | grep redis
root      5480  0.0  0.2  16180  5276 pts/1    S+   14:37   0:00 redis-cli
root      5734  0.0  0.3  41712  7520 ?        Ssl  15:03   0:01 /usr/local/bin/redis-server *:6379
root      5751  0.0  0.0 112724   988 pts/0    S+   15:27   0:00 grep --color=auto redis
看到server后面变成了*,而不是127.0.0.1了,说明成功
如果是购买的云服务器,请确保6379端口开放,到此结束
此时就可以远程访问了。