第六篇 消息总线 (Spring Cloud Bus)
一、实现原理
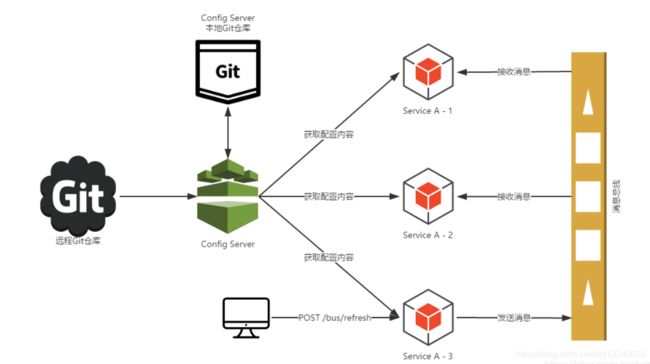
1、ConfigServer(配置中心服务端)从远端git拉取配置文件并在本地git一份,ConfigClient(微服务)从ConfigServer端获取自己对应 配置文件;
2、当远端git仓库配置文件发生改变,ConfigServer如何通知到ConfigClient端,即ConfigClient如何感知到配置发生更新?
Spring Cloud Bus会向外提供一个http接口,即图中的/bus/refresh。我们将这个接口配置到远程的git的webhook上,当git上的文件内容发生变动时,就会自动调用/bus-refresh接口。Bus就会通知config-server,config-server会发布更新消息到消息总线的消息队列中,其他服务订阅到该消息就会信息刷新,从而实现整个微服务进行自动刷新
二:实现方式
实现方式一:某个微服务承担配置刷新的职责
1、提交配置触发post调用客户端A的bus/refresh接口
2、客户端A接收到请求从Server端更新配置并且发送给Spring Cloud Bus总线
3、Spring Cloud bus接到消息并通知给其它连接在总线上的客户端,所有总线上的客户端均能收到消息
4、其它客户端接收到通知,请求Server端获取最新配置
5、全部客户端均获取到最新的配置
存在问题:
1、打破了微服务的职责单一性。微服务本身是业务模块,它本不应该承担配置刷新的职责。2、破坏了微服务各节点的对等性。3、有一定的局限性。WebHook的配置随着承担刷新配置的微服务节点发生改变。
改进如下方式二:配置中心Server端承担起配置刷新的职责,原理图如下:
1、提交配置触发post请求给server端的bus/refresh接口
2、server端接收到请求并发送给Spring Cloud Bus总线
3、Spring Cloud bus接到消息并通知给其它连接到总线的客户端
4、其它客户端接收到通知,请求Server端获取最新配置
5、全部客户端均获取到最新的配置
三:实现步骤
备注:这里给出方式二配置方法,方式一的区别在:因为是某个微服务承担配置刷新的职责,所以Server端不需要配置 Rabbitmq和添加bus-amqp的依赖。
<一>Config Server端配置(提前安装rabbitmq移步链接:)
1、添加依赖
        my-springcloud
        org.example
        1.0-SNAPSHOT

    4.0.0

    config-server


            org.springframework.cloud
            spring-cloud-starter-netflix-eureka-client


            org.springframework.cloud
            spring-cloud-config-server


            org.springframework.cloud
            spring-cloud-starter-bus-amqp
2、修改配置文件Bootstrap.yml文件
server:
  port: 5000

#指定服务注册到哪里
eureka:
  client:
    service-url:
      defaultZone: http://localhost:1111/eureka/
  instance:
    prefer-ip-address: true

spring:
  application:
    name: config-server
  cloud:
    config:
      label: master  #配置仓库的分支
      server:
        git:
          uri: https://gitee.com/xiaocheng12/my-springcloud.git/    #配置git仓库地址
          searchPaths: config   #配置仓库路径
          username: [email protected]   #访问git仓库的用户名
          password: xiaocheng006   #访问git仓库的用户名密码
  rabbitmq:
      host: localhost   #本地环境不需要配置mq,但是需要启动mq,Springboot会自动连接本地mq
      port: 5672
      username: guest
      password: guest

#所有端点开放
management:
  endpoints:
    web:
      exposure:
        include: "*"
3、启动类注解
@SpringBootApplication
@EnableConfigServer
@EnableDiscoveryClient
public class ConfigServerApplication {

    public static void main(String[] args) {
        SpringApplication.run(ConfigServerApplication.class, args);
    }

}
<二>Config Client端配置
1、添加依赖
        my-springcloud
        org.example
        1.0-SNAPSHOT

    4.0.0

    config-client


            org.springframework.boot
            spring-boot-starter-web


            org.springframework.cloud
            spring-cloud-starter-netflix-eureka-client


            org.springframework.cloud
            spring-cloud-starter-config


            org.springframework.cloud
            spring-cloud-starter-bus-amqp
2、修改配置文件Bootstrap.yml文件
server:
  port: 5001

#指定服务注册到哪里
eureka:
  client:
    service-url:
      defaultZone: http://localhost:1111/eureka/
  instance:
    prefer-ip-address: true

spring:
  application:
    name: myconfig   #对应配置文件规则中的{application}部分
  cloud:
    config:
      label: test  #指明远程仓库的分支,对应配置文件规则中的{label}部分
      profile: dev    #指明远程仓库的分支下的环境,对应配置文件规则中的{profile}部分
      discovery:
        enabled: true      #是从配置中心读取文件
        serviceId: config-server   #配置中心的serviceId,即服务名 和之前通过url访问一样
3、添加注解: @RefreshScope添加在需要刷新的配置文件上
注明:自动刷新只能刷新 @RefreshScope 注解下的配置,一些特殊配置,如数据库等,需要同样先设置数据库链接ConfigServer类,然后通过加 @RefreshScope 注解方式
@RestController
@RefreshScope
public class TestController {


    @Value("${from}")
    private String from;


    @Autowired
    private Environment environment;

    /**
     * 从配置文件中获取属性
     * @return
     */
    @RequestMapping("/from")
    public String from()
    {
        return this.from;
    }

    /**
     *  从环境变量中获取属性
     * @return
     */
    @RequestMapping("/from/environment")
    public String fromEnvironment()
    {
        String from = environment.getProperty("from");
        return from;
    }
}
到这里Config-Server端和Client端已经配置完毕,先后启动Server端和Client端,post请求方式进行测试:http://localhost:5000//actuator/bus-refresh 发现客户端的配置文件,成功实现了动态刷新

