ASP.NET MVC 3 (Adding a Create Method and Create View ) (6/9)
Adding a Create Method and Create View
In this section we're going to implement the support necessary to enable users to create new movies in the database. We'll do this by creating a controller action method that we can call using /Movies/Create on the end of the URL.
Implementing the code to handle /Movies/Create in the URL is a two-step process. When a user first visits the /Movies/Create URL we want to show an HTML form that they can fill out to enter a new movie. Then when the user submits the form and posts the data back to the server, we want to retrieve the values they posted and save them in the database.
We'll implement these two steps using two Create methods in the MoviesController class. One method will display the HTML form that the user fills in to create a new movie. The second method will process the posted data when the user submits the HTML form and save a new Movie object in the database.
The following example shows the code to add to the MoviesController class to implement this:
public ActionResult Create()

{

    return View();

}


[HttpPost]

public ActionResult Create(Movie newMovie)

{

    if (ModelState.IsValid)

    {

        db.Movies.Add(newMovie);

        db.SaveChanges();

        return RedirectToAction("Index");

    }

    else

    {

        return View(newMovie);

    }

}
The ModelState.IsValid test in the code uses the default model binder to verify that the data submitted in the form can be used to create a Movie object. We'll talk more about this in a moment.
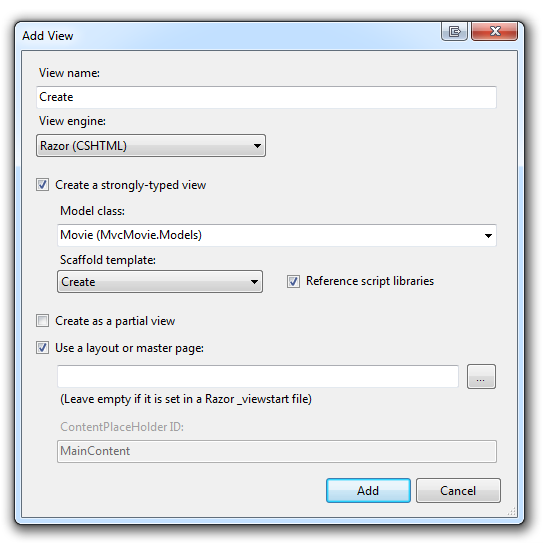
Let's now actually implement the Create view that we'll use to display the form to the user. Right-click inside the first Create method and select Add View to create the view template for the movie form.
Specify that you're going to pass a Movie object to the view template as its view data class, and indicate that you want to scaffold a Create template.

After you click the Add button, the /Movies/Create.cshtml view template is created. Because you selected Create in the Scaffold template list, Visual Web Developer automatically scaffolded some default content. The scaffolding created an HTML form and a place for validation error messages. The scaffolding tool in Visual Web Developer examined the Movies class and created code to render <label> and <input> elements for each property of the class. The example below shows the scaffolded Create view.
@model MvcMovie.Models.Movie


@{

    ViewBag.Title = "Create";

}


<h2>Create</h2>


<script src="@Url.Content("/Scripts/jquery.validate.min.js")" type="text/javascript"></script>

<script src="@Url.Content("/Scripts/jquery.validate.unobtrusive.min.js")" type="text/javascript"></script>


@using (Html.BeginForm()) {

    @Html.ValidationSummary(true)

    <fieldset>

        <legend>Movie</legend>


        <div class="editor-label">

            @Html.LabelFor(model => model.Title)

        </div>

        <div class="editor-field">

            @Html.EditorFor(model => model.Title)

            @Html.ValidationMessageFor(model => model.Title)

        </div>


        <div class="editor-label">

            @Html.LabelFor(model => model.ReleaseDate)

        </div>

        <div class="editor-field">

            @Html.EditorFor(model => model.ReleaseDate)

            @Html.ValidationMessageFor(model => model.ReleaseDate)

        </div>


        <div class="editor-label">

            @Html.LabelFor(model => model.Genre)

        </div>

        <div class="editor-field">

            @Html.EditorFor(model => model.Genre)

            @Html.ValidationMessageFor(model => model.Genre)

        </div>


        <div class="editor-label">

            @Html.LabelFor(model => model.Price)

        </div>

        <div class="editor-field">

            @Html.EditorFor(model => model.Price)

            @Html.ValidationMessageFor(model => model.Price)

        </div>


        <p>

            <input type="submit" value="Create" />

        </p>

    </fieldset>

}


<div>

    @Html.ActionLink("Back to List", "Index")

</div>
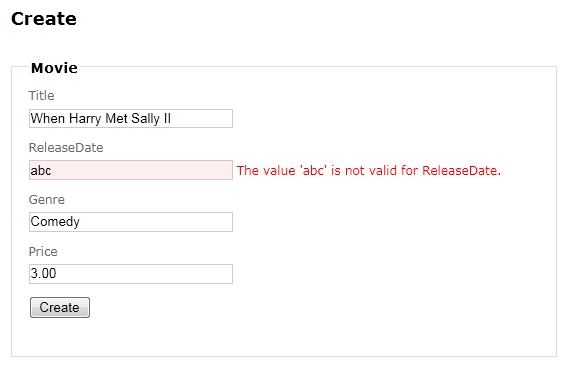
The scaffolding correctly assumes that the database will generate the ID field for a new movie, so it doesn't include the ID in the Create view. The LabelFor helper displays the name of the field ("Title", "Release date", "Genre", or "Price"). The EditorFor helper displays an HTML <input> element where the user can enter a value. The ValidationMessageFor helper displays validation messages. (You'll see an example of a validation message below when "abc" is entered for the date.)
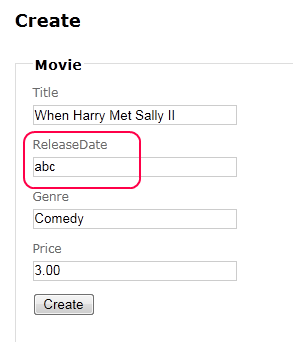
How do we know if a field is not valid? The ModelState.IsValid property will tell us. If a field value cannot be used as a property value for the model, the Create form will be redisplayed showing the data that the user submitted and an error message for each property that had an error. For example, suppose you submit a new movie with an invalid release date like "abc":

When you click the Create button, the if (ModelState.IsValid) call returns false, so the Create form is redisplayed with the data originally submitted plus an error. You need to correct only the field containing the error; all the data is preserved so you don't need to re-enter it.

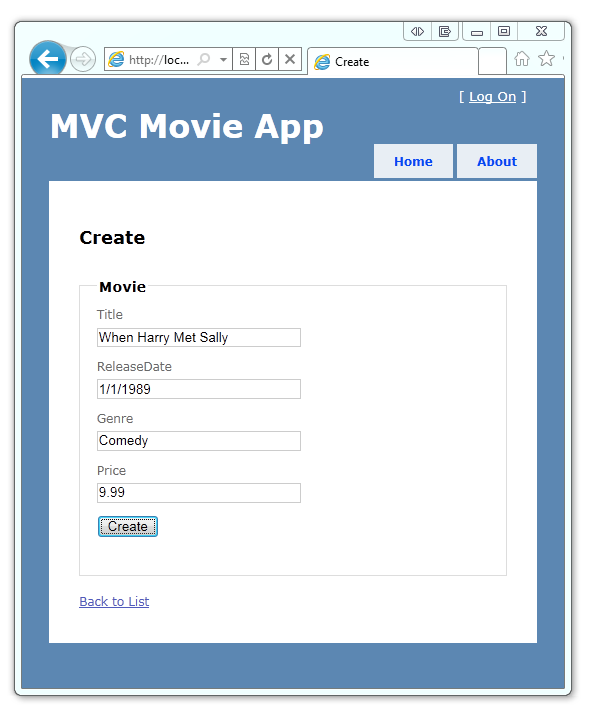
Now let's now create a new movie and add it to the database. Run the application and navigate to the MoviesController class by appending /Movies to the URL. Click the Create link.

After you click the Create button, the movie is saved in the database and the controller redirects you to the Index page, where the movie is displayed.

You've probably noticed that the price displayed is $10, not the $9.99 we entered. The database created by the code-first approach did not create the right kind of field for money, so the value you entered was rounded up. We'll fix this problem later in the tutorial.
When the Create button was clicked, the values in the Create form were posted (using HTTP POST) to the Create method of the movie controller. Just like you saw earlier when ASP.NET MVC automatically took the numTimes and name parameter values out of the URL and mapped them to parameters for a method, the system automatically takes the form fields from a POST and maps them to an object in the model. In this case, values from HTML fields like ReleaseDate and Title are automatically put into the corresponding properties of a new instance of the Movie class. The code-first approach enables the Movie object to be saved in the Movie table of the MovieDBContext database that was generated by the code-first approach.
Let's look at the second Create method from the MoviesController again. Notice how it takes a Movie object as a parameter:
[HttpPost]

public ActionResult Create(Movie newMovie)

{

    if (ModelState.IsValid)

    {

        db.Movies.Add(newMovie);

        db.SaveChanges();

        return RedirectToAction("Index");

    }

    else

    {

        return View(newMovie);

    }

}
This Movie object was passed to the [HttpPost] version of the Create action method, which saved it in the database and then redirected the user back to the Index action method. The code-first approach transparently handled adding the new movie to the database with two lines of code. The Index method ends up displaying the movie list:

With only a few lines of hand-written code plus the scaffolded code, we have the beginning of an application that can create and display data from a database. In the next section, we'll add validation to the model to make sure the user doesn't enter a movie without a title.