阿里云 官方文档 (必看几遍)
https://help.aliyun.com/document\_detail/58646.html?spm=a2c4g.11186623.6.547.7c2b7556jv2l3F
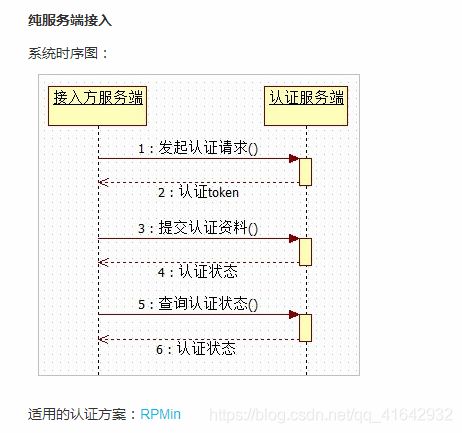
如果你的是网页版或者是微信小程序 适用的认证方案:RPH5BioOnly 和 RPMin 
这次我用的是 RPMin
准备工作
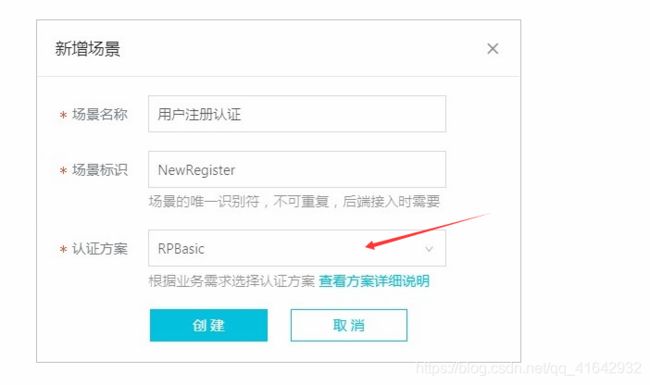
1.需要要先去设置场景 按照以下步骤执行
https://help.aliyun.com/document\_detail/59975.html?spm=a2c4g.11186623.6.549.596d7556enMgP2 
认证方案 请选择 RPMin 适用 网页和 小程序 公众号
场景标识就是以后需要用到的 $biz 请先记得
2.获取AccessKey 。这个是为了安全起见创建子用户 。可以参考以下的
https://help.aliyun.com/document\_detail/63821.html?spm=a2c4g.11186623.6.554.6d5178a2ZYrAYY
走完这个你会得到 Access Key ID 和 Access Key Secret 请一定妥善保管 丢了就没有了
3.俗话说 : 兵草未动,粮草先行。先去买个测试流量包。免费的100条 。
https://common-buy.aliyun.com/?commodityCode=cloudauthflowbag
4.提交认证资料(需要先了解 后面我用到了我再说)
https://help.aliyun.com/document\_detail/58176.html?spm=a2c4g.11186623.6.560.5e2f7b98SbkCcs
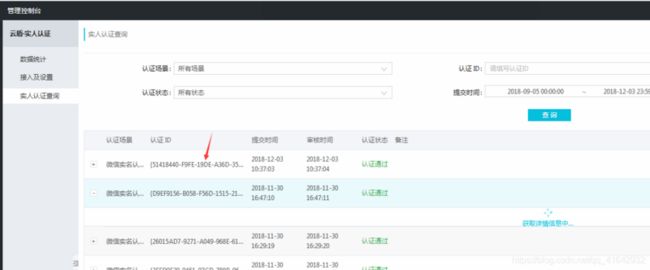
5.查询认证状态: 重点 需要与当前认证任务在GetVerifyToken时的认证ID保持一致。
就是这个id 这个是带 ‘{ }’ 这个括号一定要带上哈 切记 
https://help.aliyun.com/document\_detail/57049.html?spm=a2c4g.11186623.6.558.6b8a2daeqf2otb
好 以上只是废话 code才是关键
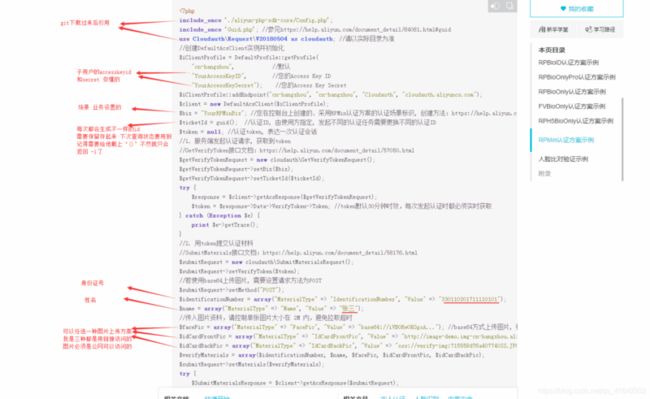
GitHub,引入 aliyun-php-sdk-core和 aliyun-php-sdk-cloudauth。
说明 两个SDK 都必须引入。其中 aliyun-php-sdk-core为阿里云的核心SDK, aliyun-php-sdk-cloudauth为实人认证的SDK。
RPMin认证方案示例
setBiz($biz);
$getVerifyTokenRequest->setTicketId($ticketId);
try {
    $response = $client->getAcsResponse($getVerifyTokenRequest);
    $token = $response->Data->VerifyToken->Token; //token默认30分钟时效,每次发起认证时都必须实时获取
} catch (Exception $e) {
    print $e->getTrace();
}
//2. 用token提交认证材料
//SubmitMaterials接口文档:https://help.aliyun.com/document_detail/58176.html
$submitRequest = new cloudauth\SubmitMaterialsRequest();
$submitRequest->setVerifyToken($token);
//若使用base64上传图片, 需要设置请求方法为POST
$submitRequest->setMethod("POST");
$identificationNumber = array("MaterialType" => "IdentificationNumber", "Value" => "330110201711110101");
$name = array("MaterialType" => "Name", "Value" => "张三");
//传入图片资料,请控制单张图片大小在 2M 内,避免拉取超时
$facePic = array("MaterialType" => "FacePic", "Value" => "base64://iVBORw0KGgoA..."); //base64方式上传图片, 格式为"base64://图片base64字符串", 以"base64://"开头且图片base64字符串去掉头部描述(如"data:image/png;base64,"), 并注意控制接口请求的Body在8M以内
$idCardFrontPic = array("MaterialType" => "IdCardFrontPic", "Value" => "http://image-demo.img-cn-hangzhou.aliyuncs.com/example.jpg"); //http方式上传图片, 此http地址须可公网访问
$idCardBackPic = array("MaterialType" => "IdCardBackPic", "Value" => "oss://verify-img:715559d76a40774OSS.JPG"); //oss方式上传图片, 此oss文件地址须可公开访问
$verifyMaterials = array($identificationNumber, $name, $facePic, $idCardFrontPic, $idCardBackPic);
$submitRequest->setMaterials($verifyMaterials);
try {
    $SubmitMaterialsResponse = $client->getAcsResponse($submitRequest);
    //由于审核需要时间,SubmitMaterials接口并不保证同步返回认证结果,可能会返回认证中状态, 此时需要使用GetStatus接口轮询认证结果。
    //GetStatus接口文档:https://help.aliyun.com/document_detail/57049.html
    //$getStatusRequest = new cloudauth\GetStatusRequest();
    //$getStatusRequest->setBiz($biz);
    //$getStatusRequest->setTicketId($ticketId);
    //$response = $client->getAcsResponse($getStatusRequest);
    //$statusCode = $response->Data->StatusCode;
    //后续业务处理
} catch (ServerException $e) {
    print $e->getMessage();
} catch (ClientException $e) {
    print $e->getMessage();
}
//常见问题:https://help.aliyun.com/document_detail/57640.html
Guid.php
功能说明
获取认证状态 我是单独拿出来操作的
//获取认证状态
    public function getstate(){

//        {D9EF9156-B058-F56D-1515-211BF38768B8} 需要取到大括号

        $ticketId = $_GET['ticketId'];


        require APPPATH.'third_party/aliyun-php-sdk-core/Config.php';
        require APPPATH.'third_party/Cloudauth/Request/V20180807/GetStatusRequest.php';
        include_once 'Guid.php'; //参见https://help.aliyun.com/document_detail/64081.html#guid


        //创建DefaultAcsClient实例并初始化
        $iClientProfile = DefaultProfile::getProfile(
            "cn-hangzhou",            //默认
            "xxxxxxxxxxxx",        //您的Access Key ID
            "xxxxxxxxxxxx");    //您的Access Key Secret
        $iClientProfile::addEndpoint("cn-hangzhou", "cn-hangzhou", "Cloudauth", "cloudauth.aliyuncs.com");

        $biz = "YourRPMinBiz"; //您在控制台上创建的、采用RPMin认证方案的认证场景标识, 创建方法:https://help.aliyun.com/document_detail/59975.html


        $getStatusRequest = new GetStatusRequest();
        $getStatusRequest->setBiz($biz);
        $getStatusRequest->setTicketId($ticketId);

        $client = new DefaultAcsClient($iClientProfile);
        $response = $client->getAcsResponse($getStatusRequest);
        $statusCode = $response->Data->StatusCode;

        echo  $statusCode;

    }