一、下载Xxl-Job源代码并导入本地并运行
Github地址:
https://github.com/xuxueli/xxl-job
中文文档地址:
https://www.xuxueli.com/xxl-job/
1.使用Idea或Eclipse导入
2.执行sql脚本(红色标记处)

3.运行xxl-job-admin(xxl-job后台管理,主要方便管理各种各样的任务)
注意:在运行之前,需要把2的sql脚本执行完毕,并修改数据库连接池。
正常启动,访问地址为:http://localhost:8080/xxl-job-admin
效果图,如下所示:
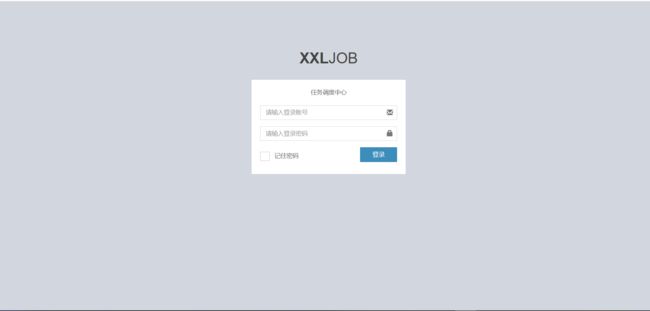
用户名默认为admin
密码为123456
输入后,进入这个界面,如图:

这样就表示Xxl-Job成功运行了。确保运行没问题后,就可以开始下一步。
二、添加执行器(Xxl-Job源代码就一个Example,可以复用过来,你也可以选择自己新建项目,新建项目可以在Xxl-Job基础上,也可以放在其它项目中)
1.新建一个Maven项目,命名为blog-xxl-job。
2.导入Maven依赖
   com.xuxueli
   xxl-job-core
   2.2.0


   org.springframework.cloud
   spring-cloud-starter-netflix-eureka-client


   org.springframework.boot
   spring-boot-starter-web
3.新建application.yml配置文件并添加如下内容
#eureka
eureka.client.serviceUrl.defaultZone=http://localhost:8761/eureka/
# web port
server.port=8081
# no web
#spring.main.web-environment=false
# log config
logging.config=classpath:logback.xml
### xxl-job admin address list, such as "http://address" or "http://address01,http://address02"
xxl.job.admin.addresses=http://127.0.0.1:8080/xxl-job-admin
### xxl-job, access token
xxl.job.accessToken=
### xxl-job executor appname
xxl.job.executor.appname=blog-xxl-job-executor
### xxl-job executor registry-address: default use address to registry , otherwise use ip:port if address is null
xxl.job.executor.address=
### xxl-job executor server-info
xxl.job.executor.ip=
xxl.job.executor.port=9999
### xxl-job executor log-path
xxl.job.executor.logpath=/data/applogs/xxl-job/jobhandler
### xxl-job executor log-retention-days
xxl.job.executor.logretentiondays=30
可以不用eureka,这里我的项目中用到eureka所以增加该配置。
增加logback.xml配置:
 logback


   %d{HH:mm:ss.SSS} %contextName [%thread] %-5level %logger{36} - %msg%n


  ${log.path}

   ${log.path}.%d{yyyy-MM-dd}.zip


   %date %level [%thread] %logger{36} [%file : %line] %msg%n
4.编写Application类
package com.springcloud.blog.job.execute;

import org.springframework.boot.SpringApplication;
import org.springframework.boot.autoconfigure.SpringBootApplication;
import org.springframework.cloud.client.discovery.EnableDiscoveryClient;
import org.springframework.cloud.netflix.eureka.EnableEurekaClient;

@EnableEurekaClient
@EnableDiscoveryClient
@SpringBootApplication
public class BlogXxlJobExecutorApplication {
 public static void main(String[] args) {
  SpringApplication.run(BlogXxlJobExecutorApplication.class, args);
 }

}
5.编写Job执行器
package com.springcloud.blog.job.execute.jobhandler; import com.xxl.job.core.biz.model.ReturnT; import com.xxl.job.core.handler.IJobHandler; import com.xxl.job.core.handler.annotation.XxlJob; import com.xxl.job.core.log.XxlJobLogger; import com.xxl.job.core.util.ShardingUtil; import org.slf4j.Logger; import org.slf4j.LoggerFactory; import org.springframework.stereotype.Component; import java.io.BufferedInputStream; import java.io.BufferedReader; import java.io.DataOutputStream; import java.io.InputStreamReader; import java.net.HttpURLConnection; import java.net.URL; import java.util.Arrays; import java.util.concurrent.TimeUnit; /** * XxlJob开发示例(Bean模式) ** 开发步骤: * 1、在Spring Bean实例中,开发Job方法,方式格式要求为 "public ReturnT
execute(String param)" * 2、为Job方法添加注解 "@XxlJob(value="自定义jobhandler名称", init = "JobHandler初始化方法", destroy = "JobHandler销毁方法")",注解value值对应的是调度中心新建任务的JobHandler属性的值。 * 3、执行日志:需要通过 "XxlJobLogger.log" 打印执行日志; * * @author xuxueli 2019-12-11 21:52:51 */ @Component public class SampleXxlJob { private static Logger logger = LoggerFactory.getLogger(SampleXxlJob.class); /** * 1、简单任务示例(Bean模式) */ @XxlJob("demoJobHandler") public ReturnT demoJobHandler(String param) throws Exception { XxlJobLogger.log("XXL-JOB, Hello World."); for (int i = 0; i < 5; i++) { XxlJobLogger.log("beat at:" + i); TimeUnit.SECONDS.sleep(2); } return ReturnT.SUCCESS; } /** * 2、分片广播任务 */ @XxlJob("shardingJobHandler") public ReturnT shardingJobHandler(String param) throws Exception { // 分片参数 ShardingUtil.ShardingVO shardingVO = ShardingUtil.getShardingVo(); XxlJobLogger.log("分片参数:当前分片序号 = {}, 总分片数 = {}", shardingVO.getIndex(), shardingVO.getTotal()); // 业务逻辑 for (int i = 0; i < shardingVO.getTotal(); i++) { if (i == shardingVO.getIndex()) { XxlJobLogger.log("第 {} 片, 命中分片开始处理", i); } else { XxlJobLogger.log("第 {} 片, 忽略", i); } } return ReturnT.SUCCESS; } /** * 3、命令行任务 */ @XxlJob("commandJobHandler") public ReturnT commandJobHandler(String param) throws Exception { String command = param; int exitValue = -1; BufferedReader bufferedReader = null; try { // command process Process process = Runtime.getRuntime().exec(command); BufferedInputStream bufferedInputStream = new BufferedInputStream(process.getInputStream()); bufferedReader = new BufferedReader(new InputStreamReader(bufferedInputStream)); // command log String line; while ((line = bufferedReader.readLine()) != null) { XxlJobLogger.log(line); } // command exit process.waitFor(); exitValue = process.exitValue(); } catch (Exception e) { XxlJobLogger.log(e); } finally { if (bufferedReader != null) { bufferedReader.close(); } } if (exitValue == 0) { return IJobHandler.SUCCESS; } else { return new ReturnT (IJobHandler.FAIL.getCode(), "command exit value(" + exitValue + ") is failed"); } } /** * 4、跨平台Http任务 * 参数示例: * "url: http://www.baidu.com\n" + * "method: get\n" + * "data: content\n"; */ @XxlJob("httpJobHandler") public ReturnT httpJobHandler(String param) throws Exception { // param parse if (param == null || param.trim().length() == 0) { XxlJobLogger.log("param[" + param + "] invalid."); return ReturnT.FAIL; } String[] httpParams = param.split("\n"); String url = null; String method = null; String data = null; for (String httpParam : httpParams) { if (httpParam.startsWith("url:")) { url = httpParam.substring(httpParam.indexOf("url:") + 4).trim(); } if (httpParam.startsWith("method:")) { method = httpParam.substring(httpParam.indexOf("method:") + 7).trim().toUpperCase(); } if (httpParam.startsWith("data:")) { data = httpParam.substring(httpParam.indexOf("data:") + 5).trim(); } } // param valid if (url == null || url.trim().length() == 0) { XxlJobLogger.log("url[" + url + "] invalid."); return ReturnT.FAIL; } if (method == null || !Arrays.asList("GET", "POST").contains(method)) { XxlJobLogger.log("method[" + method + "] invalid."); return ReturnT.FAIL; } // request HttpURLConnection connection = null; BufferedReader bufferedReader = null; try { // connection URL realUrl = new URL(url); connection = (HttpURLConnection) realUrl.openConnection(); // connection setting connection.setRequestMethod(method); connection.setDoOutput(true); connection.setDoInput(true); connection.setUseCaches(false); connection.setReadTimeout(5 * 1000); connection.setConnectTimeout(3 * 1000); connection.setRequestProperty("connection", "Keep-Alive"); connection.setRequestProperty("Content-Type", "application/json;charset=UTF-8"); connection.setRequestProperty("Accept-Charset", "application/json;charset=UTF-8"); // do connection connection.connect(); // data if (data != null && data.trim().length() > 0) { DataOutputStream dataOutputStream = new DataOutputStream(connection.getOutputStream()); dataOutputStream.write(data.getBytes("UTF-8")); dataOutputStream.flush(); dataOutputStream.close(); } // valid StatusCode int statusCode = connection.getResponseCode(); if (statusCode != 200) { throw new RuntimeException("Http Request StatusCode(" + statusCode + ") Invalid."); } // result bufferedReader = new BufferedReader(new InputStreamReader(connection.getInputStream(), "UTF-8")); StringBuilder result = new StringBuilder(); String line; while ((line = bufferedReader.readLine()) != null) { result.append(line); } String responseMsg = result.toString(); XxlJobLogger.log(responseMsg); return ReturnT.SUCCESS; } catch (Exception e) { XxlJobLogger.log(e); return ReturnT.FAIL; } finally { try { if (bufferedReader != null) { bufferedReader.close(); } if (connection != null) { connection.disconnect(); } } catch (Exception e2) { XxlJobLogger.log(e2); } } } /** * 5、生命周期任务示例:任务初始化与销毁时,支持自定义相关逻辑; */ @XxlJob(value = "demoJobHandler2", init = "init", destroy = "destroy") public ReturnT demoJobHandler2(String param) throws Exception { XxlJobLogger.log("XXL-JOB, Hello World."); return ReturnT.SUCCESS; } public void init() { logger.info("init"); } public void destroy() { logger.info("destory"); } }
6.增加XxlJobConfig配置类
package com.springcloud.blog.job.execute.core.config;

import com.xxl.job.core.executor.impl.XxlJobSpringExecutor;
import org.slf4j.Logger;
import org.slf4j.LoggerFactory;
import org.springframework.beans.factory.annotation.Value;
import org.springframework.context.annotation.Bean;
import org.springframework.context.annotation.Configuration;

@Configuration
public class XxlJobConfig {
 private Logger logger = LoggerFactory.getLogger(XxlJobConfig.class);

 @Value("${xxl.job.admin.addresses}")
 private String adminAddresses;

 @Value("${xxl.job.accessToken}")
 private String accessToken;

 @Value("${xxl.job.executor.appname}")
 private String appname;

 @Value("${xxl.job.executor.address}")
 private String address;

 @Value("${xxl.job.executor.ip}")
 private String ip;

 @Value("${xxl.job.executor.port}")
 private int port;

 @Value("${xxl.job.executor.logpath}")
 private String logPath;

 @Value("${xxl.job.executor.logretentiondays}")
 private int logRetentionDays;


 @Bean
 public XxlJobSpringExecutor xxlJobExecutor() {
  logger.info(">>>>>>>>>>> xxl-job config init.");
  XxlJobSpringExecutor xxlJobSpringExecutor = new XxlJobSpringExecutor();
  xxlJobSpringExecutor.setAdminAddresses(adminAddresses);
  xxlJobSpringExecutor.setAppname(appname);
  xxlJobSpringExecutor.setAddress(address);
  xxlJobSpringExecutor.setIp(ip);
  xxlJobSpringExecutor.setPort(port);
  xxlJobSpringExecutor.setAccessToken(accessToken);
  xxlJobSpringExecutor.setLogPath(logPath);
  xxlJobSpringExecutor.setLogRetentionDays(logRetentionDays);

  return xxlJobSpringExecutor;
 }


}
三、结合Xxl-Job后台系统增加定时任务
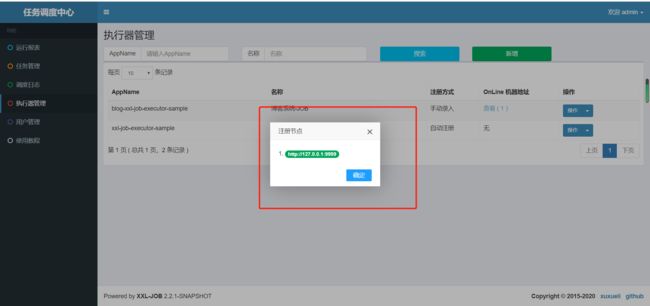
1.配置执行器

执行器地址为(与blog-xxl-job中application.yml配置文件里的执行器地址需要保持一致,否则会注册失败,导致任务执行不了:
2.添加任务

3.任务执行成功的标志

四、为什么选择Xxl-Job
当初选择使用Xxl-Job有这么几个原因:
第一、团队里有好几个人上一家公司或上上家公司用过。
第二、这个生态比较丰富且开源。
第三、确实非常容易上手且轻量化(轻量化的一个体现就是非侵入式)
到此这篇关于SpringBoot整合Xxl-Job的文章就介绍到这了,更多相关SpringBoot整合Xxl-Job内容请搜索脚本之家以前的文章或继续浏览下面的相关文章希望大家以后多多支持脚本之家!