又学习了两天爬虫,总想爬点什么。emmm,雷佳音代言了三陪三包广告好像叫瓜子二手车撒,得,今个儿就爬它。看看他们卖车是不是真便宜。Tip:本文仅供学习与交流,切勿用于非法用途!!!
页面分析
首先我们打开选车页面https://www.guazi.com/sjz/buy/#bread。我们选择变速箱类型为自动,车型为SUV。

可以看出,链接变成了https://www.guazi.com/sjz/buy/h2n2/#bread。可以想到筛选条件就是/h2n2。在此基础上,我们翻到第二页。链接变成了https://www.guazi.com/sjz/buy/o2h2n2/#bread。所以/o{index}h2n2中的index就是页码。
根据上图,可以看出此条件下一共有13805辆车,可是下面的页码选项卡只能到50页。

我试了一下,将index调整为51,数据同第50页。所以我们爬前50页数据就好了。每页有40辆车,一共2000条数据,不妨碍咱们说事情对吧~
撸起袖子写代码
获取
获取同样用到requests库。
headers = {
    'User-Agent': '你的User-Agent',
    'Cookie':'你的cookie'
}

def get_page(url):
    response = requests.get(url, headers=headers)
    response.encoding = 'utf-8'

if __name__ == '__main__':
    for x in range(1,51):
get_page(f'https://www.guazi.com/sjz/buy/o{x}h2n2/#bread')辣条君尝试了一下,如果不加headers,请求到的页面是数据加载中...,不是我们想要的数据。至于这两个值的获取,请按F12,自行获取。这个cookie是不用登录就存在的,所以储存的不是登录信息
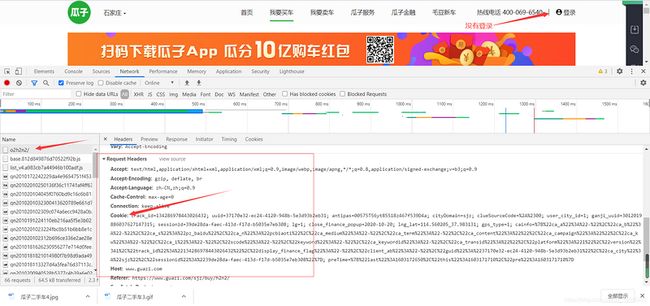
页面都截成这种程度了,是不是很贴心 哎呀,User-Agent没截取到,反正就在下面,你们自己获取就好了。逃~
解析
解析依然使用的是PyQuery库。查看下网页源码

只需要获取那个ul,然后获取所有的a标签就好了,有了现价和原价,我们还可以计算出车辆的折扣。
from multiprocessing.pool import Pool
import requests
from pyquery import PyQuery as pq
import json
from decimal import *

def get_page(url):
    response = requests.get(url, headers=headers)
    response.encoding = 'utf-8'
    doc = pq(response.text)
    ul = doc('.carlist.clearfix.js-top')
    links = ul.find('a')
    datas = []
    for link in links:
        name = pq(link)('h2').text()
        img = pq(link)('img').attr('src')
        msg = pq(link)('.t-i').text()
        year = msg.split('|')[0]
        distance = msg.split('|')[1]
        now_price = pq(link)('.t-price p').text()
        original_price = pq(link)('.t-price em').text()
        if len(original_price) == 0:
            original_price = now_price
        discount = Decimal(now_price.replace('万', ''))*100/Decimal(original_price.replace('万', ''))
        discount_str = str(Decimal(discount).quantize(Decimal('0.00')))+'%'
        dict ={
           'name': name,
           'img': img,
           'year': year,
           'distance': distance,
           'now_price': now_price,
           'original_price': original_price,
           'discount': discount_str
        }
        datas.append(dict)
        print(json.dumps(dict, ensure_ascii=False))

if __name__ == '__main__':
    pool = Pool(3)
    group = ([f'https://www.guazi.com/sjz/buy/o{x}h2n2/#bread' for x in range(1, 51)])
    pool.map(get_page, group)
    pool.close()
    pool.join()
这次我们将数据放到一个列表里面,待会一口气塞进mongo。同时为了加快爬取速度,利用多进程爬取,相关代码写在主函数里面了。
储存
这次储存,使用mongo,一个非常优秀的NoSQL数据库。
from pymongo import MongoClient
client = MongoClient('127.0.0.1', 27017)
db = client.pjjlt
collection = db.guazi

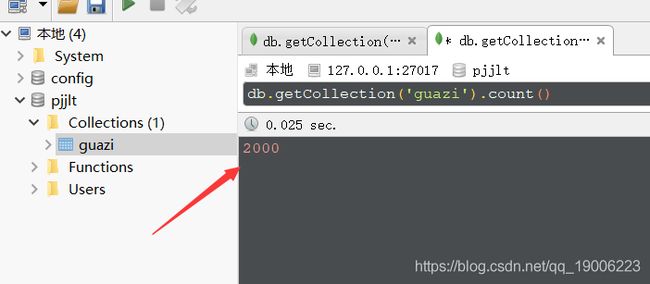
collection.insert_many(datas)在MongoClient中填入链接和端口,得到一个客户端client。再从客户端获取pjjlt数据库。从数据库中拿到guazi集合。然后一口气塞进去。
可视化
直方图
我们得到了数据,先看下这2000辆车都是什么价位区间的。生成一张价位-数量关系图。用到了matplotlib库。
from matplotlib import pyplot as plt
# 获取数据
def get_mongo_datas():
    datas = collection.find({})
    return datas
# 给条形图上方加上纵坐标的值
def add_labels(rects):
    for rect in rects:
        height = rect.get_height()
        plt.text(rect.get_x() + rect.get_width()/2, height+0.01*height, height, ha='center',  va='bottom')
        rect.set_edgecolor('white')
# 生成二维柱状条形图
def create_two_dimensional_diagram(datas):
    price_5 = 0
    price_10 = 0
    price_20 = 0
    price_20_plus = 0
    for data in datas:
        price = Decimal(data.get('now_price').replace('万', ''))
        if price < 5:
            price_5 += 1
        elif price >= 5 and price < 10:
            price_10 += 1
        elif price >= 10 and price < 20:
            price_20 += 1
        else:
            price_20_plus += 1
    price_y = [price_5, price_10, price_20, price_20_plus]
    price_x = ['0~5', '5~10', '10~20', '20+']
    plt.rcParams['font.sans-serif'] = ['SimHei']
    rects = plt.bar(price_x, price_y, align='center')
    # 在直方图上加上纵坐标的值
    add_labels(rects)
    plt.title('价格-数量关系图')
    plt.ylabel('数量(辆)')
    plt.xlabel('价格(万)')
plt.show()首先通过get_mongo_datas从mongo中获取车辆信息。(这个方法后面也会用到)。然后通过create_two_dimensional_diagram方法生成二维柱状条形图。生成工具,使用的是matplotlib。首先根据现价分组,计算数量,然后放到横纵坐标数组中。需要添加字体,['SimHei'],否则无法正常显示中文。原生的柱状图上方是没有纵坐标的数值的,所以需要我们利用add_labels方法画上去。生成的表格是这样子的。
是不是像看博客的你一样好看~
好了好了,这里不是说脸长了,不要打我,辣条君的意思是你很好看就完事了。逃~
词云
接下来看下都是卖的什么车。这里将名称分词之后,形成词云。利用了jieba和wordcloud库。
import jieba
from wordcloud import WordCloud

def create_wordCloud(datas):
    names = []
    for data in datas:
        names.append(data.get('name').replace(' ',''))
    big_name = ''.join(names)
    wl = jieba.lcut(big_name, cut_all=True)
    wl_space_split = ' '.join(wl)
    wc = WordCloud('simhei.ttf',
                   background_color='white',  # 背景颜色
                   width=1000,
                   height=600).generate(wl_space_split)
wc.to_file('%s.png' % 'SUV')首先利用上一节的get_mongo_datas从mongo中获取车辆信息。然后通过将名称去空格再拼接在一起,得到一个超长的名称串,再利用jieba分词,将这个大字符串分词得到一个列表。cut_all=True参数是完全分词,就是词特别特别多那种了。然后利用WordCloud生成词云图片。simhei.ttf参数同样是处理中文名称转化问题的。然后让我们期待已久的图片闪亮登场吧!
我们是不是需要屏蔽一些词。。将代码改成如下:
def create_wordCloud(datas):
    names = []
    for data in datas:
        names.append(data.get('name').replace(' ',''))
    big_name = ''.join(names)
    wl = jieba.lcut(big_name, cut_all=True)
    wl_space_split = ' '.join(wl)
    stopwords = ['豪华', '豪华型', '豪华版', '自动', '精英'
                 , '舒适', '舒适版', '进口'
                 , 'OL', '运动', '运动版'
                 , '舒适型', 'VI', 'OT','CVT']
    wc = WordCloud('simhei.ttf',
                   background_color='white',  # 背景颜色
                   width=1000,
                   height=600,
                   stopwords=stopwords).generate(wl_space_split)
wc.to_file('%s.png' % 'SUV2')增加停止词参数stopwords,可以屏蔽一些词。然后继续生成图片。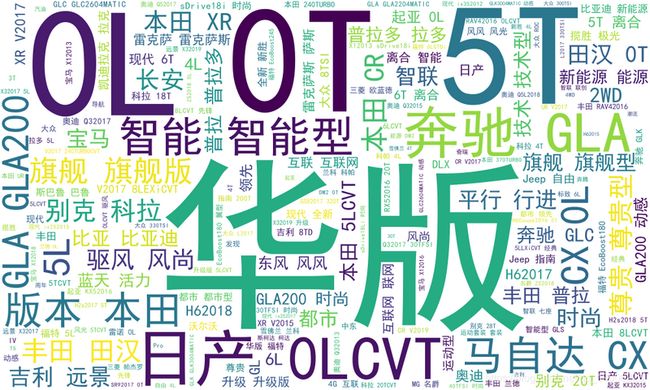
emmm,好像屏蔽的还不够。屏幕前帅气美丽的你可以接着屏蔽,但是大体已出现一些车辆名称了哈。什么日产啊、马自达啊、本田啊、奔驰什么的。呵,辣条君全买不起~快去搜搜三手五菱宏光几个钱。
结束
又写完了一个爬虫,新get到了mongo储存,还有一些可视化的知识,满足的说~
喜欢的小伙伴,点个赞再走吧,辣条君会继续输出爬虫博客的,谢谢各位帅气美丽智慧大大们的观看和支持。
