【SpringBoot DB 系列】h2databse 集成示例 demo
h2dabase 基于内存的数据库,更常见于嵌入式数据库的使用场景,依赖小,功能齐全;一般来讲,正常的商业项目用到它的场景不多,但是在一些特殊的 case 中,还是比较有用的,比如用于单元测试,业务缓存,一些简单的示例 demo 等;本文将手把手教你创建一个继承 h2dabase 的项目,并支持从 sql 中导入预定好的 schema 和 data
I. 项目创建
本文对应的示例 demo,采用SpringBoot 2.2.1.RELEASE + maven 3.5.3 + IDEA进行开发
1. pom 配置
关于如何创建一个 springboot 项目本文就不介绍了,在我们创建好的项目中,pom.xml文件如下
    org.springframework.boot
    spring-boot-starter-parent
    2.2.1.RELEASE


        org.springframework.boot
        spring-boot-starter-web


        org.springframework.boot
        spring-boot-starter-data-jpa


        com.h2database
        h2


                org.springframework.boot
                spring-boot-maven-plugin


        spring-snapshots
        Spring Snapshots
        https://repo.spring.io/libs-snapshot-local

            true


        spring-milestones
        Spring Milestones
        https://repo.spring.io/libs-milestone-local

            false


        spring-releases
        Spring Releases
        https://repo.spring.io/libs-release-local

            false
重点关注一下dependency中的com.h2database,另外两个非必须,只是在后面的测试用例中会用到,推荐加上
从上面的引入也可以知道,我们将借助 JPA 来操作数据库
2. 属性配置
既然是连接数据库,当然少不了数据库的相关配置,在项目的资源路径下,新建配置文件application.properties
# 数据库的相关配置
spring.datasource.url=jdbc:h2:~/h2-db
spring.datasource.username=test
spring.datasource.password=
spring.datasource.driverClassName=org.h2.Driver
上面的配置方式,和我们的 mysql 数据库配置没有什么特别的,这里的 url 请注意一下
jdbc:h2:~/h2-db: 嵌入式使用姿势,会在用户根目录下生成一个名为h2-db.mv.db的文件(数据库的 schema 和 d column 就存在里面)jdbc:h2:mem:DBName;DB_CLOSE_DELAY=-1: 内存模式,应用重启之后数据库会清空,所以在测试用例中,可以考虑用这种
除了上面嵌入式的使用姿势之外,h2-dabase 还支持通过 tcp 方式,指定一个远程的目录
jdbc:h2:tcp://localhost/~/test
上面是 h2dabase 的基本配置,为了更友好的展示,我们开启了 h2dabase 的 web console 控制台
##h2 web console设置
spring.datasource.platform=h2
#进行该配置后,h2 web consloe就可以在远程访问了。否则只能在本机访问。
spring.h2.console.settings.web-allow-others=true
#进行该配置,你就可以通过YOUR_URL/h2访问h2 web consloe
spring.h2.console.path=/h2
#进行该配置,程序开启时就会启动h2 web consloe
spring.h2.console.enabled=true
最好开启一下 jpa 的 sql 语句
spring.jpa.show-sql=true
spring.jpa.generate-ddl=true
II. 实例测试
上面配置搞完之后,基本上就可以说是完成了 h2dabase 的集成了
0. 入口
@SpringBootApplication
public class Application {
    public static void main(String[] args) {
        SpringApplication.run(Application.class);
    }
}
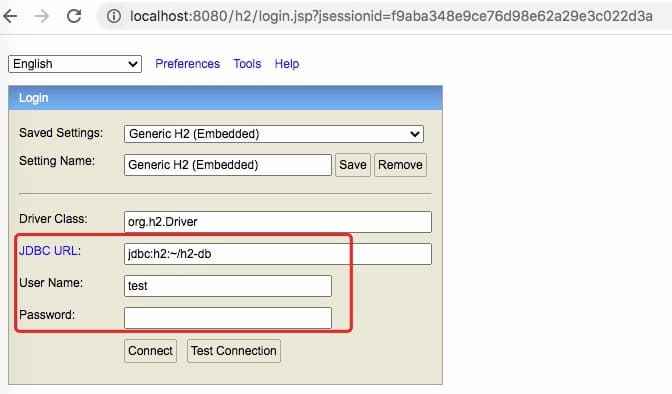
SpringBoot 应用的启动入口,上面执行之后,我们就可以通过http://localhost:8080/h2访问 h2dabase 的控制台,注意下面框处的内容,与前面的配置文件保持一致
登录之后,就是一个建议的数据库操作控制台了
1. Entity 定义
下面这个属于 JPA 的知识点,对于 jpa 有兴趣的小伙伴,可以看一下前面的《JPA 系列教程》
@Entity
@Table(name = "test")
public class TestEntity {
    @Id
    private Integer id;
    @Column
    private String name;

    public Integer getId() {
        return id;
    }

    public void setId(Integer id) {
        this.id = id;
    }

    public String getName() {
        return name;
    }

    public void setName(String name) {
        this.name = name;
    }
}
2. Repository 接口
数据库操作接口,直接使用默认的 curd 即可,并没有额外的添加方法
@Repository
public interface TestRepository extends CrudRepository {
}
3. 测试 case
接下来给几个 CURD 的测试 case,来演示一下我们的集成效果
@RestController
public class TestController {
    @Autowired
    private TestRepository testRepository;

    @GetMapping("/save")
    public TestEntity save(Integer id, String name) {
        TestEntity testEntity = new TestEntity();
        testEntity.setId(id);
        testEntity.setName(name);
        return testRepository.save(testEntity);
    }

    @GetMapping("/update")
    public TestEntity update(Integer id, String name) {
        Optional entity = testRepository.findById(id);
        TestEntity testEntity = entity.get();
        testEntity.setName(name);
        return testRepository.save(testEntity);
    }

    @GetMapping("/list")
    public Iterable list() {
        return testRepository.findAll();
    }

    @GetMapping("/get")
    public TestEntity get(Integer id) {
        return testRepository.findById(id).get();
    }

    @GetMapping("/del")
    public boolean del(Integer id) {
        testRepository.deleteById(id);
        return true;
    }
}
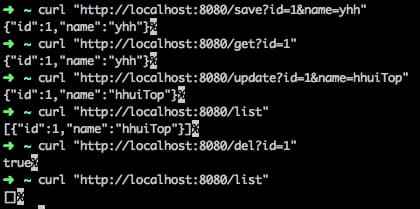
实测 case 如下
# 新增一条记录
curl 'http://localhost:8080/save?id=1&name=一灰灰'

# 查询记录
curl 'http://localhost:8080/get?id=1'

# 修改记录
curl 'http://localhost:8080/update?id=1&name=一灰灰Blog'

# 查询全部
curl 'http://localhost:8080/list'

# 删除记录
curl 'http://localhost:8080/del?id=1'
4. sql 文件导入
注意我们前面的所有步骤,没有任何一个地方有说明需要主动去创建一个名为test的表,这一点和我们熟悉的 mysql 是不一样的;
某些时候我们可能希望将准备好的 sql 文件来初始化数据库,这个时候可以如下操作
对应的 sql 文件
表结构 schema-h2.sql
DROP TABLE IF EXISTS book_to_book_store;
DROP TABLE IF EXISTS book_store;
DROP TABLE IF EXISTS book;
DROP TABLE IF EXISTS author;

DROP SEQUENCE IF EXISTS s_author_id;
CREATE SEQUENCE s_author_id START WITH 1;

CREATE TABLE author (
  id INT NOT NULL,
  first_name VARCHAR(50),
  last_name VARCHAR(50) NOT NULL,
  date_of_birth DATE,
  year_of_birth INT,
  address VARCHAR(50),

  CONSTRAINT pk_t_author PRIMARY KEY (ID)
);

CREATE TABLE book (
  id INT NOT NULL,
  author_id INT NOT NULL,
  co_author_id INT,
  details_id INT,
  title VARCHAR(400) NOT NULL,
  published_in INT,
  language_id INT,
  content_text CLOB,
  content_pdf BLOB,

  rec_version INT,
  rec_timestamp TIMESTAMP,

  CONSTRAINT pk_t_book PRIMARY KEY (id),
  CONSTRAINT fk_t_book_author_id FOREIGN KEY (author_id) REFERENCES author(id),
  CONSTRAINT fk_t_book_co_author_id FOREIGN KEY (co_author_id) REFERENCES author(id)
);

CREATE TABLE book_store (
  name VARCHAR(400) NOT NULL,

  CONSTRAINT uk_t_book_store_name PRIMARY KEY(name)
);

CREATE TABLE book_to_book_store (
  book_store_name VARCHAR(400) NOT NULL,
  book_id INTEGER NOT NULL,
  stock INTEGER,

  CONSTRAINT pk_b2bs PRIMARY KEY(book_store_name, book_id),
  CONSTRAINT fk_b2bs_bs_name FOREIGN KEY (book_store_name)
                             REFERENCES book_store (name)
                             ON DELETE CASCADE,
  CONSTRAINT fk_b2bs_b_id    FOREIGN KEY (book_id)
                             REFERENCES book (id)
                             ON DELETE CASCADE
);
数据文件 data-h2.sql
INSERT INTO author VALUES (next value for s_author_id, 'George', 'Orwell', '1903-06-25', 1903, null);
INSERT INTO author VALUES (next value for s_author_id, 'Paulo', 'Coelho', '1947-08-24', 1947, null);

INSERT INTO book VALUES (1, 1, null, null, '1984', 1948, 1, 'To know and not to know, to be conscious of complete truthfulness while telling carefully constructed lies, to hold simultaneously two opinions which cancelled out, knowing them to be contradictory and believing in both of them, to use logic against logic, to repudiate morality while laying claim to it, to believe that democracy was impossible and that the Party was the guardian of democracy, to forget, whatever it was necessary to forget, then to draw it back into memory again at the moment when it was needed, and then promptly to forget it again, and above all, to apply the same process to the process itself -- that was the ultimate subtlety; consciously to induce unconsciousness, and then, once again, to become unconscious of the act of hypnosis you had just performed. Even to understand the word ''doublethink'' involved the use of doublethink..', null, 1, '2010-01-01 00:00:00');
INSERT INTO book VALUES (2, 1, null, null, 'Animal Farm', 1945, 1, null, null, null, '2010-01-01 00:00:00');
INSERT INTO book VALUES (3, 2, null, null, 'O Alquimista', 1988, 4, null, null, 1, null);
INSERT INTO book VALUES (4, 2, null, null, 'Brida', 1990, 2, null, null, null, null);

INSERT INTO book_store (name) VALUES
    ('Orell Füssli'),
    ('Ex Libris'),
    ('Buchhandlung im Volkshaus');

INSERT INTO book_to_book_store VALUES
    ('Orell Füssli', 1, 10),
    ('Orell Füssli', 2, 10),
    ('Orell Füssli', 3, 10),
    ('Ex Libris', 1, 1),
    ('Ex Libris', 3, 2),
    ('Buchhandlung im Volkshaus', 3, 1);
上面两个文件准备好,接下来我们如何导入呢?
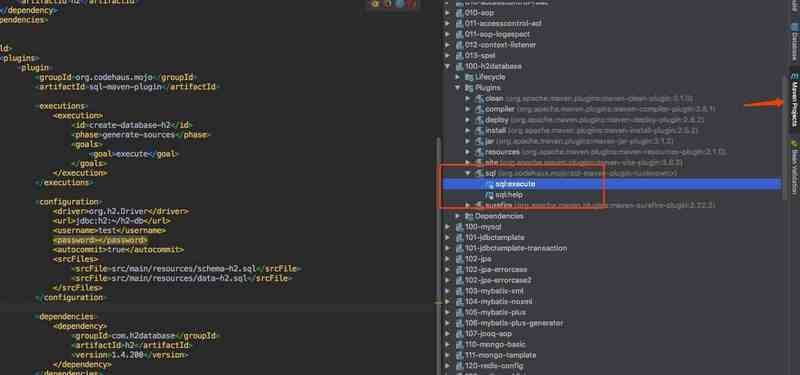
借助sql-maven-plugin方式,在 pom 配置文件中,添加下面这段
        org.codehaus.mojo
        sql-maven-plugin


                create-database-h2
                generate-sources

                    execute


            org.h2.Driver
            jdbc:h2:~/h2-db
            test

            true

                src/main/resources/schema-h2.sql
                src/main/resources/data-h2.sql


                com.h2database
                h2
                1.4.200
然后如下操作即可
导入成功之后,再到 h2 控制台,就可以查看对应的数据
II. 其他
0. 项目
- 工程:https://github.com/liuyueyi/spring-boot-demo
- 项目源码: https://github.com/liuyueyi/spring-boot-demo/tree/master/spring-boot/100-h2database
1. 一灰灰 Blog
尽信书则不如,以上内容,纯属一家之言,因个人能力有限,难免有疏漏和错误之处,如发现 bug 或者有更好的建议,欢迎批评指正,不吝感激
下面一灰灰的个人博客,记录所有学习和工作中的博文,欢迎大家前去逛逛
- 一灰灰 Blog 个人博客 https://blog.hhui.top
- 一灰灰 Blog-Spring 专题博客 http://spring.hhui.top
![]()


