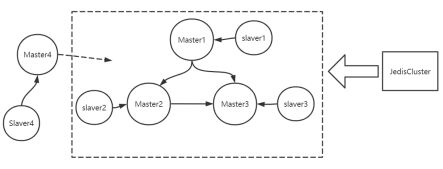
1.需求描述
如图:
1、搭建Redis5.0集群,要求三主三从,记录下安装步骤;
2、能够添加一主一从(Master4和Slaver4),记录下安装步骤;
3、能够通过JedisCluster向RedisCluster添加数据和取出数据。
2.单机版搭建步骤
2.1 安装c语言所需环境
yum install -y gcc-c++
yum install -y wget
2.2 下载redis-5.0.5并进行解压,编译,安装
## 编译
wget http://download.redis.io/releases/redis-5.0.5.tar.gz
tar -zxf redis-5.0.5.tar.gz
cd redis-5.0.5/src
make
## 安装,后续直接安装即可,用现成编译好的包
mkdir /usr/redis -p
make install PREFIX=/usr/redis
2.3 配置redis,关闭保护模式and后台启动
cp redis-5.0.5/redis.conf /usr/redis/bin/
vi usr/redis/bin/redis.conf

# 将`daemonize`由`no`改为`yes`
daemonize yes

# 默认绑定的是回环地址,默认不能被其他机器访问
# bind 127.0.0.1

# 是否开启保护模式,由yes该为no
protected-mode no
2.4 启动redis的几种方式
# 后端模式启动服务
cd /usr/redis;bin/redis-server bin/redis.conf

# 进入命令行模式
cd /usr/redis;bin/redis-cli -h hostname -p 端口号
cd /usr/redis;bin/redis-cli -h 127.0.0.1 -p 6379 #默认
# 退出命令行模式
exit

# 后端模式关闭服务(推荐)
cd /usr/redis;bin/redis-cli shutdown

# 前端模式启动服务(不推荐)
cd /usr/redis;bin/redis-server
2.4 api的方式来调用
// 1.导入依赖包

    redis.clients
    jedis
    2.9.0

// 2.示例代码
package com.lagou.redis;

import org.junit.Test;
import redis.clients.jedis.Jedis;

public class JedisDemo {

    @Test
    public void testConn() {
        //与Redis建立连接 IP+port
        Jedis redis = new Jedis("linux121", 6379);
        //在Redis中写字符串 key value
        redis.set("jedis:name:1", "hoult");
        //获得Redis中字符串的值
        System.out.println(redis.get("jedis:name:1"));
        //在Redis中写list
        redis.lpush("jedis:list:1", "1", "2", "3", "4", "5");
        //获得list的长度
        System.out.println(redis.llen("jedis:list:1"));
    }
}
//输出
hoult
5
3.三主三从搭建步骤
3.1 集群规划
伪集群方式,单机上多个端口来模拟,即三台主服务器,三台从服务器,端口从7001-7006 ,安装位置mkdir -p /root/redis-cluster
3.2 创建实例并配置redis.conf文件
# 编译安装
cd /opt/hoult/software/redis-5.0.5/src
make install PREFIX=/root/redis-cluster/7001

# 复制redis.conf文件
cp /opt/hoult/software/redis-5.0.5/redis.conf /root/redis-cluster/7001/bin/
vi /root/redis-cluster/7001/bin/redis.conf

# 修改port为7001
port 7001

# 打开cluster-enable yes
cluster-enable yes

# ----------------------------------------------
# 配置后端开启模式
# 将`daemonize`由`no`改为`yes`
daemonize yes

# 默认绑定的是回环地址,默认不能被其他机器访问
# bind 127.0.0.1
# 所有机器可以访问
# bind 0.0.0.0
# 建议注释掉 bind x.x.x.x

# 是否开启保护模式,由yes该为no
protected-mode no
3.3 将7001复制六份,注意修改端口
# 拷贝7001-->7002,7003,7004,7005,7006
cp -r /root/redis-cluster/7001 /root/redis-cluster/7002

# 重新修改:先删除再复制新的redis.conf文件
# 好处:只需要先修改7001的配置文件,再复制,再修改port即可
# rm -rf /root/redis-cluster/7002/bin/redis.conf
# cp /root/redis-cluster/7002/bin/redis.conf /root/redis-cluster/7002/bin/redis.conf
# 修改对应的端口号
vi /root/redis-cluster/7002/bin/redis.conf
3.4 使用启动脚本,启动所有实例
cd /root/redis-cluster/
vim start-redis-cluster.sh
 # 启动7001
cd /root/redis-cluster/7001/bin;redis-server redis.conf
# 启动7002
cd /root/redis-cluster/7002/bin;redis-server redis.conf
# 启动7003
cd /root/redis-cluster/7003/bin;redis-server redis.conf
# 启动7004
cd /root/redis-cluster/7004/bin;redis-server redis.conf
# 启动7005
cd /root/redis-cluster/7005/bin;redis-server redis.conf
# 启动7006
cd /root/redis-cluster/7006/bin;redis-server redis.conf
# 启动7007
cd /root/redis-cluster/7007/bin;redis-server redis.conf
# 启动7008
cd /root/redis-cluster/7008/bin;redis-server redis.conf
# 启动
cd /root/redis-cluster/
sh start-redis-cluster.sh

## 登录客户端
/root/redis-cluster/7001/bin/redis-cli -h linux121 -p 7001
3.5 使用关闭脚本,关闭所有实例
# stop脚本
cd /root/redis-cluster/;
vim stop-redis-cluster.sh

# 关闭7001
cd /root/redis-cluster/7001/bin;redis-cli -h linux121 -p 7001 shutdown
# 关闭7002
cd /root/redis-cluster/7002/bin;redis-cli -h linux121 -p 7002 shutdown
# 关闭7003
cd /root/redis-cluster/7003/bin;redis-cli -h linux121 -p 7003 shutdown
# 启关闭7004
cd /root/redis-cluster/7004/bin;redis-cli -h linux121 -p 7004 shutdown
# 关闭7005
cd /root/redis-cluster/7005/bin;redis-cli -h linux121 -p 7005 shutdown
# 关闭7006
cd /root/redis-cluster/7006/bin;redis-cli -h linux121 -p 7006 shutdown
# 关闭7007
cd /root/redis-cluster/7007/bin;redis-cli -h linux121 -p 7007 shutdown
# 关闭7008
cd /root/redis-cluster/7008/bin;redis-cli -h linux121 -p 7008 shutdown
3.6 删除集群原始数据,并创建集群
# 删除集群遗留任何数据

cd /root/redis-cluster/7001/bin/;rm -rf dump.rdb nodes.conf appendonly.aof
cd /root/redis-cluster/7002/bin/;rm -rf dump.rdb nodes.conf appendonly.aof
cd /root/redis-cluster/7003/bin/;rm -rf dump.rdb nodes.conf appendonly.aof
cd /root/redis-cluster/7004/bin/;rm -rf dump.rdb nodes.conf appendonly.aof
cd /root/redis-cluster/7005/bin/;rm -rf dump.rdb nodes.conf appendonly.aof
cd /root/redis-cluster/7006/bin/;rm -rf dump.rdb nodes.conf appendonly.aof
cd /root/redis-cluster/7007/bin/;rm -rf dump.rdb nodes.conf appendonly.aof
cd /root/redis-cluster/7008/bin/;rm -rf dump.rdb nodes.conf appendonly.aof

# 创建集群
# 注:必须写172.18.0.9(而不是linux121),否则出现:
# 1)ERR Invalid node address specified: linux121:7001;
# 2)jedis-2.9.0:Exception in thread "main" redis.clients.jedis.exceptions.JedisConnectionException: Could not get a resource from the pool. Caused by: redis.clients.jedis.exceptions.JedisConnectionException: java.net.ConnectException: Connection refused: connect;
# 3)jedis-2.9.3:redis.clients.jedis.exceptions.JedisClusterMaxRedirectionsException: Too many Cluster redirections?
cd /root/redis-cluster/7001/bin;./redis-cli --cluster create 172.18.0.9:7001 172.18.0.9:7002 172.18.0.9:7003 172.18.0.9:7004 172.18.0.9:7005 172.18.0.9:7006 --cluster-replicas 1

# 输入yes继续部署
3.7 登录客户端进行验证
# 集群模式:-c必不可少
cd /root/redis-cluster/7001/bin/;redis-cli -h 127.0.0.1 -p 7001 -c
4.集群扩容
为集群添加一主一从
4.1 添加主节点
## 跟前面一样,先复制好redis,配置好端口,但是注意,还是删除数据,再重新启动
cp -r /root/redis-cluster/7001 /root/redis-cluster/7007
vi /root/redis-cluster/7007/bin/redis.conf

# 启动node7007
cd /root/redis-cluster/7007/bin;redis-server redis.conf

# 添加node7007为集群主节点
cd /root/redis-cluster/7007/bin/;redis-cli --cluster add-node 172.18.0.9:7007 172.18.0.9:7001
4.2 为新添加的主节点分配slots槽
cd /root/redis-cluster/7007/bin/;redis-cli --cluster reshard 172.18.0.9:7007

# How many slots do you want to move(from 1 to 16384)?
# 输入3000(数值不超过18364)
3000

# 输入分slots的主节点ID(新添加的主节点ID)
04969194dd9b051d16dc41ef8cd4a72a71f03c51
# 通过cluster nodes可查看

# 选择分槽方式
# 选择all
all
# 一直输入yes继续完成
yes
4.3 为7007添加从节点
# 启动node7008
cd /root/redis-cluster/7008/bin;redis-server redis.conf

# 为新添加的主节点添加从节点
cd /root/redis-cluster/7007/bin/;redis-cli --cluster add-node 172.18.0.9:7008 172.18.0.9:7007 --cluster-slave --cluster-master-id 04969194dd9b051d16dc41ef8cd4a72a71f03c51
5.使用Jedis来访问RedisCluster
5.1 导入依赖包
    redis.clients
    jedis
    2.9.3
5.2 代码demo
package com.hoult.redis;

import redis.clients.jedis.HostAndPort;
import redis.clients.jedis.JedisCluster;
import redis.clients.jedis.JedisPoolConfig;

import java.io.IOException;
import java.util.HashSet;

public class JedisClusterDemo {
    public static void main(String[] args) throws IOException {
        JedisPoolConfig config = new JedisPoolConfig();
        HashSet jedisClusterNodes = new HashSet<>();

        //添加集群节点
        jedisClusterNodes.add(new HostAndPort("centos",7001));
        jedisClusterNodes.add(new HostAndPort("centos",7002));
        jedisClusterNodes.add(new HostAndPort("centos",7003));
        jedisClusterNodes.add(new HostAndPort("centos",7004));
        jedisClusterNodes.add(new HostAndPort("centos",7005));
        jedisClusterNodes.add(new HostAndPort("centos",7006));
        jedisClusterNodes.add(new HostAndPort("centos",7007));
        jedisClusterNodes.add(new HostAndPort("centos",7008));

        //获取集群连接
        JedisCluster jedisCluster = new JedisCluster(jedisClusterNodes, config);

        //设置值
        jedisCluster.set("name:001","zhangfei");

        //获取值
        String value = jedisCluster.get("name:001");
        System.out.println(value);

        //关闭连接
        jedisCluster.close();
    }

}


