主题列表:juejin, github, smartblue, cyanosis, channing-cyan, fancy, hydrogen, condensed-night-purple, greenwillow, v-green, vue-pro, healer-readable, mk-cute, jzman, geek-black, awesome-green
贡献主题:https://github.com/xitu/jueji...
theme: juejin
highlight:
Create React App is an officially supported way to create single-page React applications. It offers a modern build setup with no configuration.
create react app 是 React 官方创建单页应用的方式,为了方便,下文皆简称 CRA。
它的核心思想我理解主要是:
- 脚手架核心功能中心化:使用
npx保证每次用户使用的都是最新版本,方便功能的升级 - 模板去中心化:方便地进行模板管理,这样也允许用户自定义模板
- 脚手架逻辑和初始化代码逻辑分离:在
cra中只执行了脚手架相关逻辑,而初始化代码的逻辑在react-scripts包里执行
本文主要就是通过源码分析对上述的理解进行阐述。
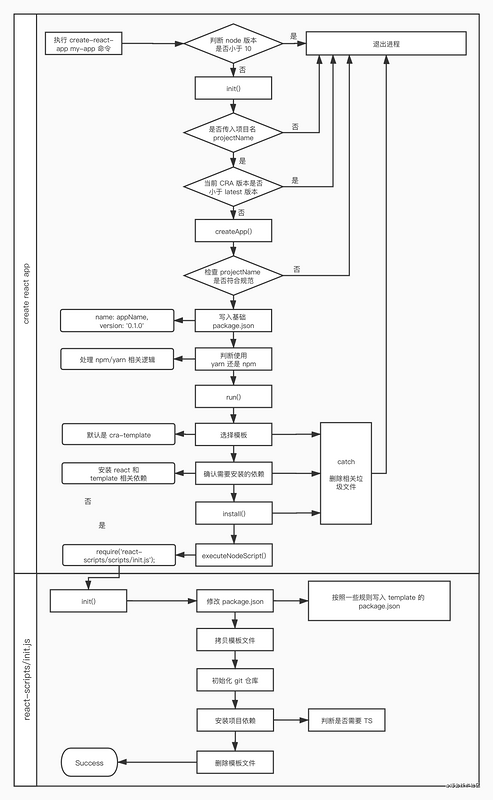
按照自己的理解,画了个流程图,大家可以带着该流程图去阅读源码(主要包含两个部分 create-react-app 和 react-scripts/init):
如果图片不清晰可以微信搜索公众号 玩相机的程序员,回复 CRA 获取。
0. 用法
CRA 的用法很简单,两步:
- 安装:
npm install -g create-react-app - 使用:
create-react-app my-app
这是常见的用法,会在全局环境下安装一个 CRA,在命令行中可以通过 create react app 直接使用。
现在更推荐的用法是使用 npx 来执行 create react app:
npx create-react-app my-app这样确保每次执行 create-reat-app 使用的都是 npm 上最新的版本。
注:npx 是 npm 5.2+ 之后引入的功能,如需使用需要 check 一下本地的 npm 版本。
默认情况下,CRA 命令只需要传入 project-directory 即可,不需要额外的参数,更多用法查看:https://create-react-app.dev/docs/getting-started#creating-an-app,就不展开了。
可以看一下官方的 Demo 感受一下:
我们主要还是通过 CRA 的源码来了解一下它的思路。
1. 入口
本文中的create-react-app版本为4.0.1。若阅读本文时存在break change,可能就需要自己理解一下啦
按照正常逻辑,我们在 package.json 里找到了入口文件:
{
  "bin": {
    "create-react-app": "./index.js"
  },
}
index.js 里的逻辑比较简单,判断了一下 node 环境是否是 10 以上,就调用 init 了,所以核心还是在 init 方法里。
// index.js
const { init } = require('./createReactApp');
init();
打开 createReactApp.js 文件一看,好家伙,1017 行代码(别慌,跟着我往下看,1000 行代码也分分钟看明白)
吐槽一下,虽然代码逻辑写得很清楚,但是为啥不拆几个模块呢?
找到 init 方法之后发现,其实就执行了一个 Promise:
// createReactApp.js
function init() {
  checkForLatestVersion().catch().then();
}
注意这里是先 catch 再 then。
跟着我往下看呗 ~ 一步一步理清楚 CRA,你也能依葫芦画瓢造一个。
2. 检查版本
checkForLatestVersion 就做了一件事,获取 create-react-app 这个 npm 包的 latest 版本号。
如果你想获取某个 npm 包的版本号,可以通过开放接口 [https://registry.npmjs.org/-/package/{pkgName}/dist-tags](https://registry.npmjs.org/-/package/%7BpkgName%7D/dist-tags "https://registry.npmjs.org/-/package/{pkgName}/dist-tags") 获得,其返回值为:
{
  "next": "4.0.0-next.117",
  "latest": "4.0.1",
  "canary": "3.3.0-next.38"
}
如果你想获取某个 npm 包完整信息,可以通过开放接口 [https://registry.npmjs.org/{pkgName}](https://registry.npmjs.org/%7BpkgName%7D "https://registry.npmjs.org/{pkgName}") 获得,其返回值为:
{
  "name": "create-react-app",       # 包名
  "dist-tags": {},                  # 版本语义化标签
  "versions": {},                   # 所有版本信息
  "readme": "",                     # README 内容(markdown 文本)
  "maintainers": [],
  "time": {},                       # 每个版本的发布时间
  "license": "",
  "readmeFilename": "README.md",
  "description": "",
  "homepage": "",                   # 主页
  "keywords": [],                   # 关键词
  "repository": {},                 # 代码仓库
  "bugs": {},                       # 提 bug 链接
  "users": {}
}回到源码,checkForLatestVersion().catch().then(),注意这里是先 catch 再 then,也就是说如果 checkForLatestVersion 里抛错误了,会被 catch 住,然后执行一些逻辑,再执行 then。
是的,Promise 的 catch 后面的 then 还是会执行。
2.1 Promise catch 后的 then
我们可以做个小实验:
function promise() {
  return new Promise((resolve, reject) => {
    setTimeout(() => {
      reject('Promise 失败了');
    }, 1000)
  });
}

promise().then(res => {
  console.log(res);
}).catch(error => {
  console.log(error);   // Promise 失败了
  return `ErrorMessage: ${error}`;
}).then(res => {
  console.log(res);     // ErrorMessage: Promise 失败了
});原理也很简单,then 和 catch 返回的都是一个 promise,当然可以继续调用。
OK,checkForLatestVersion 以及之后的 catch 都是只做了一件事,获取 latest 版本号,如果没有就是 null。
这里拿到版本号之后也就判断一下当前使用的版本是否比 latest 版本低,如果是就推荐你把全局的 CRA 删了,使用 npx 来执行 CRA。
3. 核心方法 createApp
再往下看就是执行了一个 createApp 了,看这名字就知道最关键的方法就是它了。
function createApp(name, verbose, version, template, useNpm, usePnp) {
  // 此处省略 100 行代码
}
createApp 传入了 6 个参数,对应的是 CRA 命令行传入的一些配置。
我在思考为啥这里不设计成一个 options 对象来接受这些参数?如果后期需要增删一些参数,是不是比较不好维护?这样的想法是我过度设计吗?
4. 检查应用名
CRA 会检查输入的 project name 是否符合以下两条规范:
- 检查是否符合
npm命名规范 - 检查是否含有
react/react-dom/react-scripts等关键字
不符合规范则直接process.exit(1)退出进程。
5. 创建 package.json
和一般脚手架不同的是,CRA 会在创建项目时新创建一个 package.json,而不是直接复制代码模板的文件。
const packageJson = {
  name: appName,
  version: '0.1.0',
  private: true,
};
fs.writeFileSync(
  path.join(root, 'package.json'),
  JSON.stringify(packageJson, null, 2) + os.EOL
);
6. 选择模板
function getTemplateInstallPackage(template, originalDirectory) {
  let templateToInstall = 'cra-template';
  if (template) {
    // 一些处理逻辑 doTemplate(template);
    templateToInstall = doTemplate(template);
  }
  return Promise.resolve(templateToInstall);
}
默认使用 cra-template 模板,如果传入 template 参数,则使用对用的模板,该方法主要是给额外的 template 加 scope 和 prefix,比如 @scope/cra-template-${template},具体逻辑不展开。
这里 CRA 的核心思想是通过 npm 来对模板进行管理,这样方便扩展和管理。
7. 安装依赖
CRA 会自动给项目安装 react、react-dom 和 react-scripts 以及模板。
command = 'npm';
args = [
  'install',
  '--save',
  '--save-exact',
  '--loglevel',
  'error',
].concat(dependencies);

const child = spawn(command, args, { stdio: 'inherit' });
8. 初始化代码
CRA 的功能其实不多,安装完依赖之后,实际上初始化代码的工作还没做。
接着往下看,看到这样一段代码代码:
await executeNodeScript(
  {
    cwd: process.cwd(),
  },
  [root, appName, verbose, originalDirectory, templateName],
  `
var init = require('${packageName}/scripts/init.js');
init.apply(null, JSON.parse(process.argv[1]));
`
);除此之外,CRA 貌似看不到任何复制代码的代码了,那我们需要的“初始化代码”的工作应该就是在这里完成了。
为了分析方便,忽略了上下文代码,说明一下,这段代码中的 packageName 的值是 react-scripts。也就是这里执行了 react-scripts 包中的 scripts/init 方法,并传入了几个参数。
8.1 react-scripts/init.js
老规矩,只分析主流程代码,主流程主要就做了四件事:
- 处理
template里的packages.json - 处理
package.json的scripts:默认值和template合并 - 写入
package.json - 拷贝
template文件
除此之外还有一些 git 和 npm 相关的操作,这里就不展开了。
// init.js
// 删除了不影响主流程的代码
module.exports = function (
  appPath,
  appName,
  verbose,
  originalDirectory,
  templateName
) {
  const appPackage = require(path.join(appPath, 'package.json'));

  // 通过一些判断来处理 template 中的 package.json
  // 返回 templatePackage

  const templateScripts = templatePackage.scripts || {};

  // 修改实际 package.json 中的 scripts
  // start、build、test 和 eject 是默认的命令,如果模板里还有其它 script 就 merge
  appPackage.scripts = Object.assign(
    {
      start: 'react-scripts start',
      build: 'react-scripts build',
      test: 'react-scripts test',
      eject: 'react-scripts eject',
    },
    templateScripts
  );

  // 写 package.json
  fs.writeFileSync(
    path.join(appPath, 'package.json'),
    JSON.stringify(appPackage, null, 2) + os.EOL
  );

  // 拷贝 template 文件
  const templateDir = path.join(templatePath, 'template');
  if (fs.existsSync(templateDir)) {
    fs.copySync(templateDir, appPath);
  }
};到这里,CRA 的主流程就基本走完了,关于 react-scripts 的命令,比如 start 和 build,后续会单独有文章进行讲解。
9. 从 CRA 中借鉴的工具方法
CRA 的代码和思路其实并不复杂,但是不影响我们读它的代码,并且从中学习到一些好的想法。(当然,有一些代码我们也是可以拿来直接用的 ~
9.1 npm 相关
9.1.1 获取 npm 包版本号
const https = require('https');

function getDistTags(pkgName) {
  return new Promise((resolve, reject) => {
    https
      .get(
        `https://registry.npmjs.org/-/package/${pkgName}/dist-tags`,
        res => {
          if (res.statusCode === 200) {
            let body = '';
            res.on('data', data => (body += data));
            res.on('end', () => {
              resolve(JSON.parse(body));
            });
          } else {
            reject();
          }
        }
      )
      .on('error', () => {
        reject();
      });
  });
}

// 获取 react 的版本信息
getDistTags('react').then(res => {
  const tags = Object.keys(res);
  console.log(tags); // ['latest', 'next', 'experimental', 'untagged']
  console.log(res.latest]); // 17.0.1
});
9.1.2 比较 npm 包版本号
使用 semver 包来判断某个 npm 的版本号是否符合你的要求:
const semver = require('semver');

semver.gt('1.2.3', '9.8.7');   // false
semver.lt('1.2.3', '9.8.7');   // true
semver.minVersion('>=1.0.0');  // '1.0.0'
9.1.3 检查 npm 包名
可以通过 validate-npm-package-name 来检查包名是否符合 npm 的命名规范。
const validateProjectName = require('validate-npm-package-name');

const validationResult = validateProjectName(appName);

if (!validationResult.validForNewPackages) {
  console.error('npm naming restrictions');
  // 输出不符合规范的 issue
  [
    ...(validationResult.errors || []),
    ...(validationResult.warnings || []),
  ].forEach(error => {
    console.error(error);
  });
}
对应的 npm 命名规范可以见:Naming Rules
9.2 git 相关
9.2.1 判断本地目录是否是一个 git 仓库
const execSync = require('child_process').execSync;

function isInGitRepository() {
  try {
    execSync('git rev-parse --is-inside-work-tree', { stdio: 'ignore' });
    return true;
  } catch (e) {
    return false;
  }
}
9.2.2 git init
脚手架初始化代码之后,正常的研发链路都希望能够将本地代码提交到 git 进行托管。在这之前,就需要先对本地目录进行 init:
const execSync = require('child_process').execSync;

function tryGitInit() {
  try {
    execSync('git --version', { stdio: 'ignore' });
    if (isInGitRepository()) {
      return false;
    }
    execSync('git init', { stdio: 'ignore' });
    return true;
  } catch (e) {
    console.warn('Git repo not initialized', e);
    return false;
  }
}
9.2.3 git commit
对本地目录执行 git commit:
function tryGitCommit(appPath) {
  try {
    execSync('git add -A', { stdio: 'ignore' });
    execSync('git commit -m "Initialize project using Create React App"', {
      stdio: 'ignore',
    });
    return true;
  } catch (e) {
    // We couldn't commit in already initialized git repo,
    // maybe the commit author config is not set.
    // In the future, we might supply our own committer
    // like Ember CLI does, but for now, let's just
    // remove the Git files to avoid a half-done state.
    console.warn('Git commit not created', e);
    console.warn('Removing .git directory...');
    try {
      // unlinkSync() doesn't work on directories.
      fs.removeSync(path.join(appPath, '.git'));
    } catch (removeErr) {
      // Ignore.
    }
    return false;
  }
}
10. 总结
回到 CRA,看完本文,对于 CRA 的思想可能有了个大致了解:
CRA是一个通用的React脚手架,它支持自定义模板的初始化。将模板代码托管在npm上,而不是传统的通过git来托管模板代码,这样方便扩展和管理CRA只负责核心依赖、模板的安装和脚手架的核心功能,具体初始化代码的工作交给react-scripts这个包
但是具体细节上它是如何做的这个我没有详细的阐述,如果感兴趣的同学可以自行下载其源码阅读。推荐阅读源码流程:
- 看它的单测
- 一步一步 debug 它
- 看源码细节
个人原创技术文章会同步更新在公众号 玩相机的程序员 上,欢迎大家关注。我是 axuebin,用键盘和相机记录生活。


