C#使用TCP/UDP协议通信并用Wireshark抓包分析数据
目录
- 一、Wireshark抓包软件下载安装
- 二、控制台程序使用 UDP 通信
-
- 1)创建新项目
- 2)编写代码
- 3)编译结果
- 4)抓包分析数据
- 三、Form窗口程序使用 TCP 通信
-
- 1)创建新项目
- 2)设计图形界面
- 3)编写代码
- 4)编译客户端和服务器端
- 5)抓包分析数据
- 四、总结
- 五、参考资料
本文章主要讲述使用 VS2019 编写 C# 程序,并通过 UDP/TCP 进行通信,使用 Wireshark 抓包软件抓取发送的包并分析数据结构,由于涉及到客户端和服务器端,可以使用两台电脑,一台电脑编写客户端代码,另一台电脑编写服务器端代码。
实验环境: Window 10 系统
开发工具: Visual Studio 2019
使用工具: Wireshark 2.6.4
一、Wireshark抓包软件下载安装
下载 Wireshark 安装包,点击下面的链接提取,里面有 2.6.4 和 3.2.7 版本的
注:我安装 3.2.7 版本的时候安装报错1603,百度了好久都没解决,但我室友安装时并没问题,所以我安装的是 2.6.4 版本的,可能是我缺少某个包,你可自行选择版本安装。
链接:https://pan.baidu.com/s/18jMDSNe6Za-iMccuTsvm9w
提取码:vbli
下载好后,就开始来安装(版本不同,但是安装的步骤一样,除了后续我安装了额外的 WinPcap 组件,可能这就是我电脑缺少的吧,哎)。
- 打开 Wireshark-win64-2.6.4.exe 文件。
![]()
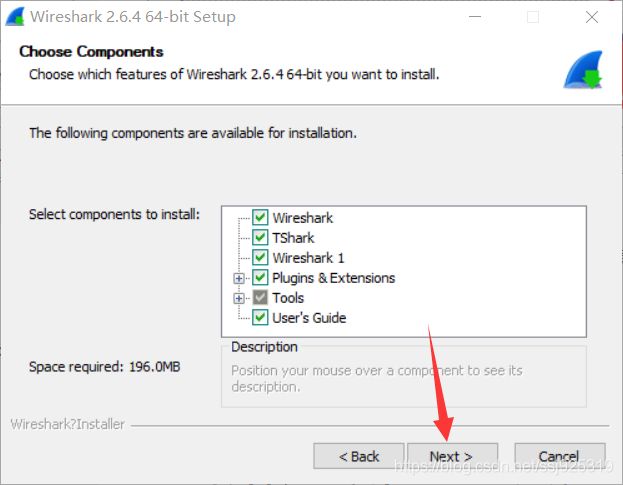
- 点击 “ Next > ”。
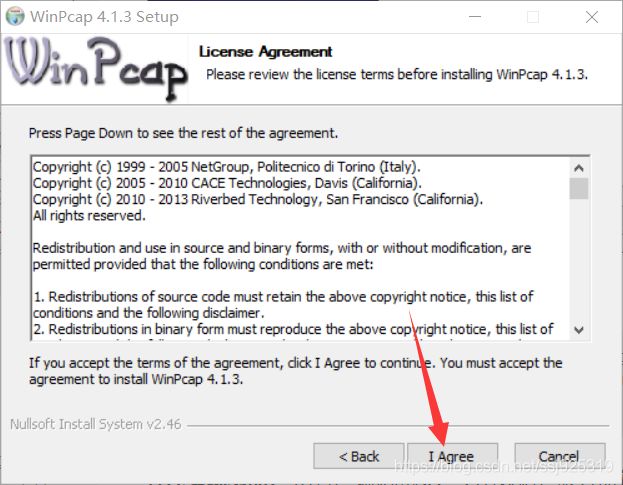
- 点击 “ I Agree ”。
- 点击 “ Next > ”。
- 勾选上 “ Wireshark Desktop Icon ”,意思为创建桌面快捷方式,再点击 “ Next > ”。
- 选择保存目录,再点击 “ Next > ”。
- 点击 “ Next > ”。
- 点击 “ Install ”。
- 然后弹出一个窗口,点击 “ 是 ” ,后又弹出一个窗口,点击 “ Next > ”。
- 点击 “ I Agree ”。
- 点击 “ Install ”。
- 点击 “ Finish ”。
- 然后 Wireshark 继续安装。
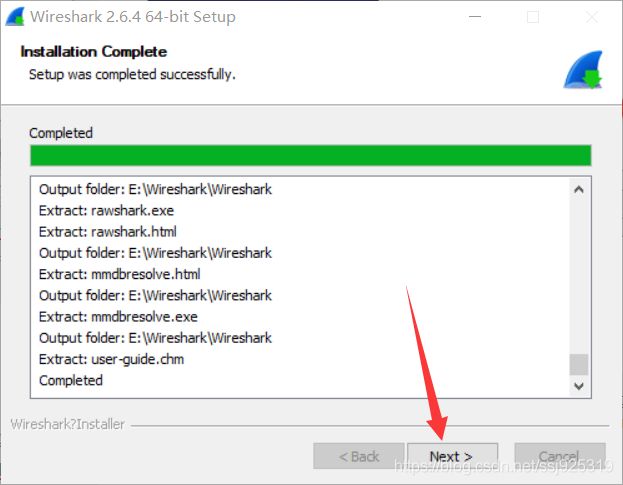
- 安装完成后,点击 “ Next > ”。
- 点击 “ Finish ”。
二、控制台程序使用 UDP 通信
本部分内容: 用 C# 编写一个命令行/控制台 hello world 程序,实现如下功能:在屏幕上连续输出 50 行 “ hello cqjtu!重交物联2018级 ” ;同时打开一个网络 UDP 套接字,向室友电脑或树莓派发送这 50 行消息。
程序实现功能: 从客户端循环发送多条数据,服务器端接收多条数据。
接下来我们创建一个新的 C# 控制台程序。
1)创建新项目
- 打开 VS2019 ,点击 “ 创建新项目 ”
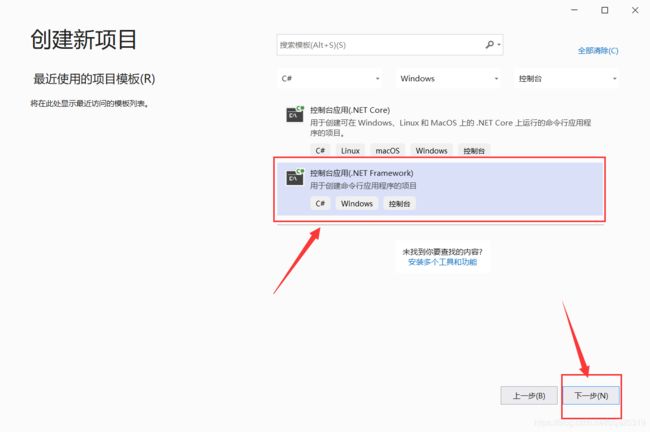
- 选择 “ 控制台应用(.NET Framework) ” ,然后点击 “ 下一步 ”。
- 编辑 “ 项目名称 ” ,选择程序保存位置,然后点击 “ 创建 ”。
- 创建完毕就如下显示。
![]()
2)编写代码
在控制台上简单输出:
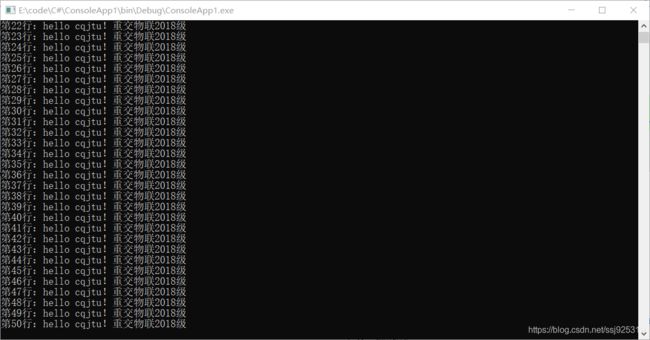
- 在 Main 函数内书写如下的代码(功能:连续输出 50 行数据)。
for(int i = 0; i < 50; i++)
            {
                Console.WriteLine("第{0}行:hello cqjtu!重交物联2018级", (i + 1));
            }
            System.Console.ReadKey();
- 编译输出结果。
这一部分编写一个简单的 UDP 通信实例,下一部分写个更复杂一点的 TCP 通信。
目前最普遍的服务模式是 C/S 模式,所以需要一个客户端 client 和一个服务端 Server ,来实现通信。
比如我现在在我的电脑上运行一个客户端代码,在我室友的电脑上运行一个服务端的代码,就可以实现通信功能。
- 在我自己的电脑上使用 VS2019 创建一个新项目 client ,并将下列代码复制粘贴进去。(注意头文件!!!使用网络协议需要引入头文件 .Net 和 .Net.Sockets)
客户端:
using System;
using System.Collections.Generic;
using System.Linq;
using System.Net;
using System.Net.Sockets;
using System.Text;
using System.Threading.Tasks;

namespace Client
{

    class Program
    {

        static void Main(string[] args)
        {

            //提示信息
            Console.WriteLine("按下任意按键开始发送...");
            Console.ReadKey();

            int m;

            //做好链接准备
            UdpClient client = new UdpClient();  //实例一个端口
            IPAddress remoteIP = IPAddress.Parse("10.60.202.32");  //假设发送给这个IP
            int remotePort = 11000;  //设置端口号
            IPEndPoint remotePoint = new IPEndPoint(remoteIP, remotePort);  //实例化一个远程端点

            for(int i = 0; i < 50; i++)
            {

                //要发送的数据:第n行:hello cqjtu!重交物联2018级
                string sendString = null;
                sendString += "第";
                m = i+1;
                sendString += m.ToString();
                sendString += "行:hello cqjtu!重交物联2018级";

                //定义发送的字节数组
                //将字符串转化为字节并存储到字节数组中
                byte[] sendData = null;
                sendData = Encoding.Default.GetBytes(sendString);

                client.Send(sendData, sendData.Length, remotePoint);//将数据发送到远程端点
            }
            client.Close();//关闭连接

            //提示信息
            Console.WriteLine("");
            Console.WriteLine("数据发送成功,按任意键退出...");
            System.Console.ReadKey();
        }
    }
}
代码流程:
- ①首先显示提示信息,等待使用人员操作;
- ②做好连接准备,如:设置IP、端口号等;
- ③ for 循环发送数据;
- ④关闭端口;
- ⑤显示提示信息,等待用户确认退出。
在我室友的电脑上使用 VS2019 创建一个新项目 server,并将下列代码复制粘贴进去。
服务器端:
using System;
using System.Collections.Generic;
using System.Linq;
using System.Net;
using System.Net.Sockets;
using System.Text;
using System.Threading.Tasks;

namespace Server
{

    class Program
    {

        static void Main(string[] args)
        {

            int result;
            string str = "第50行:hello cqjtu!重交物联2018级";
            UdpClient client = new UdpClient(11000);
            string receiveString = null;
            byte[] receiveData = null;
            //实例化一个远程端点,IP和端口可以随意指定,等调用client.Receive(ref remotePoint)时会将该端点改成真正发送端端点
            IPEndPoint remotePoint = new IPEndPoint(IPAddress.Any, 0);
            Console.WriteLine("正在准备接收数据...");
            while (true)
            {

                receiveData = client.Receive(ref remotePoint);//接收数据
                receiveString = Encoding.Default.GetString(receiveData);
                Console.WriteLine(receiveString);
                result = String.Compare(receiveString, str);
                if (result == 0)
                {

                    break;
                }
            }
            client.Close();//关闭连接
            Console.WriteLine("");
            Console.WriteLine("数据接收完毕,按任意键退出...");
            System.Console.ReadKey();
        }
    }
}
代码流程:
- ①做好连接准备,并设置结束标志;
- ②循环接收数据;
- ③关闭连接;
- ④显示提示信息,等待用户确定退出。
3)编译结果
客户端:
4)抓包分析数据
- 在桌面双击打开之前下载的 Wireshark 。
- 由于我使用的网线连接,所以是通过以太网通信的,双击 “ 以太网 ”。
- 可以看到现在 Wireshark 不断的在抓包,先点击红色的按钮暂停抓包。
- 重新编译客户端和服务器端,先不要按下按键发送数据,先挂着,看下一步。
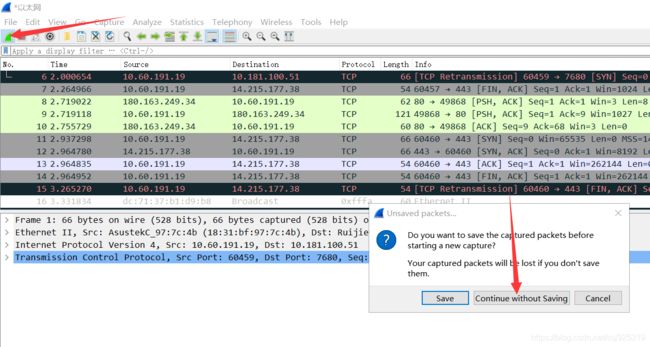
- 点击鲨鱼鱼鳍的图标,然后点击 “ Continue without Saving ”,不保存之前抓取的包。
- 然后按键盘开始发送数据,发送完后,点击 Wireshark 的红色按钮,停止抓包。
- 在方框内输入 “ UDP ” 过滤包,然后就可以看到下面的信息,这些就是我发送给我室友电脑上的 50 条数据,下面开始分析这些数据,只选择其中一条分析。
- 在抓包分析数据之前,先有一个网络协议层的概念,主机上的数据都是从应用层→运输层→网络层→数据链路层→物理层(比特流,也就是二进制,高低电平)。
- 选中 Ethernet ,这就是数据链路层的帧的头部,相应的下面蓝色部分的十六进制,就是相应的帧头部数据。
- 目的地址(Destination):数据的接收方,这里是:10.60.202.32;


- 源地址(Source):数据的发送方,这里是:10.60.191.19;


- 数据类型(Type):分为 IP(0800) 包和 ARP(0806) 包,这个包是 0800 ,所以是 IP 包。


- 数据:后面三排,上层(网络层)传下来的一个 IP 包,数据部分又分为数据部分和填充部分,当这个 IP 包的长度小于 46 个字节,比如数据部分长度为 30 ,那么填充部分(垃圾信息)就是 16 个字节,保证这个帧的总长度最短为 64 个字节(其原因可自行百度),如果数据部分长度为50,那么填充部分就为 0 个字节,最后,数据(数据部分 + 填充部分)的长度最长为 1500 个字节,不能过大,所以帧的总长度最长为 1518 字节,抓取的所有包,都不会超过这个长度。

- 校验码:帧的末尾有 4 字节的校验码,但是抓包软件会自动舍去。
- Version(版本号):分为 IPv4 和 IPv6 现在普遍都用的 IPv4 ,所以值为 4 ,1 个字节;


- HLen(ip报头长度):32位字的报头长度(HLEN);


- TOS(级别):服务类型描述数据报将如何被处理,比如优先发送等,大多数都是默认为 0 ;


- Datagram Total Length(总长度):包括报头和数据的数据包长度;


- identifier(标识):唯一的 IP 数据包值;

- Flags(标志):说明是否有数据被分段,我是一条一条的发送多个数据包,每个包的数据很小,没有被分段,所以这里数值为 0 。


- Fragmentation Offset(分段偏移):如果数据包在装人帧时太大,则需要进行分段和重组,这里没有分段,所以偏移量为 0 ;


- TTL(存活期):存活期是在数据包产生时建立在其内部的一个设置,如果这个数据包在这个TTL到期时仍没有到达它要去的目的地,那么它将被丢弃,这个设置将防止IP包在寻找目的地的时候在网络中不断循环,每经过一个路由器,它的值就减一,这里它的值为 128 ,也就是 128 个生存期;


- Protocol(协议):上层协议的端口( TCP 是端口 6;UDP 是端口 17) ,同样也支持网络层协议,如ARP和ICMP,这里值为 17 ,也就是 UDP 协议;


- Header Checksum(校验码):只针对报头的循环冗余校验(CRC);


- Source Address(源地址):消息发送者的 ip 地址,这里是10.60.191.19;


- Destination Address(目的地址):消息接收者的 ip 地址,这里是10.60.202.32;


- ip包头的第六行:用于网络检测、调试、安全以及更多的内容,不过大多数情况都是默认为 0 的;
到此,一个 UDP 包就分析完了。
下面演示如何通过窗口程序使用 TCP 通信,并抓包分析一下 TCP 包。
三、Form窗口程序使用 TCP 通信
本部分内容: 用 VS2019 的 C# 编写一个简单的 Form 窗口程序,有一个文本框 textEdit 和一个发送按钮 button ,运行程序后,可以在文本框里输入文字,如 “ hello cqjtu!重交物联2018级 ” ,点击 button ,将这些文字发送给室友电脑或树莓派,采用 TCP 套接字;
程序实现功能: 从客户端发送多条数据,服务器端接收多条数据,服务器端反馈发送信息给客户端,客户端收到并显示出来。
接下来,我们创建一个新的 C# Form 窗口程序。
1)创建新项目
- 选中 “ Windows 窗体应用 ” ,再点击 “ 下一步 ”。
- 设置项目名称、保存位置,再点击 “ 创建 ” 。
- 创建完毕。
2)设计图形界面
摆放控件:
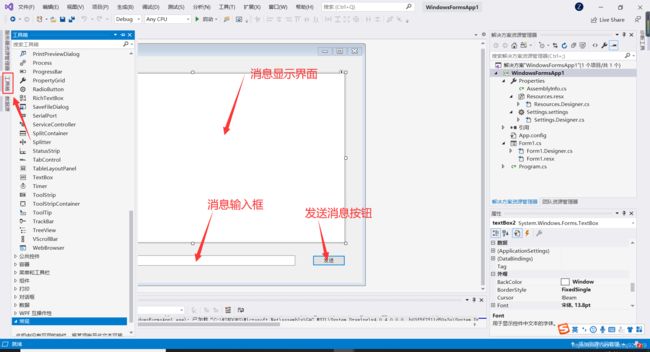
- 首先往图形界面内拖动控件并进行摆放,如下图所示。
- 从工具箱内拖 2 个 TextBox 和 1 个 Button 控件。
注:刚拖出来的 TextBox 只能输入一行,只能横着拖,不能竖着拖,不用担心,看看下面的设置属性,就可以设计出如下的界面了。
- 左键选中最下面的 TextBox ,并在右下角的属性中找到 Font 属性,并点击 “ … ” 。
- 该界面内可以设置文本样式。
- 然后在设计属性中的(Name)这里默认的 textBox1 ,也可以更改,但不能重复,唯一标识,这是控件的编号,用于代码编写的时候识别,就像是身份证号一样,不能出现中文。
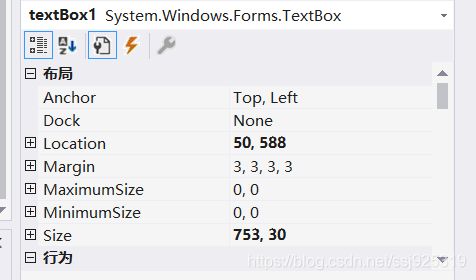
- 在布局这里,Location 是指控件左上角顶点基于窗口所在的位置,Size 是指控件的长和宽,可以自行设置。
- 选中一个 TextBox ,并点击黑色的小三角按钮,可以将单行文本框设置为多行文本框。
- 添加垂直滚动条:找到 ScrollBars 属性,设置参数为 Vertical 。
- 设置边界样式:找到 BorderStyle ,参数设置为 FixedSingle 。
- 编号为 textBox2 。
- 设置消息显示界面的 TextBox 不可编辑:找到 Enabled 属性,参数设为 False 。
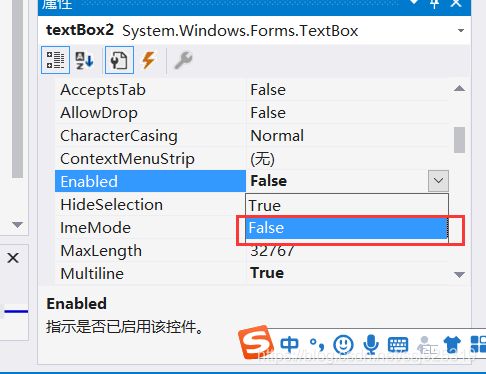
除此之外,你还可以根据设置消息输入框的文本样式来设置消息显示界面内的文本样式。
设置发送消息按钮属性:
- 左键点击选中按钮,找到 Text 属性,参数输入为 “ 发送 ” ,则控件上就会显示输入的字样。
- 它的唯一标识为:button1
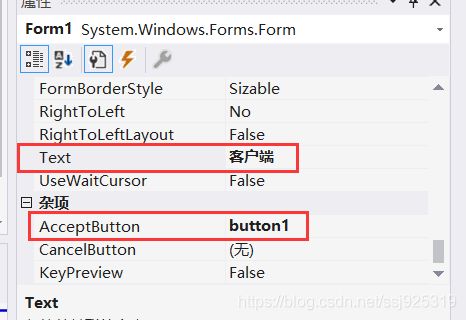
- 左击窗体选中它,在右下角的属性中找到 Text 属性,编辑为 “ 客户端 ” ,然后窗体的左上角,就显示为 “ 客户端 ”。
- 紧接着,有个 AcceptButton 属性,下拉框选中这个 button1 按钮,设置完这个属性后,当我们最后执行这个程序后,按下回车键 = 点击这个按钮。

想了解控件的其它属性可以参考:https://wenwen.sogou.com/z/q707115213.htm
你也可以设置更多的属性,使界面更加的好看,这里就不再赘述,着重点在于代码。
3)编写代码
现在来开始编写代码。
- 双击图形界面的按钮后,VS2019 会自动的转到代码编辑区域。
- 红色方框后就是我们双击按钮后,要编写触发事件执行过程的代码,也就是点击按钮后,就会执行这个函数体。
- 在 button1_Click 函数内复制粘贴如下代码。
using System;
using System.Collections.Generic;
using System.ComponentModel;
using System.Data;
using System.Drawing;
using System.Linq;
using System.Net;
using System.Net.Sockets;
using System.Text;
using System.Threading.Tasks;
using System.Windows.Forms;

namespace WindowsFormsApp1
{

    public partial class Form1 : Form
    {

        public Form1()
        {

            InitializeComponent();
        }

         public void button1_Click(object sender, EventArgs e)
        {

            try
            {

                /*
                 * 显示当前时间
                 */
                string str = "The current time: ";
                str += DateTime.Now.ToString("yyyy-MM-dd HH:mm:ss");
                textBox2.AppendText(str + Environment.NewLine);
                /*
                 * 做好连接准备
                 */
                int port = 2000;
                string host = "10.60.202.32";//我室友的IP地址
                IPAddress ip = IPAddress.Parse(host);
                IPEndPoint ipe = new IPEndPoint(ip, port);//把ip和端口转化为IPEndPoint实例
                Socket c = new Socket(AddressFamily.InterNetwork, SocketType.Stream, ProtocolType.Tcp);//创建一个Socket
                /*
                 * 开始连接
                 */
                str = "Connect to server...";
                textBox2.AppendText(str + Environment.NewLine);
                c.Connect(ipe);//连接到服务器
                /*
                 *发送消息
                 */
                string sendStr = textBox1.Text;
                str = "The message content: " + sendStr;
                textBox2.AppendText(str + Environment.NewLine);
                byte[] bs = Encoding.UTF8.GetBytes(sendStr);
                str = "Send the message to the server...";
                textBox2.AppendText(str + Environment.NewLine);
                c.Send(bs, bs.Length, 0);//发送信息
                /*
                 * 接收服务器端的反馈信息
                 */
                string recvStr = "";
                byte[] recvBytes = new byte[1024];
                int bytes;
                bytes = c.Receive(recvBytes, recvBytes.Length, 0);//从服务器端接受返回信息
                recvStr += Encoding.UTF8.GetString(recvBytes, 0, bytes);
                str = "The server feedback: " + recvStr;//显示服务器返回信息
                textBox2.AppendText(str + Environment.NewLine);
                /*
                 * 关闭socket
                 */
                c.Close();
            }
            catch (ArgumentNullException f)
            {

                string str = "ArgumentNullException: " + f.ToString();
                textBox2.AppendText(str + Environment.NewLine);
            }
            catch (SocketException f)
            {

                string str = "ArgumentNullException: " + f.ToString();
                textBox2.AppendText(str + Environment.NewLine);
            }
            textBox2.AppendText("" + Environment.NewLine);
            textBox1.Text = "";
        }
    }
}
代码流程:
- 当点击按钮后,button1_Click 函数开始执行。
①获取当前时间,并打印到消息显示界面内;
②做连接服务器端的准备,如:设置IP、设置端口号、实例socket端口;
③打印连接信息,并连接服务器;
④从消息输入框获取字符串并按照UTF8编码到字节数组存储,然后发送出去。
⑤将从服务器端接收到的字节流按照UTF8解码为字符串并存储打印出来。
⑥关闭socket端口变量。 - 两个 catch 是做异常情况处理,并打印到消息显示界面内。
接下来开始编写服务器端代码:
注:从第三部分: “ Form窗口程序使用 TCP 通信 ” 开始至此,都是在编写客户端的部分,接下来我们需要编写服务器端的代码了。
- 根据第二部分: “ 控制台程序使用 UDP 通信 ” 创建一个新的控制台程序,这里就不再演示了。
- 复制下面 main 函数内的代码,并粘贴进你自己的 main 函数体内。
using System;
using System.Collections.Generic;
using System.Linq;
using System.Net;
using System.Net.Sockets;
using System.Text;
using System.Threading.Tasks;

namespace ConsoleApp2
{

    class Program
    {

        static void Main(string[] args)
        {

            /*
             * 做好连接准备
             */
            int i = 0;
            int port = 2000;
            string host = "10.60.202.32";
            IPAddress ip = IPAddress.Parse(host);
            IPEndPoint ipe = new IPEndPoint(ip, port);
            Socket s = new Socket(AddressFamily.InterNetwork, SocketType.Stream, ProtocolType.Tcp);//创建一个Socket类
            s.Bind(ipe);//绑定2000端口
            /*
             * 循环监听并处理消息
             */
            while (true)
            {

                i++;
                try
                {

                    Console.Write("Perform operations {0} :",i);
                    Console.WriteLine("\t-----------------------------------------------");
                    s.Listen(0);//开始监听
                    Console.WriteLine("1. Wait for connect...");
                    /*
                     * 实例一个新的socket端口
                     */
                    Socket temp = s.Accept();//为新建连接创建新的Socket。
                    Console.WriteLine("2. Get a connect");
                    /*
                     * 接收客户端发的消息并做解码处理
                     */
                    string recvStr = "";
                    byte[] recvBytes = new byte[1024];
                    int bytes;
                    bytes = temp.Receive(recvBytes, recvBytes.Length, 0);//从客户端接受信息
                    recvStr += Encoding.UTF8.GetString(recvBytes, 0, bytes);
                    Console.WriteLine("3. Server Get Message:{0}", recvStr);//把客户端传来的信息显示出来
                    /*
                     * 返回给客户端连接成功的消息
                     */
                    string sendStr = "Ok!Client send message sucessful!";
                    byte[] bs = Encoding.UTF8.GetBytes(sendStr);
                    temp.Send(bs, bs.Length, 0);//返回客户端成功信息
                    /*
                     * 关闭端口
                     */
                    temp.Close();
                    Console.WriteLine("4. Completed...");
                    Console.WriteLine("-----------------------------------------------------------------------");
                    Console.WriteLine("");
                    //s.Close();//关闭socket(由于再死循环中,所以不用写,但如果是单个接收,实例socket并完成任务后需关闭)
                }
                catch (ArgumentNullException e)
                {

                    Console.WriteLine("ArgumentNullException: {0}", e);
                }
                catch (SocketException e)
                {

                    Console.WriteLine("SocketException: {0}", e);
                }
            }
        }
    }
}
4)编译客户端和服务器端
客户端:
服务器端:
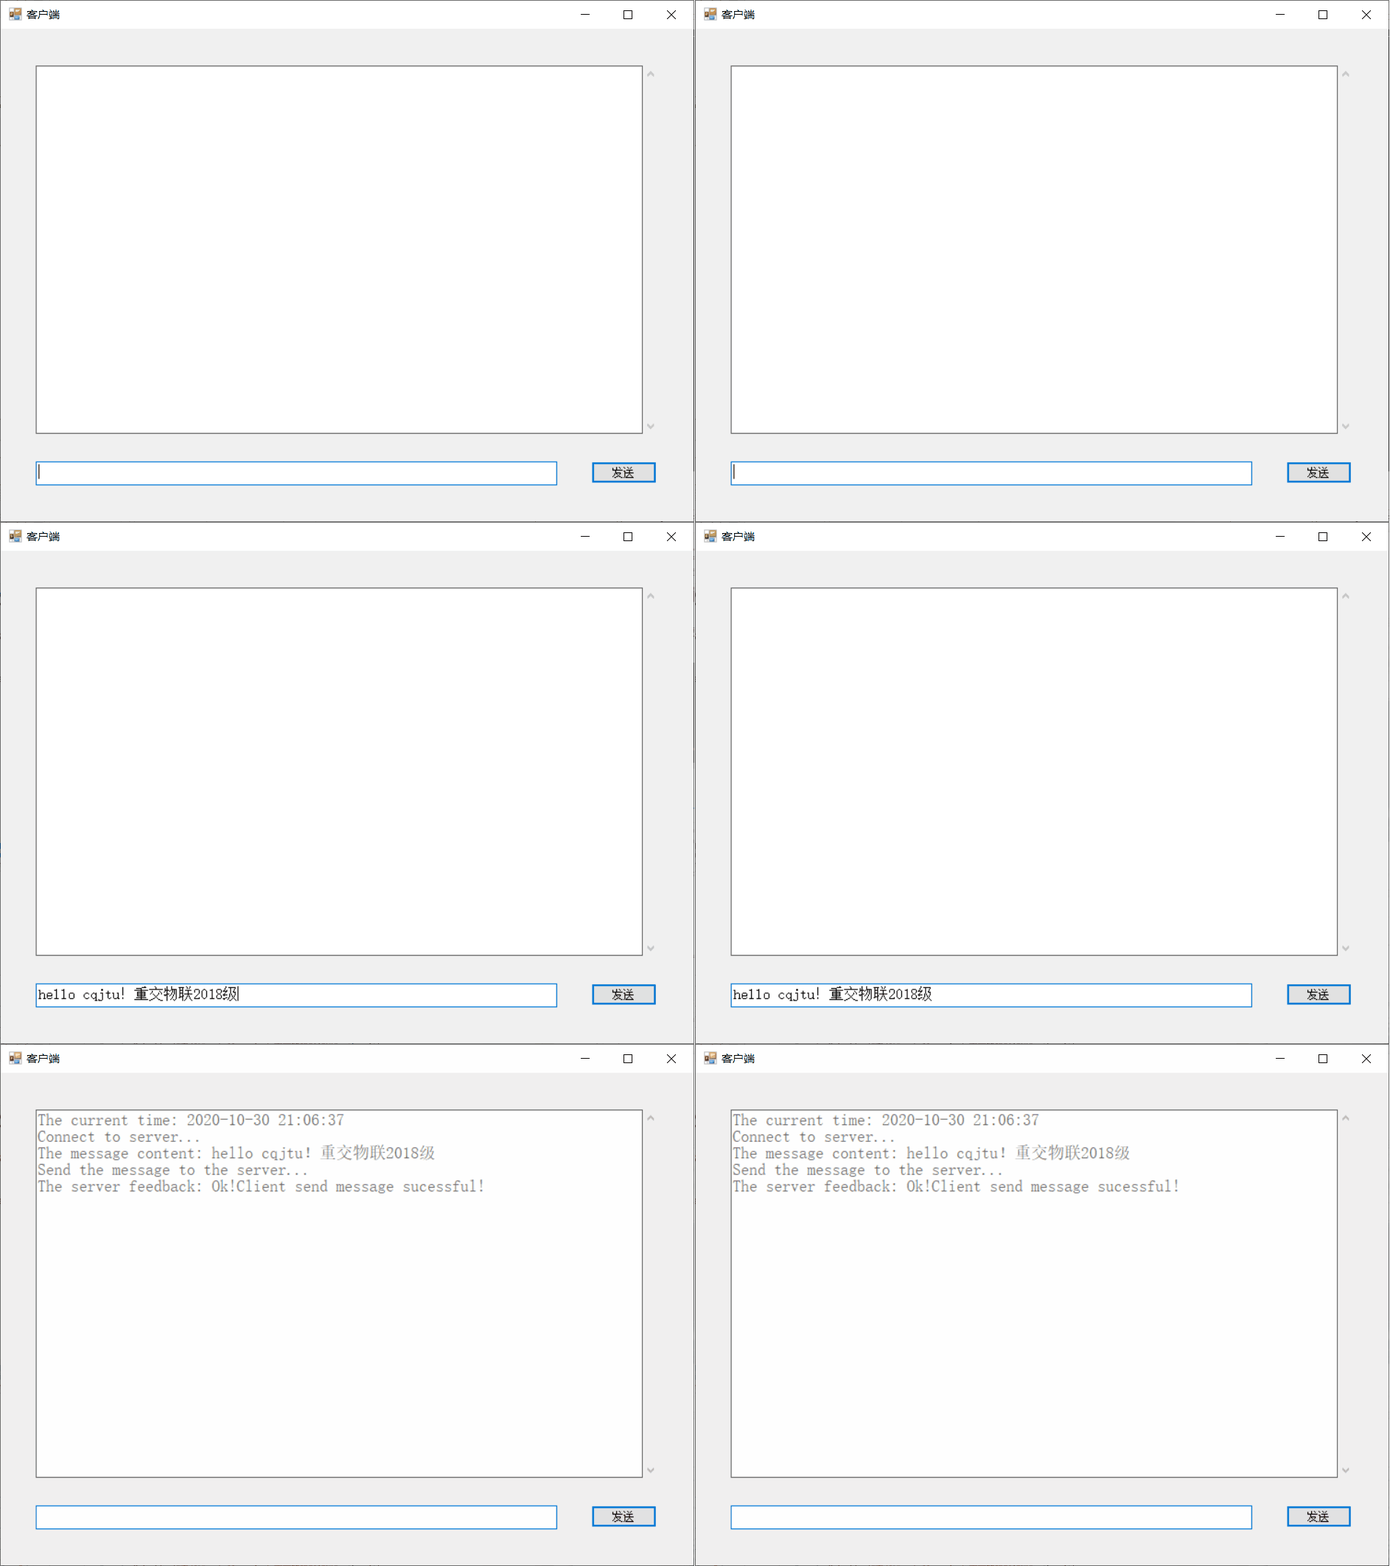
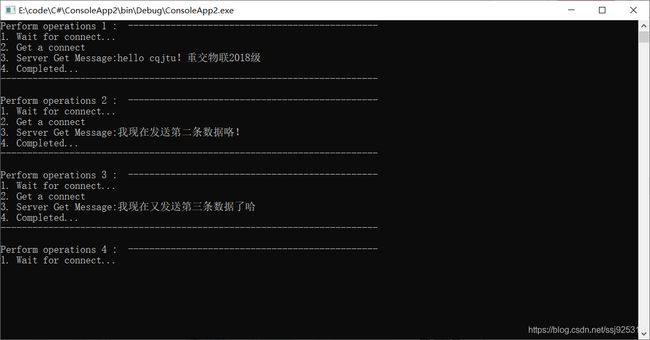
- 然后在客户端内输入信息,并点击 “ 发送 ” 按钮或者按回车键发送消息,服务器端显示客户端发来的消息,并做回复(由于使用的 GIF 制作动态图,显示不同步,自己试验结果的时候可以对照来看),然后服务器端处理完消息后,进入下一个准备接收阶段。
客户端:
客户端:
5)抓包分析数据
- 按照第二部分的抓包步骤来,开始抓包。
- 下面这几个包就是我发送给我室友电脑上的信息了。
- 以及室友电脑的客户端反馈给我的信息。
![]()
-
再来看一下 UDP 包和 TCP 包的区别。
UDP:

第三行:Internet Protocl Version 4:IPv4协议
第四行:User Datagram Protocol:UDP协议
TCP:

第三行:Internet Protocl Version 4:IPv4协议
第四行:Transmission Control Protocol:TCP协议 -
它们的区别也就在于第四行,第三行都是 IPv4 协议。
-
这个 ip 包头也是 45 00 开头,对比一下第二部分对 ip 包的分析,这个 ip 包头也是 45 00 开头,所以一个 ip 包的前两个字节一定是 45 00 。

-
生存期也是 128 ,一个包的生存期基本上都是默认的数值 128 ,而这里的协议号是 6 ,这就是 TCP 的协议号,第二部分的协议号是 17 ,是 UDP 的。

其余的数据和第二部分抓取的数据包差不多了,这里不再赘述了。
至此本文章就差不多结束了。
四、总结
通过本篇文章,学会了如何使用 UDP/TCP 套接字进行网络通信,这都是基于 C/S 模式,一个客户端,一个服务器端,在使用套接字的时候,端口号、IP地址是必不可缺的,缺一不可,如果你觉得本篇文章还可以的话,谢谢点个赞。
五、参考资料
1、C#套接字编程实例UDP/TCP通信
2、网络编程之UDP套接字
3、c# 实现简单udp数据的发送和接收
4、IP报头结构


