手写Tomcat(一)实现Tomcat的基本原理
1、项目来由
前几天,偶然机会刷到一篇关于手写tomcat的博客,当晚就写了个Demo来玩了下,感觉很有趣。今年疫情全球蔓延,本是绝佳的提高自己能力的时候,却苦于自身自制力太差,一直拖到现在,才决定重新开始写博客,学技术。开始努力吧,奥利给。。。
Tomcat是一款Servlet规范的web容器,提供了包括Socket服务、请求分发、封装请求和响应的功能。轻量级、性能优秀、操作简单、上手快等一系列优点,让我始终放在j2ee开发的首位web容器,当然可能是自己见识鄙薄,其他的了解的少,感觉就他用着挺棒的。此次打算做个手写Tomcat的系列博客,从基础功能出发,先实现Tomcat服务的基础原理;然后再研究动态添加Servlet的功能;继而加入多项目启动的功能....不能再说下去了,万一牛P吹大了,没实现好尴尬的。老实说,之后的自己还没想好呢,哈哈,那就先就这样吧。那现在开始着手实现Tomcat的基本原理吧。
2、上代码
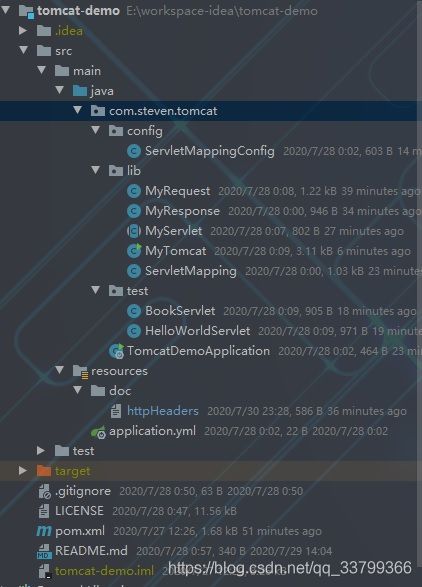
本项目通过SpringBoot构建,随SpringBoot项目进行启动,项目结构如下:
2.1、自定义请求对象
MyRequest主要是解析请求的URL地址,获取请求Servlet的映射路径、HTTP请求方式。怎么解析呢,其实是从HTTP请求头中取出相关信息,请求报文的格式如下(此为测试时获取的,在JAVA代码中打印出来的结果,同时放入项目资源文件doc):
GET /world HTTP/1.1
Host: 127.0.0.1:8080
Connection: keep-alive
Upgrade-Insecure-Requests: 1
User-Agent: Mozilla/5.0 (Windows NT 10.0; Win64; x64) AppleWebKit/537.36 (KHTML, like Gecko) Chrome/83.0.4103.116 Safari/537.36
Accept: text/html,application/xhtml+xml,application/xml;q=0.9,image/webp,image/apng,*/*;q=0.8,application/signed-exchange;v=b3;q=0.9
Sec-Fetch-Site: none
Sec-Fetch-Mode: navigate
Sec-Fetch-User: ?1
Sec-Fetch-Dest: document
Accept-Encoding: gzip, deflate, br
Accept-Language: zh-CN,zh;q=0.9
Cookie: siteId=2c254a3dfd344686922a027f2aead8df1; siteCode=xxzj
其实就是解析获取第一行中的GET请求方式;请求路径为/world。具体代码如下:
package com.steven.tomcat.lib;

import java.io.IOException;
import java.io.InputStream;

/**
 * @desc 自定义请求对象
 * @author steven
 * @date 2020/7/27 12:30
 */
public class MyRequest {

    private String url;
    private String method;

    /**
     * 通过InputStream将请求地址,请求方法解析
     * @param inputStream
     * @throws IOException
     */
    public MyRequest(InputStream inputStream) throws IOException {
        String httpRequest = "";
        byte[] httpRequestBytes = new byte[1024];
        int length = 0;
        if((length = inputStream.read(httpRequestBytes)) > 0){
            httpRequest = new String(httpRequestBytes,0,length);
        }
        //System.out.println("httpRequest = " + httpRequest);

        String httpHead = httpRequest.split("\n")[0];
        url = httpHead.split("\\s")[1];
        method = httpHead.split("\\s")[0];
    }

    public String getUrl() {
        return url;
    }

    public void setUrl(String url) {
        this.url = url;
    }

    public String getMethod() {
        return method;
    }

    public void setMethod(String method) {
        this.method = method;
    }
}
2.2、 自定义响应对象
主要是定义一个响应对象的write方法,将请求的Servlet执行的业务结果返回。
package com.steven.tomcat.lib;

import java.io.IOException;
import java.io.OutputStream;

/**
 * @desc 自定义响应对象
 * @author steven
 * @date 2020/7/27 12:30
 */
public class MyResponse {

    private OutputStream outputStream;

    public MyResponse(OutputStream outputStream) {
        this.outputStream = outputStream;
    }

    /**
     * 自定义HTTP协议的输出
     * @param content
     * @throws IOException
     */
    public void write(String content) throws IOException {

        StringBuffer httpResponse = new StringBuffer();
        httpResponse.append("HTTP/1.1 200 OK\n")
                .append("Content-Type: text/html\n")
                .append("\r\n")
                .append("")
                .append(content)
                .append("");
        outputStream.write(httpResponse.toString().getBytes());
        outputStream.close();
    }

}
2.3、自定义请求服务抽象类
请求和响应都有了,自然需要执行业务逻辑,此时就写了doGet、doPost方法处理请求,通过service调用对应的请求处理方法,其实就是重写Servlet。
package com.steven.tomcat.lib;

/**
 * @desc 自定义请求服务抽象类
 * @author steven
 * @date 2020/7/27 12:30
 */
public abstract class MyServlet {

    public abstract void doGet(MyRequest myRequest, MyResponse myResponse);

    public abstract void doPost(MyRequest myRequest, MyResponse myResponse);

    public void service(MyRequest myRequest, MyResponse myResponse){
        if("POST".equalsIgnoreCase(myRequest.getMethod())){
            //System.out.println("Myservlet is executing service of 'GET' ......");
            doPost(myRequest,myResponse);
        }else if("GET".equalsIgnoreCase(myRequest.getMethod())){
            //System.out.println("Myservlet is executing service of 'POST' ......");
            doGet(myRequest,myResponse);
        }
    }

}
2.4、新建测试的Servlet
HelloWorldServlet如下:
package com.steven.tomcat.test;

import com.steven.tomcat.lib.MyRequest;
import com.steven.tomcat.lib.MyResponse;
import com.steven.tomcat.lib.MyServlet;

import java.io.IOException;

/**
 * @desc MyServlet实现类,进行测试
 * @author steven
 * @date 2020/7/27 12:30
 */
public class HelloWorldServlet extends MyServlet {

    @Override
    public void doGet(MyRequest myRequest, MyResponse myResponse) {
        try {
            myResponse.write("hello world get request .....");
            System.out.println("HelloWorldServlet.doGet");
        } catch (IOException e) {
            e.printStackTrace();
        }
    }

    @Override
    public void doPost(MyRequest myRequest, MyResponse myResponse) {
        try {
            myResponse.write("hello world post request .....");
            System.out.println("HelloWorldServlet.doPost");
        } catch (IOException e) {
            e.printStackTrace();
        }
    }
}
BookServlet如下:
package com.steven.tomcat.test;

import com.steven.tomcat.lib.MyRequest;
import com.steven.tomcat.lib.MyResponse;
import com.steven.tomcat.lib.MyServlet;

import java.io.IOException;

/**
 * @desc
 * @author steven
 * @date 2020/7/27 12:30
 */
public class BookServlet extends MyServlet {

    @Override
    public void doGet(MyRequest myRequest, MyResponse myResponse) {
        try {
            myResponse.write("mytomcat book get ....");
            System.out.println("BookServlet.doGet");
        } catch (IOException e) {
            e.printStackTrace();
        }
    }

    @Override
    public void doPost(MyRequest myRequest, MyResponse myResponse) {
        try {
            myResponse.write("mytomcat book post ....");
            System.out.println("BookServlet.doPost");
        } catch (IOException e) {
            e.printStackTrace();
        }
    }
}
2.5、Servlet的映射结构
package com.steven.tomcat.lib;

/**
 * @desc 将Servlet映射到一个请求列表
 * 在servlet开发中,会在web.xml中通过和来进行指定哪个URL交给哪个servlet进行处理。
 * @author steven
 * @date 2020/7/27 12:30
 */
public class ServletMapping {

    private String servletName;
    private String url;
    private String clazz;

    public ServletMapping(String servletName, String url, String clazz) {
        this.servletName = servletName;
        this.url = url;
        this.clazz = clazz;
    }

    public String getServletName(){
        return servletName;
    }

    public void setServletName(String servletName) {
        this.servletName = servletName;
    }

    public String getUrl() {
        return url;
    }

    public void setUrl(String url) {
        this.url = url;
    }

    public String getClazz() {
        return clazz;
    }

    public void setClazz(String clazz) {
        this.clazz = clazz;
    }
}
2.7、创建Serlvet和URL的映射表
此处相当于web项目中的web.xml中的
package com.steven.tomcat.config;

import com.steven.tomcat.lib.ServletMapping;

import java.util.ArrayList;
import java.util.List;

/**
 * @desc Servlet的请求映射表
 * @author steven
 * @date 2020/7/27 12:30
 */
public class ServletMappingConfig {

    public static List servletMappingList = new ArrayList<>();

    static {
        servletMappingList.add(new ServletMapping("book","/book","com.steven.tomcat.test.BookServlet"));
        servletMappingList.add(new ServletMapping("helloWorld","/world","com.steven.tomcat.test.HelloWorldServlet"));
    }

}
2.8、重写Tomcat的执行原理(核心)
Tomcat启动调用start方法,首先通过initServletMapping方法初始化Servlet和URL的请求映射表;然后通过ServerSocket建立服务器上的端口通信,调用ServerSocket的accept方法等待请求;当请求到来时,创建请求和响应对象,调用dispatch方法转发请求到具体业务;dispatch方法首先将请求的业务类通过java反射机制实例化对象,然后调用service执行对应的服务逻辑。
package com.steven.tomcat.lib;

import com.steven.tomcat.config.ServletMappingConfig;

import java.io.IOException;
import java.io.InputStream;
import java.io.OutputStream;
import java.net.ServerSocket;
import java.net.Socket;
import java.util.HashMap;
import java.util.Map;

/**
 * @desc Tomcat处理逻辑:先初始化servlet映射的请求url列表;然后建立
 * @author steven
 * @date 2020/7/27 12:30
 */
public class MyTomcat {

    private int port = 8080;
    private Map urlServletMap = new HashMap<>(16);

    public MyTomcat(int port) {
        this.port = port;
    }

    public void start(){
        // 初始化servlet映射的请求url列表
        initServletMapping();

        ServerSocket serverSocket = null;
        try {
            serverSocket = new ServerSocket(port);
            System.out.println("\n\n MyTomcat is started ...... \n\n");

            while (true){
                Socket socket = serverSocket.accept();
                InputStream inputStream = socket.getInputStream();
                OutputStream outputStream = socket.getOutputStream();

                MyRequest myRequest = new MyRequest(inputStream);
                MyResponse myResponse = new MyResponse(outputStream);

                // 请求转发
                dispatch(myRequest,myResponse);

                socket.close();
            }

        } catch (IOException e) {
            e.printStackTrace();
        } finally{
            if(serverSocket != null){
                try {
                    serverSocket.close();
                } catch (IOException e) {
                    e.printStackTrace();
                }
            }
        }
    }

    /**
     * 请求转发(将请求的url放入到映射表中查找,然后利用反射原理实例化请求类,再调用相关服务)
     * @param myRequest
     * @param myResponse
     */
    private void dispatch(MyRequest myRequest, MyResponse myResponse) {
        //System.out.println("MyTomcat is dispatch request's url ......");
        String clazz = urlServletMap.get(myRequest.getUrl());

        try {
            Class myServletClass = (Class) Class.forName(clazz);
            MyServlet myServlet = myServletClass.newInstance();
            myServlet.service(myRequest,myResponse);
        } catch (ClassNotFoundException e) {
            e.printStackTrace();
        } catch (IllegalAccessException e) {
            e.printStackTrace();
        } catch (InstantiationException e) {
            e.printStackTrace();
        }
    }

    /**
     * 初始化servlet映射的请求url列表
     */
    private void initServletMapping(){
        //System.out.println("Servlet request mapping ......");
        for(ServletMapping servletMapping : ServletMappingConfig.servletMappingList){
            urlServletMap.put(servletMapping.getUrl(),servletMapping.getClazz());
        }
    }

    public static void main(String[] args) {
        new MyTomcat(8000).start();
    }
}
2.9、Tomcat启动类
package com.steven.tomcat;

import com.steven.tomcat.lib.MyTomcat;
import org.springframework.boot.SpringApplication;
import org.springframework.boot.autoconfigure.SpringBootApplication;

import javax.servlet.http.HttpServlet;

@SpringBootApplication
public class TomcatDemoApplication extends HttpServlet {

    public static void main(String[] args) {
        SpringApplication.run(TomcatDemoApplication.class, args);
        new MyTomcat(8080).start();
    }
}
3、测试
博客参考:从零开始写一个迷你版的Tomcat、我手写的简易tomcat
本次Demo代码存放 Github仓库

