SpringMvc+饿了么UI组件+七牛云做图片上传
前言
我之前也有用过SpringBoot+OSS做过云存储,可以去看我的文章https://blog.csdn.net/Curtisjia/article/details/109339980,当时我做了个工具类的封装,可以拿过来直接用!这次用的技术栈是Springmvc,所以需要做些配置!
配置
springmvc.xml
<beans xmlns="http://www.springframework.org/schema/beans"
       xmlns:xsi="http://www.w3.org/2001/XMLSchema-instance"
       xmlns:context="http://www.springframework.org/schema/context"
       xmlns:dubbo="http://code.alibabatech.com/schema/dubbo"
       xmlns:mvc="http://www.springframework.org/schema/mvc"
       xsi:schemaLocation="http://www.springframework.org/schema/beans
						http://www.springframework.org/schema/beans/spring-beans.xsd
						http://www.springframework.org/schema/mvc
						http://www.springframework.org/schema/mvc/spring-mvc.xsd
						http://code.alibabatech.com/schema/dubbo
						http://code.alibabatech.com/schema/dubbo/dubbo.xsd
						http://www.springframework.org/schema/context
						http://www.springframework.org/schema/context/spring-context.xsd">
    <mvc:annotation-driven>
        <mvc:message-converters register-defaults="true">
            <bean class="com.alibaba.fastjson.support.spring.FastJsonHttpMessageConverter">
                <property name="supportedMediaTypes" value="application/json"/>
                <property name="features">
                    <list>
                        <value>WriteMapNullValuevalue>
                        <value>WriteDateUseDateFormatvalue>
                    list>
                property>
            bean>
        mvc:message-converters>
    mvc:annotation-driven>

    <dubbo:application name="health_backend" />

    <dubbo:registry address="zookeeper://127.0.0.1:2181"/>

    <dubbo:annotation package="com.itheima.controller" />

    <dubbo:consumer timeout="600000" check="false"/>

    <bean id="multipartResolver"
          class="org.springframework.web.multipart.commons.CommonsMultipartResolver">
        <property name="maxUploadSize" value="104857600" />
        <property name="maxInMemorySize" value="4096" />
        <property name="defaultEncoding" value="UTF-8"/>
    bean>
beans>
配置到web.xml
<web-app>
  <display-name>Archetype Created Web Applicationdisplay-name>

  <filter>
    <filter-name>CharacterEncodingFilterfilter-name>
    <filter-class>org.springframework.web.filter.CharacterEncodingFilterfilter-class>
    <init-param>
      <param-name>encodingparam-name>
      <param-value>utf-8param-value>
    init-param>
    <init-param>
      <param-name>forceEncodingparam-name>
      <param-value>trueparam-value>
    init-param>
  filter>
  <filter-mapping>
    <filter-name>CharacterEncodingFilterfilter-name>
    <url-pattern>/*url-pattern>
  filter-mapping>
  <servlet>
    <servlet-name>springmvcservlet-name>
    <servlet-class>org.springframework.web.servlet.DispatcherServletservlet-class>

    <init-param>
      <param-name>contextConfigLocationparam-name>
      <param-value>classpath:springmvc.xmlparam-value>
    init-param>
    <load-on-startup>1load-on-startup>
  servlet>
  <servlet-mapping>
    <servlet-name>springmvcservlet-name>
    <url-pattern>*.dourl-pattern>
  servlet-mapping>
web-app>
然后去七牛云的官网注册个账号,并且实名认证下(要身份证),但是认证过程很快,我几分钟认证就通过了!
七牛云需要进行的操作
开发者文档:https://developer.qiniu.com/kodo/sdk/1239/java
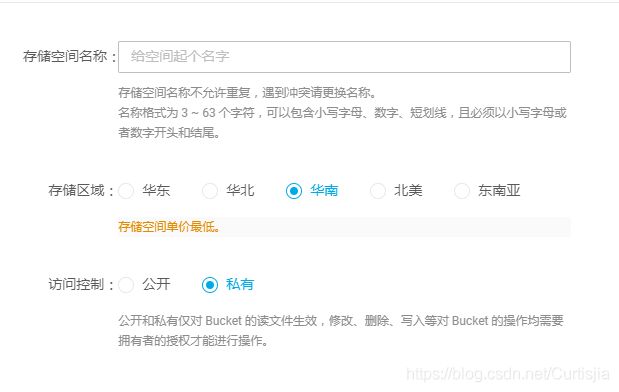
创建空间,就是阿里云的bucket!

下面的看着写,看着选!存储区域的选择,对后面代码的配置会小有不同,待会代码里会说!
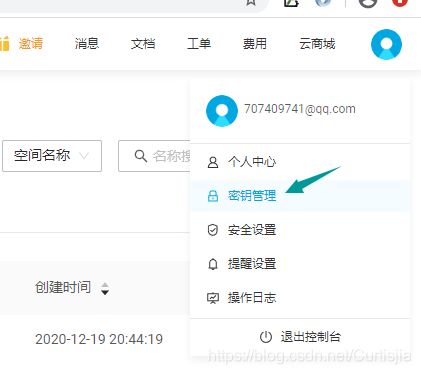
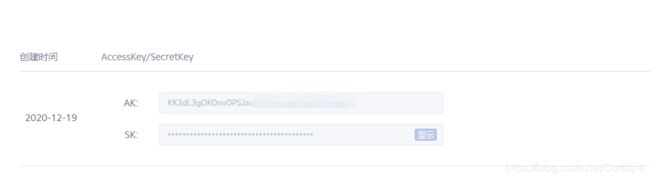
右上角拿秘钥
拿到之后,可以看七牛云的示例代码:
//构造一个带指定 Region 对象的配置类
Configuration cfg = new Configuration(Region.region0());
//...其他参数参考类注释

UploadManager uploadManager = new UploadManager(cfg);
//...生成上传凭证,然后准备上传
String accessKey = "your access key";
String secretKey = "your secret key";
String bucket = "your bucket name";
//如果是Windows情况下,格式是 D:\\qiniu\\test.png
String localFilePath = "/home/qiniu/test.png";
//默认不指定key的情况下,以文件内容的hash值作为文件名
String key = null;

Auth auth = Auth.create(accessKey, secretKey);
String upToken = auth.uploadToken(bucket);

try {

    Response response = uploadManager.put(localFilePath, key, upToken);
    //解析上传成功的结果
    DefaultPutRet putRet = new Gson().fromJson(response.bodyString(), DefaultPutRet.class);
    System.out.println(putRet.key);
    System.out.println(putRet.hash);
} catch (QiniuException ex) {

    Response r = ex.response;
    System.err.println(r.toString());
    try {

        System.err.println(r.bodyString());
    } catch (QiniuException ex2) {

        //ignore
    }
}
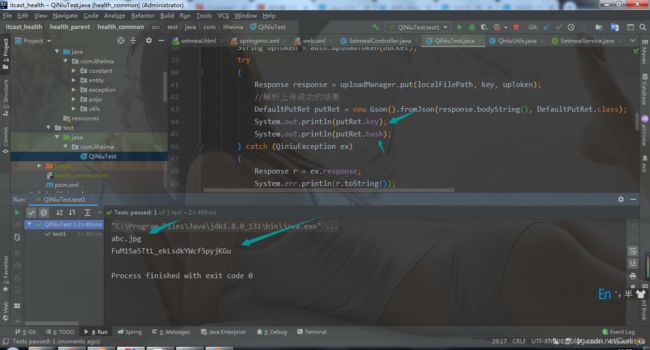
先混个眼熟,待会我写个测试类简单调试下!
测试类:
        //构造一个带指定Zone对象的配置类
        Configuration cfg = new Configuration(Zone.zone2());
        //...其他参数参考类注释
        UploadManager uploadManager = new UploadManager(cfg);
        //...生成上传凭证,然后准备上传
        String accessKey = "KK3dL3gOKOnvOPSJzc********";
        String secretKey = "*******";
        String bucket = "itspace-health";
        //如果是Windows情况下,格式是 D:\\qiniu\\test.png
        String localFilePath = "";
        //默认不指定key的情况下,以文件内容的hash值作为文件名
        String key = "abc.jpg";
        Auth auth = Auth.create(accessKey, secretKey);
        String upToken = auth.uploadToken(bucket);
        try
        {

            Response response = uploadManager.put(localFilePath, key, upToken);
            //解析上传成功的结果
            DefaultPutRet putRet = new Gson().fromJson(response.bodyString(), DefaultPutRet.class);
            System.out.println(putRet.key);
            System.out.println(putRet.hash);
        } catch (QiniuException ex)
        {

            Response r = ex.response;
            System.err.println(r.toString());
            try
            {

                System.err.println(r.bodyString());
            } catch (QiniuException ex2)
            {

                //ignore
            }
        }
    }
一、Zone.zone2(),这里就是我说的,选的存储区域,会影响代码的配置,因为我选的华南,所以是zone2,如果你选华东那就是zone0
二、uploadManager.put(localFilePath, key, upToken);,那个key/默认不指定key的情况下,以文件内容的hash值作为文件名
测试类执行结果
去七牛云空间查看:
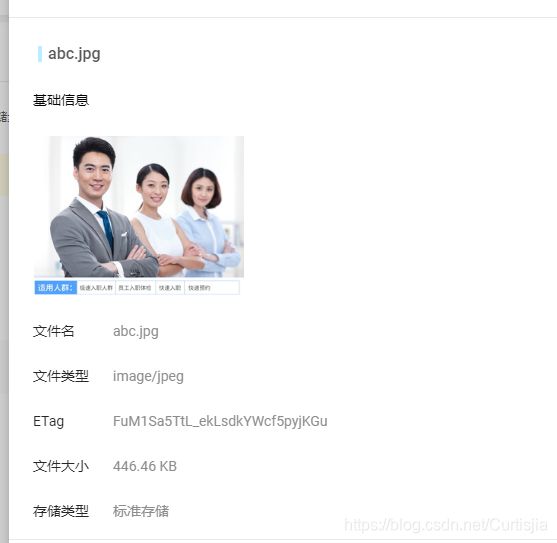
上传成功!
工具类
package com.itheima.utils;

import com.google.gson.Gson;
import com.qiniu.common.QiniuException;
import com.qiniu.common.Zone;
import com.qiniu.http.Response;
import com.qiniu.storage.BucketManager;
import com.qiniu.storage.Configuration;
import com.qiniu.storage.UploadManager;
import com.qiniu.storage.model.DefaultPutRet;
import com.qiniu.util.Auth;

import java.io.File;
import java.io.FileInputStream;
import java.io.InputStream;

/**
 * 七牛云工具类
 */
public class QiniuUtils
{

    public static String accessKey = "";
    public static String secretKey = "";
    public static String bucket = "itspace-health";
    public static Zone zone = Zone.zone2();

    public static void upload2Qiniu(String filePath, String fileName)
    {

        //构造一个带指定Zone对象的配置类

        Configuration cfg = new Configuration(zone);
        UploadManager uploadManager = new UploadManager(cfg);
        Auth auth = Auth.create(accessKey, secretKey);
        String upToken = auth.uploadToken(bucket);
        try
        {

            Response response = uploadManager.put(filePath, fileName, upToken);
            //解析上传成功的结果
            DefaultPutRet putRet = new Gson().fromJson(response.bodyString(), DefaultPutRet.class);
        } catch (QiniuException ex)
        {

            Response r = ex.response;
            try
            {

                System.err.println(r.bodyString());
            } catch (QiniuException ex2)
            {

                //ignore
            }
        }
    }

    //上传文件
    public static void upload2Qiniu(byte[] bytes, String fileName)
    {

        //构造一个带指定Zone对象的配置类
        Configuration cfg = new Configuration(zone);
        //...其他参数参考类注释
        UploadManager uploadManager = new UploadManager(cfg);

        //默认不指定key的情况下,以文件内容的hash值作为文件名
        String key = fileName;
        Auth auth = Auth.create(accessKey, secretKey);
        String upToken = auth.uploadToken(bucket);
        try
        {

            Response response = uploadManager.put(bytes, key, upToken);
            //解析上传成功的结果
            DefaultPutRet putRet = new Gson().fromJson(response.bodyString(), DefaultPutRet.class);
            System.out.println(putRet.key);
            System.out.println(putRet.hash);
        } catch (QiniuException ex)
        {

            Response r = ex.response;
            System.err.println(r.toString());
            try
            {

                System.err.println(r.bodyString());
            } catch (QiniuException ex2)
            {

                //ignore
            }
        }
    }

    //删除文件
    public static void deleteFileFromQiniu(String fileName)
    {

        //构造一个带指定Zone对象的配置类
        Configuration cfg = new Configuration(zone);
        String key = fileName;
        Auth auth = Auth.create(accessKey, secretKey);
        BucketManager bucketManager = new BucketManager(auth, cfg);
        try
        {

            bucketManager.delete(bucket, key);
        } catch (QiniuException ex)
        {

            //如果遇到异常,说明删除失败
            System.err.println(ex.code());
            System.err.println(ex.response.toString());
        }
    }
}
项目地址
https://gitee.com/thirtyleo/itcast_health,希望给个star,谢谢!