centos8安装Nginx1.19.6并配置多域名反向代理
centos8安装Nginx1.19.6并配置多域名反向代理
- Nginx是什么?
- 为什么要使用Nginx?
- 安装Nginx1.19.6
-
- 安装依赖包
- 创建目录
- 下载
- 解压
- 编译安装
- 测试Nginx配置文件是否正常
- 启动Nginx
-
- 用户和组
- 属组和属主
- Nginx的其他命令
- 加入systemctl管理并设置开机自启动
-
- 将Nginx加入systemctl管理
-
- 创建nginx.service服务文件
- 重新加载服务列表
- 启动服务
- 将Nginx设置为开机自启动
- Nginx配置反向代理
-
- 本机配置域名
- 配置反向代理
-
- 反向代理promethues
- 反向代理grafana
- 反向代理elasticsearch
- 反向代理logstash
- 反向代理kibana
- 反向代理tomcat
- 反向代理rocketmq控制台
- 验证
Nginx是什么?
Nginx是俄罗斯人Igor Sysoev编写的轻量级Web服务器,它的发音为 [ˈendʒɪnks] ,它不仅是一个高性能的HTTP和反向代理服务器,同时也是一个IMAP/POP3/SMTP 代理服务器。
为什么要使用Nginx?
Nginx以事件驱动的方式编写,所以有非常好的性能,同时也是一个非常高效的反向代理、负载平衡服务器。在性能上,Nginx占用很少的系统资源,能支持更多的并发连接,达到更高的访问效率;在功能上,Nginx是优秀的代理服务器和负载均衡服务器;在安装配置上,Nginx安装简单、配置灵活。
Nginx支持热部署,启动速度特别快,还可以在不间断服务的情况下对软件版本或配置进行升级,即使运行数月也无需重新启动。
在微服务的体系之下,Nginx正在被越来越多的项目采用作为网关来使用,配合Lua做限流、熔断等控制。

对于大多数使用者来说,Nginx只是一个静态文件服务器或者http请求转发器,它可以把静态文件的请求直接返回静态文件资源,把动态文件的请求转发给后台的处理程序,例如JAVA、php-fpm、apache、tomcat、jetty等,这些后台服务,即使没有nginx的情况下也是可以直接访问的(有些时候这些服务器是放在防火墙的面,不是直接对外暴露,通过nginx做了转换)。
Nginx的优点:
- 高并发
- 占用资源少:2万并发、10个线程,内存消耗几百M。
- 功能种类比较多:web、cache、proxy。
- 支持epoll模型,使得nginx可以支持高并发。
- nginx 配合动态服务和Apache有区别。(FASTCGI 接口)
- 利用nginx可以对IP限速,可以限制连接数。
- 配置简单,更灵活。
安装Nginx1.19.6
安装依赖包
[root@dxm28 /]# dnf -y install gcc pcre pcre-devel zlib zlib-devel openssl openssl-devel

- gcc:它可以编译 C、C++、Ada、Object C和Java等语言。
- pcre pcre-devel:Pcre全称(Perl Compatible Regular Expressions),是一个Perl库,包括 perl兼容的正则表达式库,nginx的http模块使用pcre来解析正则表达式。
- zlib zlib-devel:zlib库提供了很多种压缩和解压缩的方式,nginx使用zlib对http包的内容进行gzip。
- openssl openssl-devel:openssl是web安全通信的基石,没有openssl,可以说我们的信息都是在裸奔
创建目录
[root@dxm28 /]# mkdir -p /data/nginx
[root@dxm28 /]# cd /data/nginx/
下载
[root@dxm28 nginx]# wget https://mirrors.huaweicloud.com/nginx/nginx-1.19.6.tar.gz
[root@dxm28 nginx]# ll -h

解压
[root@dxm28 nginx]# tar -zxvf nginx-1.19.6.tar.gz
编译安装
使用./configure --help查看各个模块的使用情况。
–without-http_ssi_module的方式关闭不需要的模块
–with-http_perl_modules方式安装需要的模块
–prefix 指定安装路径
–with-http_stub_status_module允许查看nginx状态的模块
–with-http_ssl_module支持https的模块
[root@dxm28 nginx]# cd nginx-1.19.6/
[root@dxm28 nginx-1.19.6]# ./configure --prefix=/usr/local/nginx --user=root --group=root --with-http_stub_status_module --with-http_ssl_module --with-http_v2_module --with-http_sub_module --with-http_gzip_static_module --with-pcre

说明执行成功。接下来进行编译和安装:
[root@dxm28 nginx-1.19.6]# make && make install
测试Nginx配置文件是否正常
[root@dxm28 nginx-1.19.6]# /usr/local/nginx/sbin/nginx -t

启动Nginx
用户和组
#先检查用户nginx和组nginx是否存在

#检查组是否存在
cat /etc/group | grep nginx

#如果不存在,创建组
groupadd nginx

#检查用户nginx是否存在
cat /etc/passwd | grep nginx
或者
id nginx

#如果不存在,创建用户
useradd -g nginx nginx
属组和属主
[root@dxm28 nginx-1.19.6]# chown -R nginx.nginx /usr/local/nginx

[root@dxm28 nginx-1.19.6]# su nginx
[nginx@dxm28 nginx-1.19.6]$ /usr/local/nginx/sbin/nginx

问题:nginx: [emerg] bind() to 0.0.0.0:80 failed (13: Permission denied)
原因:Linux只有root用户可以使用1024以下的端口。
解决办法:
- 以root权限启动。
- 将 /usr/local/nginx/conf/nginx.conf文件中的80端口改为1024以上,比如8082。
我们这里改成8082端口,再使用nginx用户启动。

查看一下进程和端口:
[nginx@dxm28 nginx-1.19.6]$ netstat -lntup |grep nginx
[nginx@dxm28 nginx-1.19.6]$ ps aux | grep nginx

验证一下是否启动成功:
[nginx@dxm28 nginx-1.19.6]$ curl http://localhost:8082

看到Welcome to nginx!,说明启动成功了。我们浏览器访问一下:
也可以使用root用户启动。后面我们还是改用root用户启动,端口还是80。
Nginx的其他命令
./nginx -s quit:   (温和)较stop相比就比较温和一些了,此方式停止步骤是待nginx进程处理任务完毕进行停止。
./nginx -s stop:   (强硬)此方式相当于先查出nginx进程id再使用kill命令强制杀掉进程,这种方法比较强硬,无论进程是否在工作,都直接停止进程。
./nginx -s reload   重启nginx(不推荐此方法,推荐先停止在启动)
./nginx -s reopen   reopening the log files 用来打开日志文件,这样nginx会把新日志信息写入这个新的文件中
加入systemctl管理并设置开机自启动
将Nginx加入systemctl管理
创建nginx.service服务文件
创建nginx.service服务文件
[root@dxm28 nginx-1.19.6]# vim /etc/systemd/system/nginx.service
内容如下:
[Unit]
Description=nginx server
After=network.target remote-fs.target nss-lookup.target

[Service]
Type=forking
User=root
Group=root
ExecStartPre=/usr/local/nginx/sbin/nginx -t -c /usr/local/nginx/conf/nginx.conf
ExecStart=/usr/local/nginx/sbin/nginx -c /usr/local/nginx/conf/nginx.conf
ExecReload=/usr/local/nginx/sbin/nginx -s reload
ExecStop=/usr/local/nginx/sbin/nginx -s stop
ExecQuit=/usr/local/nginx/sbin/nginx -s quit
PrivateTmp=true

[Install]
WantedBy=multi-user.target
重新加载服务列表
[root@dxm28 nginx-1.19.6]# systemctl daemon-reload
启动服务
# 停止上面手动后台启动的nginx服务
[root@dxm28 nginx-1.19.6]# ps aux | grep nginx
root      73601  0.0  0.0  24420   820 ?        Ss   18:27   0:00 nginx: master process /usr/local/nginx/sbin/nginx
root      73602  0.0  0.0  24788  2528 ?        S    18:27   0:00 nginx: worker process
root       75427  0.0  0.0  12320  1076 pts/0    S+   21:43   0:00 grep --color=auto nginx

[root@dxm28 nginx-1.19.6]$ /usr/local/nginx/sbin/nginx  -s quit

# 检查是否还存在nginx进程
[root@dxm28 nginx-1.19.6]# ps aux | grep nginx
root       75515  0.0  0.0  12320  1092 pts/0    S+   21:48   0:00 grep --color=auto nginx

# 查询所有服务单元是否有nginx
[root@dxm28 nginx-1.19.6]# systemctl list-unit-files | grep nginx
nginx.service                              disabled

# 存在,且非开启自启动,使用systemctl启动nginx服务
[root@dxm28 nginx-1.19.6]# systemctl start nginx.service

# 查看nginx服务状态
[root@dxm28 nginx-1.19.6]# systemctl status nginx.service

Active: active (running) 可以看到nginx服务已经启动成功。查看进程以及端口的监听情况:
[root@dxm28 logs]# ps aux | grep nginx

[root@dxm28 logs]# netstat -ntlp | grep 80

浏览器访问http://192.168.0.28/

将Nginx设置为开机自启动
[root@dxm28 nginx-1.19.6]# systemctl list-unit-files | grep nginx
nginx.service                              disabled
# disabled表示非开机自启动

# 设置为开机自启动
[root@dxm28 nginx-1.19.6]# systemctl enable nginx.service
Created symlink /etc/systemd/system/multi-user.target.wants/nginx.service → /etc/systemd/system/nginx.service.

# 再次查看
[root@dxm28 nginx-1.19.6]# systemctl list-unit-files | grep nginx
nginx.service                              enabled

# enabled表示是开机自启动,执行重启命令
[root@dxm28 nginx-1.19.6]# reboot

#重启后再次查看nginx服务已启动完成。
Nginx配置反向代理
基于前几篇文章,我们已经搭建好了prometheus+node_exporter+grafana、redis集群、elk、rocketmq集群、tomcat等服务,那么我们接下来就抽取其中的几个服务作为例子来配置一下反向代理吧。
本机配置域名
修改/etc/hosts配置文件加入promethues、grafana、elasticsearch、logstash、kibana、tomcat、rocketmq控制台的host映射。如下:
#配置nginx反向代理开始
192.168.0.28 promethues.dxm.com
192.168.0.28 grafana.dxm.com
192.168.0.28 elasticsearch.dxm.com
192.168.0.28 logstash.dxm.com
192.168.0.28 kibana.dxm.com
192.168.0.28 tomcat.dxm.com
192.168.0.28 rocketmqconsole.dxm.com
#配置nginx反向代理结束
配置反向代理
首先在主配置文件(nginx.conf)中添加一行代码:
#   将这些代码写在http模块中
include prometheus.conf;
include grafana.conf;
include elasticsearch.conf;
include logstash.conf;
include kibana.conf;
include tomcat.conf;
include rocketmqconsole.conf;
注意位置千万不要写错,否则配置不生效。
配置文件的名字一定要写*.conf 如:promethues.conf grafana.conf
反向代理promethues
在/usr/local/nginx/conf/目录下新增加一个prometheus.conf配置文件,server配置如下:
server {

        listen       80;
        server_name  promethues.dxm.com;

        location / {

            proxy_pass http://192.168.0.22:9090;
            index  index.html index.htm index.jsp;
        }
    }
反向代理grafana
在/usr/local/nginx/conf/目录下新增加一个grafana.conf配置文件,server配置如下:
server {

    listen       80;
    server_name  grafana.dxm.com;
    location / {

       proxy_pass http://192.168.0.22:3000;
       index  index.html index.htm index.jsp;
    }
}
反向代理elasticsearch
在/usr/local/nginx/conf/目录下新增加一个elasticsearch.conf配置文件,server配置如下:
server {

    listen       80;
    server_name  elasticsearch.dxm.com;
    location / {

       proxy_pass http://192.168.0.27:9200;
       index  index.html index.htm index.jsp;
    }
}
反向代理logstash
在/usr/local/nginx/conf/目录下新增加一个logstash.conf配置文件,server配置如下:
server {

    listen       80;
    server_name  logstash.dxm.com;
    location / {

       proxy_pass http://192.168.0.27:9200;
       index  index.html index.htm index.jsp;
    }
}
反向代理kibana
在/usr/local/nginx/conf/目录下新增加一个kibana.conf配置文件,server配置如下:
server {

    listen       80;
    server_name  kibana.dxm.com;
    location / {

       proxy_pass http://192.168.0.27:5601;
       index  index.html index.htm index.jsp;
    }
}
反向代理tomcat
在/usr/local/nginx/conf/目录下新增加一个tomcat.conf配置文件,server配置如下:
server {

        listen       80;
        server_name  tomcat.dxm.com;

        location / {

            proxy_pass http://127.0.0.1:8080;
            index  index.html index.htm index.jsp;
        }
    }
反向代理rocketmq控制台
在/usr/local/nginx/conf/目录下新增加一个rocketmqconsole.conf配置文件,server配置如下:
server {

    listen       80;
    server_name  rocketmqconsole.dxm.com;
    location / {

       proxy_pass http://192.168.0.27:8080;
       index  index.html index.htm index.jsp;
    }
}
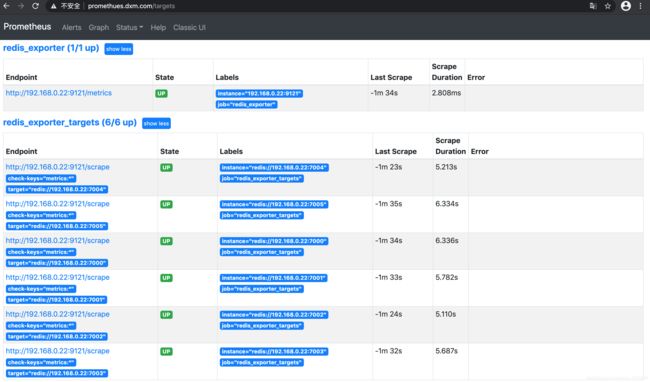
验证
上面两步配置完成之后,就可以在本机直接通过上面hosts里面绑定的域名进行访问。如图:
prometheus.dxm.com:
logstash.dxm.com:

tomcat.dxm.com:

grafana.dxm.com:
rocketmqconsole.dxm.com:
