手把手带你做项目1:个人博客(附源码)
个人博客:
- 1、项目介绍:
-
- (1)功能介绍:
- (2)业务流程:
- (3)使用的技术:
- 2、项目准备:
-
- (1)需要的资源:
- (2)创建web项目:
- (3)数据库的设计:
- 3、开发步骤:
-
- (1)准备:基类、序列化和反序列化、自定义异常:
- (2)数据库的连接和释放:
- (3)登录:
- (4)文章管理:(数据库中文章表的增删查改)
-
- ① 文章列表:
- ② 删除文章:
- ③ 发表新文章:
- ④ 查询文章:
- ⑤ 修改文章:
- (5)统一会话管理的过滤器:
- (6)本地图片的上传:
- 4、测试:
1、项目介绍:
(1)功能介绍:
实现一个简单的博客功能
包括:用户登录,查询文章列表、删除文章、查询文章详情、发表新文章、修改文章、上传图片
(2)业务流程:
- 用户登录页面:登录后才可以发表新文章
- 发表文章:如果没有登录,就退出到登录页面,只有登录的用户才能发表新文章
- 显示文章内容:发表新文章成功后跳转到文章详情,也可以单独访问
- 显示文章列表:url输入访问地址后,显示所有文章信息
- 上传图片:在修改文章和发表新文章时皆可使用
(3)使用的技术:
- maven:管理依赖,打包项目
- mysql:存储业务数据
- html:编写前端页面
- tomcat:部署Web项目的服务器
- servlet:每个页面调用后台接口都需要使用servlet来完成业务
- session:在登陆后才可以访问新增文章接口,否则直接返回到登录页面
- jackson:是java对象与JSON字符串数据进行序列化、反序列化的工具
2、项目准备:
项目全部源码(项目配置) GitHub链接:
https://github.com/JACK-QBS/Project
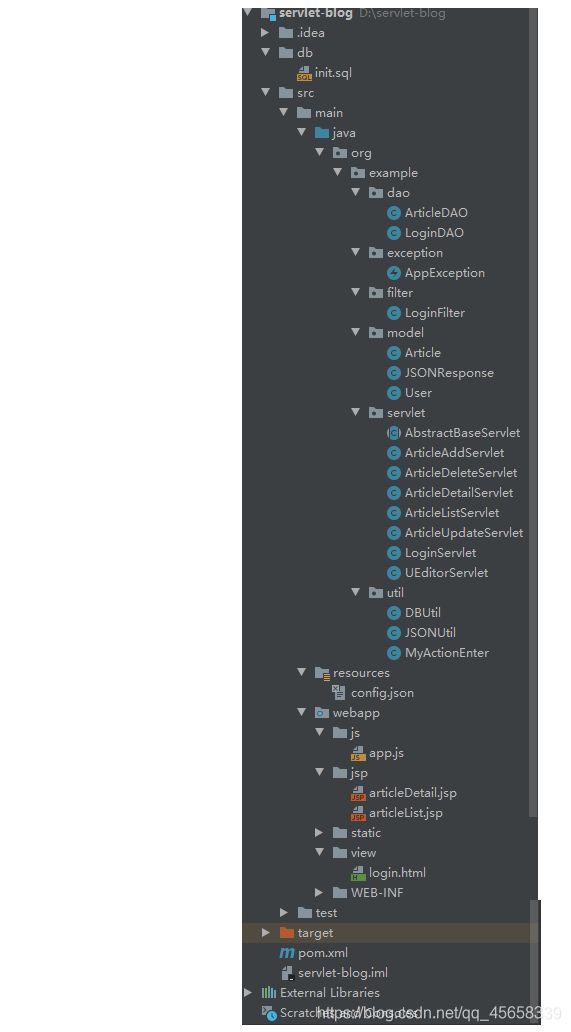
代码框架如下:

简单介绍一下:
① db文件 下的 init代码是本次项目所需的数据库相关代码,你可以直接将代码复制到你的MySql中;
② java包 下的代码是我们的 后端 代码,用来响应来自前端的请求和与数据库的交互;
③ webapp包 下的代码是我们的 前端 代码,即用户界面的设计。
(1)需要的资源:
Maven、IDEA、MySql、Chrome浏览器、Fiddler4抓包工具(可使用浏览器自带的开发者工具)
(2)创建web项目:
1、在idea中,点击 File -> new -> Module,选择 Maven -> Next
2、在 Groupld 和 Artifactld 中分别输入组织名和项目名,注意上面两项 Add as module to 和 Parent 都设置为 none,完成以后next
3、设置项目名和本地保存路径,完成后点击 Finish
4、在弹出的项目 pop.xml 文件中配置(配置源码在上面给出的链接中)
(3)数据库的设计:
-- 1、建库
drop database if exists servlet_blog;
create database servlet_blog character set utf8;

-- 2、使用该库
use servlet_blog;

-- 3、建表
-- (1)用户表:
create table user(
    id int primary key auto_increment,
    username varchar(20) not null unique,
    password varchar(20) not null,
    nickname varchar(20),
    sex bit,
    birthday date,
    head varchar(50)
);
-- (2)文章表:
create table article(
    id int primary key auto_increment,
    title varchar(20) not null comment '标题',
    content mediumtext not null comment '文章内容',
    create_time timestamp default now() comment '创作时间',
    view_count int default 0 comment '访问量',
    user_id int,
    foreign key(user_id) references user(id)
);

-- 4、添加数据:
insert into user(username,password) value ('a','1');
insert into user(username,password) value ('b','2');
insert into user(username,password) value ('c','3');

insert into article(title, content,user_id) value ('快速排序','public ...',1);
insert into article(title, content,user_id) value ('冒泡排序','public ...',1);
insert into article(title, content,user_id) value ('选择排序','public ...',1);
insert into article(title, content,user_id) value ('归并排序','public ...',2);
insert into article(title, content,user_id) value ('插入排序','public ...',2);
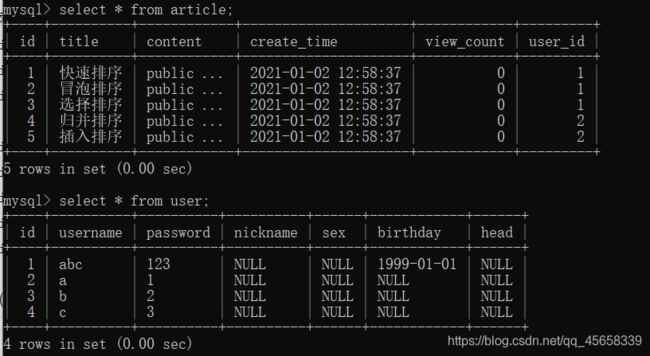
数据库 (servlet_blog) 中 已经创建好的两个表:

3、开发步骤:
(1)准备:基类、序列化和反序列化、自定义异常:
在整个的项目研发过程中,会有很多代码的冗余,以及异常,所以我们先创建一个基类(工具类),用来结合jackson序列化响应的统一数据格式,结合自定义异常来完成统一的异常处理:
public abstract class AbstractBaseServlet extends HttpServlet {

    @Override
    protected void doGet(HttpServletRequest req, HttpServletResponse resp) throws ServletException, IOException {

        doPost(req,resp);
    }
    @Override
    protected void doPost(HttpServletRequest req, HttpServletResponse resp) throws ServletException, IOException {

        //设置请求体的编码格式
        req.setCharacterEncoding("UTF-8");
        //设置响应体的编码
        resp.setCharacterEncoding("UTF-8");
        //设置响应体的数据类型(浏览器要采取什么方式执行)
        resp.setContentType("application/json"); // 设置响应头
        //session会话管理:除登录和注册接口,其他都需要登录后访问
        req.getServletPath();//获取当前请求路径
        JSONResponse json = new JSONResponse();
        try{

            // 调用子类重写方法
            Object data = process(req, resp);
            //子类的process方法执行完没有抛异常,表示业务执行成功
            json.setSuccess(true);
            json.setData(data);
        } catch(Exception e) {

            //异常如何处理?JDBC的异常SQLException,JSON处理的异常,自定义异常返回错误
            e.printStackTrace();
            String code = "unknown";
            String s = "未知的错误";
            if (e instanceof AppException) {

                code = ((AppException) e).getCode();
                s = e.getMessage();
            }
            json.setCode(code);
            json.setMessage(s);
        }
        PrintWriter pw = resp.getWriter();
        pw.println(JSONUtil.serialize(json));
        pw.flush();
        pw.close();
    }
    protected abstract Object process(HttpServletRequest req, HttpServletResponse resp) throws Exception;
}
编写一个包含序列化和反序列化的公共类:
public class JSONUtil {

    private static final ObjectMapper MAPPER = new ObjectMapper();
    /**
     * JSON序列化:将java对象序列化为json字符串
     * @param o java对象
     * @return json字符串
     */
    public static String serialize(Object o){

        try {

            return MAPPER.writeValueAsString(o);
        } catch (JsonProcessingException e) {

            e.printStackTrace();
            throw new RuntimeException("json序列化失败:"+o);
        }
    }
    /**
     * 反序列化操作:将输入流/字符串反序列化为java对象
     * @param is 输入流
     * @param clazz 指定要反序列化的类型
     * @param
     * @return 反序列化的对象
     */
    public static <T> T deserialize(InputStream is, Class<T> clazz){

        try {

            return MAPPER.readValue(is, clazz);
        } catch (IOException e) {

            e.printStackTrace();
            throw new RuntimeException("json反序列化失败:"+clazz.getName());
        }
    }
}
测试的时候肯定会报各种各样的错误,为了方便我们知道错误的来源,我们需要抛自定义异常
public class AppException extends RuntimeException{

    //给前端返回的json字符串中,保存的错误码
    private String code;
    public AppException(String code,String message) {

        this(code,message,null);
    }
    public AppException(String code,String message, Throwable cause) {

        super(message, cause);
        this.code = code;
    }
    public String getCode() {

        return code;
    }
}
(2)数据库的连接和释放:
- 注意:
URL中:servlet_blog 是你创建 数据库 的名字,
user= 的内容是你当初下载MySql时,创建的用户名字(如果当时默认的,那就是root)
password= 的内容是你当初下载MySql时,设置的密码(如果没设,那就是空白)
public class DBUtil {

    private static final String URL = "jdbc:mysql://localhost:3306/servlet_blog?user=root&password=123456&useUnicode=true&characterEncoding=UTF-8&useSSL=false";
    //定义连接池对象
    private static final DataSource DS = new MysqlDataSource();
    static {

        ((MysqlDataSource) DS).setUrl(URL);
    }
    public static Connection getConnection() {

        try {

            return DS.getConnection();
        } catch (SQLException e) {

            //抛自定义异常
            throw new AppException("DB001","获取数据库连接失败",e);
        }
    }
    public static void close(Connection c, Statement s) {

        close(c,s,null);
    }
    //关闭数据库连接:
    public static void close(Connection c, Statement s, ResultSet r) {

        try {

            if (r != null)
                r.close();
            if (s != null)
                s.close();
            if (c != null)
                c.close();
        } catch (SQLException e) {

            throw new AppException("DB002","数据库释放资源出错",e);
        }
    }
}
(3)登录:
这是我们的登录页面:

首先要想展现出这个页面,就需要我们前端代码HTML的编写:
<html lang="en">
<head>
    <meta charset="UTF-8">
    <title>登录页面title>
    <script type="text/javascript" src="../static/jquery/jquery-1.12.4.js">script>
    <script type="text/javascript" src="../js/app.js">script>
head>
<body>
<h2>登录页面h2>

    <form id="login_form" method="post" action="../login" enctype="application/x-www-form-urlencoded">

        <input id="username" type="text" name="username" placeholder="请输入用户名"><br><br>
        <input id="password" type="password" name="password" placeholder="请输入密码"><br><br>
        <input type="submit" value="登录">
    form>
body>
html>
用户在页面中输入用户名和密码,然后后端接收到了前端页面的请求,就去连接查询数据库:
public class LoginDAO {

    public static User query(String username) {

        Connection c = null;
        PreparedStatement ps = null;
        ResultSet rs = null;
        try {

            c = DBUtil.getConnection();
            String sql = "select id, username, password," +
                    " nickname, sex, birthday, head from user" +
                    " where username=?";
            ps = c.prepareStatement(sql);
            //设置占位符
            ps.setString(1,username);
            rs = ps.executeQuery();
            User user = null;
            while(rs.next()) {

                user = new User();
                //设置User的值
                user.setId(rs.getInt("id"));
                user.setUsername(username);
                user.setPassword(rs.getString("password"));
                user.setNickname(rs.getString("nickname"));
                user.setSex(rs.getBoolean("sex"));
                java.sql.Date birthday = rs.getDate("birthday");
                if (birthday != null)
                     user.setBirthday(new Date(birthday.getTime()));
                user.setHead(rs.getString("head"));
            }
            return user;
        } catch (Exception e) {

            throw new AppException("LOG001","查询用户操作出错",e);
        } finally {

            DBUtil.close(c,ps,rs);
        }
    }
}
将用户输入的用户名和密码与从数据库中查到的用户和密码进行对比:
- 若输入用户名为空,则抛出自定义异常,该用户不存在
- 若输入的用户名和密码与从数据库中查到的不一样,则抛出自定义异常,用户名或密码错误
- 否则,登录成功,创建session会话
@WebServlet("/login")
public class LoginServlet extends AbstractBaseServlet{

    @Override
    protected Object process(HttpServletRequest req, HttpServletResponse resp) throws Exception {

        String username = req.getParameter("username");
        String password = req.getParameter("password");
        User user = LoginDAO.query(username);
        if (user == null)
            throw new AppException("LOG002","用户不存在");
        if (!user.getPassword().equals(password))
            throw new AppException("LOG003","用户名或密码错误");
        //登录成功,创建session会话
        HttpSession session = req.getSession();
        session.setAttribute("user",user);
        return null;
    }
}
(4)文章管理:(数据库中文章表的增删查改)
由于文章管理这块前端代码过多,且容易看懂,所以我直接将其封装好了,在 src -> main -> webapp 下,各位老铁需要的话,直接在我GitHub仓库里就可以找到,直接复制进你的项目里就可以运行哦 !!!
https://github.com/JACK-QBS/Project
① 文章列表:
我们当初在定义数据库的时候,是创建了三个用户,我们只给前两个用户添加了数据,所以你在登录的时候,选择的是哪个用户登录的,登录成功后就会显示该用户的文章列表:
例如:我们这边登录的是a用户:

获取得到登录页面用户id,调用queryByUserId方法
@WebServlet("/articleList")
public class ArticleListServlet extends AbstractBaseServlet{

    @Override
    protected Object process(HttpServletRequest req, HttpServletResponse resp) throws Exception {

        //获取session,如果没有就返回null
        HttpSession session = req.getSession(false);
        User user = (User) session.getAttribute("user");
        //用户已登录,并且保存了用户信息
        List<Article> articles = ArticleDAO.queryByUserId(user.getId());
        return articles;
    }
}
实现 queryByUserId方法:
创建一个顺序表来存储文章列表,连接数据库,查询 user_id = 用户输入id,将查询到的文章标题和id放入顺序表中,返回顺序表。
(若数据库连接失败,则抛出自定义异常,异常状态码为"ART001",“查询文章列表出错”)
//文章列表的展示
    public static List<Article> queryByUserId(Integer userId) {

        List<Article> articles = new ArrayList<>();
        Connection c = null;
        PreparedStatement ps = null;
        ResultSet rs = null;
        try {

            c = DBUtil.getConnection();
            String sql = "select id,title from article where user_id=?";
            ps = c.prepareStatement(sql);
            //设置占位符
            ps.setInt(1,userId);
            rs = ps.executeQuery();
            while(rs.next()) {

                Article a = new Article();
                //结果集取值设置到文章对象
                a.setId(rs.getInt("id"));
                a.setTitle(rs.getString("title"));
                articles.add(a);
            }
            return articles;
        } catch (Exception e) {

            throw new AppException("ART001","查询文章列表出错",e);
        } finally {

            DBUtil.close(c,ps,rs);
        }
    }
② 删除文章:
从前端页面获取到用户想要删除的文章 id,调用delete方法
@WebServlet("/articleDelete")
public class ArticleDeleteServlet extends AbstractBaseServlet{

    @Override
    protected Object process(HttpServletRequest req, HttpServletResponse resp) throws Exception {

        String ids = req.getParameter("ids");
        int num = ArticleDAO.delete(ids.split(","));
        return null;
    }
}
实现 delete方法:
连接数据库,使用sql语句删除数据库中用户想要删除的文章,关闭数据库连接
(若数据库连接失败,则抛出自定义异常,异常状态码为"ART004",“文章删除出错”)
   //删除文章
    public static int delete(String[] split) {

        Connection c = null;
        PreparedStatement ps = null;
        try {

            c = DBUtil.getConnection();
            StringBuilder sql = new StringBuilder("delete from article where id in (");
            //拼接字符串
            for (int i = 0; i < split.length; i++) {

                if (i != 0)
                    sql.append(",");
                sql.append("?");
            }
            sql.append(")");
            ps = c.prepareStatement(sql.toString());
            //设置占位符的值
            for (int i = 0; i < split.length; i++) {

                ps.setInt(i+1,Integer.parseInt(split[i]));
            }
            return ps.executeUpdate();
        } catch (Exception e) {

            throw new AppException("ART004","文章删除出错",e);
        } finally {

            DBUtil.close(c,ps);
        }
    }
③ 发表新文章:
新建一个会话,将其强制转化为用户类型,获取前端页面的请求,并将输入的数据反序列化为文章对象类型,调用 insert 方法
@WebServlet("/articleAdd")
public class ArticleAddServlet extends AbstractBaseServlet{

    @Override
    protected Object process(HttpServletRequest req, HttpServletResponse resp) throws Exception {

        HttpSession session = req.getSession(false);
        User user = (User) session.getAttribute("user");
        //请求数据类型是application/json,需要使用输入流获取
        InputStream is = req.getInputStream();
        //输入的数据反序列化为文章对象类型
        Article a = JSONUtil.deserialize(is,Article.class);
        a.setUserId(user.getId());
        int num = ArticleDAO.insert(a);
        return null;
    }
}
实现 insert 方法:
连接数据库,使用sql语句进行添加数据,包括文章标题、内容,和用户id,关闭数据库连接
(若数据库连接失败,则抛出自定义异常,异常状态码为"ART005",“新增数据操作出错”)
//新增文章
    public static int insert(Article a) {

        Connection c = null;
        PreparedStatement ps = null;
        try {

            c = DBUtil.getConnection();
            String sql = "insert into article(title,content,user_id)" +
                    " values (?,?,?)";
            ps = c.prepareStatement(sql);
            //替换占位符
            ps.setString(1,a.getTitle());
            ps.setString(2,a.getContent());
            ps.setInt(3,a.getUserId());
            return ps.executeUpdate();
        } catch(Exception e) {

            throw new AppException("ART005","新增数据操作出错",e);
        } finally {

            DBUtil.close(c,ps);
        }
    }
④ 查询文章:
从前端页面获取请求id,调用 query 方法
@WebServlet("/articleDetail")
public class ArticleDetailServlet extends AbstractBaseServlet{

    @Override
    protected Object process(HttpServletRequest req, HttpServletResponse resp) throws Exception {

        String id = req.getParameter("id");
        Article a = ArticleDAO.query(Integer.parseInt(id));
        return a;
    }
}
实现 query 方法:
连接数据库,使用 sql 语句查询用户想要查询的文章,根据结果集设置文章属性,关闭数据库的连接
(若数据库连接失败,则抛出自定义异常,异常状态码为"ART006",“查询文章详细出错”)
 //查询文章
    public static Article query(int id) {

        Connection c = null;
        PreparedStatement ps = null;
        ResultSet rs = null;
        try {

            c = DBUtil.getConnection();
            String sql = "select id,title,content from article where id=?";
            ps = c.prepareStatement(sql);
            //替换占位符的值
            ps.setInt(1,id);
            rs = ps.executeQuery();
            Article a = null;
            while (rs.next()) {

                a = new Article();
                //根据结果集设置文章属性
                a.setId(id);
                a.setTitle(rs.getString("title"));
                a.setContent(rs.getString("content"));
            }
            return a;
        } catch (Exception e) {

            throw new AppException("ART006","查询文章详细出错",e);
        } finally {

            DBUtil.close(c,ps,rs);
        }
    }
⑤ 修改文章:
从前端页面的输入流中获取数据,将其反序列化为Java对象,调用 updata 方法
@WebServlet("/articleUpdate")
public class ArticleUpdateServlet extends AbstractBaseServlet{

    @Override
    protected Object process(HttpServletRequest req, HttpServletResponse resp) throws Exception {

        //输入流中获取数据:
        InputStream is = req.getInputStream();
        Article a = JSONUtil.deserialize(is,Article.class);
        int num = ArticleDAO.updata(a);
        return null;
    }
}
实现 updata 方法:
连接数据库,使用 sql 语句修改用户想要修改的文章,修改文章的标题和内容,关闭数据库的连接
(若数据库连接失败,则抛出自定义异常,异常状态码为"ART007",“修改文章操作出错”)
public static int updata(Article a) {

        Connection c = null;
        PreparedStatement ps = null;
        try {

            c = DBUtil.getConnection();
            String sql = "update article set title=?,content=? where id=?";
            ps = c.prepareStatement(sql);
            //设置占位符
            ps.setString(1,a.getTitle());
            ps.setString(2,a.getContent());
            ps.setInt(3,a.getId());
            return ps.executeUpdate();
        } catch (Exception e) {

            throw new AppException("ART007","修改文章操作出错",e);
        } finally {

            DBUtil.close(c,ps);
        }
    }
(5)统一会话管理的过滤器:
配置统一会话管理的过滤器:匹配所有请求路径
- 服务端资源:/login不用校验Session,其他都要校验,如果不通过,返回401,响应内容随便
- 前端资源:/jsp/校验Session,不通过重定向到登录页面
/js/, /static/,/view/ 全部不校验
@WebFilter("/*")
public class LoginFilter implements Filter {

    @Override
    public void init(FilterConfig filterConfig) throws ServletException {
     }

    /**
     * 每次http请求匹配到过滤器路径时,会执行该过滤器的doFilter
     * 如果往下执行,时调用filterChain.doFilter(request,response)
     * 否则自行处理响应
     */
    @Override
    public void doFilter(ServletRequest servletRequest, ServletResponse servletResponse, FilterChain filterChain) throws IOException, ServletException {

        HttpServletRequest req = (HttpServletRequest) servletRequest;
        HttpServletResponse resp = (HttpServletResponse) servletResponse;
        String servletPath = req.getServletPath();//获取当前请求的服务路径
        //不需要登录允许访问:往下执行继续调用
        if(servletPath.startsWith("/js/") || servletPath.startsWith("/static/") ||
                servletPath.startsWith("/view/") || servletPath.equals("/login")) {

            filterChain.doFilter(servletRequest,servletResponse);
        } else {

            //获取Session对象,没有就返回null
            HttpSession session = req.getSession(false);
            //验证用户是否登录,如果没有登录,还需要根据前端或后端做不同的处理
            if (session == null || session.getAttribute("user") == null) {

                if (servletPath.startsWith("/jsp/")) {

                    //前端重定向到登录页面
                    resp.sendRedirect(basePath(req)+"/view/login.html");
                } else {

                    //后端返回401状态码
                    resp.setStatus(401);
                    resp.setCharacterEncoding("UTF-8");
                    resp.setContentType("application/json");
                    //返回统一的json数据格式
                    JSONResponse json = new JSONResponse();
                    json.setCode("LOG000");
                    json.setMessage("用户没有登录,不允许访问");
                    PrintWriter pw = resp.getWriter();
                    pw.println(JSONUtil.serialize(json));
                    pw.flush();
                    pw.close();
                }
            } else {

                //敏感资源,但已登录,允许继续执行
                filterChain.doFilter(servletRequest,servletResponse);
            }
        }
    }

    /**
     * 根据http请求,动态的获取访问路径(服务路径之前的部分)
     */
    public static String basePath(HttpServletRequest req) {

        String schema = req.getScheme(); // 获取http
        String host = req.getServerName(); //主机ip或域名
        int port = req.getServerPort(); //服务器端口号
        String contextPath = req.getContextPath(); //应用上下文路径
        return schema + "://" + host + ":" + port + contextPath;
    }

    @Override
    public void destroy() {
     }
}
(6)本地图片的上传:
这个 config.json 和 MyActionEnter 大家在我的GitHub仓库里找到复制到自己的相应位置即可:
src -> main -> resources
https://github.com/JACK-QBS/Project
ueditor 富文本编译器图片上传:
- 1、pom.xml 中的 finalName 修改成 idea中tomcat配置的应用上下文路径

- 2、修改webapp/static/ueditor/ueditor.config.js,33行修改
(应用上下文路径+服务路径)

- 3、实现后端接口(和第二步的服务路径一致)
- 4、修改config.json配置,上传图片到服务器本地的路径,及访问的主机ip,port,应用上下文路径

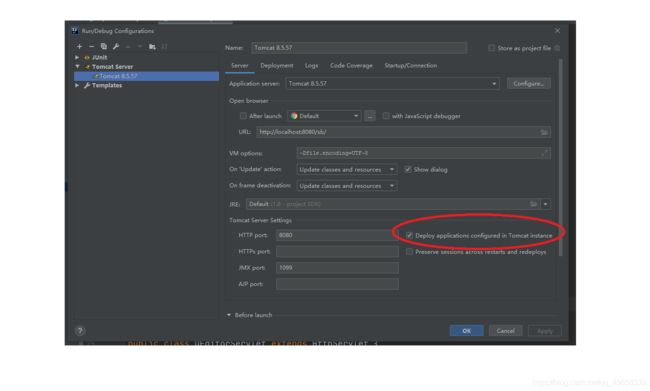
- 5、idea运行时,需要配置tomcat:将tomcat/webapps路径下的项目都部署
@WebServlet("/ueditor")
public class UEditorServlet extends HttpServlet {

    @Override
    protected void doGet(HttpServletRequest req, HttpServletResponse resp) throws ServletException, IOException {

        doPost(req, resp);
    }
    @Override
    protected void doPost(HttpServletRequest req, HttpServletResponse resp) throws ServletException, IOException {

        //通过类加载器查找资源(相对位置)
        URL url = UEditorServlet.class.getClassLoader().getResource("config.json");
        String path = URLDecoder.decode(url.getPath(),"UTF-8");
        //框架提供的富文本编译器上传功能
        MyActionEnter enter = new MyActionEnter(req,path);
        String exec = enter.exec();//执行
        PrintWriter pw = resp.getWriter();
        pw.println(exec);
        pw.flush();
        pw.close();
    }
}
4、测试:
(1)登录:


