综合项目:Keepalived+Redis+Haproxy实现主从热备、负载均衡、秒级切换
Keepalived+Redis+Haproxy 群集
- 一、部署 Redis 群集
-
- 1.编译安装 Redis
-
- 1)创建群集目录
- 2)编辑配置文件
- 3)复制配置文件到每个实例
- 4)启动 Redis 实例
- 2.配置 Ruby 环境
-
- 1)安装 Ruby 工具
- 2)使用脚本安装 Redis 群集
- 3)查看群集状态
- 二、部署 Keepalived 实现主从热备、秒级切换
-
- 1.主调度器配置
- 2.备调度器配置
- 3.编写 Haproxy 状态检测脚本
- 4.开启服务,验证 VIP
- 三、部署 Haproxy 实现负载均衡
-
- 1.编译安装 Haproxy
- 2.配置 Haproxy 主配置文件
- 3.创建自启动脚本
- 4.配置 Haproxy 日志管理
- 四、访问验证
准备工作:
| 主机名 | 操作系统 | IP地址 | 担任角色 |
| master | CentOS7 | 192.168.1.1 | Redis-主 |
| slave | 192.168.1.2 | Redis-从 | |
| haproxy1 | 192.168.1.3 | Keepalived-主,Haproxy | |
| haproxy2 | 192.168.1.4 | Keepalived-从,Haproxy |
- 实验所需软件包从这个链接下载:https://pan.baidu.com/s/1tbyUzeBI6vhYHWk92EGUwg
- 提取码:3wh6
一、部署 Redis 群集
1.编译安装 Redis
master slave 操作一致
[root@master ~]# ls
anaconda-ks.cfg  redis-3.2.9.tar.gz
[root@master ~]# tar zxf redis-3.2.9.tar.gz  -C /usr/src
[root@master ~]# cd /usr/src/redis-3.2.9/
[root@master redis-3.2.9]# make && make install
[root@master redis-3.2.9]# cd utils/
[root@master utils]# ./install_server.sh
依次回车即可
1)创建群集目录
master 上操作
[root@master ~]# /etc/init.d/redis_6379 stop
[root@master ~]# mkdir -p /redis_cluster/{
     6001..6003}
[root@slave ~]# /etc/init.d/redis_6379 stop
[root@slave ~]# mkdir -p /redis_cluster/{
     6004..6006}
2)编辑配置文件
master 和 slave 不同之处在于监听地址不同
[root@master ~]# vim redis.conf
bind 192.168.1.1		#slave 需要将 IP 地址改为 192.168.1.2
protected-mode yes
port 6001
tcp-backlog 511
timeout 0
tcp-keepalive 300
daemonize yes
supervised no
pidfile /redis_cluster/redis_6001.pid
loglevel notice
logfile /redis_cluster/6001/redis_6001.log
databases 16
save 900 1
save 300 10
save 60 10000
stop-writes-on-bgsave-error yes
rdbcompression yes
rdbchecksum yes
dbfilename dump.rdb
dir /redis_cluster/6001
slave-serve-stale-data yes
slave-read-only yes
repl-diskless-sync no
repl-diskless-sync-delay 5
repl-disable-tcp-nodelay no
slave-priority 100
appendonly no
appendfilename "appendonly.aof"
appendfsync everysec
3)复制配置文件到每个实例
master 上操作
[root@master ~]# cp redis.conf /redis_cluster/6001
[root@master ~]# cp redis.conf /redis_cluster/6002
[root@master ~]# cp redis.conf /redis_cluster/6003
[root@master ~]# sed -i 's/6001/6002/g' /redis_cluster/6002/redis.conf
[root@master ~]# sed -i 's/6001/6003/g' /redis_cluster/6003/redis.conf
[root@slave ~]# cp redis.conf /redis_cluster/6004
[root@slave ~]# cp redis.conf /redis_cluster/6005
[root@slave ~]# cp redis.conf /redis_cluster/6006
[root@slave ~]# sed -i 's/6001/6004/g' /redis_cluster/6004/redis.conf
[root@slave ~]# sed -i 's/6001/6005/g' /redis_cluster/6005/redis.conf
[root@slave ~]# sed -i 's/6001/6006/g' /redis_cluster/6006/redis.conf
4)启动 Redis 实例
master 上操作
[root@master ~]# redis-server /redis_cluster/6001/redis.conf
[root@master ~]# redis-server /redis_cluster/6002/redis.conf
[root@master ~]# redis-server /redis_cluster/6003/redis.conf
[root@slave ~]# redis-server /redis_cluster/6004/redis.conf
[root@slave ~]# redis-server /redis_cluster/6005/redis.conf
[root@slave ~]# redis-server /redis_cluster/6006/redis.conf
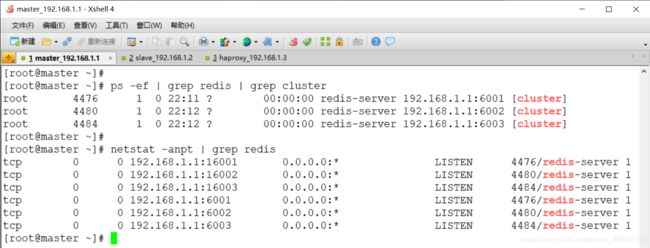
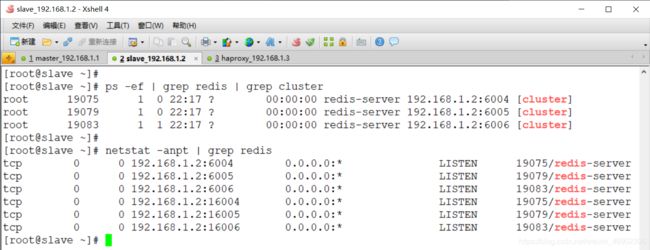
[root@master ~]# ps -ef | grep redis | grep cluster
[root@master ~]# netstat -anpt | grep redis
2.配置 Ruby 环境
1)安装 Ruby 工具
master 上操作
[root@master ~]# yum -y install ruby rubygems
上传软件 redis-3.2.0.gem
[root@master ~]# gem install redis --version 3.2.0
2)使用脚本安装 Redis 群集
[root@master ~]# cd /usr/src/redis-3.2.9/src/
[root@master src]# ./redis-trib.rb create --replicas 1 \
192.168.1.1:6001 192.168.1.1:6002 192.168.1.1:6003 \
192.168.1.2:6004 192.168.1.2:6005 192.168.1.2:6006
..........
Can I set the above configuration? (type 'yes' to accept): yes
..........
3)查看群集状态
[root@master ~]# redis-cli -h 192.168.1.1 -p 6001 -c
192.168.1.1:6001> set xingming zhangsan
OK
192.168.1.1:6001> exit
[root@master ~]#
[root@master ~]# redis-cli -h 192.168.1.2 -p 6004 -c
192.168.1.2:6004> get xingming
-> Redirected to slot [1657] located at 192.168.1.1:6001
"zhangsan"
192.168.1.1:6001> exit
二、部署 Keepalived 实现主从热备、秒级切换
1.主调度器配置
[root@haproxy1 ~]# yum -y install keepalived
[root@haproxy1 ~]# vim /etc/keepalived/keepalived.conf
global_defs {

        router_id Haproxy_1
}
vrrp_script chk_haproxy {

        script "/etc/keepalived/check_haproxy.sh"
        interval 2
        weight 2
}
vrrp_instance VI_1 {

        state MASTER
        interface ens33
        virtual_router_id 51
        priority 100
        advert_int 1
        authentication {

                auth_type PASS
        		auth_pass 123456
    		}
    	track_script {

                chk_haproxy
        }
    	virtual_ipaddress {

        		192.168.1.188/24
    		}
}
2.备调度器配置
[root@haproxy2 ~]# yum -y install keepalived
[root@haproxy2 ~]# vim /etc/keepalived/keepalived.conf
global_defs {

        router_id Haproxy_2
}
vrrp_script chk_haproxy {

        script "/etc/keepalived/check_haproxy.sh"
        interval 2
        weight 2
}
vrrp_instance VI_1 {

        state BACKUP
        interface ens33
        virtual_router_id 51
        priority 99
        advert_int 1
        authentication {

                auth_type PASS
        		auth_pass 123456
    		}
    	track_script {

                chk_haproxy
        }
    	virtual_ipaddress {

        		192.168.1.188/24
    		}
}
3.编写 Haproxy 状态检测脚本
haproxy1 haproxy2 操作一致
[root@haproxy1 ~]# vim /etc/keepalived/check_haproxy.sh
#!/bin/bash
ps aux | grep haproxy
if [ $? -ne 0 ]
then
/usr/bin/systemctl stop keepalived
fi
[root@haproxy1 ~]# chmod +x /etc/keepalived/check_haproxy.sh
4.开启服务,验证 VIP
[root@haproxy1 ~]# systemctl start keepalived
[root@haproxy1 ~]# ip a
三、部署 Haproxy 实现负载均衡
haproxy1 haproxy2操作一致
1.编译安装 Haproxy
挂光盘,并配置yum源
[root@haproxy1 ~]# yum -y install pcre-devel bzip2-devel  		      #安装依赖包
[root@haproxy1 ~]# ls
anaconda-ks.cfg  haproxy-1.5.19.tar.gz
[root@haproxy1 ~]# tar zxf haproxy-1.5.19.tar.gz -C /usr/src/         #解压到/usr/src/目录
[root@haproxy1 ~]# cd /usr/src/haproxy-1.5.19/
[root@haproxy1 haproxy-1.5.19]# make TARGET=linux26 && make install   #安装 64 位系统
2.配置 Haproxy 主配置文件
[root@haproxy1 ~]# mkdir /etc/haproxy    					#创建配置文件目录
[root@haproxy1 ~]# vim /etc/haproxy/haproxy.cfg
global
        log /dev/log    local0 info
        log /dev/log    local1 notice
        maxconn 4096
        uid 99
        gid 99
        daemon
defaults
        log     global
        mode    http
        option  httplog
        option  dontlognull
        retries 3
        redispatch
        maxconn 2000
        contimeout      5000
        clitimeout      50000
        srvtimeout      50000
listen  stats
    	bind                    *:8888
   	    stats                   enable
 	    stats                   hide-version
    	stats uri               /haproxystats
    	stats realm             Haproxy\ stats
    	stats auth              admin:admin
    	stats admin             if TRUE
listen  redis
        bind *:6379
        mode tcp
        balance roundrobin
        server redis1 192.168.1.1:6001 check inter 2000 fall 3
        server redis2 192.168.1.1:6002 check inter 2000 fall 3
        server redis3 192.168.1.1:6003 check inter 2000 fall 3
        server redis4 192.168.1.2:6004 check inter 2000 fall 3
        server redis5 192.168.1.2:6005 check inter 2000 fall 3
        server redis6 192.168.1.2:6006 check inter 2000 fall 3
3.创建自启动脚本
[root@haproxy1 ~]# cp /usr/src/haproxy-1.5.19/examples/haproxy.init /etc/init.d/haproxy
[root@haproxy1 ~]# chmod +x /etc/init.d/haproxy     						#添加可执行权限
[root@haproxy1 ~]# ln -s /usr/local/sbin/haproxy /usr/sbin/			   		#软链接,优化执行路径
[root@haproxy1 ~]# /etc/init.d/haproxy restart      						#启动 haproxy
4.配置 Haproxy 日志管理
[root@Haproxy1 ~]# vim /etc/rsyslog.d/haproxy.conf
if ($programname == 'haproxy' and $syslogseverity-text == 'info') then -/var/log/haproxy/haproxy-info.log
& ~
if ($programname == 'haproxy' and $syslogseverity-text == 'notice') then -/var/log/haproxy/haproxy-notice.log
& ~
[root@haproxy1 ~]# systemctl restart rsyslog
[root@haproxy1 ~]# /etc/init.d/haproxy restart


