Elasticsearch:使用 Nginx 来保护 Elastic Stack
在我之前的文章 “反向代理及负载均衡在 Elasticsearch 中的应用” 中,我已经详述了如何使用 Nginx 来作为一个反向代理来访问 Elastic Stack。在今天的文章中,我将详述如何使用 Nginx 来保护 Elastic Stack。基于 Elastic Stack Basic 许可以上,我们都可以使用 Elastic Stack 所提供的安全方案来对 Elastic Stack 进行保护。针对 OSS 的用户来说,我们可以使用 Nginx 所提供的安全措施来对我们的 Elastic Stack 进行保护。在本文中,我想解释一下如何实现保护 Elastic Stack 的一种更常见,更简单的方法-在 Elasticsearch 和 Kibana 的前面部署 nginx 作为反向代理。
![]()
在今天的实验中,我将使用一个 Ubuntu 20.04 的机器来做演示。
安装
Elastic Stack
针对我们的实验,我们需要安装 Elasticsearch 已经 Kibana。请参阅我之前的文章 “Elastic:菜鸟上手指南” 进行安装。我都使用默认的配置。等 Elasticsearch 以及 Kibana 都起来之后,我们可以看到如下的画面:
Elasticsearch 运用于 localhost:9200 上,而 Kibana 运行于 localhost:5601 上。
Nginx
参考我之前的文章 “Beats:使用Elastic Stack对Nginx Web服务器监控” 来进行安装。我们可以通过如下的方式来进行安装 Nginx:
sudo apt-get install nginx我们还将安装 apache2-utils 来帮助我们创建用于基本身份验证的帐户:
sudo apt-get install apache2-utils接下来,我们将创建一个用于基本身份验证的用户帐户(我选择了kibanauser,但你当然可以将其替换为您想要的任何用户帐户):
sudo htpasswd -c /etc/nginx/htpasswd.users kibanauser按下 Enter 键后,系统会提示我们输入并验证用户密码。
$ sudo htpasswd -c /etc/nginx/htpasswd.users kibanauser
New password:
Re-type new password:
Adding password for user kibanauser
为了方便,我使用了 1234 作为 kibanauser 用户的密码。
接下来,我们将创建一个nginx配置文件:
sudo vi /etc/nginx/conf.d/kibana.conf输入以下配置:
/etc/nginx/conf.d/kibana.conf upstream elasticsearch {
server 127.0.0.1:9200;
keepalive 15;
}
upstream kibana {
server 127.0.0.1:5601;
keepalive 15;
}
server {
listen 8881;
location / {
auth_basic "Restricted Access";
auth_basic_user_file /etc/nginx/htpasswd.users;
proxy_pass http://elasticsearch;
proxy_redirect off;
proxy_buffering off;
proxy_http_version 1.1;
proxy_set_header Connection "Keep-Alive";
proxy_set_header Proxy-Connection "Keep-Alive";
}
}
server {
listen 8882;
location / {
auth_basic "Restricted Access";
auth_basic_user_file /etc/nginx/htpasswd.users;
proxy_pass http://kibana;
proxy_redirect off;
proxy_buffering off;
proxy_http_version 1.1;
proxy_set_header Connection "Keep-Alive";
proxy_set_header Proxy-Connection "Keep-Alive";
}
}
我们要求 nginx 使用通过 htpasswd 创建的帐户进行基本身份验证,以侦听端口 8881 与 Elasticsearch 的连接以及端口 8882 与 Kibana 的连接。这就是我们所有需要配置的东西。
重新启动 nginx:
sudo service nginx restart
验证身份证
现在,Elasticsearch 和 Kibana 都已通过基本身份验证进行了门控。 我们可以使用一些 cURL 命令来验证这一点。
对于 Elasticsearch,使用:
curl --verbose http://127.0.0.1:8881上面的输出为:
$ curl --verbose http://127.0.0.1:8881
*   Trying 127.0.0.1:8881...
* TCP_NODELAY set
* Connected to 127.0.0.1 (127.0.0.1) port 8881 (#0)
> GET / HTTP/1.1
> Host: 127.0.0.1:8881
> User-Agent: curl/7.68.0
> Accept: */*
>
* Mark bundle as not supporting multiuse
< HTTP/1.1 401 Unauthorized
< Server: nginx/1.18.0 (Ubuntu)
< Date: Tue, 05 Jan 2021 02:37:57 GMT
< Content-Type: text/html
< Content-Length: 188
< Connection: keep-alive
< WWW-Authenticate: Basic realm="Restricted Access"
<

401 Authorization Required

401 Authorization Required
nginx/1.18.0 (Ubuntu)


* Connection #0 to host 127.0.0.1 left intact
从上面的输出中我们可以看出来他需要验证才可以进行访问。我们接下来使用如下的方式来访问 Elasticsearch:
curl --verbose http://kibanauser:[email protected]:8881上面的命令的输出为:
$ curl --verbose http://kibanauser:[email protected]:8881
*   Trying 127.0.0.1:8881...
* TCP_NODELAY set
* Connected to 127.0.0.1 (127.0.0.1) port 8881 (#0)
* Server auth using Basic with user 'kibanauser'
> GET / HTTP/1.1
> Host: 127.0.0.1:8881
> Authorization: Basic a2liYW5hdXNlcjoxMjM0
> User-Agent: curl/7.68.0
> Accept: */*
>
* Mark bundle as not supporting multiuse
< HTTP/1.1 200 OK
< Server: nginx/1.18.0 (Ubuntu)
< Date: Tue, 05 Jan 2021 02:42:25 GMT
< Content-Type: application/json; charset=UTF-8
< Content-Length: 531
< Connection: keep-alive
<
{
  "name" : "liuxgu",
  "cluster_name" : "elasticsearch",
  "cluster_uuid" : "6DeOscunTaevVlsn68DYYA",
  "version" : {
    "number" : "7.6.2",
    "build_flavor" : "default",
    "build_type" : "tar",
    "build_hash" : "ef48eb35cf30adf4db14086e8aabd07ef6fb113f",
    "build_date" : "2020-03-26T06:34:37.794943Z",
    "build_snapshot" : false,
    "lucene_version" : "8.4.0",
    "minimum_wire_compatibility_version" : "6.8.0",
    "minimum_index_compatibility_version" : "6.0.0-beta1"
  },
  "tagline" : "You Know, for Search"
}
* Connection #0 to host 127.0.0.1 left intact
在上面,我们使用了用户名及密码 kibanauser:1234,那么我们可以看到正确的输出。
同样地,我们可以在另外一台电脑上对 Ubuntu 机器进行访问:
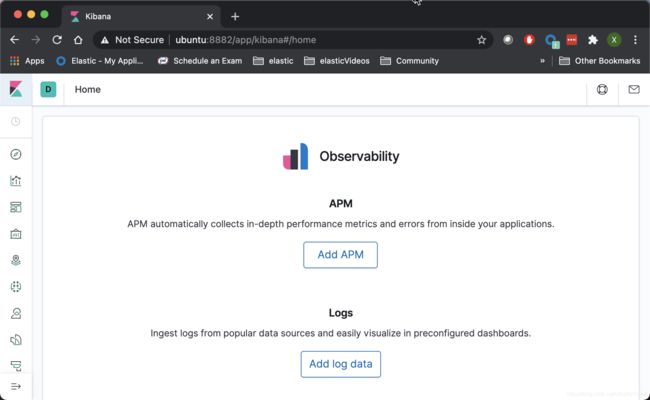
它提示我们需要输入正确的用户名及密码来进行访问。我们输入正确的用户名及密码,并点击上面的 Sign In 按钮:
我们就进入到 Kibana 的界面中了。
如果我们使用其它机器访问 Elasticsearch,我们同样也需要使用正确的用户名及密码:
在上面输入正确的用户名及密码:


