- Java-- 异常--try/catch/finally 的执行顺序
刘小炮吖i
Java后端开发面试题Javajava开发语言面试
直接说结论:当catch或者finally中有return语句时,catch和finally代码块之后的程序部分将不会被执行到。如果catch和finally中都存在return语句,最终的返回值将是finally中的return语句所指定的值。无论try代码块中是否出现异常,只要try或catch执行到了return之前,finally代码块都会被执行。为了代码的可读性和健壮性,尽量避免在try
- Java中字符流和字节流的区别
刘小炮吖i
Java后端开发面试题Javajava开发语言
相同点在Java的I/O体系中,字节流和字符流都配备了缓冲机制的实现类,以此显著提升数据读写的效率。字符流:借助BufferedReader和BufferedWriter,它们在处理字符数据时,会将数据先缓存起来,减少与底层数据源或目标的交互次数,从而加速操作。例如,当逐行读取大文本文件时,BufferedReader的缓冲功能能避免频繁的磁盘I/O操作。字节流:BufferedInputStre
- 【现代前端框架中本地图片资源的处理方案】
Gazer_S
前端框架前端缓存javascriptchrome
现代前端框架中本地图片资源的处理方案前言在前端开发中,正确引用本地图片资源是一个常见但容易被忽视的问题。我们不能像在HTML中那样简单地使用相对路径,因为JavaScript模块中的路径解析规则与HTML不同,且现代构建工具对静态资源有特殊的处理机制。本文将详细探讨在webpack和Vite等构建工具中处理本地图片引用的各种方法。传统方式的局限性在传统开发中,我们可能习惯这样引用图片:constl
- javaweb将上传的图片保存在项目文件webapp下的upload文件夹下
yuren_xia
后端技术前端技术webappjavatomcateclipse
前端HTML表单(upload.html)首先,创建一个HTML页面,允许用户选择并上传图片。图片上传上传图片注意:表单的method设置为"post",enctype需设置成"multipart/form-data"2.后端Servlet(UploadServlet.java)接下来,创建一个Servlet来处理文件上传请求,并将上传的图片保存到webapp/load目录下。packagecom
- 通俗理解闭包
yuren_xia
前端技术javascript
JavaScript在ES6之前并没有类的概念,但通过原型链和闭包,开发者可以实现类似继承和封装的功能(原型链实现继承,闭包实现封装)。ES6引入了类语法,但闭包仍然是实现私有数据封装的重要手段之一。另外,使用闭包还可用于保存上下文信息等场景。一、定义从函数角度闭包是指有权访问另一个函数作用域中的变量的函数。即使外部函数已经返回,闭包仍然可以访问外部函数内部的变量。例如:functionouter
- 说说 Spring MVC 的执行流程?
浮生带你学Java
Java面试题Springspringmvcjava
高频面试题:说说SpringMVC的执行流程?大家好,我是浮生,一个工作了十四年的java程序员!昨天,一个工作2年的粉丝在面试的时候,面试官要求他说SpringMVC的执行流程。他没回答上来,错过了这个offer。一、问题解析SpringMVC的执行流程,一个面试频率超级高的问题,但是缺难倒了无数的程序员。这个问题的考察范围主要是3~5年,甚至5年以上都会问到。和它同类型的问题还有Bean的加载
- SpringCloud/Boot集成LogBack
azoon.top
springcloudlogbackspringlog4jslf4j
一.简要介绍什么是SLF4J?官网介绍:SimpleLoggingFacadeforJava(SLF4J)充当简单的各种日志记录框架的Facade或抽象(e.g.java.util.logging、logback、log4j)允许最终用户在部署时插入所需的日志记录框架。类似java中的接口,如果只集成SLF4J,日志只能输出在控制台,并没有输出到文件的能力,要实现真正的日志能力,需要引入其实现层:
- 深入剖析 Weblogic、ThinkPHP、Jboss、Struct2 历史漏洞
阿贾克斯的黎明
网络安全web安全
目录深入剖析Weblogic、ThinkPHP、Jboss、Struct2历史漏洞一、Weblogic漏洞(一)漏洞原理(二)漏洞利用代码(Python示例)(三)防范措施二、ThinkPHP漏洞(一)漏洞原理(二)漏洞利用代码(示例,假设存在漏洞的代码片段)(三)防范措施三、Jboss漏洞(一)漏洞原理(二)漏洞利用代码(Java示例,用于构造恶意序列化数据)(三)防范措施四、Struct2漏洞
- 深入剖析 Java 反序列化:FASTjson 漏洞与 Shiro 漏洞
阿贾克斯的黎明
网络安全phpweb安全开发语言
目录深入剖析Java反序列化:FASTjson漏洞与Shiro漏洞引言Java反序列化原理示例代码FASTjson漏洞分析漏洞成因示例代码防护措施Shiro漏洞分析漏洞成因示例代码(模拟攻击场景)防护措施总结引言在Java应用开发中,反序列化是一项重要的技术,但同时也隐藏着巨大的安全风险。FASTjson和Shiro作为Java开发中常用的工具和框架,其反序列化漏洞曾引发了广泛关注。本文将深入探讨
- 前端开发中的常见问题与疑惑:解析与应对策略
lina_mua
javascriptvue.jshtml前端es6
1.引言1.1前端开发的复杂性前端开发涉及HTML、CSS、JavaScript等多种技术,同时还需要考虑性能优化、跨浏览器兼容性、用户体验等问题。随着前端技术的快速发展,开发者面临的挑战也越来越多。1.2本文的目标本文旨在总结前端开发中常见的问题与疑惑,并提供相应的解决方案和应对策略,帮助开发者更好地应对挑战。2.HTML/CSS常见问题2.1布局问题:如何实现复杂的页面布局?问题描述:实现复杂
- Java微服务的注册中心Nacos
铁锤学代码
微服务java微服务开发语言
文章目录Nacos的主要作用Nacos实现动态配置更新的技术Nacos实现CAPNacos实现CAP原理Nacos使用Distro和Raft分别干什么用?ZAB与Raft的区别Nacos的主要作用配置中心:可以将微服务中的一些配置信息放到Nacos进行统一管理,也可以通过Nacos实现动态配置管理。也可以将不同环境的配置放在不同的Namespace下的group下,实现动态选择配置发布部署。服务注
- ArrayList 源码分析
2401_85327573
java开发语言
ArrayList简介ArrayList的底层是数组队列,相当于动态数组。与Java中的数组相比,它的容量能动态增长。在添加大量元素前,应用程序可以使用ensureCapacity操作来增加ArrayList实例的容量。这可以减少递增式再分配的数量。ArrayList继承于AbstractList,实现了List,RandomAccess,Cloneable,java.io.Serializabl
- javaweb文件上传:@MultipartConfig注解与Apache Commons FileUpload对比
yuren_xia
后端技术apachejavatomcat
在JavaWeb应用中处理文件上传时,可以选择使用@MultipartConfig注解或第三方库如ApacheCommonsFileUpload(通常简称为fileupload)。以下是两者的比较和建议:使用@MultipartConfig注解简介:@MultipartConfig是JavaServlet规范中用于处理multipart/form-data请求(通常是文件上传)的注解。它简化了在S
- Golang的Aes加解密工具类
张声录1
golang开发语言后端
packagemainimport("bytes""crypto/aes""crypto/sha1""encoding/binary""encoding/hex""fmt")//SHA1PRNG模拟Java的SHA1PRNG算法typeSHA1PRNGstruct{state[sha1.Size]bytecounteruint32indexint}//NewSHA1PRNG使用种子初始化SHA1P
- android:onClick 无法成功映射到对应Activity问题的解决过程记录
陈金鑫
android
在学习android静态绑定按钮点击事件时出现报错:08-1300:30:32.510:E/AndroidRuntime(2039):java.lang.IllegalStateException:Couldnotexecutemethodoftheactivity08-1300:30:32.510:E/AndroidRuntime(2039): atandroid.view.View$1.o
- React vs Vue3深度对比与使用场景分析
匹马夕阳
VUE技术集锦react.js前端前端框架
在前端开发领域,React和Vue3是两个备受瞩目的框架。它们都提供了强大的功能和灵活的开发方式,但各自的设计理念、使用方式和适用场景有所不同。本文将深入探讨React和Vue3的区别,通过代码示例和具体的使用场景,帮助开发者更好地理解并选择适合自己的框架。一、核心概念与设计理念1.ReactReact是由Facebook开发的一个JavaScript库,主要用于构建用户界面。它的核心理念是组件化
- staruml java类图_使用staruml绘制类图
weixin_39999025
starumljava类图
抽象类的表示选中需要设置的类,勾选Properties->General->IsAbstract进行设置,设置完成后,类名会变成斜体抽象类的表示接口的表示在Properties->General中将Stereotype设置为interface接口的表示新增类的属性选中需要新增属性的类,点击Properties->General->Attributes的右侧按钮在Properties->Genera
- Java与Spring的“甜蜜毒药”:从辉煌到疲态的技术反思
步子哥
javaspringpython
“Java生态就像一场漫长的婚姻,Spring是那个看似完美的伴侣,但当你意识到对方的控制欲时,已经为TA背上了巨额房贷。”Java,这位曾经的企业级开发之王,如今却像一位中年危机的技术巨人,站在2023年的技术浪潮中,显露出疲态。而Spring,这个曾经被誉为“轻量级救世主”的框架,早已从灵活的工具箱变成了沉重的枷锁。今天,我们就来聊聊这对技术界的“黄金搭档”,如何从蜜月期走向了“分居边缘”。Ⅰ
- Spring Boot 集成 Kafka
m0_74823471
面试学习路线阿里巴巴springbootkafkalinq
在现代软件开发中,分布式系统和微服务架构越来越受到关注。为了实现系统之间的异步通信和解耦,消息队列成为了一种重要的技术手段。Kafka作为一种高性能、分布式的消息队列系统,被广泛应用于各种场景。而SpringBoot作为一种流行的Java开发框架,提供了便捷的方式来构建应用程序。本文将介绍如何在SpringBoot项目中集成Kafka,包括Kafka的基本概念、SpringBoot集成Kafka的
- 《从空指针到百万访问:小丁学Java的1024天创作者之路》
小丁学Java
创作者纪念日
文章目录文章目录✨机缘收获日常️成就憧憬文章目录✨机缘提示:可以和大家分享最初成为创作者的初心,例如实战项目中的经验分享、日常学习过程中的记录、通过文章进行技术交流等…收获提示:在这创作过程中都有哪些收获,例如获得了多少粉丝的关注、获得了多少正向的反馈如赞、评论、阅读量等、认识和哪些志同道合的领域同行等…日常️提示:当前创作和你的工作、学习是什么样的关系,例如创作是否已经是你生活的一部分了、有限的
- JavaScript BOM(浏览器对象模型)与 `setTimeout` 函数:控制浏览器行为的利器
人才程序员
杂谈javascript开发语言ecmascriptfirefoxhtml5jquerysafari
文章目录JavaScriptBOM(浏览器对象模型)与`setTimeout`函数:控制浏览器行为的利器⏳什么是BOM?`setTimeout`函数:实现延时操作⏳基本语法:示例:基本使用`setTimeout`返回值:定时器ID示例:取消定时器`setTimeout`的实际应用`setTimeout`的注意事项⚠️小结:BOM与`setTimeout`的妙用JavaScriptBOM(浏览器对象
- Java与C#语法对比及转换
carcarrot
Javajavac#
转载自:https://blog.csdn.net/eray/article/details/1553731Java(J2SE5.0)andC#ComparisonThisisaquickreferenceguidetohighlightsomekeysyntacticaldifferencesbetweenJavaandC#.Thisisbynomeansacompleteoverviewofe
- Java内存与缓存
C6666888
java专栏java开发语言
Java内存管理和缓存机制是构建高性能应用程序的关键要素。它们之间既有联系又有区别,理解这两者对于优化Java应用至关重要。Java内存模型Java内存模型(JMM)定义了线程如何以及何时可以看到其他线程修改过的共享变量的值,并且规定了所有线程在读取或写入共享变量时必须遵循的一些规则。根据JVM规范,Java运行时数据区可以分为以下几个部分:程序计数器:每个线程都有自己的程序计数器,它记录当前线程
- 【GO】学习笔记
勤不了一点
GOgolang学习笔记go
目录学习链接开发环境开发工具GVM-GO多版本部署GOPATH与go.modgo常用命令环境初始化编译与运行GDB--GNU调试器基本语法与字符类型关键字与标识符格式化占位符基本语法初始值&零值&默认值变量声明与赋值_下划线的用法字符类型const常量字符串类型转换与判断指针值类型和引用类型复杂数据类型数组:一个由固定长度的特定类型元素组成的序列切片(Slice):动态序列链表(list):没有元
- Processing 009 一个复杂点的例子,OOP实现屏幕碰撞小球
SuperCandyXu
Processing笔记
Processing009一个复杂点的例子,OOP实现屏幕碰撞小球1processing中的面向对象编程基本上和java的语法一致,例如classCar{Stringname;intprice;publicCar(Stringname,intprice){this.name=name;this.price=price;}publicvoidprintInfo(){println("name:"+t
- [特殊字符] Java 函数式接口深度解析:让你轻松掌握 Lambda 表达式与函数式编程!
扣丁梦想家
Javajava开发语言
引言:在Java8版本中,引入了函数式接口以及Lambda表达式,彻底改变了Java的编程模式,使得编程变得更加简洁、灵活、易读。特别是函数式接口,它是函数式编程的核心,使得Java代码能够像处理数据流一样高效且可读性强。本文将带你深入了解函数式接口的概念、使用方式以及如何充分利用它来优化代码。无论你是刚接触Java8的新手,还是已经掌握一些基础知识的开发者,阅读完本文后,你将能够更加自如地使用函
- Spring Boot 动态配置数据源全解析
♢.*
springboot后端java
亲爱的小伙伴们,在求知的漫漫旅途中,若你对深度学习的奥秘、Java与Python的奇妙世界,亦或是读研论文的撰写攻略有所探寻,那不妨给我一个小小的关注吧。我会精心筹备,在未来的日子里不定期地为大家呈上这些领域的知识宝藏与实用经验分享。每一个点赞,都如同春日里的一缕阳光,给予我满满的动力与温暖,让我们在学习成长的道路上相伴而行,共同进步✨。期待你的关注与点赞哟!引言在企业级应用开发中,单一数据源往往
- 深入解析:如何编写 Mapper 文件
♢.*
oracle数据库mybatis
亲爱的小伙伴们,在求知的漫漫旅途中,若你对深度学习的奥秘、Java与Python的奇妙世界,亦或是读研论文的撰写攻略有所探寻,那不妨给我一个小小的关注吧。我会精心筹备,在未来的日子里不定期地为大家呈上这些领域的知识宝藏与实用经验分享。每一个点赞,都如同春日里的一缕阳光,给予我满满的动力与温暖,让我们在学习成长的道路上相伴而行,共同进步✨。期待你的关注与点赞哟!在软件开发尤其是涉及数据库交互的项目中
- 【华为OD-E卷 - 120 分割数组的最大差值 100分(python、java、c++、js、c)】
CodeClimb
算法题华为od(A+B+C+D+E卷)收录分享华为odpythonjavac++javascript
【华为OD-E卷-分割数组的最大差值100分(python、java、c++、js、c)】题目给定一个由若干整数组成的数组nums,可以在数组内的任意位置进行分割,将该数组分割成两个非空子数组(即左数组和右数组),分别对子数组求和得到两个值,计算这两个值的差值,请输出所有分割方案中,差值最大的值输入描述第一行输入数组中元素个数n,10?prefixSum[i-1]:0);}longtotalSum
- OpenCV开源机器视觉软件
视觉人机器视觉
杂说opencv开源人工智能
OpenCV(OpenSourceComputerVisionLibrary)是一个开源的计算机视觉和机器学习软件库,广泛应用于实时图像处理、视频分析、物体检测、人脸识别等领域。它由英特尔实验室于1999年发起,现已成为计算机视觉领域最流行的工具之一,支持多种编程语言(如C++、Python、Java)和操作系统(Windows、Linux、macOS、Android、iOS)。核心功能图像处理基
- web报表工具FineReport常见的数据集报错错误代码和解释
老A不折腾
web报表finereport代码可视化工具
在使用finereport制作报表,若预览发生错误,很多朋友便手忙脚乱不知所措了,其实没什么,只要看懂报错代码和含义,可以很快的排除错误,这里我就分享一下finereport的数据集报错错误代码和解释,如果有说的不准确的地方,也请各位小伙伴纠正一下。
NS-war-remote=错误代码\:1117 压缩部署不支持远程设计
NS_LayerReport_MultiDs=错误代码
- Java的WeakReference与WeakHashMap
bylijinnan
java弱引用
首先看看 WeakReference
wiki 上 Weak reference 的一个例子:
public class ReferenceTest {
public static void main(String[] args) throws InterruptedException {
WeakReference r = new Wea
- Linux——(hostname)主机名与ip的映射
eksliang
linuxhostname
一、 什么是主机名
无论在局域网还是INTERNET上,每台主机都有一个IP地址,是为了区分此台主机和彼台主机,也就是说IP地址就是主机的门牌号。但IP地址不方便记忆,所以又有了域名。域名只是在公网(INtERNET)中存在,每个域名都对应一个IP地址,但一个IP地址可有对应多个域名。域名类型 linuxsir.org 这样的;
主机名是用于什么的呢?
答:在一个局域网中,每台机器都有一个主
- oracle 常用技巧
18289753290
oracle常用技巧 ①复制表结构和数据 create table temp_clientloginUser as select distinct userid from tbusrtloginlog ②仅复制数据 如果表结构一样 insert into mytable select * &nb
- 使用c3p0数据库连接池时出现com.mchange.v2.resourcepool.TimeoutException
酷的飞上天空
exception
有一个线上环境使用的是c3p0数据库,为外部提供接口服务。最近访问压力增大后台tomcat的日志里面频繁出现
com.mchange.v2.resourcepool.TimeoutException: A client timed out while waiting to acquire a resource from com.mchange.v2.resourcepool.BasicResou
- IT系统分析师如何学习大数据
蓝儿唯美
大数据
我是一名从事大数据项目的IT系统分析师。在深入这个项目前需要了解些什么呢?学习大数据的最佳方法就是先从了解信息系统是如何工作着手,尤其是数据库和基础设施。同样在开始前还需要了解大数据工具,如Cloudera、Hadoop、Spark、Hive、Pig、Flume、Sqoop与Mesos。系 统分析师需要明白如何组织、管理和保护数据。在市面上有几十款数据管理产品可以用于管理数据。你的大数据数据库可能
- spring学习——简介
a-john
spring
Spring是一个开源框架,是为了解决企业应用开发的复杂性而创建的。Spring使用基本的JavaBean来完成以前只能由EJB完成的事情。然而Spring的用途不仅限于服务器端的开发,从简单性,可测试性和松耦合的角度而言,任何Java应用都可以从Spring中受益。其主要特征是依赖注入、AOP、持久化、事务、SpringMVC以及Acegi Security
为了降低Java开发的复杂性,
- 自定义颜色的xml文件
aijuans
xml
<?xml version="1.0" encoding="utf-8"?> <resources> <color name="white">#FFFFFF</color> <color name="black">#000000</color> &
- 运营到底是做什么的?
aoyouzi
运营到底是做什么的?
文章来源:夏叔叔(微信号:woshixiashushu),欢迎大家关注!很久没有动笔写点东西,近些日子,由于爱狗团产品上线,不断面试,经常会被问道一个问题。问:爱狗团的运营主要做什么?答:带着用户一起嗨。为什么是带着用户玩起来呢?究竟什么是运营?运营到底是做什么的?那么,我们先来回答一个更简单的问题——互联网公司对运营考核什么?以爱狗团为例,绝大部分的移动互联网公司,对运营部门的考核分为三块——用
- js面向对象类和对象
百合不是茶
js面向对象函数创建类和对象
接触js已经有几个月了,但是对js的面向对象的一些概念根本就是模糊的,js是一种面向对象的语言 但又不像java一样有class,js不是严格的面向对象语言 ,js在java web开发的地位和java不相上下 ,其中web的数据的反馈现在主流的使用json,json的语法和js的类和属性的创建相似
下面介绍一些js的类和对象的创建的技术
一:类和对
- web.xml之资源管理对象配置 resource-env-ref
bijian1013
javaweb.xmlservlet
resource-env-ref元素来指定对管理对象的servlet引用的声明,该对象与servlet环境中的资源相关联
<resource-env-ref>
<resource-env-ref-name>资源名</resource-env-ref-name>
<resource-env-ref-type>查找资源时返回的资源类
- Create a composite component with a custom namespace
sunjing
https://weblogs.java.net/blog/mriem/archive/2013/11/22/jsf-tip-45-create-composite-component-custom-namespace
When you developed a composite component the namespace you would be seeing would
- 【MongoDB学习笔记十二】Mongo副本集服务器角色之Arbiter
bit1129
mongodb
一、复本集为什么要加入Arbiter这个角色 回答这个问题,要从复本集的存活条件和Aribter服务器的特性两方面来说。 什么是Artiber? An arbiter does
not have a copy of data set and
cannot become a primary. Replica sets may have arbiters to add a
- Javascript开发笔记
白糖_
JavaScript
获取iframe内的元素
通常我们使用window.frames["frameId"].document.getElementById("divId").innerHTML这样的形式来获取iframe内的元素,这种写法在IE、safari、chrome下都是通过的,唯独在fireforx下不通过。其实jquery的contents方法提供了对if
- Web浏览器Chrome打开一段时间后,运行alert无效
bozch
Webchormealert无效
今天在开发的时候,突然间发现alert在chrome浏览器就没法弹出了,很是怪异。
试了试其他浏览器,发现都是没有问题的。
开始想以为是chorme浏览器有啥机制导致的,就开始尝试各种代码让alert出来。尝试结果是仍然没有显示出来。
这样开发的结果,如果客户在使用的时候没有提示,那会带来致命的体验。哎,没啥办法了 就关闭浏览器重启。
结果就好了,这也太怪异了。难道是cho
- 编程之美-高效地安排会议 图着色问题 贪心算法
bylijinnan
编程之美
import java.util.ArrayList;
import java.util.Collections;
import java.util.List;
import java.util.Random;
public class GraphColoringProblem {
/**编程之美 高效地安排会议 图着色问题 贪心算法
* 假设要用很多个教室对一组
- 机器学习相关概念和开发工具
chenbowen00
算法matlab机器学习
基本概念:
机器学习(Machine Learning, ML)是一门多领域交叉学科,涉及概率论、统计学、逼近论、凸分析、算法复杂度理论等多门学科。专门研究计算机怎样模拟或实现人类的学习行为,以获取新的知识或技能,重新组织已有的知识结构使之不断改善自身的性能。
它是人工智能的核心,是使计算机具有智能的根本途径,其应用遍及人工智能的各个领域,它主要使用归纳、综合而不是演绎。
开发工具
M
- [宇宙经济学]关于在太空建立永久定居点的可能性
comsci
经济
大家都知道,地球上的房地产都比较昂贵,而且土地证经常会因为新的政府的意志而变幻文本格式........
所以,在地球议会尚不具有在太空行使法律和权力的力量之前,我们外太阳系统的友好联盟可以考虑在地月系的某些引力平衡点上面,修建规模较大的定居点
- oracle 11g database control 证书错误
daizj
oracle证书错误oracle 11G 安装
oracle 11g database control 证书错误
win7 安装完oracle11后打开 Database control 后,会打开em管理页面,提示证书错误,点“继续浏览此网站”,还是会继续停留在证书错误页面
解决办法:
是 KB2661254 这个更新补丁引起的,它限制了 RSA 密钥位长度少于 1024 位的证书的使用。具体可以看微软官方公告:
- Java I/O之用FilenameFilter实现根据文件扩展名删除文件
游其是你
FilenameFilter
在Java中,你可以通过实现FilenameFilter类并重写accept(File dir, String name) 方法实现文件过滤功能。
在这个例子中,我们向你展示在“c:\\folder”路径下列出所有“.txt”格式的文件并删除。 1 2 3 4 5 6 7 8 9 10 11 12 13 14 15 16
- C语言数组的简单以及一维数组的简单排序算法示例,二维数组简单示例
dcj3sjt126com
carray
# include <stdio.h>
int main(void)
{
int a[5] = {1, 2, 3, 4, 5};
//a 是数组的名字 5是表示数组元素的个数,并且这五个元素分别用a[0], a[1]...a[4]
int i;
for (i=0; i<5; ++i)
printf("%d\n",
- PRIMARY, INDEX, UNIQUE 这3种是一类 PRIMARY 主键。 就是 唯一 且 不能为空。 INDEX 索引,普通的 UNIQUE 唯一索引
dcj3sjt126com
primary
PRIMARY, INDEX, UNIQUE 这3种是一类PRIMARY 主键。 就是 唯一 且 不能为空。INDEX 索引,普通的UNIQUE 唯一索引。 不允许有重复。FULLTEXT 是全文索引,用于在一篇文章中,检索文本信息的。举个例子来说,比如你在为某商场做一个会员卡的系统。这个系统有一个会员表有下列字段:会员编号 INT会员姓名
- java集合辅助类 Collections、Arrays
shuizhaosi888
CollectionsArraysHashCode
Arrays、Collections
1 )数组集合之间转换
public static <T> List<T> asList(T... a) {
return new ArrayList<>(a);
}
a)Arrays.asL
- Spring Security(10)——退出登录logout
234390216
logoutSpring Security退出登录logout-urlLogoutFilter
要实现退出登录的功能我们需要在http元素下定义logout元素,这样Spring Security将自动为我们添加用于处理退出登录的过滤器LogoutFilter到FilterChain。当我们指定了http元素的auto-config属性为true时logout定义是会自动配置的,此时我们默认退出登录的URL为“/j_spring_secu
- 透过源码学前端 之 Backbone 三 Model
逐行分析JS源代码
backbone源码分析js学习
Backbone 分析第三部分 Model
概述: Model 提供了数据存储,将数据以JSON的形式保存在 Model的 attributes里,
但重点功能在于其提供了一套功能强大,使用简单的存、取、删、改数据方法,并在不同的操作里加了相应的监听事件,
如每次修改添加里都会触发 change,这在据模型变动来修改视图时很常用,并且与collection建立了关联。
- SpringMVC源码总结(七)mvc:annotation-driven中的HttpMessageConverter
乒乓狂魔
springMVC
这一篇文章主要介绍下HttpMessageConverter整个注册过程包含自定义的HttpMessageConverter,然后对一些HttpMessageConverter进行具体介绍。
HttpMessageConverter接口介绍:
public interface HttpMessageConverter<T> {
/**
* Indicate
- 分布式基础知识和算法理论
bluky999
算法zookeeper分布式一致性哈希paxos
分布式基础知识和算法理论
BY
[email protected]
本文永久链接:http://nodex.iteye.com/blog/2103218
在大数据的背景下,不管是做存储,做搜索,做数据分析,或者做产品或服务本身,面向互联网和移动互联网用户,已经不可避免地要面对分布式环境。笔者在此收录一些分布式相关的基础知识和算法理论介绍,在完善自我知识体系的同
- Android Studio的.gitignore以及gitignore无效的解决
bell0901
androidgitignore
github上.gitignore模板合集,里面有各种.gitignore : https://github.com/github/gitignore
自己用的Android Studio下项目的.gitignore文件,对github上的android.gitignore添加了
# OSX files //mac os下 .DS_Store
- 成为高级程序员的10个步骤
tomcat_oracle
编程
What
软件工程师的职业生涯要历经以下几个阶段:初级、中级,最后才是高级。这篇文章主要是讲如何通过 10 个步骤助你成为一名高级软件工程师。
Why
得到更多的报酬!因为你的薪水会随着你水平的提高而增加
提升你的职业生涯。成为了高级软件工程师之后,就可以朝着架构师、团队负责人、CTO 等职位前进
历经更大的挑战。随着你的成长,各种影响力也会提高。
- mongdb在linux下的安装
xtuhcy
mongodblinux
一、查询linux版本号:
lsb_release -a
LSB Version: :base-4.0-amd64:base-4.0-noarch:core-4.0-amd64:core-4.0-noarch:graphics-4.0-amd64:graphics-4.0-noarch:printing-4.0-amd64:printing-4.0-noa
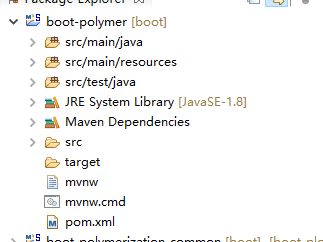
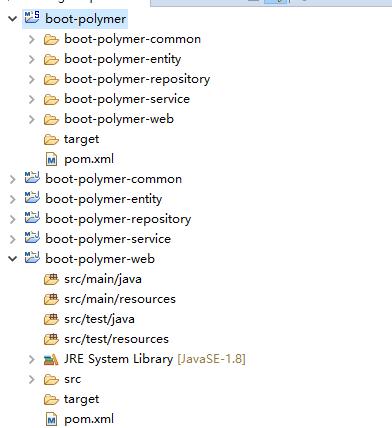
 然后去掉,无关紧要的东西留下pom文件就好了,这样父工程就创建好了;


