SpringCloud-2.0-周阳(23. 熔断降级 - Sentinel)学习笔记
上一篇 :22. 流量监控 - Sentinel
下一篇 :24. 分布式事务 - Seata
文章目录
- 1. 降级规则
-
- 1.1 介绍
- 1.2 慢调用比例(RT)
- 1.3 异常比例
- 1.4 异常数
- 2. @SentinelResource 详解
-
- 2.1 按资源名称限流 + 备选方案
-
- 2.1.1 环境搭建
- 2.1.2 配置流控规则
- 2.1.3 额外问题
- 2.2 按照Url地址限流 + 备选方案
- 2.3 上面 两个配置备选方案的方式 的问题
- 2.4 自定义限流处理逻辑
- 2.5 @SentinelResource 注解属性说明
- 3. 服务熔断功能
-
- 3.1 Ribbon系列
-
- 3.1.1 提供者 Provider-9003
- 3.1.2 消费者 Consumer-84
- 3.1.3 熔断降级配置
-
-
- 只配置 fallback
- 只配置 blockHandler
- 同时配置 fallBack 和 blockHandler
- 配置 exceptionsToIgnore
-
- 3.2 Feign系列
-
- 3.2.1 环境配置
- 3.3 熔断降级框架对比
- 4. Sentinel 规则持久化
1. 降级规则
1.1 介绍
-
官方文档 :https://github.com/alibaba/Sentinel/wiki/%E7%86%94%E6%96%AD%E9%99%8D%E7%BA%A7
-
熔断策略:
- 慢调用比例 (SLOW_REQUEST_RATIO):
- 选择以慢调用比例作为阈值,需要设置允许的 慢调用 RT(即最大的响应时间),请求的响应时间大于该值则统计为慢调用。
- 当单位统计时长(statIntervalMs)内请求数目大于设置的最小请求数目,并且慢调用的比例大于阈值,则接下来的熔断时长内请求会自动被熔断。
- 经过熔断时长后熔断器会进入探测恢复状态(HALF-OPEN 状态)
- 若接下来的一个请求响应时间小于设置的慢调用 RT 则结束熔断,若大于设置的慢调用 RT 则会再次被熔断。
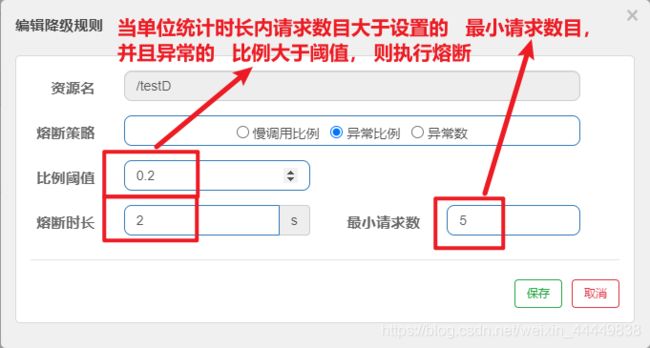
- 异常比例 (ERROR_RATIO):
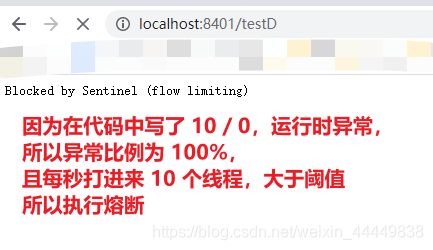
- 当单位统计时长(statIntervalMs)内请求数目大于设置的最小请求数目,并且异常的比例大于阈值,则接下来的熔断时长内请求会自动被熔断。
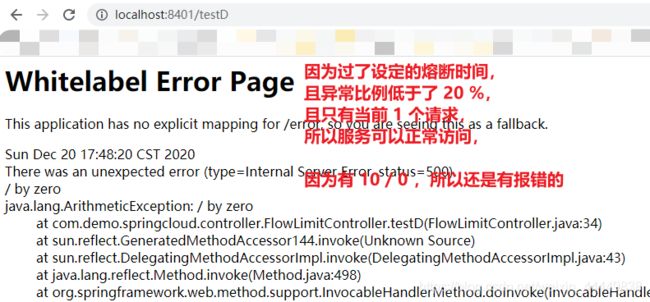
- 经过熔断时长后熔断器会进入探测恢复状态(HALF-OPEN 状态),若接下来的一个请求成功完成(没有错误)则结束熔断,否则会再次被熔断。异常比率的阈值范围是 [0.0, 1.0],代表 0% - 100%。
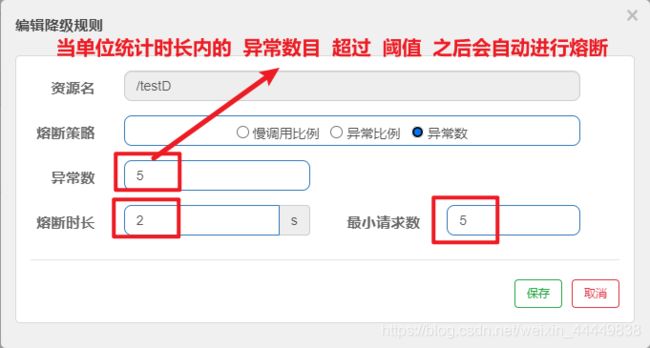
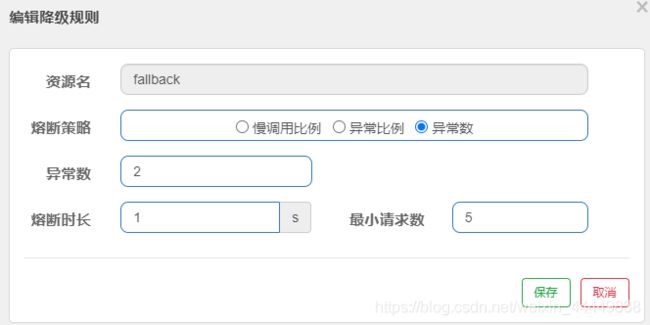
- 异常数 (ERROR_COUNT):
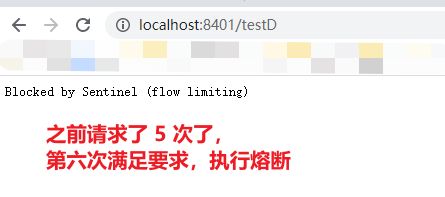
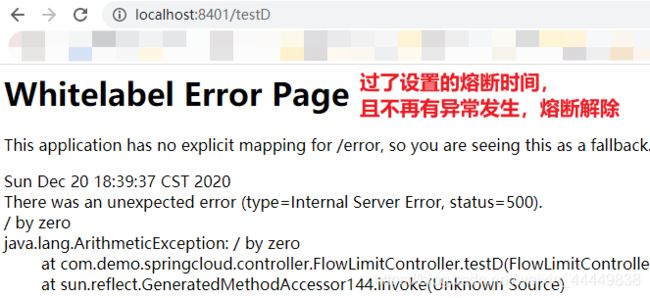
- 当单位统计时长内的异常数目超过阈值之后会自动进行熔断。经过熔断时长后熔断器会进入探测恢复状态(HALF-OPEN 状态),若接下来的一个请求成功完成(没有错误)则结束熔断,否则会再次被熔断。
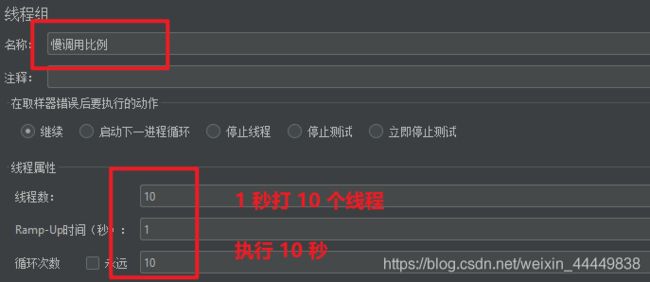
1.2 慢调用比例(RT)
-
先在 Controller 中添加一个方法
@GetMapping("/testD")
public String testD(){

    try {
        TimeUnit.SECONDS.sleep(1); } catch (InterruptedException e) {
        e.printStackTrace(); }
    log.info("testD 测试RT");

    return "------testD";
}
1.3 异常比例
1.4 异常数
2. @SentinelResource 详解
2.1 按资源名称限流 + 备选方案
- 启动 Nacos 控制台
- 启动 Sentinel 控制台
2.1.1 环境搭建
-
修改模块 :8401
-
修改 POM
<dependency> <groupId>com.demo.springcloudgroupId> <artifactId>cloud-api-commonsartifactId> <version>${project.version}version> dependency> -
新建 Controller :RateLimitController
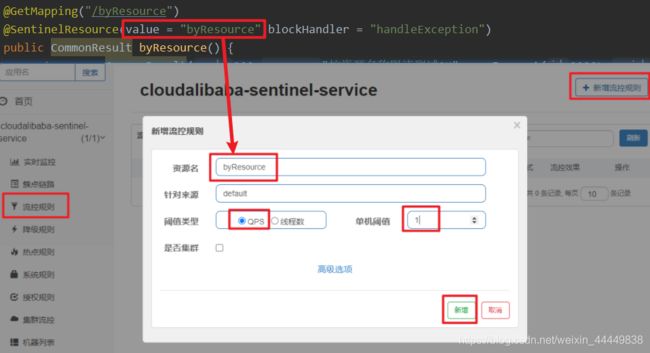
@RestController public class RateLimitController { @GetMapping("/byResource") @SentinelResource(value = "byResource",blockHandler = "handleException") public CommonResult byResource() { return new CommonResult(200,"按资源名称限流测试OK",new Payment(2020L,"serial001")); } public CommonResult handleException(BlockException exception) { return new CommonResult(444,exception.getClass().getCanonicalName()+"\t 服务不可用"); } } -
启动项目
2.1.2 配置流控规则
2.1.3 额外问题
- 这时突然关闭 8401 服务,流控规则是否会消失?
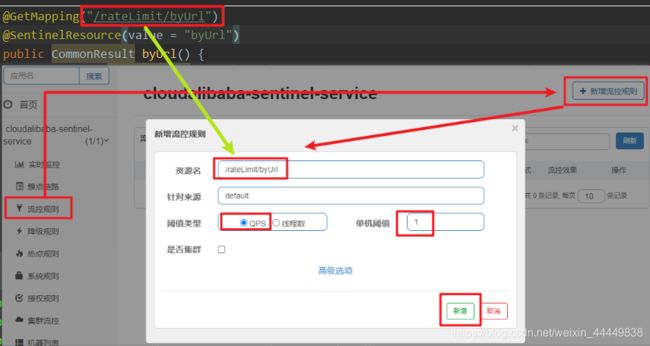
2.2 按照Url地址限流 + 备选方案
-
修改 RateLimitController
@GetMapping("/rateLimit/byUrl")
@SentinelResource(value = "byUrl")
public CommonResult byUrl() {

    return new CommonResult(200,"按url限流测试OK",new Payment(2020L,"serial002"));
}
在 Controller 中添加这样一个方法
没有配置 blockHandler 限流之后的处理方法
-
启动 8401
2.3 上面 两个配置备选方案的方式 的问题
-
系统默认的,没有体现我们自己的业务要求。
-
依照现有条件,我们自定义的处理方法又和业务代码耦合在一块,不直观。
-
每个业务方法都添加一个兜底的,那代码膨胀加剧。
-
全局统—的处理方法没有体现。
- 下面就来尝试解决一下这些 代码耦合、膨胀的问题
2.4 自定义限流处理逻辑
- 修改 alibaba-sentinel-service-8401
-
自定义一个限流处理类 :CustomerBlockHandler
public class CustomerBlockHandler { public static CommonResult handleException(BlockException exception) { return new CommonResult(2020, "自定义限流处理信息....CustomerBlockHandler"); } } -
修改 Controller :RateLimitController
@GetMapping("/rateLimit/customerBlockHandler") @SentinelResource(value = "customerBlockHandler", blockHandlerClass = CustomerBlockHandler.class, blockHandler = "handlerException2") public CommonResult customerBlockHandler() { return new CommonResult(200,"客戶自定义 Handler",new Payment(2020L,"serial003")); } -
重启 8401
-
连续访问 :http://localhost:8401/rateLimit/customerBlockHandler
2.5 @SentinelResource 注解属性说明
-
value:资源名称,必需项(不能为空)
-
entryType:entry 类型,可选项(默认为 EntryType.OUT)
-
blockHandler: 处理BlockException的函数名称。函数要求:
1、必须是 public
2、返回类型与原方法一致
3、参数类型需要和原方法相匹配,并在最后加 BlockException 类型的参数。
4、默认需和原方法在同一个类中。若希望使用其他类的函数,可配置 blockHandlerClass ,并指定blockHandlerClass里面的方法。 -
blockHandlerClass :存放blockHandler的类。对应的处理函数必须static修饰,否则无法解析,其他要求:同blockHandler。
-
fallback :fallback 函数名称,可选项,用于在抛出异常的时候提供 fallback 处理逻辑。fallback 函数可以针对所有类型的异常(除了 里面排除掉的异常类型)进行处理。fallback 函数签名和位置要求:
1、返回值类型必须与原函数返回值类型一致;
2、方法参数列表需要和原函数一致,或者可以额外多一个 Throwable 类型的参数用于接收对应的异常。
3、fallback 函数默认需要和原方法在同一个类中。若希望使用其他类的函数,则可以指定 fallbackClass 为对应的类的 Class 对象,注意对应的函数必需为 static 函数,否则无法解析。 -
exceptionsToTrace :需要trace的异常
3. 服务熔断功能
- 先启动 Nacos 和 Sentinel
3.1 Ribbon系列
- 避免和前面的知识点混淆,这里重新创建一套环境
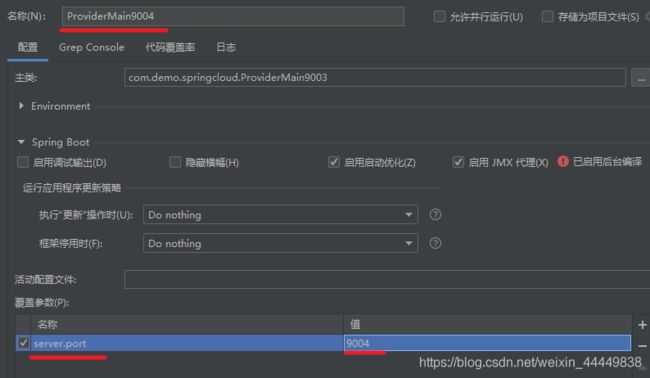
3.1.1 提供者 Provider-9003
-
新建模块 :alibaba-provider-Sentinel-Ribbon-9003
-
修改 POM
<dependencies> <dependency> <groupId>com.alibaba.cloudgroupId> <artifactId>spring-cloud-starter-alibaba-nacos-discoveryartifactId> dependency> <dependency> <groupId>com.demo.springcloudgroupId> <artifactId>cloud-api-commonsartifactId> <version>${project.version}version> dependency> <dependency> <groupId>org.springframework.bootgroupId> <artifactId>spring-boot-starter-webartifactId> dependency> <dependency> <groupId>org.springframework.bootgroupId> <artifactId>spring-boot-starter-actuatorartifactId> dependency> <dependency> <groupId>org.springframework.bootgroupId> <artifactId>spring-boot-devtoolsartifactId> <scope>runtimescope> <optional>trueoptional> dependency> <dependency> <groupId>org.projectlombokgroupId> <artifactId>lombokartifactId> <optional>trueoptional> dependency> <dependency> <groupId>org.springframework.bootgroupId> <artifactId>spring-boot-starter-testartifactId> <scope>testscope> dependency> dependencies> -
编写 YML
server: port: 9003 spring: application: name: nacos-payment-provider cloud: nacos: discovery: server-addr: localhost:8848 #配置Nacos地址 management: endpoints: web: exposure: include: '*' -
编写主启动类
@SpringBootApplication @EnableDiscoveryClient public class ProviderMain9003 { public static void main(String[] args) { SpringApplication.run(ProviderMain9003.class, args); } } -
业务类
-
Controller
@RestController
public class ProviderController {

    @Value("${server.port}")
    private String serverPort;

    public static HashMap<Long, Payment> hashMap = new HashMap<>();
    static{

        hashMap.put(1L,new Payment(1L,"28a8c1e3bc2742d8848569891fb42181"));
        hashMap.put(2L,new Payment(2L,"bba8c1e3bc2742d8848569891ac32182"));
        hashMap.put(3L,new Payment(3L,"6ua8c1e3bc2742d8848569891xt92183"));
    }

    @GetMapping(value = "/paymentSQL/{id}")
    public CommonResult<Payment> paymentSQL(@PathVariable("id") Long id){

        Payment payment = hashMap.get(id);
        CommonResult<Payment> result = new CommonResult(200,"from mysql,serverPort:  "+serverPort,payment);
        return result;
    }
}
3.1.2 消费者 Consumer-84
-
新建模块 :alibaba-consumer-Sentinel-Ribbon-84
-
修改 POM
<dependencies> <dependency> <groupId>org.springframework.cloudgroupId> <artifactId>spring-cloud-starter-openfeignartifactId> dependency> <dependency> <groupId>com.alibaba.cloudgroupId> <artifactId>spring-cloud-starter-alibaba-nacos-discoveryartifactId> dependency> <dependency> <groupId>com.alibaba.cloudgroupId> <artifactId>spring-cloud-starter-alibaba-sentinelartifactId> dependency> <dependency> <groupId>com.demo.springcloudgroupId> <artifactId>cloud-api-commonsartifactId> <version>${project.version}version> dependency> <dependency> <groupId>org.springframework.bootgroupId> <artifactId>spring-boot-starter-webartifactId> dependency> <dependency> <groupId>org.springframework.bootgroupId> <artifactId>spring-boot-starter-actuatorartifactId> dependency> <dependency> <groupId>org.springframework.bootgroupId> <artifactId>spring-boot-devtoolsartifactId> <scope>runtimescope> <optional>trueoptional> dependency> <dependency> <groupId>org.projectlombokgroupId> <artifactId>lombokartifactId> <optional>trueoptional> dependency> <dependency> <groupId>org.springframework.bootgroupId> <artifactId>spring-boot-starter-testartifactId> <scope>testscope> dependency> dependencies> -
编写 YML
server: port: 84 spring: application: name: nacos-order-consumer cloud: nacos: discovery: server-addr: localhost:8848 sentinel: transport: dashboard: localhost:8080 port: 8719 service-url: nacos-user-service: http://nacos-payment-provider -
编写主启动类
@SpringBootApplication @EnableDiscoveryClient public class ConsumerMain84 { public static void main(String[] args) { SpringApplication.run(ConsumerMain84.class, args); } } -
业务类
-
Config :ApplicationContextConfig
@Configuration public class ApplicationContextConfig { @Bean @LoadBalanced public RestTemplate getRestTemplate(){ return new RestTemplate(); } } -
Controller
@RestController
public class CircleBreakerController {

    @Value("${service-url.nacos-user-service}")
    private String SERVER_URL;

    @Autowired
    private RestTemplate restTemplate;

    @GetMapping(value = "/consumer/paymentSQL/{id}")
    @SentinelResource(value = "fallback")
    public CommonResult<Payment> paymentSQL(@PathVariable("id") Long id){

        return restTemplate.getForObject(SERVER_URL+"/paymentSQL/"+id, CommonResult.class);
    }
}
3.1.3 熔断降级配置
- 注意 :
- 热部署对java代码级生效及时
- 对 @SentinelResource 注解内属性,有时效果不好
- 所以需改了该注解中的内容,最好还是重启
-
在之前的 Consumer 的 Controller 中添加一段异常捕获的代码
// 异常捕捉 if (id == 4) { throw new IllegalArgumentException ("IllegalArgumentException,非法参数异常...."); }else if (result.getData() == null) { throw new NullPointerException ("NullPointerException,该ID没有对应记录,空指针异常"); } -
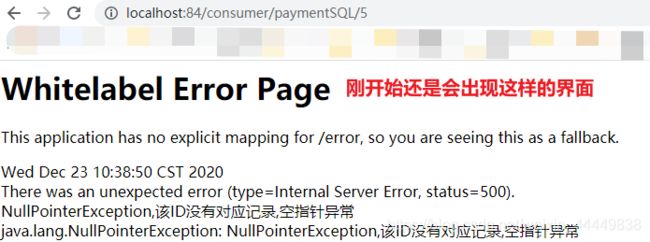
访问 :http://localhost:84/consumer/paymentSQL/4
因为之前在 Provider 中只定义了三条数据,没有 Id 为 4 的数据,所以肯定报错。
-
现在没有配置任何备选方案,直接把异常的代码展示给用户,很不友好。
只配置 fallback
- 下面开始配置,fallback
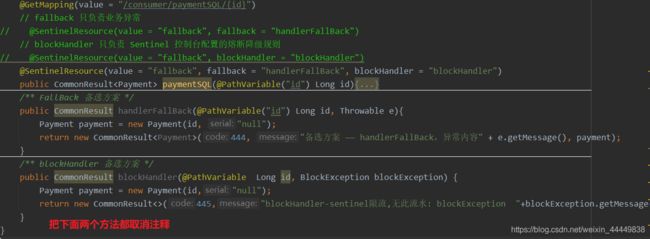
@SentinelResource(value = "fallback", fallback = "handlerFallBack") // fallback 只负责业务异常/** FallBack 备选方案 */ public CommonResult handlerFallBack(@PathVariable("id") Long id, Throwable e){ Payment payment = new Payment(id, "null"); return new CommonResult<Payment>(444, "备选方案 —— handlerFallBack,异常内容" + e.getMessage(), payment); } - 重启 Consumer-84 ,还访问 :http://localhost:84/consumer/paymentSQL/4

只配置 blockHandler
-
下面开始配置,blockHandler
// blockHandler 只负责 Sentinel 控制台配置的熔断降级规则
    @SentinelResource(value = "fallback", blockHandler = "blockHandler")
/** blockHandler 备选方案 */ public CommonResult blockHandler(@PathVariable Long id, BlockException blockException) { Payment payment = new Payment(id,"null"); return new CommonResult<>(445,"blockHandler-sentinel限流,无此流水: blockException "+blockException.getMessage(),payment); } -
重启 Consumer-84
同时配置 fallBack 和 blockHandler
-
下面开始配置
@SentinelResource(value = "fallback", fallback = "handlerFallBack", blockHandler = "blockHandler") -
重启 Consumer-84
配置 exceptionsToIgnore
3.2 Feign系列
3.2.1 环境配置
- 修改 Consumer-84 模块
-
修改 POM
添加 OpenFeign 依赖
<dependency> <groupId>org.springframework.cloudgroupId> <artifactId>spring-cloud-starter-openfeignartifactId> dependency> -
修改 YML
添加 Sentinel 对 Feign 的支持
feign: sentinel: enabled: true -
修改主启动类
// 开启对 Feign 的支持 @EnableFeignClients -
添加业务类
-
Feign 的业务接口 :FeignService
@FeignClient(value = "nacos-payment-provider", fallback = FeignFallbackService.class) public interface FeignService { @GetMapping(value = "/paymentSQL/{id}") public CommonResult<Payment> paymentSQL(@PathVariable("id") Long id); } -
对应的 FallBack 的 Service :FeignFallbackService
@Component public class FeignFallbackService implements FeignService { @Override public CommonResult<Payment> paymentSQL(Long id) { return new CommonResult<>(44444,"服务降级返回,---FeignFallbackService",new Payment(id,"errorSerial")); } } -
Controller :FeignController
@RestController
public class FeignController {

    @Autowired
    private FeignService feignService;

    @GetMapping(value = "/consumer/feign/{id}")
    public CommonResult<Payment> paymentSQL(@PathVariable("id") Long id) {

        return feignService.paymentSQL(id);
    }
}
3.3 熔断降级框架对比
| Sentinel | Hystrix | Resilience4j | |
|---|---|---|---|
| 隔离策略 | 信号量隔离(并发线程数限流) | 线程池隔离 / 信号量隔离 | 信号量隔离 |
| 熔断降级策略 | 基于响应时间、异常比、异常数 | 基于异常比 | 基于异常比、响应时间 |
| 实时统计实现 | 滑动窗口(LeapArray) | 滑动窗口(RxJava) | Ring Bit Buffer |
| 动态规则配置 | 支持多种数据源 | 支持多种数据源 | 有限支持 |
| 扩展性 | 多个扩展点 | 插件形式扩展 | 接口形式扩展 |
| 限流 | 基于 QPS、支持基于调用关系的限流 | 有限支持 | Rate Limter |
| 流量整形 | 支持预热、匀加速、预热排队模式 | 不支持 | 简单的 Rate Limiter |
| 系统自适应保护 | 支持 | 不支持 | 不支持 |
| 控制台 | 提供开箱即用的控制台,可以配置规则、查看妙计监控、机器发现等 | 简单的监控查看 | 不提供控制台,可对接其他监控系统 |
| 基于注解的支持 | 支持 | 支持 | 支持 |
4. Sentinel 规则持久化
- 一旦我们重启应用,Sentinel规则将消失
- 生产环境需要将配置规则进行持久化
- 将限流配置规则持久化进 Nacos 保存
- 只要刷新 8401 某个 rest 地址,sentinel 控制台的流控规则就能看到,只要 Nacos 里面的配置不删除,针对 8401 上 Sentinel 上的流控规则持续有效
- 具体使用步骤 :
- 修改 alibaba-sentinel-service-8401
-
修改 POM,添加相关依赖
<dependency> <groupId>com.alibaba.cspgroupId> <artifactId>sentinel-datasource-nacosartifactId> dependency> -
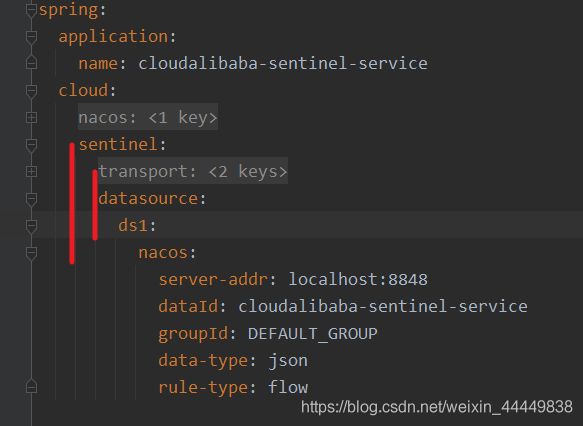
修改 YML,添加 Nacos 业务规则配置
datasource: ds1: nacos: server-addr: localhost:8848 dataId: cloudalibaba-sentinel-service groupId: DEFAULT_GROUP data-type: json rule-type: flow -
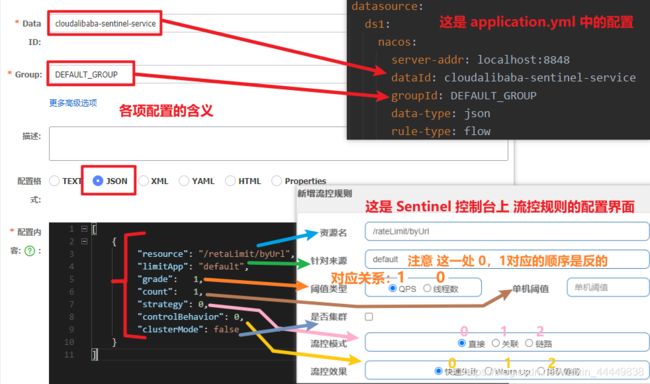
添加 Nacos 业务规则配置
配置内容 :
[ { "resource": "/retaLimit/byUrl", "limitApp": "default", "grade": 1, "count": 1, "strategy": 0, "controlBehavior": 0, "clusterMode": false } ] -
启动 alibaba-sentinel-service-8401、Sentinel
-
请求 :http://localhost:8401/rateLimit/byUrl


