transformer(下)机器翻译+pytorch实现
transformer(下)机器翻译+pytorch实现
- 说在前面
- 实验环境
- 注意点
- 1.加载数据 建立input pipeline
- 2.位置编码 positional encoding
- 3.掩码 masking
- 4.scaled dot product attention
- 5.multi-head attention
- 6.point wise feed forward network
- 7.encoder layer
- 8.decoder layer
- 9.encoder
- 10.decoder
- 11.搭建transformer
- 12.设置超参
- 13.优化器
- 14.损失和评价准则
- 15.生成mask
- 16.训练和保存
- 17.评估
- 18.attention 的可视化
- 19.总结
- 完整代码
- 参考
说在前面
在 《transformer(上)论文解读+pytorch实现》 篇里介绍了其原理和模型的部分子模块的实现,现在就来使用我们搭建的transformer来解决一个真实的翻译任务:法语到英语的翻译。
数据集的加载以及整个data pipeline的建立使用的是 torchtext,其官方文档可参考这里,这是一个专门用于处理文本数据的神器,可以对文本进行预处理、构建词表、转换成索引、构建数据迭代器等,非常方便。
数据集来自于pytorch官方教程文本篇,可以在这里下载到,也可以直接去我github上下载完整的代码和数据集。
模型代码参考的是tensorflow2的官方教程的一个实现,它主要基于tf.keras,这里我实现一个pytorch版本,并会在代码中给出非常详尽的注释,适合和我一样的小白查看哈哈。
看本篇实现时,最好看一下对应的 《transformer(上)论文解读+pytorch实现》 篇章节。
实验环境
| 环境 | 版本/型号 |
|---|---|
| python | 3.6.9 |
| pytorch | 1.7.0 |
| cuda | 10.2 |
| gpu | NVIDIA V100 (32G) x 4张 |
注意点
这里都是我写代码过程中出错比较坑的地方,特此列出,希望能帮到你:
- (1)pytorch中交叉熵
关于pytorch CrossEntropy,首先,输入的target不需要转换成one-hot,第二也是重点:CrossEntropy的输入的shape也很特别,跟tf2有很大不同:【注意】,当输入是多维时交叉熵的参数维度,跟tf2不一样,例如对于最后模型已经在词表上投影后的输出,一般pred的shape是【b,seq_len,vocab_size】,tf2的交叉熵接收这样的输入,但pytorch的接收的pred的shape是【b,vocab_size, seq_len】,sequence_len不能在第2个维度。注意pytorch的交叉熵参数说明:
Input: :math:
(N, C)whereC = number of classes, or :math:(N, C, d_1, d_2, ..., d_K)with :math:K \geq 1in the case ofK-dimensional loss.
Target: :math:(N)where each value is :math:0 \leq \text{targets}[i] \leq C-1, or :math:(N, d_1, d_2, ..., d_K)with :math:K \geq 1in the case of K-dimensional loss.
- (2)当堆叠多层自定义的layer时
例如在encoder实现时堆叠了6层encoder_layer,此时不能像tf2中直接使用列表:
enc_layers = [EncoderLayer(d_model, num_heads, dff, rate) for _ in range(num_layers)],在pytorch中必须使用nn.ModulueLIst类型,也就是说模型或者模型子层都必须是基于nn.Module或者nn.ModuleList或者nn.ModuleDict类型,否则多卡训练时,子层不会随着nn.DataParallel的设置而将device_0的模型参数广播其他device,训练时就会出现模型weights和数据inputs不在相同设备上,例如weights在device_0上,而数据在device_1上。 - (3)保存复杂模型时,尤其是含有各种自定义子层的
因为模型中有ModulueLIst这样含有多个子层列表的layer,想Python list一样,拷贝时是浅拷贝,直接使用model_sd = model.module.state_dict()并不会保存list中layer对象的权重,只能保存模型最外层参数,内层嵌套参数无法保存,应当使用深拷贝: model_sd = copy.deepcopy(model.module.state_dict()) - (4)多卡并行化训练时
一定要注意并行化各个数据输入输出,模型,包括掩码、位置编码等位置,是在cpu上还是在gpu上,以及可能出现在不同的gpu卡上的错误,例如:RuntimeError: Expected all tensors to be on the same device, but found at least two devices, cuda:1 and cuda:0!,仔细排查问题,养成好的编码习惯。 - (5)
因为我使用的torchtext,它生成词表是给 - (6)optimizer和lr_scheduler
optimizer别忘了每次train_step时清零,以及手动对自定义的lr_scheduler执行step()操作以更新学习率。另外pytorch中自带的learning scheduler都是基于epoch 变化的,例如LambdaLR、StepLR等,没有基于step 变化的,像tensorflow2中tf.keras.optimizers.schedules.LearningRateSchedule就是基于step的,可以实现更细粒度的调度。所以这里我pytorch实现Scheduler是继承基类torch.optim.lr_scheduler._LRScheduler自己实现的
1.加载数据 建立input pipeline
先引入需要的包:
import torch
import torchtext

from sklearn.model_selection import train_test_split

import random
import re
from tqdm import tqdm  # 进度条
import pandas as pd
import numpy as np
from matplotlib import pyplot as plt
import unicodedata
import datetime
import time
import copy

import os
print(os.getcwd()) # /home/xijian

ngpu = 4

use_cuda = torch.cuda.is_available()  ##检测是否有可用的gpu
device = torch.device("cuda:0" if (use_cuda and ngpu > 0) else "cpu")
print('device=', device)

project_dir = '/home/xijian/pycharm_projects/Magic-NLPer/'
# 当前目录cwd
cwd = project_dir + 'NLP/MachineTranslation/transformer/pytorch/'
data_dir = cwd + './data/' # 数据所在目录
一起来看看数据长什么样:
data_df = pd.read_csv(data_dir + 'eng-fra.txt',  # 数据格式:英语\t法语,注意我们的任务源语言是法语,目标语言是英语
                      encoding='UTF-8', sep='\t', header=None,
                      names=['eng', 'fra'], index_col=False)

print(data_df.shape)
print(data_df.values.shape)
print(data_df.values[0])
print(data_df.values[0].shape)
data_df.head()
输出:
(135842, 2)
(135842, 2)
['Go.' 'Va !']
(2,)
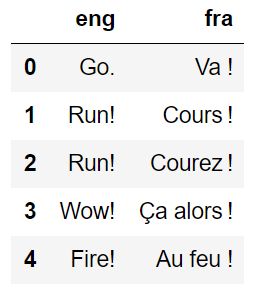
数据每行是一句英语和一句法语,因为后面实现的是法语翻译英语,所以注意后面要将句子对的顺序交换一下。
接下来是一些文本预处理的工作,注释里有非常详尽的注释,这里就不废话了。
# 数据预处理

# 将unicode字符串转化为ASCII码:
def unicodeToAscii(s):
    return ''.join(c for c in unicodedata.normalize('NFD', s) if unicodedata.category(c) != 'Mn')


# 规范化字符串
def normalizeString(s):
    # print(s) # list  ['Go.']
    # s = s[0]
    s = s.lower().strip()
    s = unicodeToAscii(s)
    s = re.sub(r"([.!?])", r" \1", s)  # \1表示group(1)即第一个匹配到的 即匹配到'.'或者'!'或者'?'后,一律替换成'空格.'或者'空格!'或者'空格?'
    s = re.sub(r"[^a-zA-Z.!?]+", r" ", s)  # 非字母以及非.!?的其他任何字符 一律被替换成空格
    s = re.sub(r'[\s]+', " ", s)  # 将出现的多个空格,都使用一个空格代替。例如:w='abc  1   23  1' 处理后:w='abc 1 23 1'
    return s


print(normalizeString('Va !'))
print(normalizeString('Go.'))
输出:
va !
go .
对文本较小标准化处理,并生成句子对儿:
MAX_LENGTH = 10

eng_prefixes = (  # 之前normalizeString()已经对撇号等进行了过滤,以及清洗,小写化等
    "i am ", "i m ",
    "he is", "he s ",
    "she is", "she s ",
    "you are", "you re ",
    "we are", "we re ",
    "they are", "they re "
)

# print(eng_prefixes)
pairs = [[normalizeString(s) for s in line] for line in data_df.values]

print('pairs num=', len(pairs))
print(pairs[0])
print(pairs[1])
输出:
pairs num= 135842
['go .', 'va !']
['run !', 'cours !']
数据文件是英译法,我们实现的是法译英,所以进行了reverse,所以pair[1]是英语。另外为了快速训练,仅保留“我是”“你是”“他是”等简单句子,并且删除原始文本长度大于10个标记的样本:
# 文件是英译法,我们实现的是法译英,所以进行了reverse,所以pair[1]是英语
# 为了快速训练,仅保留“我是”“你是”“他是”等简单句子,并且删除原始文本长度大于10个标记的样本
def filterPair(p):
    return len(p[0].split(' ')) < MAX_LENGTH and len(p[1].split(' ')) < MAX_LENGTH and \
           p[0].startswith(eng_prefixes)  # startswith first arg must be str or a tuple of str


def filterPairs(pairs):
    # 过滤,并交换句子顺序,得到法英句子对(之前是英法句子对)
    return [[pair[1], pair[0]] for pair in pairs if filterPair(pair)]


pairs = filterPairs(pairs)

print('after trimming, pairs num=', len(pairs))
print(pairs[0])
print(pairs[1])
print(random.choice(pairs))
输出:
after trimming, pairs num= 10599
['j ai ans .', 'i m .']
['je vais bien .', 'i m ok .']
['je suis si heureuse pour toi tom .', 'i m so happy for you tom .']
划分数据集:训练集和验证集:
# 划分数据集:训练集和验证集
train_pairs, val_pairs = train_test_split(pairs, test_size=0.2, random_state=1234)

print(len(train_pairs))
print(len(val_pairs))
输出:
8479
2120
下面是重点了,使用torchtext.data.Field来完成一系列文本处理:分词,建立词表,给句子加上特殊标记:
tokenizer = lambda x: x.split() # 分词器
SRC_TEXT = torchtext.data.Field(sequential=True,
tokenize=tokenizer,
# lower=True,
fix_length=MAX_LENGTH + 2,
preprocessing=lambda x: ['' ] + x + ['' ],
# after tokenizing but before numericalizing
# postprocessing # after numericalizing but before the numbers are turned into a Tensor
)
TARG_TEXT = torchtext.data.Field(sequential=True,
tokenize=tokenizer,
# lower=True,
fix_length=MAX_LENGTH + 2,
preprocessing=lambda x: ['' ] + x + ['' ],
)
def get_dataset(pairs, src, targ):
fields = [('src', src), ('targ', targ)] # filed信息 fields dict[str, Field])
examples = [] # list(Example)
for fra, eng in tqdm(pairs): # 进度条
# 创建Example时会调用field.preprocess方法
examples.append(torchtext.data.Example.fromlist([fra, eng], fields))
return examples, fields
# examples, fields = get_dataset(pairs, SRC_TEXT, TARG_TEXT)
ds_train = torchtext.data.Dataset(*get_dataset(train_pairs, SRC_TEXT, TARG_TEXT))
ds_val = torchtext.data.Dataset(*get_dataset(val_pairs, SRC_TEXT, TARG_TEXT))
  0%|          | 0/8479 [00:00<?, ?it/s]/usr/local/lib/python3.6/dist-packages/torchtext/data/example.py:78: UserWarning: Example class will be retired soon and moved to torchtext.legacy. Please see the most recent release notes for further information.
  warnings.warn('Example class will be retired soon and moved to torchtext.legacy. Please see the most recent release notes for further information.', UserWarning)
100%|██████████| 8479/8479 [00:00<00:00, 99813.09it/s]
100%|██████████| 2120/2120 [00:00<00:00, 96628.25it/s]
查看一个样本的信息:
# 查看1个样本的信息
print(len(ds_train[0].src), ds_train[0].src)
print(len(ds_train[0].targ), ds_train[0].targ)
输出:
9 ['' , 'tu', 'n', 'es', 'qu', 'un', 'lache', '.', '' ]
8 ['' , 'you', 're', 'just', 'a', 'coward', '.', '' ]
构建词表,构建完词表后再查看词表对词到索引的映射关系:
# 构建词典
SRC_TEXT.build_vocab(ds_train) # 建立词表 并建立token和ID的映射关系
print(len(SRC_TEXT.vocab))
print(SRC_TEXT.vocab.itos[0])
print(SRC_TEXT.vocab.itos[1])
print(SRC_TEXT.vocab.itos[2])
print(SRC_TEXT.vocab.itos[3])
print(SRC_TEXT.vocab.stoi['' ])
print(SRC_TEXT.vocab.stoi['' ])
# 模拟decode
res = []
for id in [ 3, 5, 6, 71, 48, 5, 8, 32, 743, 4, 2, 1]:
res.append(SRC_TEXT.vocab.itos[id])
print(' '.join(res)+'\n')
TARG_TEXT.build_vocab(ds_train)
print(len(TARG_TEXT.vocab))
print(TARG_TEXT.vocab.itos[0])
print(TARG_TEXT.vocab.itos[1])
print(TARG_TEXT.vocab.itos[2])
print(TARG_TEXT.vocab.itos[3])
print(TARG_TEXT.vocab.stoi['' ])
print(TARG_TEXT.vocab.stoi['' ])
输出:
3901


3
2
 je suis fais si je vous l examen .

2591


3
2
构建数据管道迭代器,即创建torchtext.data.Iterator对象:
BATCH_SIZE = 64 * ngpu

# 构建数据管道迭代器
train_iter, val_iter = torchtext.data.Iterator.splits(
    (ds_train, ds_val),
    sort_within_batch=True,
    sort_key=lambda x: len(x.src),
    batch_sizes=(BATCH_SIZE, BATCH_SIZE)
)

# 查看数据管道信息,此时会触发postprocessing,如果有的话
for batch in train_iter:
    # 注意,这里text第0维不是batch,而是seq_len
    print(batch.src[:,0])
    print(batch.src.shape, batch.targ.shape)  # [12,64], [12,64]
    break
输出:
tensor([   3,    5,    6,   69,   75,   15,  108, 1951,    9,    4,    2,    1])
torch.Size([12, 256]) torch.Size([12, 256])
将数据管道组织成与torch.utils.data.DataLoader相似的inputs, targets的输出形式:
# 将数据管道组织成与torch.utils.data.DataLoader相似的inputs, targets的输出形式
class DataLoader:
    def __init__(self, data_iter):
        self.data_iter = data_iter
        self.length = len(data_iter)  # 一共有多少个batch?

    def __len__(self):
        return self.length

    def __iter__(self):
        # 注意,在此处调整text的shape为batch first
        for batch in self.data_iter:
            yield (torch.transpose(batch.src, 0, 1), torch.transpose(batch.targ, 0, 1))


train_dataloader = DataLoader(train_iter)
val_dataloader = DataLoader(val_iter)
# 查看数据管道
print('len(train_dataloader):', len(train_dataloader))  # 34 个step/batch
for batch_src, batch_targ in train_dataloader:
    print(batch_src.shape, batch_targ.shape)  # [256,12], [256,12]
    print(batch_src[0], batch_src.dtype)
    print(batch_targ[0], batch_targ.dtype)
    break
输出:
len(train_dataloader): 34
torch.Size([256, 12]) torch.Size([256, 12])
tensor([   3,   11,    7,   17,   46,   10, 1261,  117,  143,    4,    2,    1]) torch.int64
tensor([   3,    9,   15, 1097,   53,  405,    4,    2,    1,    1,    1,    1]) torch.int64
下面的第2节--第11节 《transformer(上)论文解读+pytorch实现》 篇已经讲过原理了,下面直接给出代码,仅对代码做出一些解释,不再赘述原理方面的内容。
2.位置编码 positional encoding
绝对位置编码
由于model中不含有任何recurrence or convolution,所以句子中token的相对位置关系无法体现,所以就需要在embedding vector中加入position encoding vector(维度相同)。这样每个词的词向量在 d m o d e l d_{model} dmodel 维的空间中,就可以基于meaning和position来计算相似度或相关性
P E ( p o s , 2 i ) = s i n ( p o s / 1000 0 2 i / d m o d e l ) P E ( p o s , 2 i + 1 ) = c o s ( p o s / 1000 0 2 i / d m o d e l ) \begin{array}{ll} & PE_{(pos,2i)}=sin(pos/10000^{2i/d_{model}}) \\ & PE_{(pos,2i+1)}=cos(pos/10000^{2i/d_{model}})\end{array} PE(pos,2i)=sin(pos/100002i/dmodel)PE(pos,2i+1)=cos(pos/100002i/dmodel)
特点:
- (1)后面位置是前面位置的线性组合,保证了即使位置不是相邻的,也可能有关系
- (2)每个位置的编码又是独特的
- (3)每两个位置的encoding互相做点积,位置越远,点积的值越小,自己和自己点积,值最大
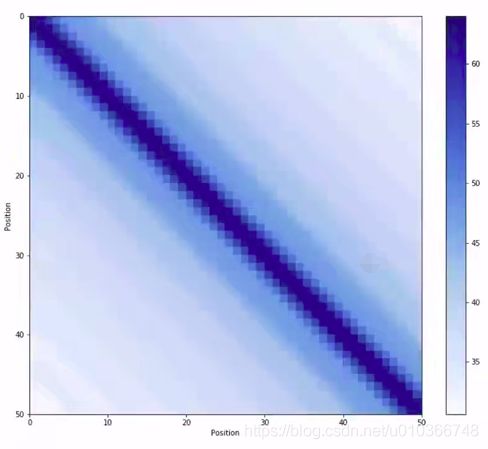
# 计算角度:pos * 1/(10000^(2i/d))
def get_angles(pos, i, d_model):
    # 2*(i//2)保证了2i,这部分计算的是1/10000^(2i/d)
    angle_rates = 1 / np.power(10000, 2 * (i // 2) / np.float32(d_model))  # => [1, 512]
    return pos * angle_rates  # [50,1]*[1,512]=>[50, 512]


# np.arange()函数返回一个有终点和起点的固定步长的排列,如[1,2,3,4,5],起点是1,终点是5,步长为1
# 注意:起点终点是左开右闭区间,即start=1,end=6,才会产生[1,2,3,4,5]
# 只有一个参数时,参数值为终点,起点取默认值0,步长取默认值1。
def positional_encoding(position, d_model):  # d_model是位置编码的长度,相当于position encoding的embedding_dim?
    angle_rads = get_angles(np.arange(position)[:, np.newaxis],  # [50, 1]
                            np.arange(d_model)[np.newaxis, :],  # [1, d_model=512]
                            d_model)
    angle_rads[:, 0::2] = np.sin(angle_rads[:, 0::2])  # 2i
    angle_rads[:, 1::2] = np.cos(angle_rads[:, 1::2])  # 2i+2

    pos_encoding = angle_rads[np.newaxis, ...]  # [50,512]=>[1,50,512]
    return torch.tensor(pos_encoding, dtype=torch.float32)

pos_encoding = positional_encoding(50, 512)
print(pos_encoding.shape) # [1,50,512]
输出:
torch.Size([1, 50, 512])
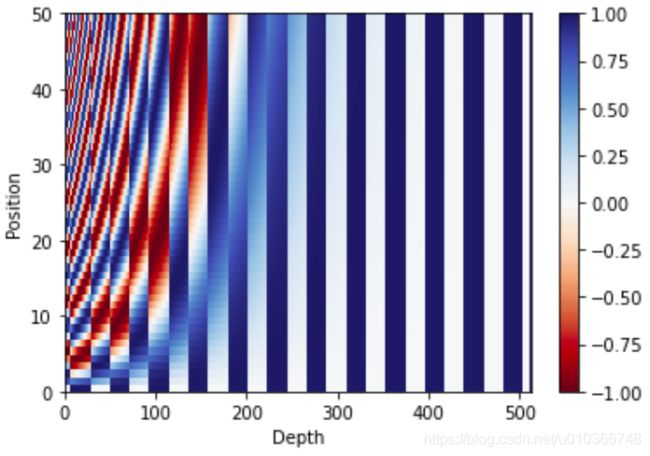
绘制位置编码分布图:
from matplotlib import pyplot as plt

def draw_pos_encoding(pos_encoding):
    plt.figure()
    plt.pcolormesh(pos_encoding[0], cmap='RdBu') # 绘制分类图
    plt.xlabel('Depth')
    plt.xlim((0, 512))
    plt.ylabel('Position')
    plt.colorbar() # 条形bar颜色图例
    plt.savefig(cwd+'imgs/pos_encoding.png')
    plt.show()

draw_pos_encoding(pos_encoding)
3.掩码 masking
这里用到的mask有2种:
- padding mask:mask pad,即句子中为pad(value=0)的位置处其mask值为1
- look-ahead mask:mask future token,将当前token后面的词mask掉,只让看到前面的词,即future token位置的mask值为1
【注意】: 因为我这里使用的是torchtext里的tokenizer,从前面可以看出它的词表里pad的index=1,而不是常规的0。
这里要特别注意,不然容易出错!
pad = 1 # 重要!
def create_padding_mask(seq):  # seq [b, seq_len]
    # seq = torch.eq(seq, torch.tensor(0)).float() # pad=0的情况
    seq = torch.eq(seq, torch.tensor(pad)).float()  # pad!=0
    return seq[:, np.newaxis, np.newaxis, :]  # =>[b, 1, 1, seq_len]

x = torch.tensor([[7, 6, 0, 0, 1],
                  [1, 2, 3, 0, 0],
                  [0, 0, 0, 4, 5]])
print(x.shape) # [3,5]
print(x)
mask = create_padding_mask(x)
print(mask.shape, mask.dtype) # [3,1,1,5]
print(mask)
输出:
torch.Size([3, 5])
tensor([[7, 6, 0, 0, 1],
        [1, 2, 3, 0, 0],
        [0, 0, 0, 4, 5]])
torch.Size([3, 1, 1, 5]) torch.float32
tensor([[[[0., 0., 0., 0., 1.]]],


        [[[1., 0., 0., 0., 0.]]],


        [[[0., 0., 0., 0., 0.]]]])
# torch.triu(tensor, diagonal=0) 求上三角矩阵,diagonal默认为0表示主对角线的上三角矩阵
# diagonal>0,则主对角上面的第|diagonal|条次对角线的上三角矩阵
# diagonal<0,则主对角下面的第|diagonal|条次对角线的上三角矩阵
def create_look_ahead_mask(size):  # seq_len
    mask = torch.triu(torch.ones((size, size)), diagonal=1)
    # mask = mask.device() #
    return mask  # [seq_len, seq_len]

x = torch.rand(1,3)
print(x.shape)
print(x)
mask = create_look_ahead_mask(x.shape[1])
print(mask.shape, mask.dtype)
print(mask)
输出:
torch.Size([1, 3])
tensor([[0.8287, 0.6121, 0.3410]])
torch.Size([3, 3]) torch.float32
tensor([[0., 1., 1.],
        [0., 0., 1.],
        [0., 0., 0.]])
4.scaled dot product attention
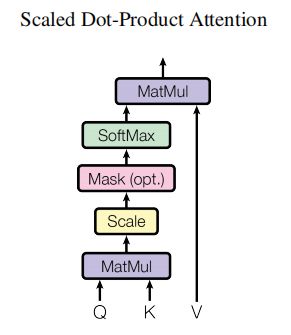
A t t e n t i o n ( Q , K , V ) = s o f t m a x ( k ) ( Q K T d k ) V Attention(Q,K,V)=softmax_{(k)}(\frac{QK^T}{\sqrt{d_k}})V Attention(Q,K,V)=softmax(k)(dkQKT)V
注意:实现时对mask的处理。
mask=1的位置是pad或者future token,乘以-1e9(即-1*10^9)成为负无穷,经过softmax后会趋于0。
def scaled_dot_product_attention(q, k, v, mask=None):
    """
    #计算注意力权重。
    q, k, v 必须具有匹配的前置维度。 且dq=dk
    k, v 必须有匹配的倒数第二个维度,例如:seq_len_k = seq_len_v。
    #虽然 mask 根据其类型(填充或前瞻)有不同的形状,
    #但是 mask 必须能进行广播转换以便求和。

    #参数:
        q: 请求的形状 == (..., seq_len_q, depth)
        k: 主键的形状 == (..., seq_len_k, depth)
        v: 数值的形状 == (..., seq_len_v, depth_v)  seq_len_k = seq_len_v
        mask: Float 张量,其形状能转换成
              (..., seq_len_q, seq_len_k)。默认为None。

    #返回值:
        #输出,注意力权重
    """
    # matmul(a,b)矩阵乘:a b的最后2个维度要能做乘法,即a的最后一个维度值==b的倒数第2个纬度值,
    # 除此之外,其他维度值必须相等或为1(为1时会广播)
    matmul_qk = torch.matmul(q, k.transpose(-1, -2))  # 矩阵乘 =>[..., seq_len_q, seq_len_k]

    # 缩放matmul_qk
    dk = torch.tensor(k.shape[-1], dtype=torch.float32)  # k的深度dk,或叫做depth_k
    scaled_attention_logits = matmul_qk / torch.sqrt(dk)  # [..., seq_len_q, seq_len_k]

    # 将 mask 加入到缩放的张量上(重要!)
    if mask is not None:  # mask: [b, 1, 1, seq_len]
        # mask=1的位置是pad,乘以-1e9(-1*10^9)成为负无穷,经过softmax后会趋于0
        scaled_attention_logits += (mask * -1e9)

    # softmax 在最后一个轴(seq_len_k)上归一化
    attention_weights = torch.nn.functional.softmax(scaled_attention_logits, dim=-1)  # [..., seq_len_q, seq_len_k]

    output = torch.matmul(attention_weights, v)  # =>[..., seq_len_q, depth_v]
    return output, attention_weights  # [..., seq_len_q, depth_v], [..., seq_len_q, seq_len_k]
5.multi-head attention
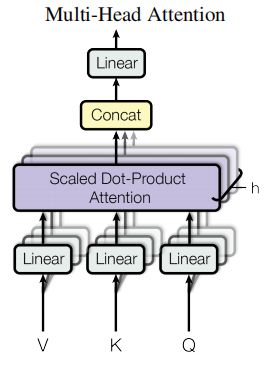
多头注意允许模型在不同的位置联合处理来自不同表示子空间的信息。(Multi-head attention allows the model to jointly attend to information from different representation subspaces at different positions.)
M u l t i H e a d ( Q , K , V ) = C o n c a t ( h e a d 1 , . . . , h e a d h ) W O w h e r e h e a d i = A t t e n t i o n ( Q W i Q , K W i K , V W i V ) \begin{array}{ll} & MultiHead(Q,K,V)=Concat(head_1,...,head_h)W^O \\ & where\; head_i=Attention(QW_i^Q,KW_i^K,VW_i^V)\end{array} MultiHead(Q,K,V)=Concat(head1,...,headh)WOwhereheadi=Attention(QWiQ,KWiK,VWiV)
其中投影维参数矩阵 W i Q ∈ R d m o d e l x d k W_i^Q\in R^{d_{model}\text{x}\,d_k} WiQ∈Rdmodelxdk, W i K ∈ R d m o d e l x d k W_i^K\in R^{d_{model}\text{x}\,d_k} WiK∈Rdmodelxdk, W i V ∈ R d m o d e l x d v W_i^V\in R^{d_{model}\text{x}\,d_v} WiV∈Rdmodelxdv, W O ∈ R h d v x d m o d e l W^O\in R^{hd_v\text{x}\,d_{model}} WO∈Rhdvxdmodel。
h = 8 , d k = d v = d m o d e l / h = 64 h=8,\;d_k = d_v = d_{model}/h = 64 h=8,dk=dv=dmodel/h=64
multi-head attention有4部分组成:
- linear layer 将 linear layer的结果 split到不同的head
- scaled dot-product attention
- 将所有的head 进行拼接 concat
- final linear layer
class MultiHeadAttention(torch.nn.Module):
    def __init__(self, d_model, num_heads):
        super(MultiHeadAttention, self).__init__()
        self.num_heads = num_heads
        self.d_model = d_model

        assert d_model % self.num_heads == 0  # 因为输入要被(平均?)split到不同的head

        self.depth = d_model // self.num_heads  # 512/8=64,所以在scaled dot-product atten中dq=dk=64,dv也是64

        self.wq = torch.nn.Linear(d_model, d_model)
        self.wk = torch.nn.Linear(d_model, d_model)
        self.wv = torch.nn.Linear(d_model, d_model)

        self.final_linear = torch.nn.Linear(d_model, d_model)

    def split_heads(self, x, batch_size):  # x [b, seq_len, d_model]
        x = x.view(batch_size, -1, self.num_heads,
                   self.depth)  # [b, seq_len, d_model=512]=>[b, seq_len, num_head=8, depth=64]
        return x.transpose(1, 2)  # [b, seq_len, num_head=8, depth=64]=>[b, num_head=8, seq_len, depth=64]

    def forward(self, q, k, v, mask):  # q=k=v=x [b, seq_len, embedding_dim] embedding_dim其实也=d_model
        batch_size = q.shape[0]

        q = self.wq(q)  # =>[b, seq_len, d_model]
        k = self.wq(k)  # =>[b, seq_len, d_model]
        v = self.wq(v)  # =>[b, seq_len, d_model]

        q = self.split_heads(q, batch_size)  # =>[b, num_head=8, seq_len, depth=64]
        k = self.split_heads(k, batch_size)  # =>[b, num_head=8, seq_len, depth=64]
        v = self.split_heads(v, batch_size)  # =>[b, num_head=8, seq_len, depth=64]

        scaled_attention, attention_weights = scaled_dot_product_attention(q, k, v, mask)
        # => [b, num_head=8, seq_len_q, depth=64], [b, num_head=8, seq_len_q, seq_len_k]

        scaled_attention = scaled_attention.transpose(1, 2)  # =>[b, seq_len_q, num_head=8, depth=64]
        # 转置操作让张量存储结构扭曲,直接使用view方法会失败,可以使用reshape方法
        concat_attention = scaled_attention.reshape(batch_size, -1, self.d_model)  # =>[b, seq_len_q, d_model=512]

        output = self.final_linear(concat_attention)  # =>[b, seq_len_q, d_model=512]
        return output, attention_weights  # [b, seq_len_q, d_model=512], [b, num_head=8, seq_len_q, seq_len_k]


temp_mha = MultiHeadAttention(d_model=512, num_heads=8)
x = torch.rand(1, 60, 512) # [b,seq_len,d_model,embedding_dim]
print(x.shape)
out, attn_weights = temp_mha(x, x, x, mask=None)
print(out.shape, attn_weights.shape) # [1, 60, 512], [1, 8, 60, 60]
输出:
torch.Size([1, 60, 512])
torch.Size([1, 60, 512]) torch.Size([1, 8, 60, 60])
6.point wise feed forward network
2层线性变换和一个ReLU激活:
F F N ( x ) = m a x ( 0 , x W 1 + b 1 ) W 2 + b 2 FFN(x) = max(0, xW1 + b1)W2 + b2 FFN(x)=max(0,xW1+b1)W2+b2
这一层的input和output的维度都是 d m o d e l d_{model} dmodel,而内层的维度的是 d f f = 2048 d_{ff}=2048 dff=2048
其实就是(nn.relu(x w1+b1))w2+b2
# 点式前馈网络
def point_wise_feed_forward_network(d_model, dff):
    feed_forward_net = torch.nn.Sequential(
        torch.nn.Linear(d_model, dff),  # [b, seq_len, d_model]=>[b, seq_len, dff=2048]
        torch.nn.ReLU(),
        torch.nn.Linear(dff, d_model),  # [b, seq_len, dff=2048]=>[b, seq_len, d_model=512]
    )
    return feed_forward_net

sample_ffn = point_wise_feed_forward_network(512, 2048)
input = torch.rand(64, 50, 512) # [b, seq_len, d_model]
print(sample_ffn(input).shape) # [b=64, seq_len=50, d_model=512]
输出:
torch.Size([64, 50, 512])
然后下面开始搭建transformer!
transformer model:
(1) input sentence 传入N个encoder layer,句子的每个token都会有一个输出
(2) decoder attends on encoder 的输出(encoder-decoder attention) 和 它自己的输入(self-attention),然后预测出下一个词
7.encoder layer
每个编码器层包括以下2个子层:
- 多头注意力(有padding mask)
- 点式前馈网络(Point wise feed forward networks)
注意:每个子层还伴随着一个残差连接,然后进行“层归一化”(LayerNorm)。残差连接有助于避免深度网络中的梯度消失问题。
每个子层的输出是 LayerNorm(x + Sublayer(x))。归一化是在 d_model(最后一个)维度完成的。
注意:实现时在每个sub layer 之后加入了dropout层,再才进行add the sub layer input 和 normalized,即LayerNorm(x + Dropout(Sublayer(x)))
Transformer 中有 N 个编码器层。
class EncoderLayer(torch.nn.Module):
    def __init__(self, d_model, num_heads, dff, rate=0.1):
        super(EncoderLayer, self).__init__()

        self.mha = MultiHeadAttention(d_model, num_heads)  # 多头注意力(padding mask)(self-attention)
        self.ffn = point_wise_feed_forward_network(d_model, dff)

        self.layernorm1 = torch.nn.LayerNorm(normalized_shape=d_model, eps=1e-6)
        self.layernorm2 = torch.nn.LayerNorm(normalized_shape=d_model, eps=1e-6)

        self.dropout1 = torch.nn.Dropout(rate)
        self.dropout2 = torch.nn.Dropout(rate)

    # x [b, inp_seq_len, embedding_dim] embedding_dim其实也=d_model
    # mask [b,1,1,inp_seq_len]
    def forward(self, x, mask):
        attn_output, _ = self.mha(x, x, x, mask)  # =>[b, seq_len, d_model]
        attn_output = self.dropout1(attn_output)
        out1 = self.layernorm1(x + attn_output)  # 残差&层归一化 =>[b, seq_len, d_model]

        ffn_output = self.ffn(out1)  # =>[b, seq_len, d_model]
        ffn_output = self.dropout2(ffn_output)
        out2 = self.layernorm2(out1 + ffn_output)  # 残差&层归一化 =>[b, seq_len, d_model]

        return out2  # [b, seq_len, d_model]

# layernorm = torch.nn.LayerNorm(normalized_shape=512, eps=1e-6)
# x = torch.rand(4, 50, 512)
# print(layernorm(x).shape)

sample_encoder_layer = EncoderLayer(512, 8, 2048)
x = torch.rand(64, 50, 512) # [b, seq_len, d_model]
sample_encoder_layer_output = sample_encoder_layer(x, None)
print(sample_encoder_layer_output.shape) # [64, 50, 512]
输出:
torch.Size([64, 50, 512])
8.decoder layer
每个解码器层包括以下3个子层:
- masked的多头注意力(look ahead mask 和 padding mask)(self-attention)
- 多头注意力(padding mask)(encoder-decoder attention)。
V和 K接收encoder的输出作为输入。Q接收masked的多头注意力子层的输出。 - 点式前馈网络
每个子层还伴随着一个残差连接,然后进行“层归一化”(LayerNorm)。
每个子层的输出是 LayerNorm(x + Sublayer(x))。归一化是在 d_model(最后一个)维度完成的。
Transformer 中共有 N 个解码器层。
当 Q 接收到decoder的第一个注意力块的输出,并且 K 接收到encoder的输出时,注意力权重表示根据encoder的输出赋予decoder输入的重要性。
换一种说法,decoder通过查看encoder输出和对其自身输出的自注意力,预测下一个词。
class DecoderLayer(torch.nn.Module):
    def __init__(self, d_model, num_heads, dff, rate=0.1):
        super(DecoderLayer, self).__init__()

        self.mha1 = MultiHeadAttention(d_model,
                                       num_heads)  # masked的多头注意力(look ahead mask 和 padding mask)(self-attention)
        self.mha2 = MultiHeadAttention(d_model, num_heads)  # 多头注意力(padding mask)(encoder-decoder attention)

        self.ffn = point_wise_feed_forward_network(d_model, dff)

        self.layernorm1 = torch.nn.LayerNorm(normalized_shape=d_model, eps=1e-6)
        self.layernorm2 = torch.nn.LayerNorm(normalized_shape=d_model, eps=1e-6)
        self.layernorm3 = torch.nn.LayerNorm(normalized_shape=d_model, eps=1e-6)

        self.dropout1 = torch.nn.Dropout(rate)
        self.dropout2 = torch.nn.Dropout(rate)
        self.dropout3 = torch.nn.Dropout(rate)

    # x [b, targ_seq_len, embedding_dim] embedding_dim其实也=d_model=512
    # look_ahead_mask [b, 1, targ_seq_len, targ_seq_len] 这里传入的look_ahead_mask应该是已经结合了look_ahead_mask和padding mask的mask
    # enc_output [b, inp_seq_len, d_model]
    # padding_mask [b, 1, 1, inp_seq_len]
    def forward(self, x, enc_output, look_ahead_mask, padding_mask):
        attn1, attn_weights_block1 = self.mha1(x, x, x,
                                               look_ahead_mask)  # =>[b, targ_seq_len, d_model], [b, num_heads, targ_seq_len, targ_seq_len]
        attn1 = self.dropout1(attn1)
        out1 = self.layernorm1(x + attn1)  # 残差&层归一化 [b, targ_seq_len, d_model]

        # Q: receives the output from decoder's first attention block,即 masked multi-head attention sublayer
        # K V: V (value) and K (key) receive the encoder output as inputs
        attn2, attn_weights_block2 = self.mha2(out1, enc_output, enc_output,
                                               padding_mask)  # =>[b, targ_seq_len, d_model], [b, num_heads, targ_seq_len, inp_seq_len]
        attn2 = self.dropout2(attn2)
        out2 = self.layernorm2(out1 + attn2)  # 残差&层归一化 [b, targ_seq_len, d_model]

        ffn_output = self.ffn(out2)  # =>[b, targ_seq_len, d_model]
        ffn_output = self.dropout3(ffn_output)
        out3 = self.layernorm3(out2 + ffn_output)  # 残差&层归一化 =>[b, targ_seq_len, d_model]

        return out3, attn_weights_block1, attn_weights_block2
        # [b, targ_seq_len, d_model], [b, num_heads, targ_seq_len, targ_seq_len], [b, num_heads, targ_seq_len, inp_seq_len]


sample_decoder_layer = DecoderLayer(512, 8, 2048) #
y = torch.rand(64, 40, 512) # [b, seq_len, d_model]
sample_decoder_layer_output,_,_ = sample_decoder_layer(y, sample_encoder_layer_output, None, None)
print(sample_decoder_layer_output.shape) # [64, 40, 512]
输出:
torch.Size([64, 40, 512])
9.encoder
编码器 包括:
- 输入嵌入(Input Embedding)
- 位置编码(Positional Encoding)
- N 个编码器层(encoder layers)
输入经过嵌入(embedding)后,该嵌入与位置编码相加。该加法结果的输出是编码器层的输入。编码器的输出是解码器的输入
注意:缩放 embedding
原始论文的3.4节Embeddings and Softmax最后一句有提到: In the embedding layers, we multiply those weights by d m o d e l \sqrt{d_{model}} dmodel.
class Encoder(torch.nn.Module):
    def __init__(self,
                 num_layers,  # N个encoder layer
                 d_model,
                 num_heads,
                 dff,  # 点式前馈网络内层fn的维度
                 input_vocab_size,  # 输入词表大小(源语言(法语))
                 maximun_position_encoding,
                 rate=0.1):
        super(Encoder, self).__init__()

        self.num_layers = num_layers
        self.d_model = d_model

        self.embedding = torch.nn.Embedding(num_embeddings=input_vocab_size, embedding_dim=d_model)
        self.pos_encoding = positional_encoding(maximun_position_encoding,
                                                d_model)  # =>[1, max_pos_encoding, d_model=512]

        # self.enc_layers = [EncoderLayer(d_model, num_heads, dff, rate).cuda() for _ in range(num_layers)] # 不行
        self.enc_layers = torch.nn.ModuleList([EncoderLayer(d_model, num_heads, dff, rate) for _ in range(num_layers)])

        self.dropout = torch.nn.Dropout(rate)

    # x [b, inp_seq_len]
    # mask [b, 1, 1, inp_sel_len]
    def forward(self, x, mask):
        inp_seq_len = x.shape[-1]

        # adding embedding and position encoding
        x = self.embedding(x)  # [b, inp_seq_len]=>[b, inp_seq_len, d_model]
        # 缩放 embedding 原始论文的3.4节有提到: In the embedding layers, we multiply those weights by \sqrt{d_model}.
        x *= torch.sqrt(torch.tensor(self.d_model, dtype=torch.float32))
        pos_encoding = self.pos_encoding[:, :inp_seq_len, :]
        pos_encoding = pos_encoding.cuda()  # ###############
        x += pos_encoding  # [b, inp_seq_len, d_model]

        x = self.dropout(x)

        for i in range(self.num_layers):
            x = self.enc_layers[i](x, mask)  # [b, inp_seq_len, d_model]=>[b, inp_seq_len, d_model]
        return x  # [b, inp_seq_len, d_model]


sample_encoder = Encoder(num_layers=2,
                         d_model=512,
                         num_heads=8,
                         dff=2048,
                         input_vocab_size=8500,
                         maximun_position_encoding=10000)
sample_encoder = sample_encoder.to(device)

x = torch.tensor(np.random.randint(low=0, high=200, size=(64, 42))) # [b, seq_len]
# print(x.shape)
sample_encoder_output = sample_encoder(x.cuda(), None)
print(sample_encoder_output.shape) # [b, seq_len, d_model]
输出:
torch.Size([64, 42, 512])
10.decoder
解码器包括:
- 输出嵌入(Output Embedding)
- 位置编码(Positional Encoding)
N 个解码器层(decoder layers)
目标(target)经过一个嵌入后,该嵌入和位置编码相加。该加法结果是解码器层的输入。解码器的输出是最后的线性层的输入。
class Decoder(torch.nn.Module):
    def __init__(self,
                 num_layers,  # N个encoder layer
                 d_model,
                 num_heads,
                 dff,  # 点式前馈网络内层fn的维度
                 target_vocab_size,  # target词表大小(目标语言(英语))
                 maximun_position_encoding,
                 rate=0.1):
        super(Decoder, self).__init__()

        self.num_layers = num_layers
        self.d_model = d_model

        self.embedding = torch.nn.Embedding(num_embeddings=target_vocab_size, embedding_dim=d_model)
        self.pos_encoding = positional_encoding(maximun_position_encoding,
                                                d_model)  # =>[1, max_pos_encoding, d_model=512]

        # self.dec_layers = [DecoderLayer(d_model, num_heads, dff, rate).cuda() for _ in range(num_layers)] # 不行
        self.dec_layers = torch.nn.ModuleList([DecoderLayer(d_model, num_heads, dff, rate) for _ in range(num_layers)])

        self.dropout = torch.nn.Dropout(rate)

    # x [b, targ_seq_len]
    # look_ahead_mask [b, 1, targ_seq_len, targ_seq_len] 这里传入的look_ahead_mask应该是已经结合了look_ahead_mask和padding mask的mask
    # enc_output [b, inp_seq_len, d_model]
    # padding_mask [b, 1, 1, inp_seq_len]
    def forward(self, x, enc_output, look_ahead_mask, padding_mask):
        targ_seq_len = x.shape[-1]

        attention_weights = {
     }

        # adding embedding and position encoding
        x = self.embedding(x)  # [b, targ_seq_len]=>[b, targ_seq_len, d_model]
        # 缩放 embedding 原始论文的3.4节有提到: In the embedding layers, we multiply those weights by \sqrt{d_model}.
        x *= torch.sqrt(torch.tensor(self.d_model, dtype=torch.float32))
        # x += self.pos_encoding[:, :targ_seq_len, :]  # [b, targ_seq_len, d_model]
        pos_encoding = self.pos_encoding[:, :targ_seq_len, :]  # [b, targ_seq_len, d_model]
        pos_encoding = pos_encoding.cuda() # ###############
        x += pos_encoding  # [b, inp_seq_len, d_model]

        x = self.dropout(x)

        for i in range(self.num_layers):
            x, attn_block1, attn_block2 = self.dec_layers[i](x, enc_output, look_ahead_mask, padding_mask)
            # => [b, targ_seq_len, d_model], [b, num_heads, targ_seq_len, targ_seq_len], [b, num_heads, targ_seq_len, inp_seq_len]

            attention_weights[f'decoder_layer{i + 1}_block1'] = attn_block1
            attention_weights[f'decoder_layer{i + 1}_block2'] = attn_block2

        return x, attention_weights
        # => [b, targ_seq_len, d_model],
        # {'..block1': [b, num_heads, targ_seq_len, targ_seq_len],
        #  '..block2': [b, num_heads, targ_seq_len, inp_seq_len], ...}

sample_decoder = Decoder(num_layers=2,
                         d_model=512,
                         num_heads=8,
                         dff=2048,
                         target_vocab_size=8000,
                         maximun_position_encoding=5000)
sample_decoder = sample_decoder.to(device)

y = torch.tensor(np.random.randint(low=0, high=200, size=(64, 36))) # [b, seq_len]
# print(y.shape) # [64, 36]
output, attn = sample_decoder(y.cuda(),
                              enc_output=sample_encoder_output, # [64, 42, 512]
                              look_ahead_mask=None,
                              padding_mask=None)
print(output.shape) # [64, 36, 512]
print(attn['decoder_layer2_block1'].shape) # [64, 8, 36, 36]
print(attn['decoder_layer2_block2'].shape) # [64, 8, 36, 42]
输出:
torch.Size([64, 36, 512])
torch.Size([64, 8, 36, 36])
torch.Size([64, 8, 36, 42])
11.搭建transformer
transformer 含有3各部分
- encoder
- decoder
- final linear layer
class Transformer(torch.nn.Module):
    def __init__(self,
                 num_layers,  # N个encoder layer
                 d_model,
                 num_heads,
                 dff,  # 点式前馈网络内层fn的维度
                 input_vocab_size,  # input此表大小(源语言(法语))
                 target_vocab_size,  # target词表大小(目标语言(英语))
                 pe_input,  # input max_pos_encoding
                 pe_target,  # input max_pos_encoding
                 rate=0.1):
        super(Transformer, self).__init__()

        self.encoder = Encoder(num_layers,
                               d_model,
                               num_heads,
                               dff,
                               input_vocab_size,
                               pe_input,
                               rate)
        self.decoder = Decoder(num_layers,
                               d_model,
                               num_heads,
                               dff,
                               target_vocab_size,
                               pe_target,
                               rate)
        self.final_layer = torch.nn.Linear(d_model, target_vocab_size)

    # inp [b, inp_seq_len]
    # targ [b, targ_seq_len]
    # enc_padding_mask [b, 1, 1, inp_seq_len]
    # look_ahead_mask [b, 1, targ_seq_len, targ_seq_len]
    # dec_padding_mask [b, 1, 1, inp_seq_len] # 注意这里的维度是inp_seq_len
    def forward(self, inp, targ, enc_padding_mask, look_ahead_mask, dec_padding_mask):
        enc_output = self.encoder(inp, enc_padding_mask)  # =>[b, inp_seq_len, d_model]

        dec_output, attention_weights = self.decoder(targ, enc_output, look_ahead_mask, dec_padding_mask)
        # => [b, targ_seq_len, d_model],
        # {'..block1': [b, num_heads, targ_seq_len, targ_seq_len],
        #  '..block2': [b, num_heads, targ_seq_len, inp_seq_len], ...}
        final_output = self.final_layer(dec_output)  # =>[b, targ_seq_len, target_vocab_size]

        return final_output, attention_weights
        # [b, targ_seq_len, target_vocab_size]
        # {'..block1': [b, num_heads, targ_seq_len, targ_seq_len],
        #  '..block2': [b, num_heads, targ_seq_len, inp_seq_len], ...}


sample_transformer = Transformer(num_layers=2,
                                 d_model=512,
                                 num_heads=8,
                                 dff=2048,
                                 input_vocab_size=8500,
                                 target_vocab_size=8000,
                                 pe_input=10000,
                                 pe_target=6000)
sample_transformer = sample_transformer.to(device)

temp_inp = torch.tensor(np.random.randint(low=0, high=200, size=(64, 42))) # [b, inp_seq_len]
temp_targ = torch.tensor(np.random.randint(low=0, high=200, size=(64, 36))) # [b, targ_seq_len]

fn_out, attn = sample_transformer(temp_inp.cuda(), temp_targ.cuda(), None, None, None)
print(fn_out.shape) # [64, 36, 8000]
print(attn['decoder_layer2_block1'].shape) # [64, 8, 36, 36]
print(attn['decoder_layer2_block2'].shape) # [64, 8, 36, 42]
输出:
torch.Size([64, 36, 8000])
torch.Size([64, 8, 36, 36])
torch.Size([64, 8, 36, 42])
12.设置超参
#Transformer 的基础模型使用的数值为:num_layers=6,d_model = 512,dff = 2048
#为了让本示例小且相对较快,已经减小了num_layers、 d_model 和 dff 的值。
num_layers = 4
d_model = 128
dff = 512
num_heads = 8

input_vocab_size = len(SRC_TEXT.vocab) # 3901
target_vocab_size = len(TARG_TEXT.vocab) # 2591
dropout_rate = 0.1

print(input_vocab_size, target_vocab_size)
输出:
3901 2591
13.优化器
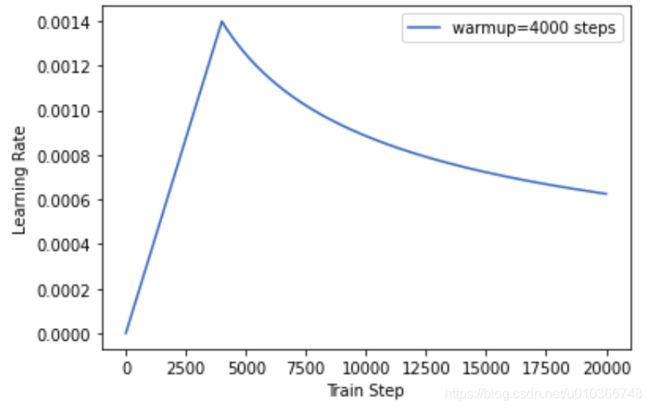
根据论文中的公式,将 Adam 优化器与自定义的学习速率调度程序(scheduler)配合使用。
l r a t e = d m o d e l − 0.5 ∗ m i n ( s t e p _ n u m − 0.5 , s t e p _ n u m ∗ w a r m u p _ s t e p s − 1.5 ) lrate = d_{model}^{-0.5} * min({step\_num}^{-0.5},\;{step\_num}*{warmup\_steps}^{-1.5}) lrate=dmodel−0.5∗min(step_num−0.5,step_num∗warmup_steps−1.5)
class CustomSchedule(torch.optim.lr_scheduler._LRScheduler):
    def __init__(self, optimizer, d_model, warm_steps=4):
        self.optimizer = optimizer
        self.d_model = d_model
        self.warmup_steps = warm_steps

        super(CustomSchedule, self).__init__(optimizer)

    def get_lr(self):
        """
        # rsqrt 函数用于计算 x 元素的平方根的倒数.  即= 1 / sqrt{x}
        arg1 = torch.rsqrt(torch.tensor(self._step_count, dtype=torch.float32))
        arg2 = torch.tensor(self._step_count * (self.warmup_steps ** -1.5), dtype=torch.float32)
        dynamic_lr = torch.rsqrt(self.d_model) * torch.minimum(arg1, arg2)
        """
        # print('*'*27, self._step_count)
        arg1 = self._step_count ** (-0.5)
        arg2 = self._step_count * (self.warmup_steps ** -1.5)
        dynamic_lr = (self.d_model ** (-0.5)) * min(arg1, arg2)
        # print('dynamic_lr:', dynamic_lr)
        return [dynamic_lr for group in self.optimizer.param_groups]
绘制学习率变化曲线:
# 测试
model = sample_transformer
optimizer = torch.optim.Adam(model.parameters(), lr=0, betas=(0.9, 0.98), eps=1e-9)
learning_rate = CustomSchedule(optimizer, d_model, warm_steps=4000)

lr_list = []
for i in range(1, 20000):
    learning_rate.step()
    lr_list.append(learning_rate.get_lr()[0])
plt.figure()
plt.plot(np.arange(1, 20000), lr_list)
plt.legend(['warmup=4000 steps'])
plt.ylabel("Learning Rate")
plt.xlabel("Train Step")
plt.show()
14.损失和评价准则
计算loss时要把mask=1的位置的去除掉
【注意】,当输入是多维时交叉熵的参数维度,跟tf2不一样,tf2中pred【b,seq_len,vocab_size】,pytorch中pred应该调整为【b,vocab_size,seq_len】
# 'none'表示直接返回b个样本的loss,默认求平均
loss_object = torch.nn.CrossEntropyLoss(reduction='none')
# 【注意】,当输入是多维时交叉熵的参数维度,跟tf2不一样,tf2中pred是【b,seq_len,vocab_size】
# pytorch中pred应该调整为【b,vocab_size,seq_len】
"""
- Input: :math:`(N, C)` where `C = number of classes`, or
          :math:`(N, C, d_1, d_2, ..., d_K)` with :math:`K \geq 1`
          in the case of `K`-dimensional loss.

- Target: :math:`(N)` where each value is :math:`0 \leq \text{targets}[i] \leq C-1`, or
          :math:`(N, d_1, d_2, ..., d_K)` with :math:`K \geq 1` in the case of
          K-dimensional loss.
"""
# real [b, targ_seq_len]
# pred [b, targ_seq_len, target_vocab_size]
def mask_loss_func(real, pred):
    # print(real.shape, pred.shape)
    # _loss = loss_object(pred, real) # [b, targ_seq_len]
    _loss = loss_object(pred.transpose(-1, -2), real)  # [b, targ_seq_len]

    # logical_not  取非
    # mask 每个元素为bool值,如果real中有pad,则mask相应位置就为False
    # mask = torch.logical_not(real.eq(0)).type(_loss.dtype) # [b, targ_seq_len] pad=0的情况
    mask = torch.logical_not(real.eq(pad)).type(_loss.dtype)  # [b, targ_seq_len] pad!=0的情况

    # 对应位置相乘,token上的损失被保留了下来,pad的loss被置为0或False 去掉,不计算在内
    _loss *= mask
    return _loss.sum() / mask.sum().item()

y_pred = torch.randn(3,3) # [3,3]
y_true = torch.tensor([1,2,0]) # [3]
# print(y_true.shape, y_pred.shape)
print(loss_object(y_pred, y_true))
print('计算loss时把mask的也算进去了,损失会偏大?:', loss_object(y_pred, y_true).mean())
print('计算loss时去除mask:', mask_loss_func(y_true, y_pred))
输出:
tensor([3.7972, 1.0699, 0.8568])
计算loss时把mask的也算进去了,损失会偏大?: tensor(1.9080)
计算loss时去除mask: tensor(1.2441)
同样计算metric(如acc)时要把mask=1的位置的去除掉:
# real [b, targ_seq_len]
# pred [b, targ_seq_len, target_vocab_size]
def mask_accuracy_func(real, pred):
    _pred = pred.argmax(dim=-1)  # [b, targ_seq_len, target_vocab_size]=>[b, targ_seq_len]
    corrects = _pred.eq(real)  # [b, targ_seq_len] bool值

    # logical_not  取非
    # mask 每个元素为bool值,如果real中有pad,则mask相应位置就为False
    # mask = torch.logical_not(real.eq(0)) # [b, targ_seq_len] bool值 pad=0的情况
    mask = torch.logical_not(real.eq(pad))  # [b, targ_seq_len] bool值 pad!=0的情况

    # 对应位置相乘,token上的值被保留了下来,pad上的值被置为0或False 去掉,不计算在内
    corrects *= mask
    return corrects.sum().float() / mask.sum().item()


y_pred = torch.randn(3,3) # [3,3]
y_true = torch.tensor([0,2,1]) # [3] 最后一个1表示pad噢~
print(y_true)
print(y_pred)
print('计算acc时去除mask:', mask_accuracy_func(y_true, y_pred))
输出:
tensor([0, 2, 1])
tensor([[-0.3903,  1.7641,  0.5455],
        [ 1.0297, -1.5503, -1.5172],
        [ 0.8182,  1.1333, -0.4007]])
计算acc时去除mask: tensor(0.)
15.生成mask
A t t e n t i o n ( Q , K , V ) = s o f t m a x ( k ) ( Q K T d k ) V Attention(Q,K,V)=softmax_{(k)}(\frac{QK^T}{\sqrt{d_k}})V Attention(Q,K,V)=softmax(k)(dkQKT)V
注意在上面的公式中,实现时对mask的处理
mask=1的位置是pad或者future token,乘以-1e9(-1*10^9)成为负无穷,经过softmax后会趋于0
【注意】:在计算decoder的第2个attention block时(encoder-decoder attention),从scaled dot-product的公式可以看出,此时Q是decoder的第一个attention block的输出,而K,V都来自encoder的输出。 Q K T QK^T QKT后得到[...,seq_len_q, seq_len_k],而softmax是在seq_len_k维上进行的,softmax后seq_len_k维上pad的位置被置于0,乘以V(seq_len_k=seq_len_v=encoder output的seq_len)后那些pad的位置还是只会是0。所以仅从公式就可以看出decoder的第2个attention block的padding mask是基于encoder output 的seq_len即整个模型的inp_seq_len来设置的,而不是targ_seq_len。
从注意力角度来看,可以理解成:当 Q 接收到decoder的第一个注意力块的输出,并且 K 接收到encoder的输出时,注意力权重表示根据encoder的输出赋予decoder输入的重要性。换一种说法,decoder通过查看encoder输出和对其自身输出的自注意`力,预测下一个词。
另外 padding mask 的维度是[b,1,1,seq_len] 一般只关注最后一个seq_len维度上pad(无论是在
self-attention 或者encoder-decoder attention上都比较容易理解)
而 look-ahead mask 是decoder self-attention时用于mask future token的,因为是“自”注意力,
所以维度是[...,seq_len, seq_len],需要自己跟自己运算,所以在 Q K T QK^T QKT(此时Q=K=V)矩阵乘的结果的最后2个维度上都需要mask
# inp [b, inp_seq_len] 序列已经加入pad填充
# targ [b, targ_seq_len] 序列已经加入pad填充
def create_mask(inp, targ):
    # encoder padding mask
    enc_padding_mask = create_padding_mask(inp)  # =>[b,1,1,inp_seq_len] mask=1的位置为pad

    # decoder's first attention block(self-attention)
    # 使用的padding create_mask & look-ahead create_mask
    look_ahead_mask = create_look_ahead_mask(targ.shape[-1])  # =>[targ_seq_len,targ_seq_len] ##################
    dec_targ_padding_mask = create_padding_mask(targ)  # =>[b,1,1,targ_seq_len]
    combined_mask = torch.max(look_ahead_mask, dec_targ_padding_mask)  # 结合了2种mask =>[b,1,targ_seq_len,targ_seq_len]

    # decoder's second attention block(encoder-decoder attention) 使用的padding create_mask
    # 【注意】:这里的mask是用于遮挡encoder output的填充pad,而encoder的输出与其输入shape都是[b,inp_seq_len,d_model]
    # 所以这里mask的长度是inp_seq_len而不是targ_mask_len
    dec_padding_mask = create_padding_mask(inp)  # =>[b,1,1,inp_seq_len] mask=1的位置为pad

    return enc_padding_mask, combined_mask, dec_padding_mask
    # [b,1,1,inp_seq_len], [b,1,targ_seq_len,targ_seq_len], [b,1,1,inp_seq_len]
16.训练和保存
配置检查点 save_dir,并创建transformer对象,这是优化器和学习率调度器:
save_dir = cwd + './save/'

transformer = Transformer(num_layers,
                          d_model,
                          num_heads,
                          dff,
                          input_vocab_size,
                          target_vocab_size,
                          pe_input=input_vocab_size,
                          pe_target=target_vocab_size,
                          rate=dropout_rate)

print(transformer) # 打印模型基本信息

transformer = transformer.to(device)
if ngpu > 1: # 并行化
    transformer = torch.nn.DataParallel(transformer,  device_ids=list(range(ngpu))) # 设置并行执行  device_ids=[0,1]

optimizer = torch.optim.Adam(transformer.parameters(), lr=0, betas=(0.9, 0.98), eps=1e-9)
lr_scheduler = CustomSchedule(optimizer, d_model, warm_steps=4000)
实现一个train_step:
# inp [b,inp_seq_len]
# targ [b,targ_seq_len]
"""
拆分targ, 例如:sentence = "SOS A lion in the jungle is sleeping EOS"
tar_inp = "> A lion in the jungle is sleeping"
tar_real = "A lion in the jungle is sleeping "
"""
def train_step(model, inp, targ):
    # 目标(target)被分成了 tar_inp 和 tar_real
    # tar_inp 作为输入传递到解码器。
    # tar_real 是位移了 1 的同一个输入:在 tar_inp 中的每个位置,tar_real 包含了应该被预测到的下一个标记(token)。
    targ_inp = targ[:, :-1]
    targ_real = targ[:, 1:]

    enc_padding_mask, combined_mask, dec_padding_mask = create_mask(inp, targ_inp)

    inp = inp.to(device)
    targ_inp = targ_inp.to(device)
    targ_real = targ_real.to(device)
    enc_padding_mask = enc_padding_mask.to(device)
    combined_mask = combined_mask.to(device)
    dec_padding_mask = dec_padding_mask.to(device)
    # print('device:', inp.device, targ_inp)

    model.train()  # 设置train mode

    optimizer.zero_grad()  # 梯度清零

    # forward
    prediction, _ = transformer(inp, targ_inp, enc_padding_mask, combined_mask, dec_padding_mask)
    # [b, targ_seq_len, target_vocab_size]
    # {'..block1': [b, num_heads, targ_seq_len, targ_seq_len],
    #  '..block2': [b, num_heads, targ_seq_len, inp_seq_len], ...}

    loss = mask_loss_func(targ_real, prediction)
    metric = mask_accuracy_func(targ_real, prediction)

    # backward
    loss.backward()  # 反向传播计算梯度
    optimizer.step()  # 更新参数

    return loss.item(), metric.item()


# 检查train_step()的效果
batch_src, batch_targ = next(iter(train_dataloader)) # [64,10], [64,10]
print(train_step(transformer, batch_src, batch_targ))
输出:
(8.07600212097168, 0.0)
因为我使用的是4张gpu,注意一下并行化的处理,否则容易出现weights和inputs不在一张卡的错误:
x += pos_encoding  # [b, inp_seq_len, d_model] 报错
RuntimeError: Expected all tensors to be on the same device,
but found at least two devices, cuda:1 and cuda:0!
实现一个validation_step:
def validate_step(model, inp, targ):
    targ_inp = targ[:, :-1]
    targ_real = targ[:, 1:]

    enc_padding_mask, combined_mask, dec_padding_mask = create_mask(inp, targ_inp)

    inp = inp.to(device)
    targ_inp = targ_inp.to(device)
    targ_real = targ_real.to(device)
    enc_padding_mask = enc_padding_mask.to(device)
    combined_mask = combined_mask.to(device)
    dec_padding_mask = dec_padding_mask.to(device)

    model.eval()  # 设置eval mode

    with torch.no_grad():
        # forward
        prediction, _ = model(inp, targ_inp, enc_padding_mask, combined_mask, dec_padding_mask)
        # [b, targ_seq_len, target_vocab_size]
        # {'..block1': [b, num_heads, targ_seq_len, targ_seq_len],
        #  '..block2': [b, num_heads, targ_seq_len, inp_seq_len], ...}

        val_loss = mask_loss_func(targ_real, prediction)
        val_metric = mask_accuracy_func(targ_real, prediction)

    return val_loss.item(), val_metric.item()
设置一些超参和打印信息:
EPOCHS = 40 # 50 # 30  # 20

print_trainstep_every = 50  # 每50个step做一次打印

metric_name = 'acc'
# df_history = pd.DataFrame(columns=['epoch', 'loss', metric_name]) # 记录训练历史信息
df_history = pd.DataFrame(columns=['epoch', 'loss', metric_name, 'val_loss', 'val_' + metric_name])


# 打印时间
def printbar():
    nowtime = datetime.datetime.now().strftime('%Y-%m_%d %H:%M:%S')
    print('\n' + "=========="*8 + '%s'%nowtime)
实现训练函数:
def train_model(model, epochs, train_dataloader, val_dataloader, print_every):
    starttime = time.time()
    print('*' * 27, 'start training...')
    printbar()

    best_acc = 0.
    for epoch in range(1, epochs + 1):

        loss_sum = 0.
        metric_sum = 0.

        for step, (inp, targ) in enumerate(train_dataloader, start=1):
            # inp [64, 10] , targ [64, 10]
            loss, metric = train_step(model, inp, targ)

            loss_sum += loss
            metric_sum += metric

            # 打印batch级别日志
            if step % print_every == 0:
                print('*' * 8, f'[step = {step}] loss: {loss_sum / step:.3f}, {metric_name}: {metric_sum / step:.3f}')

            lr_scheduler.step()  # 更新学习率

        # 一个epoch的train结束,做一次验证
        # test(model, train_dataloader)
        val_loss_sum = 0.
        val_metric_sum = 0.
        for val_step, (inp, targ) in enumerate(val_dataloader, start=1):
            # inp [64, 10] , targ [64, 10]
            loss, metric = validate_step(model, inp, targ)

            val_loss_sum += loss
            val_metric_sum += metric

        # 记录和收集1个epoch的训练(和验证)信息
        # record = (epoch, loss_sum/step, metric_sum/step)
        record = (epoch, loss_sum/step, metric_sum/step, val_loss_sum/val_step, val_metric_sum/val_step)
        df_history.loc[epoch - 1] = record

        # 打印epoch级别的日志
        print('EPOCH = {} loss: {:.3f}, {}: {:.3f}, val_loss: {:.3f}, val_{}: {:.3f}'.format(
            record[0], record[1], metric_name, record[2], record[3], metric_name, record[4]))
        printbar()

        # 保存模型
        current_acc_avg = val_metric_sum / val_step # 看验证集指标
        if current_acc_avg > best_acc:  # 保存更好的模型
            best_acc = current_acc_avg
            checkpoint = save_dir + '{:03d}_{:.2f}_ckpt.tar'.format(epoch, current_acc_avg)
            if device.type == 'cuda' and ngpu > 1:
                model_sd = model.module.state_dict(),  ##################
                model_sd = copy.deepcopy(model.module.state_dict())
            else:
                model_sd = copy.deepcopy(model.state_dict())  ##################
            torch.save({

                'loss': loss_sum / step,
                'epoch': epoch,
                'net': model_sd,
                'opt': optimizer.state_dict(),
                'lr_scheduler': lr_scheduler.state_dict()
            }, checkpoint)


    print('finishing training...')
    endtime = time.time()
    time_elapsed = endtime - starttime
    print('Training complete in {:.0f}m {:.0f}s'.format(time_elapsed // 60, time_elapsed % 60))
    return df_history
开始训练,并保存训练过程日志信息:
# 开始训练
df_history = train_model(transformer, EPOCHS, train_dataloader, val_dataloader, print_trainstep_every)
print(df_history)
输出(太长了,没有贴出完整打印信息):
*************************** start training...

================================================================================2020-12_15 12:54:02
EPOCH = 1 loss: 7.786, acc: 0.006, val_loss: 7.445, val_acc: 0.119

================================================================================2020-12_15 12:54:08
EPOCH = 2 loss: 7.084, acc: 0.191, val_loss: 6.532, val_acc: 0.292

================================================================================2020-12_15
......
......
================================================================================2020-12_15 12:57:53
EPOCH = 39 loss: 0.952, acc: 0.797, val_loss: 1.423, val_acc: 0.744

================================================================================2020-12_15 12:58:00
EPOCH = 40 loss: 0.908, acc: 0.803, val_loss: 1.343, val_acc: 0.765

================================================================================2020-12_15 12:58:06
finishing training...
Training complete in 4m 4s
    epoch      loss       acc  val_loss   val_acc
0     1.0  7.785803  0.005774  7.445163  0.119145
1     2.0  7.084351  0.191411  6.531834  0.291639
2     3.0  6.306262  0.293269  5.850180  0.336391
......
......
38   39.0  0.951878  0.796895  1.423459  0.744392
39   40.0  0.908292  0.802841  1.342724  0.764645
训练时查看一下4张GPU卡是否work起来了,因为仅是示例,所以batch设的也不大:

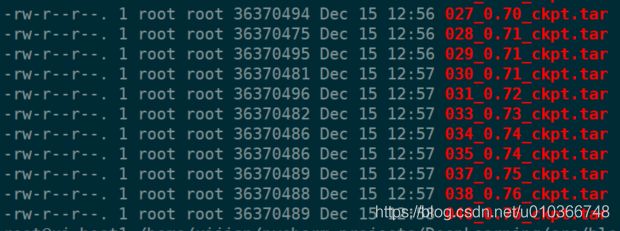
查看一下保存的部分模型参数:
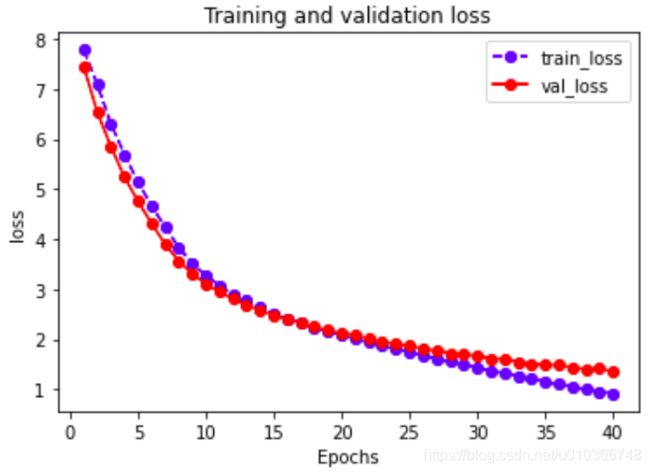
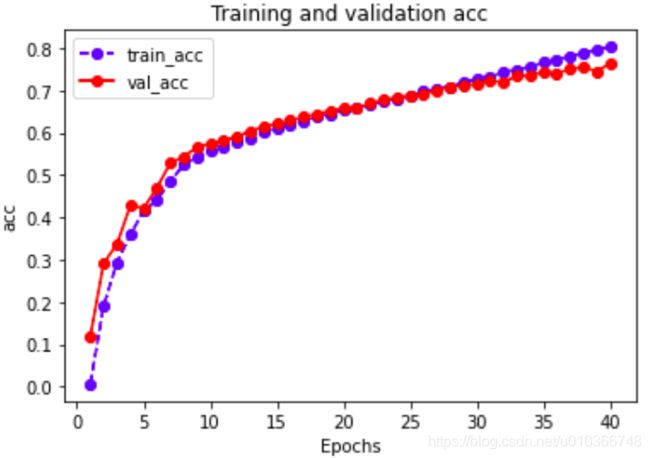
绘制训练曲线:
# 绘制训练曲线
def plot_metric(df_history, metric):
    plt.figure()

    train_metrics = df_history[metric]
    val_metrics = df_history['val_' + metric]  #

    epochs = range(1, len(train_metrics) + 1)

    plt.plot(epochs, train_metrics, 'bo--')
    plt.plot(epochs, val_metrics, 'ro-')  #

    plt.title('Training and validation ' + metric)
    plt.xlabel("Epochs")
    plt.ylabel(metric)
    plt.legend(["train_" + metric, 'val_' + metric])
    plt.savefig(cwd + 'imgs/' + metric + '.png')  # 保存图片
    plt.show()


plot_metric(df_history, 'loss')
plot_metric(df_history, metric_name)
17.评估
这里的评估 没有额外的使用测试集测评,还是拿验证集测试的。另外可以对一个法语句子进行翻译,看看翻译的结果如何
以下步骤用于评估:
- 用法语分词器(tokenizer_pt)编码输入语句。此外,添加和标记,这样输入就与模型训练的内容相同。这是编码器输入。
- 解码器输入为 token id
- 计算padding mask 和 look ahead mask
- 解码器通过查看编码器输出和它自身的输出(自注意力)给出预测。
- 选择最后一个词并计算它的 argmax。
- 将预测的词concat到解码器输入,然后传递给解码器。
- 在这种方法中,解码器根据它之前预测的words预测下一个。
【注意】:翻译时decode使用的teacher-forcing,即无论当前步预测的是什么单词,总是会将target传递到下一时间步长继续预测。
先加载保存的模型中表现最好的模型参数:
# 加载model
checkpoint = save_dir + '040_0.76_ckpt.tar'
print('checkpoint:', checkpoint)
# ckpt = torch.load(checkpoint, map_location=device)  # dict  save 在 CPU 加载到GPU
ckpt = torch.load(checkpoint)  # dict  save 在 GPU 加载到 GPU
# print('ckpt', ckpt)
transformer_sd = ckpt['net']
# optimizer_sd = ckpt['opt'] # 不重新训练的话不需要
# lr_scheduler_sd = ckpt['lr_scheduler']

reload_model = Transformer(num_layers,
                           d_model,
                           num_heads,
                           dff,
                           input_vocab_size,
                           target_vocab_size,
                           pe_input=input_vocab_size,
                           pe_target=target_vocab_size,
                           rate=dropout_rate)

reload_model = reload_model.to(device)
if ngpu > 1:
    reload_model = torch.nn.DataParallel(reload_model,  device_ids=list(range(ngpu))) # 设置并行执行  device_ids=[0,1]


print('Loading model ...')
if device.type == 'cuda' and ngpu > 1:
   reload_model.module.load_state_dict(transformer_sd)
else:
   reload_model.load_state_dict(transformer_sd)
print('Model loaded ...')
输出:
checkpoint: /home/xijian/pycharm_projects/DeepLearning/src/blogs/machine_translation/pytorch/transformer/./save/040_0.76_ckpt.tar
Loading model ...
Model loaded ...
拿验证集当测试集做一个简单的测试:
def test(model, dataloader):
    # model.eval() # 设置为eval mode

    test_loss_sum = 0.
    test_metric_sum = 0.
    for test_step, (inp, targ) in enumerate(dataloader, start=1):
        # inp [64, 10] , targ [64, 10]
        loss, metric = validate_step(model, inp, targ)
        # print('*'*8, loss, metric)

        test_loss_sum += loss
        test_metric_sum += metric
    # 打印
    print('*' * 8,
          'Test: loss: {:.3f}, {}: {:.3f}'.format(test_loss_sum / test_step, 'test_acc', test_metric_sum / test_step))


# 在测试集上测试指标,这里使用val_dataloader模拟测试集
print('*' * 8, 'final test...')
test(reload_model, val_dataloader)
输出:
******** final test...
******** Test: loss: 1.343, test_acc: 0.765
token 与 索引的编码和解码,用于将模型的输出映射成文字:
def tokenizer_encode(tokenize, sentence, vocab):
# print(type(vocab)) # torchtext.vocab.Vocab
# print(len(vocab))
sentence = normalizeString(sentence)
# print(type(sentence)) # str
sentence = tokenize(sentence) # list
sentence = ['' ] + sentence + ['' ]
sentence_ids = [vocab.stoi[token] for token in sentence]
# print(sentence_ids, type(sentence_ids[0])) # int
return sentence_ids
def tokenzier_decode(sentence_ids, vocab):
sentence = [vocab.itos[id] for id in sentence_ids if id<len(vocab)]
# print(sentence)
return " ".join(sentence)
# 只有一个句子,不需要加pad
s = 'je pars en vacances pour quelques jours .'
print(tokenizer_encode(tokenizer, s, SRC_TEXT.vocab))
s_ids = [3, 5, 251, 17, 365, 35, 492, 390, 4, 2]
print(tokenzier_decode(s_ids, SRC_TEXT.vocab))
print(tokenzier_decode(s_ids, TARG_TEXT.vocab))
输出:
[3, 5, 251, 17, 365, 35, 492, 390, 4, 2]
 je pars en vacances pour quelques jours .
 i tennis very forgetful me helping bed .
实现evaluate函数:
# inp_sentence 一个法语句子,例如"je pars en vacances pour quelques jours ."
def evaluate(model, inp_sentence):
model.eval() # 设置eval mode
inp_sentence_ids = tokenizer_encode(tokenizer, inp_sentence, SRC_TEXT.vocab) # 转化为索引
# print(tokenzier_decode(inp_sentence_ids, SRC_TEXT.vocab))
encoder_input = torch.tensor(inp_sentence_ids).unsqueeze(dim=0) # =>[b=1, inp_seq_len=10]
# print(encoder_input.shape)
decoder_input = [TARG_TEXT.vocab.stoi['' ]]
decoder_input = torch.tensor(decoder_input).unsqueeze(0) # =>[b=1,seq_len=1]
# print(decoder_input.shape)
with torch.no_grad():
for i in range(MAX_LENGTH + 2):
enc_padding_mask, combined_mask, dec_padding_mask = create_mask(encoder_input.cpu(), decoder_input.cpu()) ################
# [b,1,1,inp_seq_len], [b,1,targ_seq_len,inp_seq_len], [b,1,1,inp_seq_len]
encoder_input = encoder_input.to(device)
decoder_input = decoder_input.to(device)
enc_padding_mask = enc_padding_mask.to(device)
combined_mask = combined_mask.to(device)
dec_padding_mask = dec_padding_mask.to(device)
# forward
predictions, attention_weights = model(encoder_input,
decoder_input,
enc_padding_mask,
combined_mask,
dec_padding_mask)
# [b=1, targ_seq_len, target_vocab_size]
# {'..block1': [b, num_heads, targ_seq_len, targ_seq_len],
# '..block2': [b, num_heads, targ_seq_len, inp_seq_len], ...}
# 看最后一个词并计算它的 argmax
prediction = predictions[:, -1:, :] # =>[b=1, 1, target_vocab_size]
prediction_id = torch.argmax(prediction, dim=-1) # => [b=1, 1]
# print('prediction_id:', prediction_id, prediction_id.dtype) # torch.int64
if prediction_id.squeeze().item() == TARG_TEXT.vocab.stoi['' ]:
return decoder_input.squeeze(dim=0), attention_weights
decoder_input = torch.cat([decoder_input, prediction_id],
dim=-1) # [b=1,targ_seq_len=1]=>[b=1,targ_seq_len=2]
# decoder_input在逐渐变长
return decoder_input.squeeze(dim=0), attention_weights
# [targ_seq_len],
# {'..block1': [b, num_heads, targ_seq_len, targ_seq_len],
# '..block2': [b, num_heads, targ_seq_len, inp_seq_len], ...}
# s = 'je pars en vacances pour quelques jours .'
# evaluate(s)
s = 'je pars en vacances pour quelques jours .'
s_targ = 'i m taking a couple of days off .'
pred_result, attention_weights = evaluate(reload_model, s)
pred_sentence = tokenzier_decode(pred_result, TARG_TEXT.vocab)
print('real target:', s_targ)
print('pred_sentence:', pred_sentence)
输出:
real target: i m taking a couple of days off .
pred_sentence:  i m going on a couple of days off .
实现批量翻译:
# 批量翻译
sentence_pairs = [
    ['je pars en vacances pour quelques jours .', 'i m taking a couple of days off .'],
    ['je ne me panique pas .', 'i m not panicking .'],
    ['je recherche un assistant .', 'i am looking for an assistant .'],
    ['je suis loin de chez moi .', 'i m a long way from home .'],
    ['vous etes en retard .', 'you re very late .'],
    ['j ai soif .', 'i am thirsty .'],
    ['je suis fou de vous .', 'i m crazy about you .'],
    ['vous etes vilain .', 'you are naughty .'],
    ['il est vieux et laid .', 'he s old and ugly .'],
    ['je suis terrifiee .', 'i m terrified .'],
]


def batch_translate(sentence_pairs):
    for pair in sentence_pairs:
        print('input:', pair[0])
        print('target:', pair[1])
        pred_result, _ = evaluate(reload_model, pair[0])
        pred_sentence = tokenzier_decode(pred_result, TARG_TEXT.vocab)
        print('pred:', pred_sentence)
        print('')

batch_translate(sentence_pairs)
输出:
input: je pars en vacances pour quelques jours .
target: i m taking a couple of days off .
pred:  i m going on a couple of days off .

input: je ne me panique pas .
target: i m not panicking .
pred:  i m not getting not getting involved .

input: je recherche un assistant .
target: i am looking for an assistant .
pred:  i m looking for a lot .

input: je suis loin de chez moi .
target: i m a long way from home .
pred:  i m at home .

input: vous etes en retard .
target: you re very late .
pred:  you re late .

input: j ai soif .
target: i am thirsty .
pred:  i m thirsty .

input: je suis fou de vous .
target: i m crazy about you .
pred:  i m crazy about you .

input: vous etes vilain .
target: you are naughty .
pred:  you re foolish .

input: il est vieux et laid .
target: he s old and ugly .
pred:  he s old and old and old .

input: je suis terrifiee .
target: i m terrified .
pred:  i m being promoted .
可以看到,翻译效果还是不错的。其中input是源语言输入,target是对应的真实翻译,pred是模型的翻译。
18.attention 的可视化
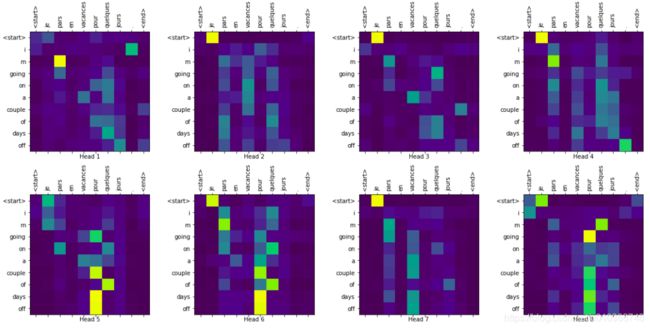
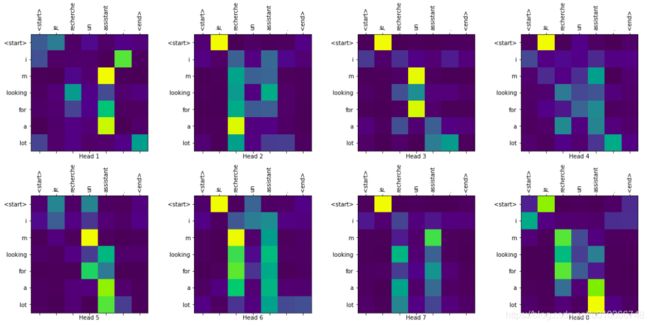
# 可视化attenton 这里我们只展示...block2的attention,即[b, num_heads, targ_seq_len, inp_seq_len]
# attention: {'decoder_layer{i + 1}_block1': [b, num_heads, targ_seq_len, targ_seq_len],
# 'decoder_layer{i + 1}_block2': [b, num_heads, targ_seq_len, inp_seq_len], ...}
# sentence: [seq_len],例如:'je recherche un assistant .'
# pred_result: [seq_len],例如:' i m looking for an assistant .'
# layer: 字符串类型,表示模型decoder的N层decoder-layer的第几层的attention,形如'decoder_layer{i}_block1'或'decoder_layer{i}_block2'
def plot_attention_weights(attention, sentence, pred_sentence, layer):
sentence = sentence.split()
pred_sentence = pred_sentence.split()
fig = plt.figure(figsize=(16, 8))
# block2 attention[layer] => [b=1, num_heads, targ_seq_len, inp_seq_len]
attention = torch.squeeze(attention[layer], dim=0) # => [num_heads, targ_seq_len, inp_seq_len]
for head in range(attention.shape[0]):
ax = fig.add_subplot(2, 4, head + 1) # 111是单个整数编码的子绘图网格参数。例如,“111”表示“1×1网格,第一子图”,“234”表示“2×3网格,第四子图”
cax = ax.matshow(attention[head].cpu(), cmap='viridis') # 绘制网格热图?注意力权重
# fig.colorbar(cax)#给子图添加colorbar(颜色条或渐变色条)
fontdict = {
'fontsize': 10}
# 设置轴刻度线
ax.set_xticks(range(len(sentence)+2)) # 算上start和end
ax.set_yticks(range(len(pred_sentence)))
ax.set_ylim(len(pred_sentence) - 1.5, -0.5) # 设定y座标轴的范围
# 设置轴
ax.set_xticklabels(['' ]+sentence+['' ], fontdict=fontdict, rotation=90) # 顺时间旋转90度
ax.set_yticklabels(pred_sentence, fontdict=fontdict)
ax.set_xlabel('Head {}'.format(head + 1))
plt.tight_layout()
plt.show()
def translate(sentence_pair, plot=None):
print('input:', sentence_pair[0])
print('target:', sentence_pair[1])
pred_result, attention_weights = evaluate(reload_model, sentence_pair[0])
print('attention_weights:', attention_weights.keys())
pred_sentence = tokenzier_decode(pred_result, TARG_TEXT.vocab)
print('pred:', pred_sentence)
print('')
if plot:
plot_attention_weights(attention_weights, sentence_pair[0], pred_sentence, plot)
translate(sentence_pairs[0], plot='decoder_layer4_block2')
translate(sentence_pairs[2], plot='decoder_layer4_block2')
19.总结
代码还有以下待完善的地方:
- 没有实现标签平滑
- 在训练过程中使用了teacher-forcing,即总是会将target传递到下一时间步长。更好的做法是设置一个teacher_forcing_ration
- 在evaluate阶段的解码使用的是greedy search decode,即对于每一步,我们只需从具有最高 softmax 值的 decoder_output 中选择单词。可以尝试使用更好的beam search
完整代码
完整代码请移步至: 我的github https://github.com/qingyujean/Magic-NLPer,找到对应博客的完整代码,求赞求星求鼓励~~~
最后:如果本文中出现任何错误,请您一定要帮忙指正,感激~
参考
[1] Attention Is All You Need
[2] https://tensorflow.google.cn/tutorials/text/transformer
