spring cloud 学习(5) - config server
分布式环境下的统一配置框架,已经有不少了,比如百度的disconf,阿里的diamand。今天来看下spring cloud对应的解决方案:
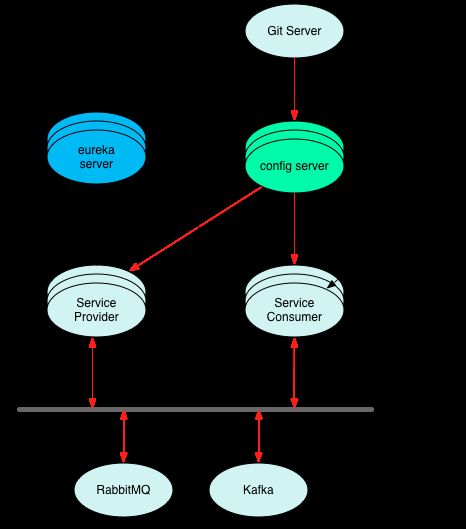
如上图,从架构上就可以看出与disconf之类的有很大不同,主要区别在于:
- 配置的存储方式不同
- disconf是把配置信息保存在mysql、zookeeper中,而spring cloud config是将配置保存在git/svn上 (即:配置当成源代码一样管理)
- 配置的管理方式不同
- spring cloud config没有类似disconf的统一管理界面,既然把配置都当成git之类的源码来看待了,git的管理界面,就是配置的管理界面
- 配置变化的通知机制不同
- disconf中配置变化后,依赖zk的事件watcher来通知应用,而spring cloud config则是依赖git每次push后,触发webhook回调,最终触发spring cloud bus(消息总线),然后由消息总线通知相关的应用。
另外,spring cloud config server本身也是一个微服务,跟其它的微服务一样,也可以注册到eureka server上,让其它使用方从注册中心来发现,单纯从解决的问题/场景来看,disconf与spring cloud config server是高度重合的,很难说哪个好,那个差,只是设计哲学不同。
但有一点,从配置变化的通知机制上看,如果有100个应用节点,都依赖于统一配置,如果修改了配置,只想让某几个节点"灰度"更新配置,spring cloud config server更容易做到,这一点相对disconf更灵活(后面会详细讲解)。
使用步骤:
一、在git/svn上创建一个配置项目(用于保存配置文件)
以https://github.com/yjmyzz/spring-cloud-config-repository 这个为例,上面就放了几个配置文件(推荐用新的yml格式,对中文支持更好码)。
application.yml里的内容如下:
demo:
  title: "default title"
其它几个文件application_xxx.yml,里面的xxx,代表不同的profile.
二、创建config-server微服务
2.1 添加依赖项
dependencies {
    compile 'org.springframework.cloud:spring-cloud-starter-eureka'
    compile 'org.springframework.cloud:spring-cloud-config-server'
    compile 'org.springframework.boot:spring-boot-starter-actuator'
}
关键是第2个依赖项
2.2 application.yml
spring:
  application:
    name: config-server
  profiles:
      active: server1
  cloud:
    config:
      server:
        git:
          uri: https://github.com/yjmyzz/spring-cloud-config-repository
#          username: *****
#          password: *****

eureka:
  instance:
    prefer-ip-address: true
    instance-id: ${spring.application.name}:${server.port}
  client:
    service-url:
      defaultZone: http://yjmyzz:123456@server1:8100/eureka,http://yjmyzz:123456@server2:8200/eureka

management:
  security:
    enabled: false
注意上面的cloud.config.server这段,里面配置了git配置项目的位置。另外:config-server服务本身也需要HA,所以本示例中起了2个实例,分别对应server1、server2 这二个profile,用不同的端口,在本机跑2个实例,以模拟高可用。
application-server1.yml
server:
  port: 8004
application-server2.yml
server:
  port: 8005
2.3 main入口类
package com.cnblogs.yjmyzz.spring.cloud.study.config;

import org.springframework.boot.SpringApplication;
import org.springframework.boot.autoconfigure.SpringBootApplication;
import org.springframework.cloud.config.server.EnableConfigServer;
import org.springframework.cloud.netflix.eureka.EnableEurekaClient;

/**
 * Created by yangjunming on 2017/7/5.
 */
@SpringBootApplication
@EnableEurekaClient
@EnableConfigServer
public class ConfigServer {

    public static void main(String[] args) {
        SpringApplication.run(ConfigServer.class, args);

    }
}
关键是@EnableConfigServer 这个注解。
2.4 跑起来看看
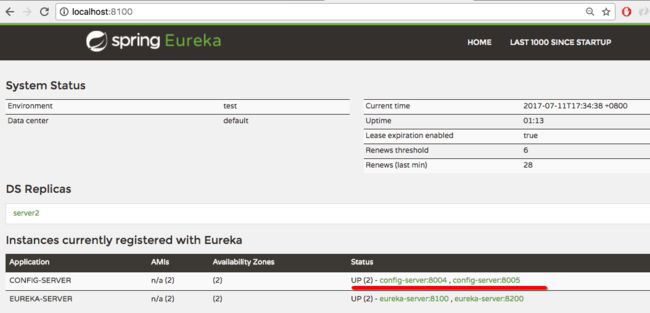
可以看到2个config-server已经注册到eureka上了,然后单独浏览一下: http://localhost:8004/application-dev.yml
已经把git上的application-dev.yml的内容输出了。
三、使用config-server
3.1 在之前的service-provider中添加依赖项
compile 'org.springframework.cloud:spring-cloud-starter-config'
3.2 创建一个简单的配置类
package com.cnblogs.yjmyzz.spring.cloud.study.config;

import lombok.Data;
import org.springframework.boot.context.properties.ConfigurationProperties;
import org.springframework.stereotype.Component;

/**
 * Created by yangjunming on 2017/7/5.
 */
@Component
@Data
@ConfigurationProperties(prefix = "demo")
public class DemoConfig {

    private String title;
}
然后找一个示例服务,使用这个配置:
package com.cnblogs.yjmyzz.spring.cloud.study.service.impl;

import com.cnblogs.yjmyzz.spring.cloud.study.api.UserService;
import com.cnblogs.yjmyzz.spring.cloud.study.config.DemoConfig;
import com.cnblogs.yjmyzz.spring.cloud.study.dto.UserDTO;
import org.springframework.beans.factory.annotation.Autowired;
import org.springframework.stereotype.Service;

@Service("userService")
public class UserServiceImpl implements UserService {

    @Autowired
    DemoConfig config;

    @Override
    public UserDTO findUser(Integer userId) {
        UserDTO user = new UserDTO();
        user.setUserId(userId);
        user.setUserName("菩提树下的杨过(" + config.getTitle() + ")");
        return user;
    }
}
3.3 添加bootstrap.yml 配置文件
spring:
  application:
    name: application
  cloud:
    config:
      profile: dev
      label: master
      discovery:
        enabled: true
        service-id: config-server

eureka:
  instance:
    prefer-ip-address: true
  client:
    service-url:
      defaultZone: http://yjmyzz:123456@server1:8100/eureka,http://yjmyzz:123456@server2:8200/eureka
注意spring.cloud这一节的内容,里面指定了profile为dev,读取的git配置文件分支为master,同时允许从eureka上自动发现config-server这个实例。另外 spring.applicatin.name 即为配置文件的名称(即:application_xxx.yml)
3.4 跑起来看看
说明已经从config-server取到了配置。
四、配置更新
4.1 Controller上添加@RefreshScope
@RestController
@RefreshScope
public class UserController {

    @Autowired
    private UserService userService;

    @GetMapping("/user/{id}")
    public UserDTO findUser(@PathVariable Integer id) {
        return userService.findUser(id);
    }
}
这个注解,根据源码上的说法:Beans annotated this way can be refreshed at runtime and any components that are using them will get a new instance on the next method call, fully initialized and injected with all dependencies. 使用该注解后,可以在运行时直接刷新Bean,并在下次方法调用时,得到一个全新的实例。
4.2 手动刷新/refresh
可以尝试把git配置项目里的application-dev.yml修改下内容,再浏览刚才的http://localhost:8001/user/1 发现内容并没有变化。
http://localhost:8001/refresh 手动向这个地址,发一个post请求(可以用postman或 curl -d '' http://localhost:8001/refresh),可以看到![]()
说明demo.title这个配置项被刷新了,再浏览http://localhost:8001/user/1 可以看到有变化了
但是这样显然不是个办法,比如有10个service-provider组成的集群,如果要1台台手动刷新,太low了(除了做配置灰度更新,可以先刷新1台这种场景外)
4.3 集成spring cloud bus来批量刷新
spring cloud bus目前仅支持rabbitmq 及 kafka,我们以kafka为例,先在service-provider的application.yml里,加入下面的配置
然后依赖项里,加入:
compile 'org.springframework.cloud:spring-cloud-starter-bus-kafka'
注:关于kafka的环境搭建,网上有很多资料,大家可以参考下。
配置好这些后,本机启动kafka,然后再重启service-provider,就会多出一个/bus/refresh的端点,即:http://xxx:port/bus/refresh ,只要向集群中的任何一台机器的/bus/refresh发起post请求,就会同步刷新其它所有节点。原理大致就是,这台机器会发一条消息到kafka中,然后其它机器都是挂在消息总线上的,也会监听到该消息,然后刷新各自的配置。
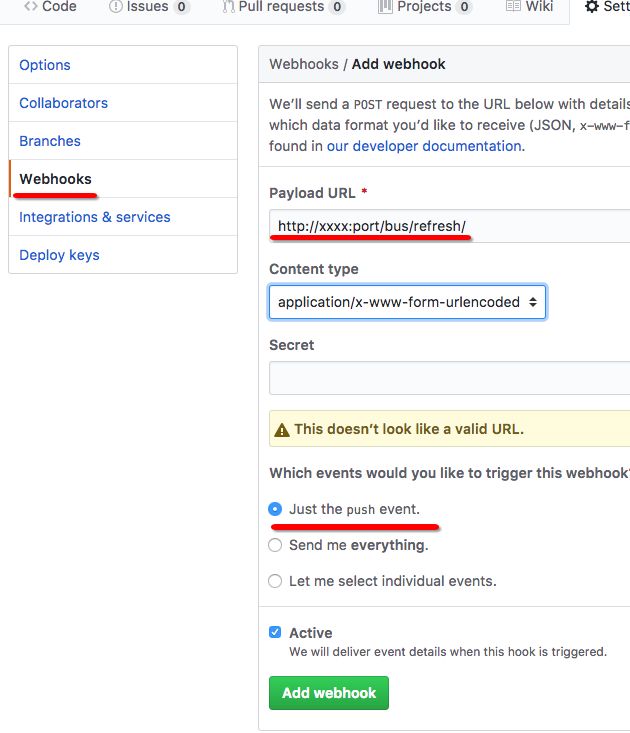
最后一个问题:就算有/bus/refresh,也需要有人或系统触发。这个很好解决,github或gitlab上一般都有webhook功能,可以配置在代码push时,触发一些地址的回调。
这样,只要配置的代码提交了,就会触发自动刷新。
注:低版本的spring-cloud-dependencies有一个严重bug,调用/bus/refresh后,会导致所有服务节点,从eureka server的实例列表中永久下线,无法自动恢复,除非再次访问某个服务的/health端点,建议使用Dalston.SR2 或以上版本。
示例源代码: https://github.com/yjmyzz/spring-cloud-demo


