yolov5笔记(3)——移动端部署自己的模型(小小小更新)
此篇正在更新中。。。
一直以来学习目标检测的最终目标就是为了移动端的部署,比方说树莓派、jetson、安卓、ios等。之前因为实在对object_detection训练出来的东西效果不满意,所以当时没继续研究移动端部署。如今的yolov5s是给了我极大的动力,经过这几天的研究,发现移动端的部署有这么几条路:
(以yolov5s.pt模型为例)
- pt文件 --> onnx文件/torchscript文件 --> ncnn --> 安卓端部署(android studio编写)
- pt文件 --> onnx文件/torchscript文件 --> ML文件 --> ios端部署(需要mac系统运行xcode编写)
- pt文件 --> onnx文件 /torchscript文件/wts文件–> openvino/tensorrt 等部署平台 --> 树莓派/jetson部署(最好是在linux环境下,而且最好不要在虚拟机上,否则诸多不便)
目前yolov5的部署可以说是把onnx文件/torchscript文件作为中间模型去转换到相应的模型。
部署需要一定的c++操作水平及工具
这几天试了试openvino,一开始win10系统老是安装不上,到换ubuntu系统,玩到最后发现目前openvino还不支持yolov5的模型转换。
so sad
搞了好几天发现openvino暂时行不通。
win10下载的make疯狂报错导致我win下无法实现tensorRT转换部署,换了虚拟机没cuda搞不了,很糟糕。
记下2020·11·22,搞搞停停 我终于完整的完成tensorrt部署,过几天闲下来就更新。
记下2020·12·18,我们取得了第三届英伟达sky hackathon比赛的前三,至少证明了我这一年多的学习和认识还算正确。
1.pt转ONNX、ML、TorchScript
安装ONNX
在yolov5文件夹下运行
pip install -r requirements.txt onnx # install requirements.txt and ONNX
转换文件
在这里,我以转换官方的yolov5s.pt模型文件为例
在yolov5文件夹下运行
python models/export.py --weights weights/yolov5s.pt --img 640 --batch 1
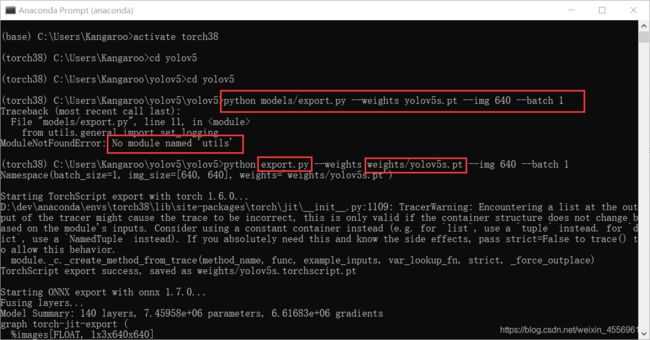
会报错No module named "utils",原因是utils这个文件夹跟models文件夹同级,所以export.py文件找不到这个文件
解决办法:将export.py从model文件夹移到上一级yolov5文件夹中
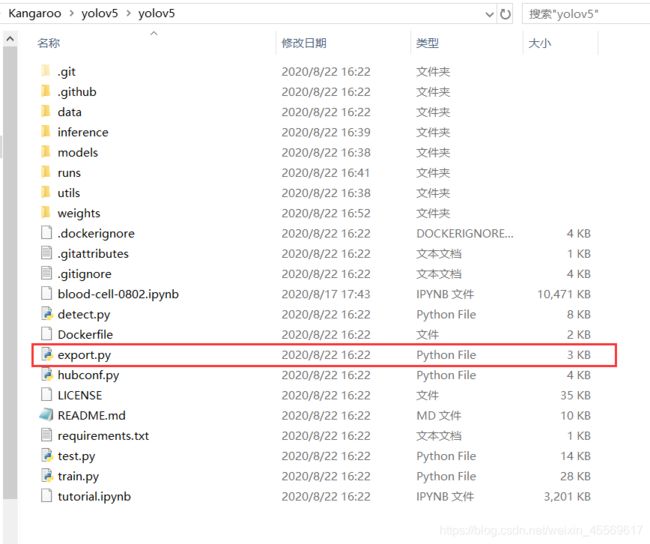
换好后小改下命令行输入
python export.py --weights weights/yolov5s.pt --img 640 --batch 1
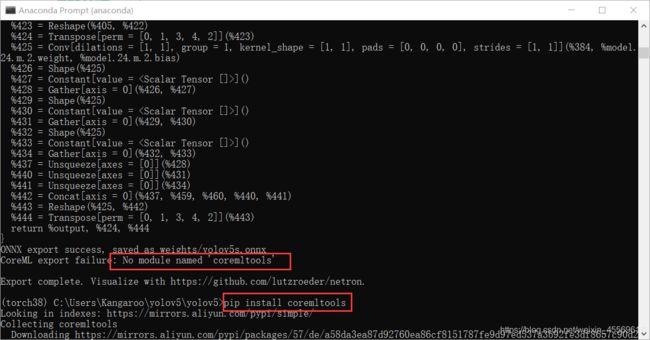
安装coremltools
pip install coremltools
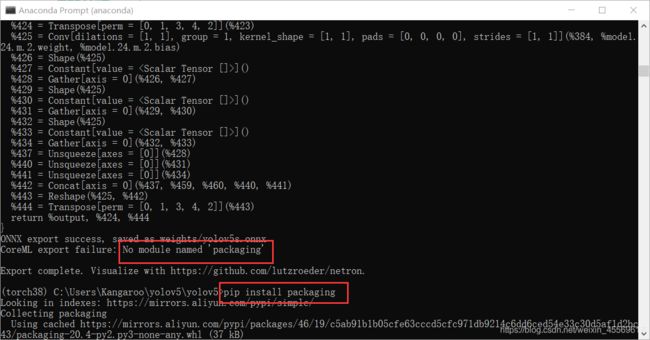
安装pankaging
pip install packaging
安装完packaging后,似乎还会遇到一个小问题,是关于转换ML文件的问题,但忘记了具体是什么问题。大家可以自己摸索下,我记得不是很难,很简单就能解决的。
成功
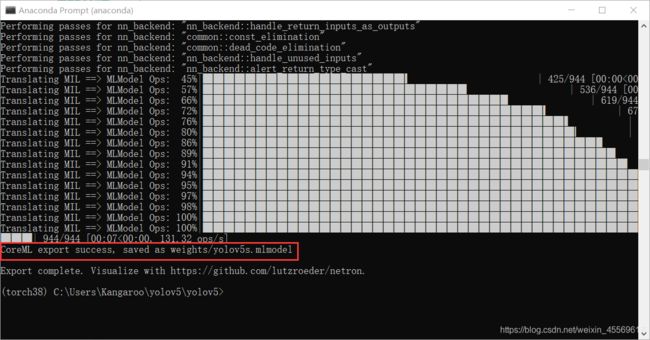
应该会多出现三个文件
分别是ONNX文件、ML文件、torchscript文件

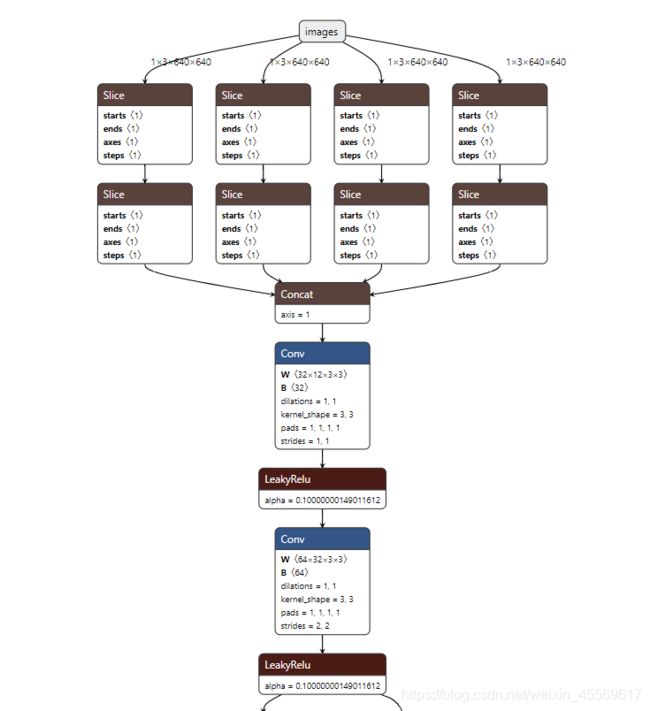
你也可以使用Netron来查看你的ONNX文件模型
使用Netron
其实netron现已支持大部分格式的模型文件,都是可以查看的。
PaddlePaddle、OpenVINO、TensorFlow 、Caffe…
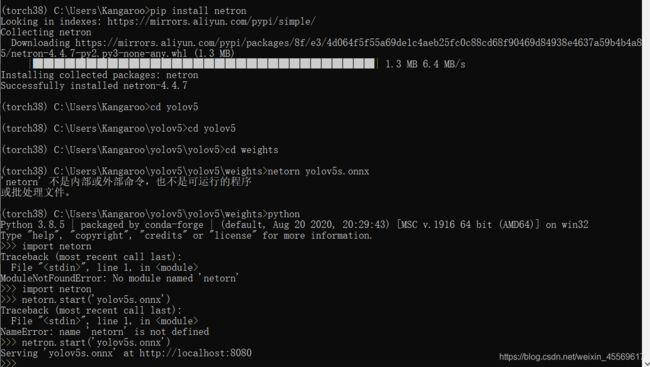
安装netron
pip install netron
进入python,运行netron.start()
import netron
netron.start('[FILE]')
2.Jetson nano的部署
准备软硬件
一个Jetson nano 4GB(据说2GB和4GB会有些不同,所以我不保证2GB照我的方法能部署成功)
下载官方的jetpack_v4.4.1
64GB 的tf卡(他镜像就30G左右所以建议64GB起步)
- 下载网址https://developer.nvidia.com/embedded/jetpack
- 下载百度云 4GB的镜像,2GB的镜像就自己下一下吧
链接:https://pan.baidu.com/s/1l-1UndyjtNYeGQTpQxKDeQ
提取码:4e67
USB无线网卡(Jetson nano不自带网络,需额外购买无线网卡)
DC 5v 4A 电源(建议使用这个供电,用5v 2A 的电源接口,常常会导致功率不足而关机)
风扇(不加风扇的话散热器摸起来就贼烫,加了就冰冰凉,虽然运行上没啥明显区别,加了求个心安吧)
大屏显示器、机械键盘、鼠标
!!!有个注意事项就是使用5V 4A电源供电的话,需要在图片位置安置一个跳线帽。
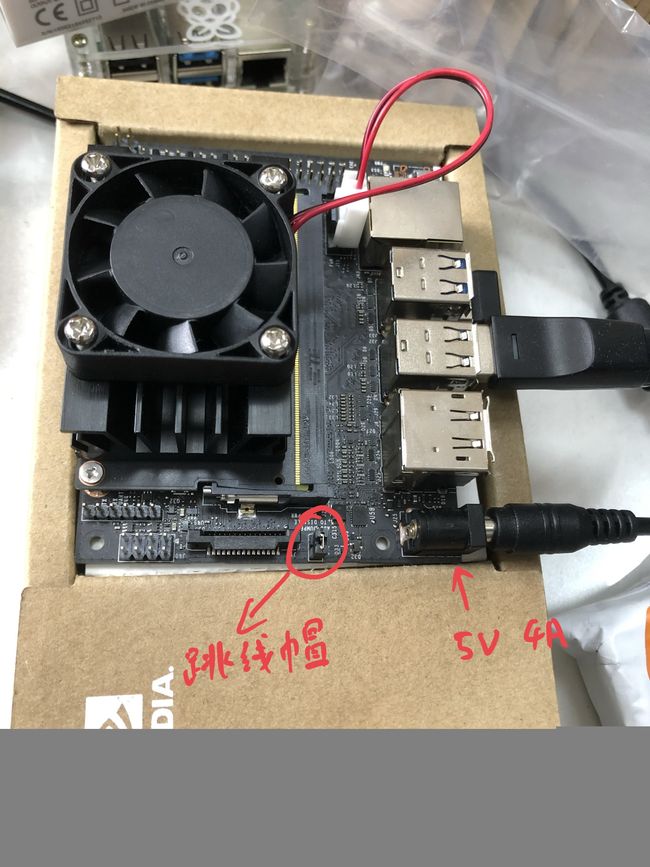
配置Jetson nano
1.上传镜像
使用Jetpack 官方的NVIDIA SDK Manager安装镜像
2.常规配置
- 插上USB无线网卡连接wifi
- 安装vim(个人习惯,可安装可不安装) 代码:sudo apt-get install vim
- 换源 网上有很多可行的教程,这里就不多说了)
Jetson Nano更换软件源 - 启用cuda、安装pip3
Jetson Nano配置与使用(5)cuda测试及tensorflow gpu安装 - 安装pycuda
jetson nano安装pycuda!!!
到这一步Jetson nano的环境就基本配置好了
如果一切正常的话,你的Jetson nano里的配置应该是下面这个样子:
- NVIDIA Jetpack 4.4DP
- Ubuntu 18.04 L4T
- Python 3.6.9
- TensorRT 7.1
- CUDA 10.2
- NVIDIA Transfer Learning Toolkit 2.0
- Opencv 4.1.1
- Numpy 1.16.1
对于我的方法这些库是必须的,版本我不能说一定是我这样的吧,但你一旦出现一些奇怪的问题,请对照下我的环境。
3.下载yolov5、tensorrtx
git clone https://github.com/wang-xinyu/tensorrtx.git
git clone https://github.com/ultralytics/yolov5.git
生成trt引擎
yolov5官方教程:https://github.com/wang-xinyu/tensorrtx/tree/master/yolov5
接下去我主要是按照官方教程给大家作中文翻译示范
1.生成wts文件
这一步可以在x86系统上完成。
首先你得有yolov5的模型文件,我上一篇有讲,我这里使用yolov5s.pt训练出来的best.pt文件来进行下面的操作。
复制 tensorrtx/yolov5/gen_wts.py文件 到 yolov5 文件夹中
打开gen_wts.py文件,确认代码中需要转换的文件是best.pt文件,需要转成的是yolov5s.pt文件(这里你用哪种大小的yolov5文件训练的就写什么)。
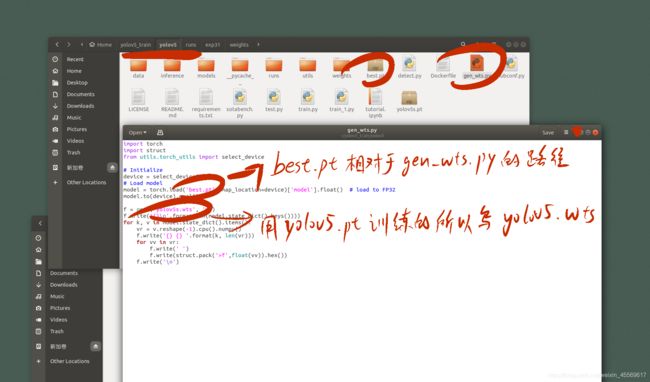
执行转换命令
python3 gen_wts.py
这样就会生成一个yolov5s.wts文件
2.build
这一步是生成部署引擎,必须来到部署该引擎的硬件设备上进行。
就像我这里模型是想在Jetson nano上部署,所以这一步就必须在Jetson nano上进行build。在此之前的有关yolov5的操作都可在x86的系统上完成。
将yolov5s.wts文件放到tensorrtx/yolov5文件夹中,
来到tensorrtx/yolov5文件夹中,查看yolov5.cpp中的模型是s。
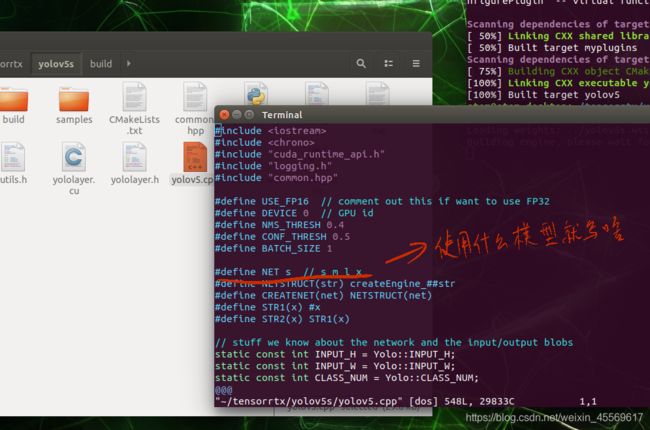
在yolov5.cpp文件中还可以修改fp16还是fp32(nano不支持int8)、device(选择哪一个GPU设备)、nms_thresh(nms的阈值)、conf_thresh(conf的置信度)、batch_size(批次大小)
这里我对于其他的参数全部默认
打开yololayer.h文件,修改他的num总数,根据你训练模型的类个数来,我这个best.pt训练的是四个种类的目标检测模型,所以我写四(并不是我上一篇文章中的检测红细胞模型的pt文件)
除此之外,我们还可以修改输入图片的尺寸,但必须是32的倍数。缩小输入尺寸可以一定程度上加快推理速度。
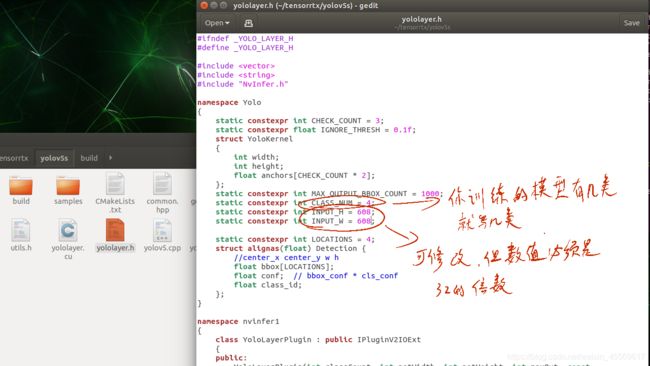
确保tensorrtx/yolov5文件下有你的wts文件,并且相应地修改了yolov5.cpp
文件和yolovlayer.h文件。
然后在tensorrtx/yolov5文件夹下依次执行下面的代码
mkdir build
cd build
cmake ..
make -j6
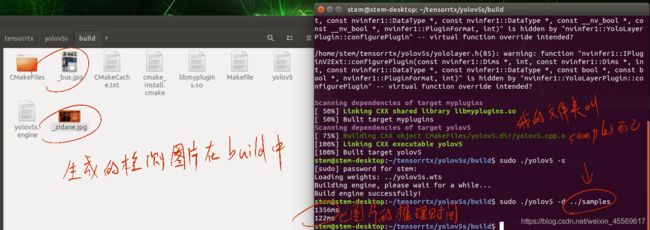
sudo ./yolov5 -s
.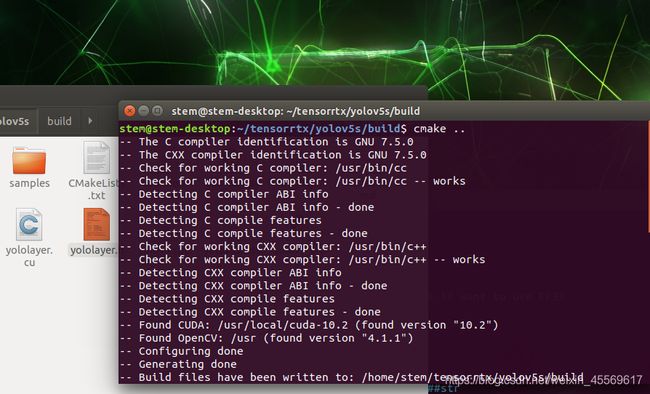


到这一步,我们便通过tensorrt生成了基于C++的engine部署引擎文件
你可以放几张用来测试,将yolov5 /data文件夹中的images文件夹整个复制到tensorrtx/yolov5文件夹,在build文件夹里执行下面的代码。
sudo ./yolov5 -d ../images
到一步我们已经算是完成了Jetson nano的部署,但你可能会发现在build中的图片几乎没有框。
这是因为s模型所产生的置信度一般在0.2-0.4之间,而我们之前在设置yolov5.cpp文件时把置信度conf_thresh设置在0.5了,也就是说低于0.5的检测框都被我们排除了,所以检测结果空空荡荡。
3.python调用
编辑yolov5_trt.py文件
这里不管在哪个系统上修改的都一样,因为此时此刻nano不在身边,所以我就直接用win来演示了。
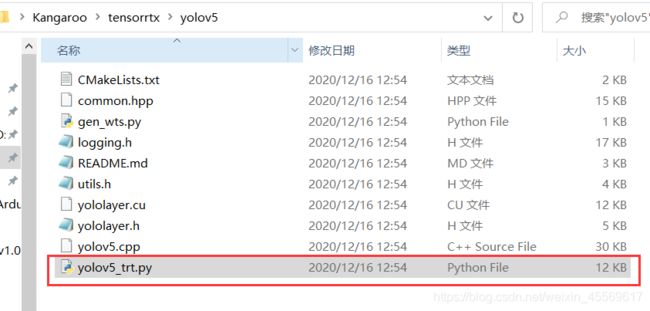
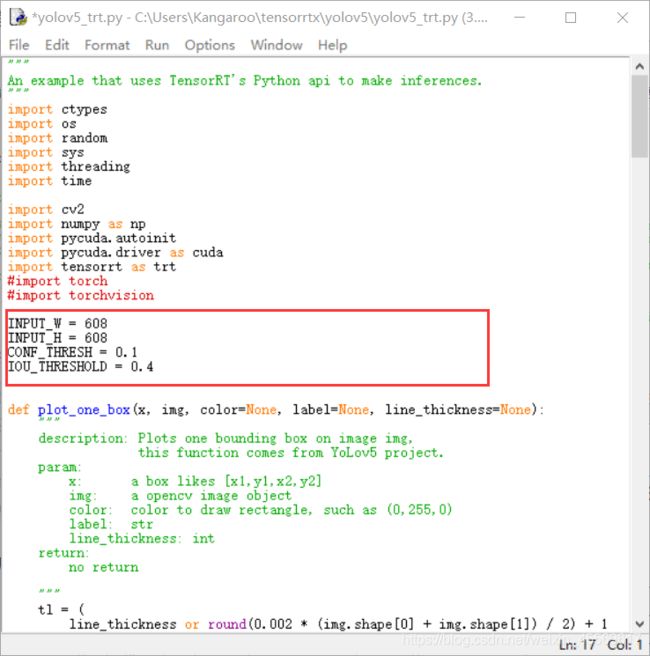
注释掉import torch和import torchvision,因为在nano上安装这两个库是有些麻烦的特别是torchvision。
当然你也可以去试试安装这两个库,网上的一些教程我有试过是可以成功,就是麻烦。

INPUT_W和INPUT_H根据你自己之前设置的来,我build时是写608,所以这里也是608。
CONF_THRESH 与 IOU_THRESHOLD 可根据最后的显示效果返回来修改他,暂且不调整。
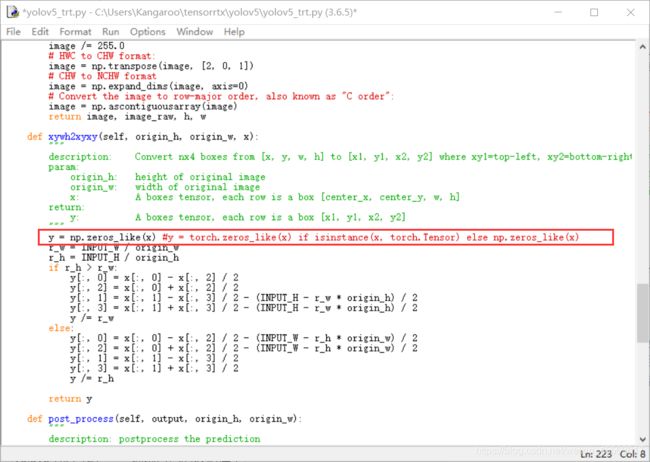
第223行,让y直接等于np.zeros_like(x),这里是创建一个和x形状相同的全0矩阵。因为不用torch库,所以用ndarray表示。
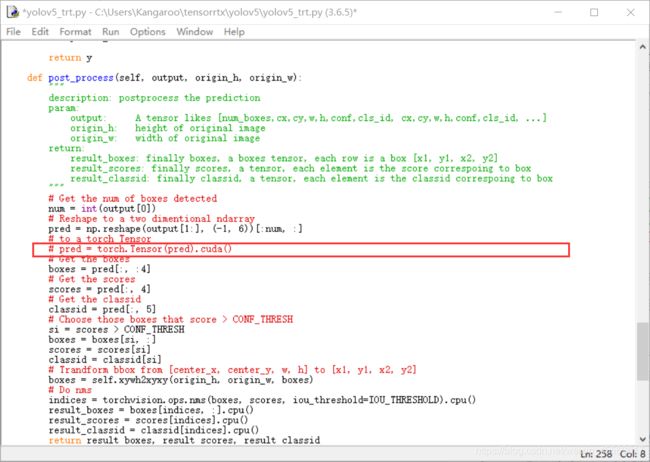
第258行,直接注释掉这句话,因为我们既不想用torch,numpy也不存在cuda方法。
如果你在nano上成功安装torch和torchvison这两个库并使用他们,最好要把这行的cuda方法给关掉,我尝试过很多次,在nano上使用cuda方法会使程序卡死,轻则过老久给你报错,重则需拔电重启。
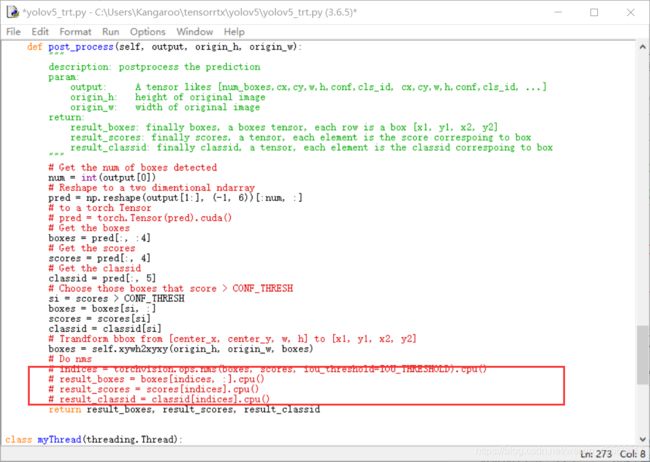
第273行注释掉,因为这一行使用到了torchvision。他用torchvision库中的nms方法来完成非极大值抑制。
后面三行去掉cpu方法,因为ndarray没有这个方法。
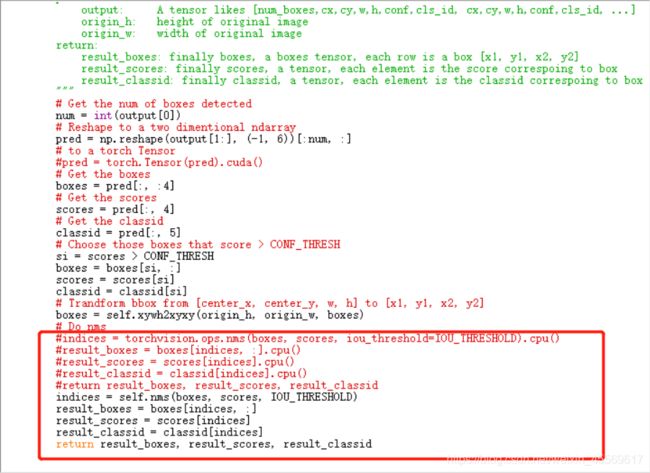
往YoLov5TRT这个类中加入一个方法,这是用numpy的方式实现nms,注意空格对齐。
def  nms(self,boxes, scores, iou_threshold=IOU_THRESHOLD):
         x1 = boxes[:, 0]
         y1 = boxes[:, 1]
         x2 = boxes[:, 2]
         y2 = boxes[:, 3]
         areas = (y2 - y1 + 1) * (x2 - x1 + 1)
         scores = scores
         keep = []
         index = scores.argsort()[::-1]
         while index.size > 0:
            i = index[0]  # every time the first is the biggst, and add it directly
            keep.append(i)

            x11 = np.maximum(x1[i], x1[index[1:]])  # calculate the points of overlap
            y11 = np.maximum(y1[i], y1[index[1:]])
            x22 = np.minimum(x2[i], x2[index[1:]])
            y22 = np.minimum(y2[i], y2[index[1:]])

            w = np.maximum(0, x22 - x11 + 1)  # the weights of overlap
            h = np.maximum(0, y22 - y11 + 1)  # the height of overlap

            overlaps = w * h
            ious = overlaps / (areas[i] + areas[index[1:]] - overlaps)

            idx = np.where(ious <= iou_threshold)[0]
            index = index[idx + 1]  # because index start from 1

         return keep

现在我们把nms的结果赋值给indices变量,如下图所示改写post_process函数
来到main函数这里,修改成你build出来的引擎的相对路径
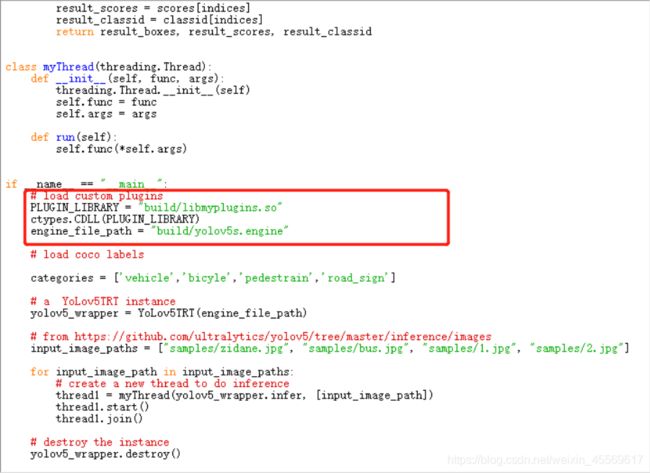
修改成你训练时相应的标签,记住一定要和你训练时的标签顺序一致,因为yolo识别出来的是0,1,2,3。他是把这个当作列表索引号来找到对应的标签名。
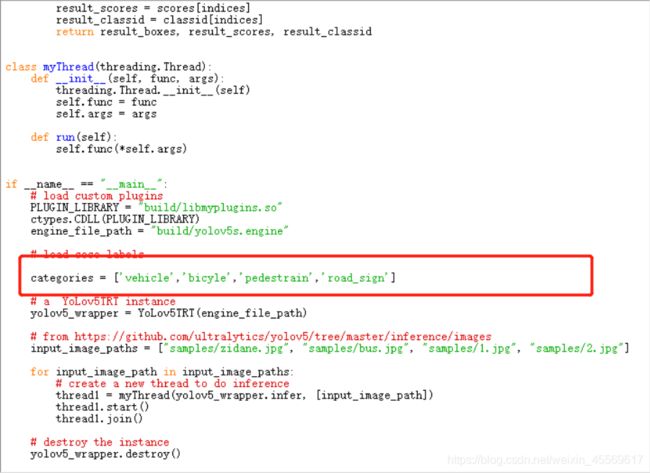
然后将要检测的图片一张一张地送进入就可以检测了。

到这一步,我们Ctrl+S保存代码,在命令行上运行这个python脚本,就可以得到检测结果。如果你觉得一些框的置信度太低导致识别地不对,可以去提高我上面说的CONF_THRESH。
4.视频检测
在之前python文件或c++文件上加入opencv的API即可。
接下来我将讲下python调用的流程,也可算是对官方的文件一个过程解释和重构。
导入必要的库
import time
import cv2
import pycuda.autoinit  # This is needed for initializing CUDA driver
import numpy as np
import ctypes
import tensorrt as trt
import pycuda.driver as cuda

import threading
import random
设置基本的参数和类别名称
INPUT_W = 608
INPUT_H = 608
CONF_THRESH = 0.2
IOU_THRESHOLD = 0.4

categories = ['vehicle','bicyle','pedestrain','road_sign']
定义画框函数
def plot_one_box(x, img, color=None, label=None, line_thickness=None):
    """
    description: Plots one bounding box on image img,
                 this function comes from YoLov5 project.
    param:
        x:      a box likes [x1,y1,x2,y2]
        img:    a opencv image object
        color:  color to draw rectangle, such as (0,255,0)
        label:  str
        line_thickness: int
    return:
        no return

    """
    tl = (
            line_thickness or round(0.002 * (img.shape[0] + img.shape[1]) / 2) + 1
    )  # line/font thickness
    color = color or [random.randint(0, 255) for _ in range(3)]
    c1, c2 = (int(x[0]), int(x[1])), (int(x[2]), int(x[3]))
    cv2.rectangle(img, c1, c2, color, thickness=tl, lineType=cv2.LINE_AA)
    if label:
        tf = max(tl - 1, 1)  # font thickness
        t_size = cv2.getTextSize(label, 0, fontScale=tl / 3, thickness=tf)[0]
        c2 = c1[0] + t_size[0], c1[1] - t_size[1] - 3
        cv2.rectangle(img, c1, c2, color, -1, cv2.LINE_AA)  # filled
        cv2.putText(
            img,
            label,
            (c1[0], c1[1] - 2),
            0,
            tl / 3,
            [225, 255, 255],
            thickness=tf,
            lineType=cv2.LINE_AA,
        )


def draw_boxes(image_raw, result_boxes, result_scores, result_classid):
    for i in range(len(result_boxes)):
        box = result_boxes[i]
        plot_one_box(
            box,
            image_raw,
            label="{}:{:.2f}".format(
                categories[int(result_classid[i])], result_scores[i]
            ),
        )
    return image_raw
定义yolov5转trt的类
class YoLov5TRT(object):
    """
    description: A YOLOv5 class that warps TensorRT ops, preprocess and postprocess ops.
    """

    def __init__(self, engine_file_path):
        # Create a Context on this device,
        self.cfx = cuda.Device(0).make_context()
        stream = cuda.Stream()
        TRT_LOGGER = trt.Logger(trt.Logger.INFO)
        runtime = trt.Runtime(TRT_LOGGER)

        # Deserialize the engine from file
        with open(engine_file_path, "rb") as f:
            engine = runtime.deserialize_cuda_engine(f.read())
        context = engine.create_execution_context()

        host_inputs = []
        cuda_inputs = []
        host_outputs = []
        cuda_outputs = []
        bindings = []

        for binding in engine:
            size = trt.volume(engine.get_binding_shape(binding)) * engine.max_batch_size
            dtype = trt.nptype(engine.get_binding_dtype(binding))
            # Allocate host and device buffers
            host_mem = cuda.pagelocked_empty(size, dtype)
            cuda_mem = cuda.mem_alloc(host_mem.nbytes)
            # Append the device buffer to device bindings.
            bindings.append(int(cuda_mem))
            # Append to the appropriate list.
            if engine.binding_is_input(binding):
                host_inputs.append(host_mem)
                cuda_inputs.append(cuda_mem)
            else:
                host_outputs.append(host_mem)
                cuda_outputs.append(cuda_mem)

        # Store
        self.stream = stream
        self.context = context
        self.engine = engine
        self.host_inputs = host_inputs
        self.cuda_inputs = cuda_inputs
        self.host_outputs = host_outputs
        self.cuda_outputs = cuda_outputs
        self.bindings = bindings

    # 释放引擎,释放GPU显存,释放CUDA流
    def __del__(self):
        print("delete object to release memory")

    def infer(self, image_raw):
        threading.Thread.__init__(self)
        # Make self the active context, pushing it on top of the context stack.
        self.cfx.push()
        # Restore
        stream = self.stream
        context = self.context
        engine = self.engine
        host_inputs = self.host_inputs
        cuda_inputs = self.cuda_inputs
        host_outputs = self.host_outputs
        cuda_outputs = self.cuda_outputs
        bindings = self.bindings
        # Do image preprocess
        input_image, image_raw, origin_h, origin_w = self.preprocess_image(
            image_raw
        )
        # Copy input image to host buffer
        np.copyto(host_inputs[0], input_image.ravel())
        # Transfer input data  to the GPU.
        cuda.memcpy_htod_async(cuda_inputs[0], host_inputs[0], stream)
        # Run inference.
        context.execute_async(bindings=bindings, stream_handle=stream.handle)
        # Transfer predictions back from the GPU.
        cuda.memcpy_dtoh_async(host_outputs[0], cuda_outputs[0], stream)
        # Synchronize the stream
        stream.synchronize()
        # Remove any context from the top of the context stack, deactivating it.
        self.cfx.pop()
        # Here we use the first row of output in that batch_size = 1
        output = host_outputs[0]
        # Do postprocess
        result_boxes, result_scores, result_classid = self.post_process(
            output, origin_h, origin_w
        )

        return image_raw, result_boxes, result_scores, result_classid

    def destroy(self):
        # Remove any context from the top of the context stack, deactivating it.
        self.cfx.pop()

    def preprocess_image(self, image_raw):
        """
        description: Read an image from image path, convert it to RGB,
                     resize and pad it to target size, normalize to [0,1],
                     transform to NCHW format.
        param:
            input_image_path: str, image path
        return:
            image:  the processed image
            image_raw: the original image
            h: original height
            w: original width
        """
        h, w, c = image_raw.shape
        image = cv2.cvtColor(image_raw, cv2.COLOR_BGR2RGB)
        # Calculate widht and height and paddings
        r_w = INPUT_W / w
        r_h = INPUT_H / h
        if r_h > r_w:
            tw = INPUT_W
            th = int(r_w * h)
            tx1 = tx2 = 0
            ty1 = int((INPUT_H - th) / 2)
            ty2 = INPUT_H - th - ty1
        else:
            tw = int(r_h * w)
            th = INPUT_H
            tx1 = int((INPUT_W - tw) / 2)
            tx2 = INPUT_W - tw - tx1
            ty1 = ty2 = 0
        # Resize the image with long side while maintaining ratio
        image = cv2.resize(image, (tw, th))
        # Pad the short side with (128,128,128)
        image = cv2.copyMakeBorder(
            image, ty1, ty2, tx1, tx2, cv2.BORDER_CONSTANT, (128, 128, 128)
        )
        image = image.astype(np.float32)
        # Normalize to [0,1]
        image /= 255.0
        # HWC to CHW format:
        image = np.transpose(image, [2, 0, 1])
        # CHW to NCHW format
        image = np.expand_dims(image, axis=0)
        # Convert the image to row-major order, also known as "C order":
        image = np.ascontiguousarray(image)
        return image, image_raw, h, w

    def xywh2xyxy(self, origin_h, origin_w, x):
        """
        description:    Convert nx4 boxes from [x, y, w, h] to [x1, y1, x2, y2] where xy1=top-left, xy2=bottom-right
        param:
            origin_h:   height of original image
            origin_w:   width of original image
            x:          A boxes tensor, each row is a box [center_x, center_y, w, h]
        return:
            y:          A boxes tensor, each row is a box [x1, y1, x2, y2]
        """
        # y = torch.zeros_like(x) if isinstance(x, torch.Tensor) else np.zeros_like(x)
        y = np.zeros_like(x)
        r_w = INPUT_W / origin_w
        r_h = INPUT_H / origin_h
        if r_h > r_w:
            y[:, 0] = x[:, 0] - x[:, 2] / 2
            y[:, 2] = x[:, 0] + x[:, 2] / 2
            y[:, 1] = x[:, 1] - x[:, 3] / 2 - (INPUT_H - r_w * origin_h) / 2
            y[:, 3] = x[:, 1] + x[:, 3] / 2 - (INPUT_H - r_w * origin_h) / 2
            y /= r_w
        else:
            y[:, 0] = x[:, 0] - x[:, 2] / 2 - (INPUT_W - r_h * origin_w) / 2
            y[:, 2] = x[:, 0] + x[:, 2] / 2 - (INPUT_W - r_h * origin_w) / 2
            y[:, 1] = x[:, 1] - x[:, 3] / 2
            y[:, 3] = x[:, 1] + x[:, 3] / 2
            y /= r_h

        return y

    def nms(self, boxes, scores, iou_threshold=IOU_THRESHOLD):
        x1 = boxes[:, 0]
        y1 = boxes[:, 1]
        x2 = boxes[:, 2]
        y2 = boxes[:, 3]
        areas = (y2 - y1 + 1) * (x2 - x1 + 1)
        scores = scores
        keep = []
        index = scores.argsort()[::-1]
        while index.size > 0:
            i = index[0]  # every time the first is the biggst, and add it directly
            keep.append(i)

            x11 = np.maximum(x1[i], x1[index[1:]])  # calculate the points of overlap
            y11 = np.maximum(y1[i], y1[index[1:]])
            x22 = np.minimum(x2[i], x2[index[1:]])
            y22 = np.minimum(y2[i], y2[index[1:]])

            w = np.maximum(0, x22 - x11 + 1)  # the weights of overlap
            h = np.maximum(0, y22 - y11 + 1)  # the height of overlap

            overlaps = w * h
            ious = overlaps / (areas[i] + areas[index[1:]] - overlaps)

            idx = np.where(ious <= iou_threshold)[0]
            index = index[idx + 1]  # because index start from 1

        return keep

    def post_process(self, output, origin_h, origin_w):
        """
        description: postprocess the prediction
        param:
            output:     A tensor likes [num_boxes,cx,cy,w,h,conf,cls_id, cx,cy,w,h,conf,cls_id, ...]
            origin_h:   height of original image
            origin_w:   width of original image
        return:
            result_boxes: finally boxes, a boxes tensor, each row is a box [x1, y1, x2, y2]
            result_scores: finally scores, a tensor, each element is the score correspoing to box
            result_classid: finally classid, a tensor, each element is the classid correspoing to box
        """
        # Get the num of boxes detected
        num = int(output[0])
        # Reshape to a two dimentional ndarray
        pred = np.reshape(output[1:], (-1, 6))[:num, :]
        # to a torch Tensor
        # pred = torch.Tensor(pred).cuda()
        # Get the boxes
        boxes = pred[:, :4]
        # Get the scores
        scores = pred[:, 4]
        # Get the classid
        classid = pred[:, 5]
        # Choose those boxes that score > CONF_THRESH
        si = scores > CONF_THRESH
        boxes = boxes[si, :]
        scores = scores[si]
        classid = classid[si]
        # Trandform bbox from [center_x, center_y, w, h] to [x1, y1, x2, y2]
        boxes = self.xywh2xyxy(origin_h, origin_w, boxes)
        # Do nms
        # indices = torchvision.ops.nms(boxes, scores, iou_threshold=IOU_THRESHOLD).cpu()
        # result_boxes = boxes[indices, :].cpu()
        # result_scores = scores[indices].cpu()
        # result_classid = classid[indices].cpu()
        # return result_boxes, result_scores, result_classid
        indices = self.nms(boxes, scores, IOU_THRESHOLD)
        result_boxes = boxes[indices, :]
        result_scores = scores[indices]
        result_classid = classid[indices]
        return result_boxes, result_scores, result_classid
定义检测图片的函数,它接收一张图片和编译好的trt文件,推理出框的坐标(中心点x,y,长,宽)、置信度、类别名称,并使用前面的画框函数在此图片上画出这个框。
def detect_one(img, yolov5_wrapper):
    full_scrn = False
    tic = time.clock()
    ##开始检测,并将结果写到result.jpg中
    img, result_boxes, result_scores, result_classid = yolov5_wrapper.infer(img)
    toc = time.clock()
    curr_fps = (toc - tic)
    print("boxes: "+str(result_boxes))
    print("clss: "+str(result_classid))
    print("confs: "+str(result_scores))
    img = draw_boxes(img, result_boxes, result_scores, result_classid)
    cv2.imwrite("result.jpg",img)
    print("time: "+str(curr_fps)+"(sec)")
检测图片,filename改为相对路径,引擎的相对路径,可放在main里直接运行
def main_one():
    filename = "1.jpg"
    img = cv2.imread(filename)
    # load custom plugins
    PLUGIN_LIBRARY = "yolov5s/libmyplugins.so"
    ctypes.CDLL(PLUGIN_LIBRARY)
    engine_file_path = "yolov5s/yolov5s.engine"

    # a  YoLov5TRT instance
    yolov5_wrapper = YoLov5TRT(engine_file_path)
    print("start detection!")
    detect_one(img, yolov5_wrapper)
    cv2.destroyAllWindows()
    print("finish!")
显示图片结果
from IPython.display import Image
main_one()
Image("result.jpg")
定义检测视频的函数,它接收一个视频和编译好的trt文件,按帧推理出框的坐标(中心点x,y,长,宽)、置信度、类别名称,并使用前面的画框函数在此图片上画出这个框。
def detect_video(video, yolov5_wrapper):
    full_scrn = False
    fps = 0.0
    tic = time.time()
    frame_width = int(video.get(cv2.CAP_PROP_FRAME_WIDTH))
    frame_height = int(video.get(cv2.CAP_PROP_FRAME_HEIGHT))
    fps = video.get(cv2.CAP_PROP_FPS)
    #print(str(frame_width)+str(frame_height))
    ##定义输入编码
    fourcc = cv2.VideoWriter_fourcc('M', 'P', '4', 'V')
    videoWriter = cv2.VideoWriter('result.AVI', fourcc, fps, (frame_width,frame_height))
    ##开始循环检测,并将结果写到result.mp4中
    while True:
        ret,img = video.read()
        if img is not None:
            img, result_boxes, result_scores, result_classid = yolov5_wrapper.infer(img)
            img = draw_boxes(img, result_boxes, result_scores, result_classid)
            videoWriter.write(img)
            toc = time.time()
            curr_fps = 1.0 / (toc - tic)
            fps = curr_fps if fps == 0.0 else (fps*0.95 + curr_fps*0.05)
            tic = toc
            print("\rfps: "+str(fps),end="")
        else:
            break
检测视频,filename改为相对路径,引擎的相对路径,可放在main里直接运行
def main_loop():
    filename = "video2.mp4"
    video = cv2.VideoCapture(filename)
    # load custom plugins
    PLUGIN_LIBRARY = "yolov5x/libmyplugins.so"
    ctypes.CDLL(PLUGIN_LIBRARY)
    engine_file_path = "yolov5x/yolov5x.engine"

    # a  YoLov5TRT instance
    yolov5_wrapper = YoLov5TRT(engine_file_path)
    print("start detection!")
    detect_video(video, yolov5_wrapper)
    video.release()
    cv2.destroyAllWindows()
    print("\nfinish!")
显示视频,先运行main_loop()函数,然后在命令行中转码,最后在python中显示,或者可以直接打开。
main_loop()
# 下面两行代码是在命令行中运行
rm result-ffmpeg4.mp4
ffmpeg -i result.AVI -vcodec libx264 -f mp4 result-ffmpeg4.mp4

from IPython.display import Video
Video("result-ffmpeg4.mp4")
yolov5笔记(1)——安装pytorch_GPU(win10+anaconda3)
yolov5笔记(2)——训练自己的数据模型
yolov5笔记(3)——移动端部署自己的模型(小小更新)
