线程&锁未完成----2021年1月19日19:17:45
线程&锁 || 如何在面试官问到线程时让他拍大腿!!! 这人我要了
- 线程
-
- 线程的相关使用及面试题
-
- 线程基础
- 常见面试题补充
-
- 弱智面试题:线程状态有哪些?
- 线程有哪些终止方式?
-
- stop、interrupt、标志位
- 线程间如何通信?什么是线程封闭
-
- ~~suspend/resume~~
- wait/notify
- park/unpark
- 线程池的基本使用
- 锁
-
- volatile
-
-
- 所以:volatile写:
- 所以:volatile读:
-
- synchronized
-
- 锁在哪了? 怎么锁的?
-
- 好的。什么是对象头?
- 对象头里有什么呢?
- 所以 我们有这么几种锁
- 或许还有独占锁、读写锁、(非)/公平锁、balabala
- LOCK
-
- 接口 Lock:
- 接口ReadWriteLock:
- 什么是AQS呢?
-
- AQS实现:ReentrantLock
: 记录我学习到的关于线程与锁的相关知识------@author 爱跳舞的小码农 Bboy_fork
线程
依稀还记得背过一道面试题,实现线程的方式有哪些? 当时。。。
兴致勃勃的背诵了如下
代码:
new Thread(()->{

    for (int i = 0; i < 1000; i++) {

        System.out.println("线程1----"+ i);
    }
}).start();
代码:
new Runnable() {

   @Override
   public void run() {

       for (int i = 0; i < 1000; i++) {

           System.out.println("线程2----"+ i);
       }
   }
}.run();
代码:
new Callable() {

    @Override
    public Object call() throws Exception {

        for (int i = 0; i < 1000; i++) {

            System.out.println("线程3----"+ i);
        }
        return null;
    }
}.call();
面试官:还有么?
我: 恩,没了,就这些。
面试官:那 callable 和 runable 的异同有哪些?
膨胀:
相同——都是接口。都可以编写多线程程序。都采用Thread.start()启动线程
不同——Runnable没有返回值;Callable可以返回执行结果,是个泛型,和Future、FutureTask配合可以用来获取异步执行的结果;
面试官:好的。
面试官:线程状态有哪些?
面试官:线程有哪些终止方式?
面试官:线程间如何通信?什么是线程封闭。
当时没感觉 现在想来 面试官内心: 小伙很一( la )般( ji )啊
很好 让我们重新审视这些题
线程的相关使用及面试题
线程基础
上代码!
点开Thread类
public
class Thread implements Runnable {
通过查看Thread类的构造方法能看到…
public Thread(Runnable target) {

    init(null, target, "Thread-" + nextThreadNum(), 0);
}
以及:
    /**
     * If this thread was constructed using a separate
     * Runnable run object, then that
     * Runnable object's run method is called;
     * otherwise, this method does nothing and returns.
     *
     * Subclasses of Thread should override this method.
     *
     * @see     #start()
     * @see     #stop()
     * @see     #Thread(ThreadGroup, Runnable, String)
     */
    @Override
    public void run() {

        if (target != null) {

            target.run();
        }
    }
还有:
    /**
     * Causes this thread to begin execution; the Java Virtual Machine
     * calls the run method of this thread.
     *
     * The result is that two threads are running concurrently: the
     * current thread (which returns from the call to the
     * start method) and the other thread (which executes its
     * run method).
     *
     * It is never legal to start a thread more than once.
     * In particular, a thread may not be restarted once it has completed
     * execution.
     *
     * @exception  IllegalThreadStateException  if the thread was already
     *               started.
     * @see        #run()
     * @see        #stop()
     */
    public synchronized void start() {
很好 Thread看起来就是皮包公司了 实际上还是 Runable 在干活
准确的说 是干Runable 手中的活
run方法什么也没做就是调一下Runable中的run,start最终也还是调一下run( 注释里写的很清楚 )
那么再点开 Runable 和 Callable
@FunctionalInterface
public interface Runnable {

    /**
     * When an object implementing interface Runnable is used
     * to create a thread, starting the thread causes the object's
     * run method to be called in that separately executing
     * thread.
     *
     * The general contract of the method run is that it may
     * take any action whatsoever.
     *
     * @see     java.lang.Thread#run()
     */
    public abstract void run();
}

@FunctionalInterface
public interface Callable<V> {

    /**
     * Computes a result, or throws an exception if unable to do so.
     *
     * @return computed result
     * @throws Exception if unable to compute a result
     */
    V call() throws Exception;
}
很好! 简洁的一匹 ,看不出来啥,让我们正常使用一下。
Runnable:
public void runnableTest(){

    Runnable runnable = new Runnable() {

        @Override
        public void run() {

            System.out.println("runable 任务1 开始");
            try {
     Thread.sleep(4000L);}
            catch (InterruptedException e) {
     e.printStackTrace();}
            System.out.println("runable 任务1 结束");
        }
    };
    Runnable runnable2 = new Runnable() {

        @Override
        public void run() {

            System.out.println("runable 任务2 开始");
            try {
     Thread.sleep(3000L);}
            catch (InterruptedException e) {
     e.printStackTrace(); }
            System.out.println("runable 任务2 结束");
        }
    };

    new Thread(runnable).start();
    new Thread(runnable2).start();
}
Callable
public void callableTest() throws Exception {

     Callable callable1 = new Callable() {

         @Override
         public String call() {

             System.out.println("callable 任务1 开始");
             try {
     Thread.sleep(4000L);}
             catch (InterruptedException e) {
     e.printStackTrace();}
             System.out.println("callable 任务1 结束");
             return "任务1返回值";
         }
     };
     Callable callable2 = new Callable() {

         @Override
         public String call() {

             System.out.println("callable 任务2 开始");
             try {
     Thread.sleep(3000L);}
             catch (InterruptedException e) {
     e.printStackTrace(); }
             System.out.println("callable 任务2 结束");
             return "任务2返回值";
         }
     };

     FutureTask futureTask = new FutureTask<>(callable1);
     FutureTask futureTask2 = new FutureTask<>(callable2);
     new Thread(futureTask).start();
     new Thread(futureTask2).start();

     Object o = futureTask.get();
     Object o1 = futureTask2.get();
     System.out.println(o.toString() + o1.toString());
 }
很好!到这里我们可以得出结论:
Runable还是比较稀松平常的 我们将要跑的代码 放在run方法里 然后交由Thread执行。
但是 Callable 呢?为什么还要再来一个FutureTask ?为什么他能够获取到返回值和异常?
好的 让我们再点开她的源码:
package java.util.concurrent;
import java.util.concurrent.locks.LockSupport;

public class FutureTask<V> implements RunnableFuture<V> {

    private volatile int state;
    private static final int NEW          = 0;
    private static final int COMPLETING   = 1;
    private static final int NORMAL       = 2;
    private static final int EXCEPTIONAL  = 3;
    private static final int CANCELLED    = 4;
    private static final int INTERRUPTING = 5;
    private static final int INTERRUPTED  = 6;
    private Callable<V> callable;
......
    /**
     * Creates a {@code FutureTask} that will, upon running, execute the
     * given {@code Callable}.
     *
     * @param  callable the callable task
     * @throws NullPointerException if the callable is null
     */
    public FutureTask(Callable<V> callable) {

        if (callable == null)
            throw new NullPointerException();
        this.callable = callable;
        this.state = NEW;       // ensure visibility of callable
    }
......
    /**
     * @throws CancellationException {@inheritDoc}
     */
    public V get() throws InterruptedException, ExecutionException {

        int s = state;
        if (s <= COMPLETING)
            s = awaitDone(false, 0L);
        return report(s);
    }
......
    public void run() {

        if (state != NEW ||
            !UNSAFE.compareAndSwapObject(this, runnerOffset,
                                         null, Thread.currentThread()))
            return;
        try {

            Callable<V> c = callable;
            if (c != null && state == NEW) {

                V result;
                boolean ran;
                try {

                    result = c.call();
                    ran = true;
                } catch (Throwable ex) {

                    result = null;
                    ran = false;
                    setException(ex);
                }
                if (ran)
                    set(result);
            }
        } finally {

            // runner must be non-null until state is settled to
            // prevent concurrent calls to run()
            runner = null;
            // state must be re-read after nulling runner to prevent
            // leaked interrupts
            int s = state;
            if (s >= INTERRUPTING)
                handlePossibleCancellationInterrupt(s);
        }
这就完了? 就这样实现了?
你没看懂?好的 我们重新写一个 ForkFutureTask
首先确定我们要实现的结果 也就是模仿 copy 盗版 剽窃创意
以达到这样的效果:
Callable callable = new Callable() {

    @Override
    public String call() throws Exception {

        return testNullDemoService.selectA(Id);
    }
};

ForkFutureTask futureTask = new ForkFutureTask(callable);
ForkFutureTask futureTask2 = new ForkFutureTask(() -> {

    return testNullDemoService.selectB(Id);
});

new Thread(futureTask).start();
new Thread(futureTask2).start();
让我们仔细分析一下 FutureTask 的源码
首先是构造 把传进来的 Callable 放到 private Callable callable; 中
很常规的操作。
run方法:
先是一顿猛的一看,还有点看不懂的操作,然后 try 块中:
result = c.call();
很好,看来执行也就这样了,实现问题不大;
下一个问题就是:
它能拿到 返回值 ! 所以就产生了这样的问题:
假如任务还没执行完成 主线程就使用get方法获取结果,怎么办?
理智: 当然是等待、睡眠、阻塞;总之 停下来
那等待到什么时候?由谁来唤醒?
理智: 当然是等到任务执行完成,再唤醒它 继续执行get方法,返回
好的 于是乎有了它:
import java.util.concurrent.Callable;
import java.util.concurrent.LinkedBlockingQueue;
import java.util.concurrent.locks.LockSupport;

/**
 * 我自己的FutureTask
 * */
public class ForkFutureTask<T> implements Runnable {

    private Callable<T> callable;
    private int status = 0;
    LinkedBlockingQueue<Thread> waiters = new LinkedBlockingQueue<>();

    //callable 内 业务代码 执行完毕后的返回值
    T result;

    public ForkFutureTask(Callable<T> callable){

        this.callable = callable;
    }

    @Override
    public void run(){

        try {

            result = callable.call();
        } catch (Exception e) {

            e.printStackTrace();
        }finally {

            status = 1;
        }
        while (true){

            Thread waiter = waiters.poll();
            if(waiter == null){

                break;
            }
            LockSupport.unpark(waiter);
        }
    }

    public T get(){

        while (status != 1){

            waiters.add(Thread.currentThread());
            LockSupport.park(Thread.currentThread());
        }
        //1 代表结束
        return result;
    }
}
我们在进入get方法时如果还未执行完成 就将目前调用get方法这个线程加入等待队列中,
等待call中执行完成,再unpark唤醒它。
是不是感觉没那么难,线程间的唤醒就这样实现了,FutureTask也简单的实现了…
小结:
我们重写 Runable和Callable中的方法 交由 Thread 执行 / FutureTask 包装过后再 Thread ,用以实现开辟线程,来加速单个访问的处理速度,FutureTask 也没什么大不了,不过是一个实现了Runable 的类 用来包装任务。bala bala。。。。。。
常见面试题补充
弱智面试题:线程状态有哪些?
这是送分题啊,直接掏出源码:
/*
 * @since   JDK1.0
 */
public class Thread implements Runnable {

    public enum State {

        NEW,
        RUNNABLE,
        BLOCKED,
        WAITING,
        TIMED_WAITING,
        TERMINATED;
    }
线程有哪些终止方式?
stop、interrupt、标志位
stop会强行终止线程 后续的操作都不干了 直接毙掉。所以 肯定有线程安全问题吖。
而且JDK早就不建议这么干了。
interrupt是官方推荐使用的。 正常interrupt 虽然还是终止了 但是后续的方法会执行。
当线程在调用wait()、wait(long) 活join sleep方法被阻塞,interrupt还是会生效,中断状态将清除,抛出InterruptedException。
标志位,说来也是取巧
    private volatile static boolean flag = true;

    public static void main (String[] args) throws InterruptedException {

        new Thread(()->{

            try {

                while (flag){

                    System.out.println("run 1s");
                    Thread.sleep(1000L);
                }
            } catch (InterruptedException e) {

                e.printStackTrace();
            }
        }).start();

        Thread.sleep(3000L);
        flag = false;
线程间如何通信?什么是线程封闭
线程之间协同、共享及通信。当然分原始办法和正常办法。
① 文件共享(就是写到文件里嘛 easy)
② 网络共享()
③ 变量共享(共享变量不多说)
④ jdk提供的协调线程API
suspend/resume
带锁 所以死锁的方式:【其成功的方式】:正常的调用,就是去掉锁,但是还要考虑 执行顺序的问题因为顺序不对也容易锁住。
public void test01() throws InterruptedException {


    Thread consumerThread = new Thread(() -> {

        System.out.println("消费者线程内");
        synchronized (this) {

            System.out.println("消费者等待");
            Thread.currentThread().suspend();
            System.out.println("消费者被唤醒");
        }
        System.out.println("消费者执行完成");
    });
    consumerThread.start();
    System.out.println("生产者开始执行");
    Thread.sleep(2000L);
    System.out.println("生产者执行完成");
    synchronized (this){

        System.out.println("生产者试图唤醒 通知 消费者");
        consumerThread.resume();
    }
}
/*
生产者开始执行
消费者线程内
消费者等待
生产者执行完成
*/
wait/notify
正常:
public void test02() throws InterruptedException {

    new Thread(() -> {

        while (box == null){

            synchronized (this){

                System.out.println("消费者线程:box里没东西 则进入等待");
                try {

                    this.wait();
                } catch (InterruptedException e) {

                    e.printStackTrace();
                }
            }
        }
        System.out.println("消费者线程:有对象,直接结束");
    }).start();

    System.out.println("生产者线程:生产对象");
    Thread.sleep(3000L);
    box = new Object();
    synchronized (this){

        this.notifyAll();
        System.out.println("生产者: 全部唤醒-->通知消费者");
    }
}

/*
生产者线程:生产对象
消费者线程:box里没东西 则进入等待
生产者: 全部唤醒-->通知消费者
消费者线程:有对象,直接结束
*/
因为线程执行顺序,会导致程序永久等待
public void test03() throws InterruptedException {

    new Thread(()->{

        System.out.println("消费者:判断");
        while (box == null){

            System.out.println("生产者判断为空 处理...");
            try {

                Thread.sleep(5000L);
            } catch (InterruptedException e) {

                e.printStackTrace();
            }
            synchronized (this){

                try {

                    System.out.println("消费者: 进入等待");
                    this.wait();
                } catch (InterruptedException e) {

                    e.printStackTrace();
                }
            }
        }
        System.out.println("已被唤醒,执行完成");
    }).start();

    Thread.sleep(1000L);
    box = new Object();
    synchronized (this){

        this.notifyAll();
        System.out.println("生产者: 唤醒全部 --> 通知消费者");
    }
}
/*
消费者:判断
生产者判断为空 处理...
生产者: 唤醒全部 --> 通知消费者
消费者: 进入等待
*/
即: wait notifyAll 解决了 锁的问题 进入wait 会自动释放锁, 但是仍有执行顺序的问题
会导致一直等待
park/unpark
采用令牌的机制,并不会出现因为执行顺序 而出现死锁。
例:
public void test04() throws InterruptedException {

    Thread consumerThread = new Thread(() -> {

        while (box == null){

            System.out.println("消费者: 进入等待");
            LockSupport.park();
        }
        System.out.println("解锁 执行完毕");
    });
    consumerThread.start();

    Thread.sleep(3000L);
    box = new Object();
    System.out.println("生产者:已创建对象 并准备通知消费者");
    LockSupport.unpark(consumerThread);
    System.out.println("生产者:已通知");
}
/*
消费者: 进入等待
生产者:已创建对象 并准备通知消费者
生产者:已通知
解锁 执行完毕
*/
但
因为park & unpark 等待的时候 不会释放锁, 所以会有这种死锁:
public void test05() throws InterruptedException {

    Thread consumerThread = new Thread(() -> {

        while (box == null){

            System.out.println("消费者: 进入等待");
            synchronized (this){

                LockSupport.park();
            }
        }
        System.out.println("消费者: 执行结束");
    });
    consumerThread.start();

    Thread.sleep(3000L);
    box = new Object();
    synchronized (this){

        LockSupport.unpark(consumerThread);
        System.out.println("生产者:通知消费者");
    }
}
/*
消费者: 进入等待
*/
另
unpark 不会叠加
弄多次unpark 但是 park第一次可以执行, 但第二次就会等待了
重:
使用 if 进行判断 是有风险的 (我的代码中已经改为while)
它存在一个伪唤醒的可能, 这个是由更底层的原因导致的 在java的api中有说明,
官方推荐: 使用while循环进行判断。
然后… … …! 很就容易就说完了,因为这里真的没那么多东西可说,但是你可以拽着面试官说啊!
比如方向1:
FutureTask里面真的没啥好说的,要说它相对于Runnable就是解决了主线程对子线程的感知,就用到了比较常见的生产者-消费者模型。。。
【模型 代码设计 】【先放着 再议 再议 写这里就跑题了,可以以后加个链接】
又或方向2:
利用这两种 able 我们就可以创建线程…但是!线程也是资源!线程的创建也是消耗!为了优化,为了节约,为了合理的限制,有了线程池这东西…池嘛…
线程池的基本使用
| 类型 | 名称 | 描述 |
|---|---|---|
| 接口 | public interface Executor { | 最上层接口,定义了执行任务的方法execute |
| 接口 | public interface ExecutorService extends Executor { | 继承了Executor接口,拓展了Callable、Future、关闭方法 |
| 接口 | public interface ScheduledExecutorService extends ExecutorService { | 继承了ExecutorService,增加了定时任务相关方法 |
| 实现类 | public class ThreadPoolExecutor extends AbstractExecutorService {---------------------分割线---------------------public abstract class AbstractExecutorService implements ExecutorService { | 基础、标准的线程池实现 |
| 实现类 | public class ScheduledThreadPoolExecutor extends ThreadPoolExecutor implements ScheduledExecutorService { | 继承了ThreadPoolExecutor,实现了ScheduledExecutorService中相关定时任务的方法 |
常见的有这些接口和这两个实现类,我们就能够一般简单的创建一个线程池了。
    /**
     * 核心:5 最大:10   无界队列,   超出核心线程数量的线程存活时间 5s,
     * 无界队列 就是会把这个最大数量 弄得没有意义,因为他会一直缓存队列中 等待执行。
     * */
    private void threadPoolExecutorTest1(){

        ThreadPoolExecutor threadPoolExecutor = new ThreadPoolExecutor(5, 10, 5, TimeUnit.SECONDS, new LinkedBlockingQueue<Runnable>());
        testCommon(threadPoolExecutor);
    }
以及使用线程池:
    @SneakyThrows
    public void testCommon(ThreadPoolExecutor threadPoolExecutor){

        for (int i = 0; i < 15; i++) {

            int n = i;
            threadPoolExecutor.submit(new Runnable() {

                @SneakyThrows
                @Override
                public void run() {

                    System.out.println("开始执行:"+ n );
                    Thread.sleep(3000L);
                    System.out.println("执行结束:"+ n );
                }
            });
            System.out.println("任务提交成功"+i);
        }

        Thread.sleep(500L);
        System.out.println("当前线程池线程数量为:" + threadPoolExecutor.getPoolSize());
        System.out.println("当前线程池等待的数量为:" + threadPoolExecutor.getQueue().size());
        Thread.sleep(15000L);
        System.out.println("当前线程池线程数量为:" + threadPoolExecutor.getPoolSize());
        System.out.println("当前线程池等待的数量为:" + threadPoolExecutor.getQueue());
    }
当然 这里可以详细说一下构造方法中的参数的具体含义:
分别是:核心线程数量、最大线程数量、超出核心线程数量的线程存活时间、其时间单位、缓存队列。
当然还有其他重载构造 传入ThreadFactory、RejectedExecutionHandler 啥的,不常用、不管、不想看。
当然,说完基础的实现肯定就会说到其简便的工具——Executors
它给了几个方法,创建一个 Single线程池、Fixed线程池、Cache线程池 等等。
        //创建一个固定大小、任务队列容量无界的线程池。核心线程数=最大线程数。
        ExecutorService executorService = Executors.newFixedThreadPool(2);

        //创建一个大小无界的缓冲线程池。它的任务队列是一个同步队列。任务加入到池中,如果池中有空闲线程,则用空闲线程执行,如无则创建新线程执行。
        //池中的线程空闲超过60秒,将被小鬼释放。线程数随任务的多少变化。适用于执行耗时较小的一部任务。池的核心线程数=0,最大线程数=integer.MAX_VALUE
        ExecutorService executorService1 = Executors.newCachedThreadPool();

        //只有一个线程来执行无界队列的单一线程池。该线程池确保任务按加入的顺序一个一个依次执行。当唯一的线程因任务异常中止时,将创建一个新的线程来继续执行后续的任务。
        //与newFixedThreadPool(1)区别在于,单一线程池的池大小在newSingle中硬编码,不能再改变。
        ExecutorService executorService2 = Executors.newSingleThreadExecutor();

        //能定时执行任务的线程池,该池的核心线程数由参数指定,最大线程数=integer.MAX_VALUE
        ScheduledExecutorService scheduledExecutorService = Executors.newScheduledThreadPool(2);
点进去后…
    public static ExecutorService newFixedThreadPool(int nThreads) {

        return new ThreadPoolExecutor(nThreads, nThreads,
                                      0L, TimeUnit.MILLISECONDS,
                                      new LinkedBlockingQueue<Runnable>());
    }

    public static ExecutorService newCachedThreadPool() {

        return new ThreadPoolExecutor(0, Integer.MAX_VALUE,
                                      60L, TimeUnit.SECONDS,
                                      new SynchronousQueue<Runnable>());
    }

    public static ExecutorService newSingleThreadExecutor() {

        return new FinalizableDelegatedExecutorService
            (new ThreadPoolExecutor(1, 1,
                                    0L, TimeUnit.MILLISECONDS,
                                    new LinkedBlockingQueue<Runnable>()));
    }

    public static ScheduledExecutorService newScheduledThreadPool(int corePoolSize) {

        return new ScheduledThreadPoolExecutor(corePoolSize);
    }
    public ScheduledThreadPoolExecutor(int corePoolSize) {

        super(corePoolSize, Integer.MAX_VALUE, 0, NANOSECONDS,
              new DelayedWorkQueue());
    }
好的、看到这里 不难看出:Executors 不过是做了几个创建线程池的工作;
例如
缓存线程池:不过是没有核心线程,最大值不限制(Integer.MAX_VALUE),无界队列,创建出来的线程60s没有被复用则会删掉。
计划线程池:创建指定核心线程数、最大线程数不限(Integer.MAX_VALUE),0纳秒回收,无界队列。
值得一提的是: 最大线程数并不是直接意义上的最大线程数,线程数达到核心线程数后,则会分配向队列中,队列中存放不下的则会查看最大线程数,尝试增加线程处理。最后是处理完毕,查看等待时间,销毁线程。
代码举例:
    /**
     * 此,等待队列为3 自然两个任务就会被拒绝执行。
     * */
    private void threadPoolExecutorTest2(){

        ThreadPoolExecutor threadPoolExecutor = new ThreadPoolExecutor(5, 10, 5, TimeUnit.SECONDS, new LinkedBlockingQueue<Runnable>(3), new RejectedExecutionHandler() {

            @Override
            public void rejectedExecution(Runnable r, ThreadPoolExecutor executor) {

                System.out.println("有任务被拒绝执行了");
            }
        });
        testCommon(threadPoolExecutor);
    }
结果:
任务提交成功0
开始执行:0
任务提交成功1
开始执行:1
任务提交成功2
开始执行:2
任务提交成功3
开始执行:3
任务提交成功4
任务提交成功5
开始执行:4
任务提交成功6
任务提交成功7
任务提交成功8
任务提交成功9
开始执行:8
任务提交成功10
开始执行:9
开始执行:10
任务提交成功11
开始执行:11
任务提交成功12
有任务被拒绝执行了
任务提交成功13
有任务被拒绝执行了
任务提交成功14
开始执行:12
当前线程池线程数量为:10
当前线程池等待的数量为:3
执行结束:4
执行结束:2
执行结束:1
执行结束:0
开始执行:7
执行结束:8
执行结束:9
执行结束:3
开始执行:6
开始执行:5
执行结束:11
执行结束:12
执行结束:10
执行结束:6
执行结束:7
执行结束:5
当前线程池线程数量为:5
当前线程池等待的数量为:[]
妥!线程池的使用看起来也说得很清晰喽。
思考:架构师门会不会将它封装/限制,线程毕竟是挺珍惜的资源嘛,肯定不能让你随便就new线程池不是。
根据和某架构师交流得到信息:
在实际开发中:很少有对线程池的限制
一是本身业务逻辑很多都是不需要 / 无法使用多线程的。比如后续操作需要用到前面操作返回的数据。
二就算有多线程的使用必要,现在前后端分离,多数也是前端同时调用多个达到多线程的效果/或者说是处理速度。
三、真真正正需要用到的时候… 写呗 反正出问题能定位到你【囧】
所以、说一句。线程作为项目里的资源,注意节约使用哦
到这里 线程就没什么好说的了 然后就需要引导!往锁那里 拐!
(正常说完线程 面试官可能也会往锁这里拐 毕竟锁就是为了给多线程数据做的解决方案)
心机: 常规使用难度不大 干就完了,但是并发量小的时候还能玩,多了就不美丽了。所以 锁就有存在的必要了…balabala 反正就是话术 不仅是你没啥好讲的 需要转到锁上来,面试官肯定也想顺便问问锁的问题。
锁
volatile
这个关键字基本都用过,我们也都知道: 它不是锁!
它是不能够保证线程安全的,它解决了变量可见性的问题
问题来了,什么是可见性的问题呢?
它是怎么解决可见性的问题的呢? 上图!

CPU有缓存:
L1 Cache(一级缓存):是CPU第一层高速缓存,分为数据缓存和指令缓存。一般服务器CPU的L1缓存容量通常在32-4096KB。
L2 由于L1级高速缓存容量的限制,为了再次提高CPU的运算速度,在CPU外部放置一高速存储器,即二级缓存。
L3 现在都是内置的。而它的实际作用是:进一步降低内存延迟,同时提升大数据量计算时处理器的性能。多核共享一个L3缓存!
【问到就简单说说,详细了没用,也记不住】
多CPU读取同样的数据进行缓存,进行运算。最终以哪个CPU为准?L3 有解决方案:
MESI协议:
它规定每条缓存有个状态位,同时定义下面四个状态。
修改态(Modified) —— 此cache行已被修改过(脏行),内容已不同于主存,为此cache专有;
专有态(Exclusive) —— 此cache行内容同于主存,但不出现于其他cache中;
共享态(Shared) —— 此cache行内容同于主存,但也出现于其它cache中;
无效态(Invalid) —— 此cache行内容无效(空行)。
好的我们解释了CPU有缓存这一事实,那么就可以直接说了,我们读到的数据,很可能是缓存哦,当然 更多的是可能其他线程修改 我们并不知道它修改了 所以就是错误的数据 ~ so,就有了可见性的问题,我们见到的可能并不是真实的数据。
小结:volatile关键字通过使用MESI协议 使用总线嗅探技术 来更新其他cpu中缓存的值,使新修改的值被读取,使旧值失效。保证了我们读到的是最新,正确的值,即可见性 读 的保证。
另一方面:三种指令重排
【java编程语言的语义允许Java编译器和微处理器进行执行优化,这些优化导致了与其交互的代码不再同步,从而导致看似矛盾的行为】
编译器优化重排:编译器在不改变单线程程序语义的前提下,可以重新安排语句的执行顺序。
指令级的并行重排:现代处理器采用了指令级并行技术来将多条指令重叠指令。如果不存在数据依赖性,处理器可以改变语句对应机器指令的执行顺序。
内存系统的重排:对于处理器使用缓存和读/写缓冲区,这使得加载和存储操作看上去可能是在乱序执行。

栗子重述: 当CPU写缓存时发现缓存区块正在被其他CPU占用,为提高性能。可能将后面的读先执行。它本身是有限制的,即as-if-serial语义:不管怎么重排序,程序的执行结果不能被改变。编译器,runtime和处理器都必须遵守as-if-serial语义。
也就是说:编译器和处理器不会对存在数据依赖关系的操作重排序。单个CPU当然没毛病,但是多核多线程中,没有因果关联的指令,无从判断,可能出现乱序执行,导致程序运行结果错误。
而volatile就是在生成的指令序列前后插入内存屏障(Memory Barries)来禁止处理器重排序。
四种内存屏障:
| 屏障类型 | 简称 | 指令示例 | 说明 |
|---|---|---|---|
| LoadLoad Barriers | 读·读 屏障 | Load1;LoadLoad;Load2 | (Load1代表加载数据,Store1表示刷新数据到内存) 确保Load1数据的状态咸鱼Load2及所有后续装载指令的装载。 |
| StoreStore Barriers | 写·写屏障 | Store1;StoreStore;Store2 | 确保Store1数据对其他处理器可见(刷新到内存) 先于Store2及所有后续存储指令的存储。 |
| LoadStore Barriers | 读·写 屏障 | Load1;LoadStore;Store2 | 确保Load1数据装载先于Store2及所有后续的存储指令刷新到内存 |
| StoreLoad Barriers | 写·读 屏障 | Store1;StoreLoad;Load2 | 确保Store1数据对其他处理器变得可见(指刷新到内存) 先于Load2及所有后续装载指令的装载。 StoreLoad Barriers会使该屏障之前的所有内存访问指令(存储和装载指令) 完成之后,才指令该屏障之后的内存访问指令。 |
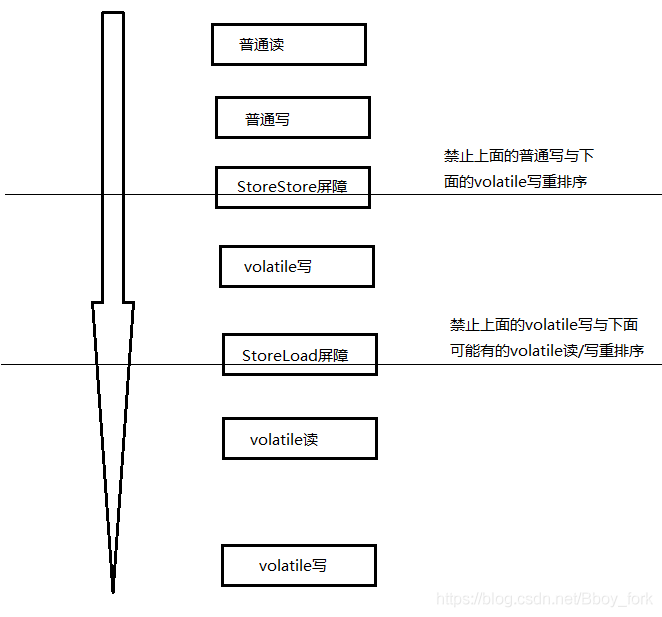
所以:volatile写:
在每个volatile写操作前面插入一个StoreStore(写-写 屏障)。
在每个volatile写操作后面插入一个StoreLoad(写-读 屏障)。(图画的丑 见谅 不谅也忍着)

所以:volatile读:
在每个volatile读操作后面插入一个LoadLoad(读-读 屏障)。
在每个volatile读操作后面插入一个LoadStore(读-写 屏障)。

到这里 我们知道了volatile关键字都做了什么并且它解决了什么问题。
小结 回到原本:什么是volatile关键字?:
即: 对CPU的两种优化:缓存和指令重排序虽然提高了CPU的性能,但是带来了这样那样的问题。而通过volatile关键字我们屏蔽了这两种优化 保证了变量的可见性。
synchronized
非公平、独享锁、悲观锁…
不多逼逼 简单的很 直接上代码:
	public synchronized void update(){
     i++;}
	//等价于
    public void updateBlock(){

        synchronized (this){
     i++;}
    }
    public static synchronized void staticUpdate(){
     i++;}
	//等价于
    public static void staticUpdateBlock(){

        synchronized (Solution.class){
     i++;}
    }
总说:给***对象上锁,思考:
锁在哪了? 怎么锁的?
答: 使用openJDK可以查看:org.openjdk.jol.info.ClassLayout
	ClassLayout layout= ClassLayout.parseInstance(t001);
	System.out.println(layout.toPrintable());
能够看到其对象头中的情况
com.julyDemo.test13.test001 object internals:
 OFFSET  SIZE                     TYPE DESCRIPTION                               VALUE
      0     4                          (object header)                           05 00 00 00 (00000101 00000000 00000000 00000000) (5)
      4     4                          (object header)                           00 00 00 00 (00000000 00000000 00000000 00000000) (0)
      8     4                          (object header)                           43 c1 00 f8 (01000011 11000001 00000000 11111000) (-134168253)
     12     4                      int test001.intttt                            5
     16     4         java.lang.String test001.tempStr1                          null
     20     4         java.lang.String test001.tempStr2                          null
     24     4         java.lang.String test001.tempStr3                          (object)
     28     4   com.julyDemo.test13.BB test001.b1                                (object)
Instance size: 32 bytes
Space losses: 0 bytes internal + 0 bytes external = 0 bytes total
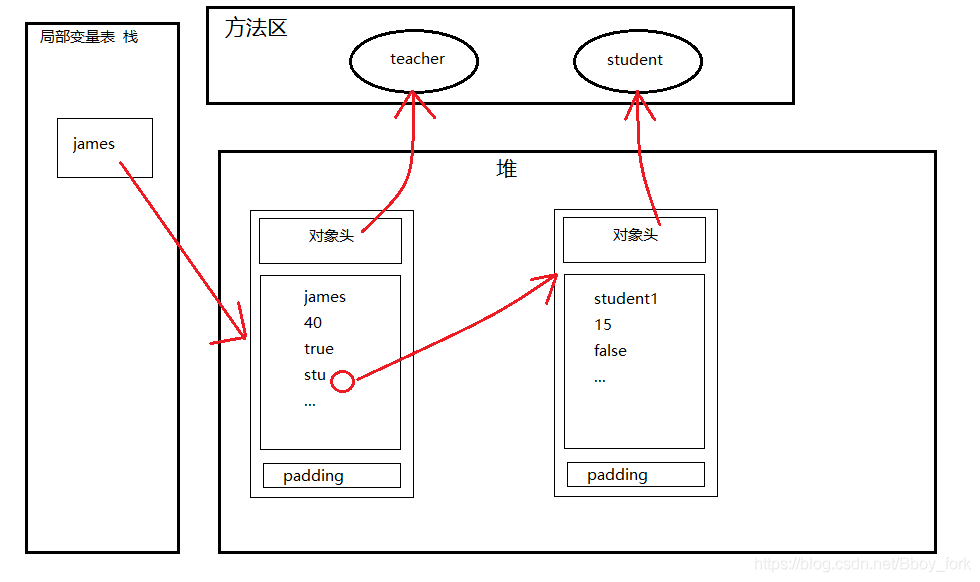
好的。什么是对象头?
对象头里有什么呢?
| Mark Word | 标志位 |
| Class Metadata Address | 字面意思,地址 |
| Array Length | 数组长度;当其为数组时,标记数组长度,平时就是0。 没啥用,或者说用处不大 |
所以 我们有这么几种锁
偏向锁
轻量级锁
重量级锁…
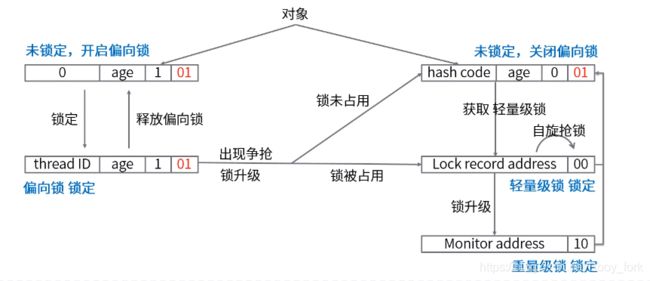
具体是怎么操作的呢? 好 上图! 锁升级流程:

JDK6以后,默认开启偏向锁。
可通过JVM参数: -XX:-UseBiasedLocking 来禁用偏向锁开启,若偏向锁开启,只有一个线程抢锁,可获取到偏向锁。
流程如上图,解读:
1、线程发现开启偏向锁( 0 / 1)①,则获取偏向锁,
2、新加入线程争抢,升级为轻量级锁,没有抢到的线程进行自旋抢锁,
3、自旋到一定,仍未抢到,升级为重量锁,执行完后重量锁降为未锁定。或抢到则继续轻量锁,最终降级为未锁定状态。【重量直接降为未锁定,不是也不能降为轻量再未锁定】
小结 :偏向锁,就是单线程情况 加锁解锁比较快。多线程来争抢时候也不影响。这就是一种锦上添花的优化。它本身是无锁状态、是乐观锁的体现。
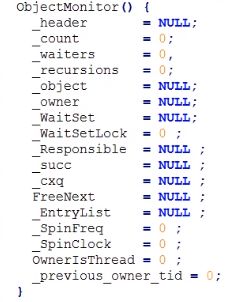
ObjectMonitor(对象监视器)里都有什么呢?
对象创建的时候 会出现这么一个Monitor 具体什么时间出现的。哪行代码 是真的没找到。
但在这个对象监视器里都有:

巴拉巴拉一大堆。我们这里用到的,就 entryList、waitSet之类的用来记录当前。
所以 补充一个重量级锁:的运行锁定情况:
重量级锁的时候:mark word变为指向对象监视器的地址。
Monitor中属性owner:中保存着现在持锁的线程(例:t1)。
EntryList:(锁池)先进先出原则,其中保存着自旋后未抢到锁的线程(例:t2、t3)。
wait方法语义: 释放锁
例1:
当t1正常执行完毕 —— 会执行monitor Exit 方法,随后t2线程(因为先进先出)获得到锁…
当t1执行了wait方法:—— t1进入waitSet ,owner=null。所以我们说 wait方法 释放了锁。
假设现在又执行了notfly():t1会和t2形成竞争(t3由于先进先出不具备竞争条件) 。t1 胜出:则t1再次获得owner 一切又回到当年模样。t2胜出:t2获得owner,而t1则进入EntryList中。(所以我们又说synchronized他不是公平锁)【因为比如t1运行完毕释放。同时t2准备争抢,这时有新线程t4 t5 t6来抢锁,那么很明显 t2不一定能抢到…所以】
synchronized锁在方法上呢?
它是一种隐式的控制,不是通过字节码指令来控制的。是通过调用方法和返回这个方法时候来控制。详细点:所有的方法呢,有一个方法常量池,在其中,通过“方法表结构”来区分这个方法是否是同步的。调用的时候呢回去检查这个标志ACC_SYNC 如果这个被设置了,也就是说这个方法时sync的了,那就先去持有Monitor,再执行方法,再去完成。不管正常完成异常完成,都会释放掉这个Monitor。
但是我们绝大多数的时候 都会是持有对象锁,极少会使用到方法上的锁。所以不太需要。
轻量级锁和重量级锁的区别?
轻量级锁时,未抢到的线程在自旋尝试抢锁。【占用CPU资源】
重量级锁时,抢owner,未抢到的线程会进入entryList挂起等待(这不也是自旋么)【这样就会对CPU的占用没那么高】。
或许还有独占锁、读写锁、(非)/公平锁、balabala
是的没错,但都是从不同角度来解读 / (划分) 锁的。
比如sync是不是独占锁呢?是的。
sync 和 ReentrantLock 都是非公平锁。
我们知道:所谓锁的公平与否 就是线程们 是否按照申请锁的顺序来获取锁。先来后到,即为公平。sync哪里不公平了呢?答:sync重量锁加锁方式:锁升级
比如所说的读写锁…一番讲述后我们可以自然的过渡到lock接口ReentrantLock等。。。
当然 这里可以顺便被问到简单的面试题:
有哪些锁分类:(很简单不多赘述)
锁分类:
自旋锁:是指当一个线程在获取锁的时候,如果锁已经被其他线程获取,那么该线程将循环等待,然后不断的判断锁是否能够被成功获取,知道获取到锁才会退出循环。
乐观锁:假定没有冲突,在修改数据时如果发现数据和之前获取的不一致,则读最新数据,修改后尝试修改 unsafe——
悲观锁:假定会发生并发冲突,同步所有对数据的相关操作,从读数据就开始上锁。
独享锁:给资源加上写锁,线程可以修改资源,其他线程不能再加锁;(单写)
共享锁:给资源加上读锁后只能读不能改,其他线程也只能加读锁,不能加写锁;(多读)
可重入锁、不可重入锁:线程拿到一把锁之后,可以自由进入同一把锁所同步的其他代码。
公平锁、非公平锁:争抢锁的顺序,如果是按先来后到,则为公平。
LOCK
查看他们的结构和继承实现关系我们能得出:
locks这包里接口就两个,Lock接口 和 ReadWriteLock接口,很简单就这么几个方法,
package java.util.concurrent.locks;
import java.util.concurrent.TimeUnit;
/*
 * @since 1.5
 * @author Doug Lea
 */
public interface Lock {


    void lock();

    void lockInterruptibly() throws InterruptedException;

    boolean tryLock();

    boolean tryLock(long time, TimeUnit unit) throws InterruptedException;

    void unlock();

    Condition newCondition();
}
以及:
package java.util.concurrent.locks;

/**
 * @since 1.5
 * @author Doug Lea
 */
public interface ReadWriteLock {

    /**
     * @return the lock used for reading
     */
    Lock readLock();

    /**
     * @return the lock used for writing
     */
    Lock writeLock();
}
接口 Lock:
它的最直接实现就是ReentrantLock(可重入锁)了。
public class ReentrantLock implements Lock, java.io.Serializable {
接口ReadWriteLock:
ReentrantReadWriteLock (读写锁)
public class ReentrantReadWriteLock implements ReadWriteLock, java.io.Serializable {

    /**
     * The lock returned by method {@link ReentrantReadWriteLock#writeLock}.
     */
    public static class WriteLock implements Lock, java.io.Serializable {

    ......

    /**
     * The lock returned by method {@link ReentrantReadWriteLock#readLock}.
     */
    public static class ReadLock implements Lock, java.io.Serializable {
所以,可以说 我们使用的都是他给我们实现的Lock接口而已。
| 方法 | 描述 |
| void lock() | 一直获取锁,直到获取到为止 |
| boolean tryLock() | 尝试获取获取不到就算了 |
| boolean tryLock(long time,TimeUnit unit) throws InterruptedException | 时间内尝试,过了还没拿到就算了 |
| void lockInterruptibly() throws InterruptedException | 可被外部中断(他尝试获取锁,如果线程被interrupt中断了 那么他就不等了) |
| void unlock() | 解锁 |
| Condition newCondition() | 返回Condition() |
方法看起来都很简单,那么 Condition 是什么呢?
Condition中有一些方法。它本身是一个类似于监视器的东西。我们来看看使用一下。
Condition :
package java.util.concurrent.locks;
import java.util.concurrent.TimeUnit;
import java.util.Date;

/**
 * @since 1.5
 * @author Doug Lea
 */
public interface Condition {


    void await() throws InterruptedException;

    void awaitUninterruptibly();

    long awaitNanos(long nanosTimeout) throws InterruptedException;

    boolean await(long time, TimeUnit unit) throws InterruptedException;

    boolean awaitUntil(Date deadline) throws InterruptedException;

    void signal();

    void signalAll();
}
/**
 * ConditionTest
 * */
public class ConditionTest {


    private static Lock lock = new ReentrantLock();
    private static Condition condition =  lock.newCondition();

    public static void main(String[] args) throws InterruptedException {

        Thread thread = new Thread() {

            @Override
            public void run() {

                try {

                    System.out.println("子线程休眠8s 后尝试获取锁");
                    Thread.sleep(8000L);
                } catch (InterruptedException e) {

                    e.printStackTrace();
                }
                lock.lock();//将线程锁定

                try {

                    System.out.println("当前线程" + Thread.currentThread().getName() + "获得锁");
                    condition.await();
                    System.out.println("当前线程" + Thread.currentThread().getName() + "开始执行");
                } catch (InterruptedException e) {

                    e.printStackTrace();
                }finally {

                    lock.unlock();
                }
            }
        };

        thread.start();
        Thread.sleep(2000L);
        System.out.println("休眠2s,来控制线程");
        lock.lock();
        System.out.println("mian方法获得锁 并且马上尝试condition.signal");
        //但是这样容易出现死锁。 即:如果signal方法先于await调用的话
        condition.signal();//直接使用 会报错 java.lang.IllegalMonitorStateException 因为主线程拿不到这个锁 所以前后加lock()unlock()
        lock.unlock();
    }
}
好的 好像明白了 来使用一下,简单的实现一个阻塞队列:
其中内容就用list来代替
public class Test {

    public static void main (String[] args) throws InterruptedException {

        ForkBlockingQueue forkBlockingQueue = new ForkBlockingQueue(6);
        new Thread(){

            @Override
            public void run() {

                for (int i = 0; i <20 ; i++) {

                    forkBlockingQueue.put("x"+i);
                }
            }
        }.start();

        Thread.sleep(1000L);
        System.out.println("开始取元素");
        for (int i = 0; i <10 ; i++) {

            forkBlockingQueue.take();
            Thread.sleep(2000);

        }
    }
}
class ForkBlockingQueue{


    List<Object> list = new ArrayList<>();
    private Lock lock = new ReentrantLock();
    private Condition putCondition = lock.newCondition(); //condition可以有多个,针对不同的操作放入不同condition,相当于等待队列
    private Condition takeCondition = lock.newCondition();
    private int length;

    public ForkBlockingQueue(int length){

        this.length =length;
    }

    public void  put(Object obj){

        lock.lock();
        try{

            while (true) {

                if (list.size() < length) {
      //集合的长度不能超过规定的长度,才能向里面放东西
                    list.add(obj);
                    System.out.println("队列中放入元素:"+obj);
                    takeCondition.signal();
                    return;
                } else {
      //如果放不进去,就该阻塞. --利用condition实现
                    putCondition.await();//挂起
                }
            }
        } catch (InterruptedException e) {

            e.printStackTrace();
        } finally {

            lock.unlock();
        }
    }

    public Object take(){

        lock.lock();
        try{

            while (true) {

                if (list.size() > 0) {

                    Object obj = list.remove(0);
                    System.out.println("队列中取得元素:"+obj);
                    putCondition.signal();
                    return obj;
                } else {

                    takeCondition.await();
                }
            }
        } catch (InterruptedException e) {

            e.printStackTrace();
        } finally {

            lock.unlock();
            return null;
        }
    }
}
很好 使用起来看起来没什么问题 在试试lock 比如面试题:ReentrantLock 重复加锁的问题。
答案当然很简单:加锁必然解锁,不然肯定拿不到 能拿到的 都是本线程,也就是所谓的可重入锁,解锁之前必须加锁 也就是不能没有锁去解锁,不然会抛异常。
所以按照这样的思想。我们就可以去尝试实现一个自己的读写锁了(其实是偷窥源码和学习之后)
分析:
①:需要一个类似于sync中owner的东西来记录是哪个线程拿到了锁;(比如AtomicReference < Thread > )
②:需要一个count之类的数字来记录这个线程加了多少次;(这个数字肯定要线程安全 比如AtomicInteger)
③:需要一个容器来存储等待的线程,比如阻塞队列(LinkedBlockingQueue);
④:实现Lock接口 其中方法。(lock ~ tryLock ~ unLock 等)
⑤:现实的 ReentrantLock 可以通过构造进行设置是否为公平锁,默认非公平。
⑥:人话连起来就是:线程来了 判断/尝试对count进行CAS操作 (0,1) count的值代表了当前是否有线程获取了锁,owner记录着这个线程,没抢到的等待线程进入等待队列阻塞,锁释放则唤醒头部的线程来抢锁,抢锁机制同为一个线程则可以多次获得即count++,释放锁时候先-- 为0顺便清空owner。
实现 + 测试:
/**
 * 尝试自己搞一个ReentrantLock
 * */
public class ForkReentrantLock implements Lock {


    //存放当前占有锁的线程 owner
    AtomicReference<Thread> owner = new AtomicReference<>();

    //重入锁 所以要有记录加锁的次数。
    AtomicInteger count = new AtomicInteger();

    //未能占有的线程,肯定要有一个等待队列
    private LinkedBlockingQueue<Thread> waiters = new LinkedBlockingQueue<>();

    @Override
    public boolean tryLock() {

        int ct = count.get();
        if(ct ==0){
     //没有被占用
            if(count.compareAndSet(ct,ct+1)){

                owner.set(Thread.currentThread());
                return true;
            }
        }else {
     // 被占用
            if(Thread.currentThread() == owner.get()){
      // 如果当前线程 就是占有锁的线程
                count.compareAndSet(ct,ct+1);
                return true;
            }
        }
        return false;
    }

    @Override
    public void lock() {

        if(!tryLock()){

            //加入等待队列
            waiters.offer(Thread.currentThread());

            while (true){

                Thread head = waiters.peek();
                if(head == Thread.currentThread()){

                    if(!tryLock()){

                        LockSupport.park();
                    }else {

                        waiters.poll();
                        return;
                    }
                }else {

                    LockSupport.park();
                }
            }
        }
    }

    public boolean tryUnLock(){

        if(owner.get()!=Thread.currentThread()){
     //尝试解锁的 不是占有锁的线程
            throw new IllegalMonitorStateException();
        }else {
     //如果是
            int ct = count.get();
            int nextc = ct -1;
            count.set(nextc);

            if(nextc == 0){

                owner.compareAndSet(Thread.currentThread(),null);
                return true;
            }else {

                return false;
            }
        }
    }

    @Override
    public void unlock() {

        if(tryUnLock()){

            Thread head = waiters.peek();
            if(head != null){

                LockSupport.unpark(head);
            }
        }
    }

    @Override
    public void lockInterruptibly() throws InterruptedException {


    }

    @Override
    public boolean tryLock(long time, TimeUnit unit) throws InterruptedException {

        return false;
    }

    @Override
    public Condition newCondition() {

        return null;
    }
}

public class ForkReentrantLockTest {

    volatile static int i=0;
    static ForkReentrantLock lock = new ForkReentrantLock();
    public static void add(){

        lock.lock();
        i++;
        lock.unlock();
    }
    public static void main(String args[]) throws InterruptedException {

        for (int i=0; i<10; i++){

            new Thread(){

                @Override
                public void run() {

                    for (int j=0; j< 10000; j++){

                        //System.out.println(currentThread().getName()+ "....");
                        add();
                    }
                    System.out.println("done...");
                }
            }.start();
        }
        Thread.sleep(5000L);
        System.out.println(i);

    }
}
成功
那好 那我们再来看看ReadWriteLock
我们都知道:它维护一对关联锁 分读和写,读可以多个读线程同时持有,写排他。并且同一时间不能被不同线程持有。 适合读操作多余写入操作的场景,改进互斥锁的性能…
一个小点: 读写锁的锁降级是——写锁降级成为读锁,
即 持有写锁的同时,再获取读锁,随后释放写锁的过程。
写锁是线程独占,读锁是共享,所以写->读是降级(而读-》写是不能实现的 【因为很多线程持有 怎么实现嘛…】)
所以先使用一下:
/**
 * 读写锁使用demo 将hashMap变成线程安全
 * */
public class ReadWriteLockTest {

    private final Map<String,Object> map = new HashMap<String,Object>();

    private final ReadWriteLock readWriteLock = new ReentrantReadWriteLock();
    private final Lock read = readWriteLock.readLock();
    private final Lock write = readWriteLock.writeLock();

    public Object get(String key){

        read.lock();
        try {

            return map.get(key);
        }finally {

            read.unlock();
        }
    }

    public void put(String key,Object value){

        write.lock();
        try {

            map.put(key,value);
        }finally {

            write.unlock();
        }
    }

    public Object remove(String key){

        write.lock();
        try {

            return map.remove(key);
        }finally {

            write.unlock();
        }
    }
}
然后看看源码 分析一下原理。怎么实现读写锁呢? 很好理解 ReentrantLock时是一个count,现在弄两个count来分别用作readCount 和writeCount 不就完了嘛。当然了 在源码中 是使用一个int值来进行记录,即int有32位,16位记一个。
就这些么?当然不是。
什么是AQS呢?
AQS实现:ReentrantLock
源码中这样定义 AbstractQueuedSynchronizer :
public class ReentrantReadWriteLock
        implements ReadWriteLock, java.io.Serializable {

    /**
     * Synchronization implementation for ReentrantReadWriteLock.
     * Subclassed into fair and nonfair versions.
     */
    abstract static class Sync extends AbstractQueuedSynchronizer {
字面意思:抽象同步队列。它就是使用的 模板方法模式
我的理解:模板方法帮你实现大部分 并且搭出框架,你使用的时候,只需要少部分的细节需要实现即可。
即: 定义一个算法的骨架,将骨架中的特定步骤延迟到子类中(注:特定步骤由子类实现)。
模板方法模式使得子类可以不改变算法的结构即可重新定义算法的某些特定步骤。
在这里呢,AQS实现对同步状态的管理,以及对阻塞线程排队等待通知等一系列的处理。
所以 我们可以模仿弄一个MyAQS 例如 这样:
/**
 * 提取出来的公共代码,主要实现AQS的功能
 * @author Bboy_fork
 * @date 2021年1月11日21:36:56
 * */
public class AQSDemo {

    AtomicInteger readCount = new AtomicInteger();
    AtomicInteger writeCount = new AtomicInteger();

    //独占锁 拥有者
    AtomicReference<Thread> owner = new AtomicReference<>();

    //等待队列
    public volatile LinkedBlockingQueue<WaitNode> waiters = new LinkedBlockingQueue<WaitNode>();

    public class WaitNode{

        int type = 0;   //0 为想获取独占锁的线程,  1为想获取共享锁的线程 //ReadWriteLock用一个int值存储了两个count值

        Thread thread = null;
        int arg = 0;

        public WaitNode(Thread thread, int type, int arg){

            this.thread = thread;
            this.type = type;
            this.arg = arg;
        }
    }

    //获取独占锁
    public void lock() {

        int arg = 1;
        //尝试获取独占锁,若成功,退出方法,    若失败...
        if (!tryLock(arg)){

            //标记为独占锁
            WaitNode waitNode = new WaitNode(Thread.currentThread(), 0, arg);
            waiters.offer(waitNode);    //进入等待队列

            //循环尝试拿锁
            for(;;){

                //若队列头部是当前线程
                WaitNode head = waiters.peek();
                if (head!=null && head.thread == Thread.currentThread()){

                    if (!tryLock(arg)){
           //再次尝试获取 独占锁
                        LockSupport.park();     //若失败,挂起线程
                    } else{
          //若成功获取
                        waiters.poll();     //  将当前线程从队列头部移除
                        return;         //并退出方法
                    }
                }else{
       //若不是队列头部元素
                    LockSupport.park();     //将当前线程挂起
                }
            }
        }
    }

    //释放独占锁
    public boolean unlock() {

        int arg = 1;

        //尝试释放独占锁 若失败返回true,若失败...
        if(tryUnlock(arg)){

            WaitNode next = waiters.peek(); //取出队列头部的元素
            if (next !=null){

                Thread th = next.thread;
                LockSupport.unpark(th);     //唤醒队列头部的线程
            }
            return true;                //返回true
        }
        return false;
    }

    //尝试获取独占锁
    public boolean tryLock(int acquires) {

        throw new UnsupportedOperationException();
    }

    //尝试释放独占锁
    public boolean tryUnlock(int releases) {

        throw  new UnsupportedOperationException();
    }
代码中添加 UnsupportedOperationException() 来让使用者自行实现这个方法。
当然 abstract 也行。。。
最后 掏出源码欣(折)赏(磨)一下
package java.util.concurrent.locks;
public class ReentrantReadWriteLock
//想啥呢 自己去翻源码
//它里面用的是一个链表,再有就是之前提到的用一个值去记录。


