QT项目设计:基于Linux系统的车载系统,地图、音视频播放、天气显示、优美界面 详细教程
文章目录
-
- QT车载系统
-
- 一、音频播放
- 二、视频播放
- 三、地图显示
- 四、天气功能
- 五、界面美化
QT车载系统

哔哩哔哩视频链接:https://www.bilibili.com/video/BV1Bv4y1f71F/
资料下载链接:https://download.csdn.net/download/mbs520/14919182

一、音频播放
1、播放命令格式
mplayer -quiet -slave ./1.mp3
2、音量控制(音量条)
volume 100 1  //设置音量百分比 中间的为音量的大小
mute  1/0 //静音开关
3、上下曲控制方案(上下曲按钮)
if(curr_num>0)
	curr_num--;//上一曲
else
	curr_num=video_info_list.size()-1;//

   mypro->close();//先关闭上一个进程
   QString cmd;
   cmd = "mplayer -geometry 0:0 -zoom -x 600 -y 380";
   cmd += " -slave -quiet ";
   cmd += video_info_list[curr_num].filePath());//要播放的文件名

   mypro->start(cmd);//开始运行新的程序
下一曲类似…
4、进度控制(进度条)
seek value //快进value秒(int)
seek value 1 //偏移到文件value% 位置
seek value 2 //偏移到文件value 秒位置

//例子:
mypro->write("seek 30 1\n"); //偏移到文件30% 位置
5、进度获取(实时更新进度条)
mypro->write("get_percent_pos\n");//获取进度
mypro->write("get_time_pos\n");//获取当前时间
mypro->write("get_time_length\n");//获取总时间
需要每隔0.5秒发送一次命令,发送一次命令进程会返回一次数据,例如发送:get_percent_pos,返回:ANS_TIME_POSITION=1
解析返回的数据代码:(更新进度条与时间)
if(msg.indexOf("ANS_TIME_POSITION",0)!=-1)//获取播放时间
{

    msg = msg.section('=', 1, 1).trimmed();
    now_palytime = msg.toDouble();

}
else if(msg.indexOf("ANS_LENGTH",0)!=-1)//获取时间
{

    msg = msg.section('=', 1, 1).trimmed();
    time_length = msg.toDouble();
}
else if(msg.indexOf("ANS_PERCENT_POSITION=",0)!=-1)//获取进度
{

    last_progress = now_progress;
    msg = msg.section('=', 1, 1).trimmed();
    now_progress = msg.toInt();

}
6、显示歌词(逻辑比较复杂)
1)使用了一个Label组显示歌词
//初始化歌词标签文本
labelArr.clear();
 for (int i = 0; i < 7; i++) {

     QLabel *label = new QLabel(this);
     labelArr.append(label);
 }
2)查找系统匹配歌词方法
// 周杰伦-夜曲.mp3->周杰伦-夜曲.lrc
QString lrcFile = labelSongsTitle->text();//获取当前播放文件名
lrcFile.remove(QString("mp3"), Qt::CaseInsensitive);//删除
lrcFile  = lrcFile+"lrc";
3)查找系统匹配写真方法
if(lrcFile.indexOf("zjl",0)!=-1)//显示写真
    this->setStyleSheet("MainWindow{border-image: url(./pic/周杰伦-夜曲.jpeg);}");
else if(lrcFile.indexOf("ljj",0)!=-1)//显示写真
    this->setStyleSheet("MainWindow{border-image: url(./pic/周杰伦-夜曲.jpeg);}");
4)定义一个歌词信息结构体,存放时间与对应歌词
lrc歌词格式:用文本编辑器打开,会发现歌词文件是这样的

那么我们就可以把内容中的时间与歌词对应起来,结构体无疑是一个好方法,
//歌词结构体
typedef struct LrcParseFormat {

    QString time;//存放时间 "00:31"
    QString content;//存放歌词 "告别的时间已到了"
}LrcFormat;

 //lrc歌词数组 存放整首歌的歌词信息
QVector<LrcFormat> lrcArr;
5)读取歌词文件信息到结构体数组(切歌时调用,也就是每播放一首歌前要重新获取歌词信息)
QString line;
LrcFormat info;

while (!in.atEnd()) {
     //循环读取歌词数据到结构体容器
    line = in.readLine();
    info.time = line.mid(1,5);
    info.content = line.mid(10);
    lrcArr.append(info);

    qDebug() << info.time << info.content;//debug
}
file.close();                                                        //读取完成之后 关闭文件
5)定时显示刷新歌词(放歌时定时调用,每隔0.5秒更新一次歌词)
以下是歌词刷新的核心代码:
int second  = now_palytime%60;//获取歌曲当前播放时间 秒
int minute = now_palytime/60;//获取歌曲当前播放时间 分

QString strLabel; //把秒与分转化为"00:31"格式
strLabel.clear();
if (minute >= 10)
    strLabel = QString::number(minute, 10);
else
    strLabel = "0" + QString::number(minute, 10);
if (second >= 10)
    strLabel = strLabel + ":" + QString::number(second, 10);
else
    strLabel = strLabel + ":0" + QString::number(second, 10);

//歌词显示更新
int count = lrcArr.count();
for (int i = 0; i < count; i++) {

    if (lrcArr[i].time == strLabel) {

        labelArr[3]->setText(lrcArr[i].content);
        if (i-1 >= 0)
            labelArr[2]->setText(lrcArr[i-1].content);
        else
            labelArr[2]->clear();
        if (i-2 >= 0)
            labelArr[1]->setText(lrcArr[i-2].content);
        else
            labelArr[1]->clear();
        if (i-3 >= 0)
            labelArr[0]->setText(lrcArr[i-3].content);
        else
            labelArr[0]->clear();
        if (i+1 < count)
            labelArr[4]->setText(lrcArr[i+1].content);
        else
            labelArr[4]->clear();
        if (i+2 < count)
            labelArr[5]->setText(lrcArr[i+2].content);
        else
            labelArr[5]->clear();
        if (i+3 < count)
            labelArr[6]->setText(lrcArr[i+3].content);
        else
            labelArr[6]->clear();
    }
}
二、视频播放
1、视频播放命令
mplayer -geometry 0:0 -zoom -x 800 -y 480 -slave -quiet ./1.mp4
2、控制命令与音乐播放相似
(不一一介绍)
三、地图显示
1、百度静态地图API:
http://api.map.baidu.com/staticimage?center=百度大厦&markers=百度大厦
这个API 不需要获取ak,直接使用,如果觉得不好用可以到百度地图API搜静态图
服务参数列表
| 参数名 | 必选 | 默认值 | 描述 |
|---|---|---|---|
| width | 否 | 400 | 图片宽度。取值范围:(0, 1024]。 |
| height | 否 | 300 | 图片高度。取值范围:(0, 1024]。 |
| center | 否 | 北京 | 地图中心点位置,参数可以为经纬度坐标或名称。 |
| zoom | 否 | 11 | 地图级别。取值范围:[1, 18]。 |
| bbox | 否 | null | 地图视野范围。格式:minX,minY,maxX,maxY。 |
| markers | 否 | null | 标注,可通过经纬度或地址/地名描述;多个标注之间用竖线分隔。 |
| markerStyles | 否 | null | 标注样式,格式为:size,label。多个样式之间用竖线分隔。与markers有索引对应关系。 |
2、显示地图原理
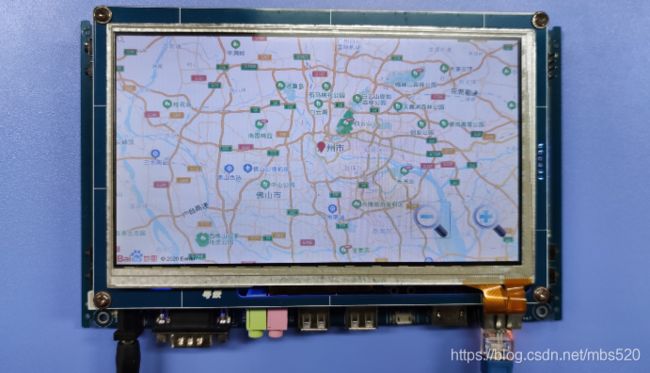
点击链接会返回一张百度大厦的图片,开发板通过链接下载好图片显示到屏幕,就完成了地图功能
请求图片代码:
QString resq_msg;
msg = "http://api.map.baidu.com/staticimage?";
msg+= QString("¢er=%1&markers=%2&zoom=%3")
	.arg(city).arg(markers).arg(zoom);//需要的参数
msg+= "&width=800&height=480";

resquest.setUrl(QUrl(resq_msg.toUtf8().data()));
reply=manager->get(resquest);//发送请求

//绑定链接,当有数据来时触发信号
connect(reply, &QIODevice::readyRead,this,&MainWindow::ready_Read_slots);
其中markers填写坐标
//east 东经 north北纬
markers = QString("%1,%2").arg(east).arg(north);
city可以不填
city="";
zoom:放大功能(放大按钮)
zoom: 1~18
zoom=11;//默认11倍
3、地图拖动功能(可查看全球任意地点地图)
根据识别拖动的动作,改变API的地理位置参数markers,来实现地图拖动功能
需要用到触摸事件、鼠标事件处理
实现代码:
//事件过滤器
QPoint point,last_point;//按下坐标
bool pres_flag,rele_flag;//按下松开标志
bool MainWindow::eventFilter(QObject *watched, QEvent *event)
{


    if(watched == this ){

        QTouchEvent* touch = static_cast<QTouchEvent*>(event);

        switch (event->type()) {

        case QEvent::MouseButtonPress://鼠标按下事件

            pres_flag = 1;
            last_point.setY(cursor().pos().y());     // 记录按下点的y坐标
            last_point.setX(cursor().pos().x());     // 记录按下点的x坐标
            break;
        case QEvent::MouseButtonRelease://鼠标松开事件
            rele_flag = 1;
            point.setY(cursor().pos().y());     // 记录按下点的y坐标
            point.setX(cursor().pos().x());     // 记录按下点的x坐标
            break;

        case QEvent::TouchBegin://触摸事件

            point.setY(touch->touchPoints().at(0).pos().y());     // 记录按下点的y坐标
            point.setX(touch->touchPoints().at(0).pos().x());     // 记录按下点的x坐标
            if(point.x()<580 || point.y()<350)
            {

                rele_flag = 1;
                pres_flag = 1;
            }
            event->accept();
            break;

        default:
            break;
        }
    }
    if(pres_flag==1 && rele_flag==1)
    {

        pres_flag = 0;
        rele_flag = 0;
        if(event->type() == QEvent::TouchBegin)//触摸
        {

            m_x = 400-point.x();
            m_y = 240-point.y();
        }
        else {
         //鼠标
            m_x = point.x()-last_point.x();
            m_y = point.y()-last_point.y();
        }
        if(m_x>10 || m_x<-10 || m_y>10 || m_y<-10)
        {

            QString m_zoom = zoom;
            //计算需要偏移多少东经北纬
            move_x = m_x*0.0000003*(19-m_zoom.toInt())*(19-m_zoom.toInt())*(19-m_zoom.toInt())*(19-m_zoom.toInt());
            move_y = m_y*0.0000003*(19-m_zoom.toInt())*(19-m_zoom.toInt())*(19-m_zoom.toInt())*(19-m_zoom.toInt());
            east -= move_x;
            north += move_y;
            markers = QString("%1,%2").arg(east).arg(north);
            sendResquest(city,markers,zoom);//发送图片请求
        }

    }

    return QWidget::eventFilter(watched,event);//将事件传递给父类
}
四、天气功能
1、获取天气API接口:
http://wthrcdn.etouch.cn/weather_mini?city=广州市
这个接口因为编码格式问题显示乱码。不过不影响使用,代码中可以转换编码。也可以用以下API:后面接城市编码
http://t.weather.itboy.net/api/weather/city/101030100
2、获取当前位置接口:
http://ip.ws.126.net/ipquery
比如我现在在广州,返回:
var lo=“广东省”, lc=“广州市”; var localAddress={city:“广州市”, province:“广东省”}
3、获取当前位置的天气
通过位置接口返回当前城市名,再把城市名称传参到获取天气API接口中
代码:
#define   WEATHER_GET_API_URL  "http://wthrcdn.etouch.cn/weather_mini?city="
//发送天气请求
QString cityName = "广州";
QNetworkRequest  weatherGetNRequest;
weatherGetNRequest.setUrl(QUrl(WEATHER_GET_API_URL + cityName));
QNetworkReply *newReply = NAManager->get(weatherGetNRequest);
connect(newReply, SIGNAL(finished()), this, SLOT(slotFinishedWeatherGetReply()));
4、查询其他地点的天气原理
由于开发板没有输入法,需要移植输入法比较麻烦,于是我想到了一种好用快捷,并且可以查询任意地点的方法.
方法就是通过地图。
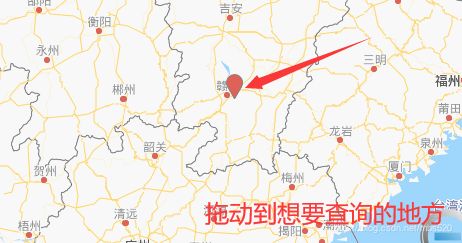
点击搜索调用地图APP,地图可以提供一个经度,一个维度,返回给天气APP,天气APP就可以根据地图提供的地理信息,
1)首先,点击搜索图标:

2)进入地图APP后,把地图标记点拖动到想要的位置后,点击返回,地图会把当前的地理信息(经度纬度)保存到“p.info”文件里

3)得到地理位置信息后,通过逆地理API转化为城市信息,由于百度地图逆地理API试了好几次,许多地理位置不能转换,于是找到了高德地图API,非常好用
高德地图逆地理API:
https://lbs.amap.com/api/webservice/guide/api/georegeo
点击链接,查看使用方法,先注册,后申请一个AK就可以使用了,请求格式如下
http://restapi.amap.com/v3/geocode/regeo?output=json&location=116.310003,39.991957&key=<您的key>&radius=1000&extensions=all
4)发送请求后得到一个很长的json数据,我们只需要提取一个城市即可,这样逆地理处理就完成了,得到城市名之后,再传参给获取天气API就可以得到新地址的天气了
5)json数据在线解析网站:https://json.im/
获取到json数据后,可以利用数据解析更好的提取想要的数据
复制文档到网站,就可以很方便找到目标的位置

6)获取到城市信息后利用天气API,就可以得到该地的天气信息
点击返回,就查询到了赣州的天气

5、天气查询功能具体实现
1)在地图APP返回前获取地图位置
/**************地图APP的返回按钮程序****************/
f_file.setFileName("p.info");//保存地理信息的文件名
f_file.open(QIODevice::Append | QIODevice::Truncate);//打开文件
QString point_msg = QString("%1\n%2").arg(east).arg(north);//
f_file.write(point_msg.toUtf8().data());//写入地理信息
f_file.close();//关闭文件
exit(1);//退出程序
2)用天气APP打开地图APP
/**************天气APP的搜索按钮程序****************/
this->hide();//这个窗口隐藏
mypro->start("./QMap");//运行地图APP
mypro->waitForFinished();//等待地图APP退出
this->show();//重新显示这个窗口

QString file_n = "p.info";//获取信息的文件名
QFile f_file;
f_file.setFileName(file_n);
f_file.open(QIODevice::ReadOnly);//打开文件
QString east_n = f_file.readLine();//读取经度信息
QString north_n = f_file.readLine();//读取维度信息
f_file.close();//关闭文件
east = east_n.toDouble();//转化为double
north = north_n.toDouble();

//发送逆地理请求,获取城市名
sendResquest();
3)逆地理获取城市名
给一个经维度信息(116.310003,39.991957),得到这个地址的城市名(北京市)
代码:
//逆地理请求
void MainWindow::sendResquest()
{

    QString resq_msg =
    QString("http://restapi.amap.com/v3/geocode/regeo?output=josn&location=%1,%2&key=f98d84de8b3b0bf7ac20c80d9775796b&radius=1000&extensions=all")
            .arg(east).arg(north);
    resquest.setUrl(QUrl(resq_msg.toUtf8().data()));
    reply=manager->get(resquest);//发送请求
    //绑定链接,当有数据来时触发信号
    connect(reply, &QIODevice::readyRead,this,&MainWindow::ready_Read_slots);

}
发送逆地理请求后,接收处理json数据,提取城市信息,并发送该城市的天气数据请求,获取到天气数据会自动更新显示界面的天气信息
//处理接收的josn数据
void MainWindow::ready_Read_slots()
{

    QString msg = reply->readAll();//读取所有接收的信息
    //解析接收到的信息
    msg  = msg.remove("\n");//去除没有用的字符
    msg=msg.remove("\r");
    QJsonDocument json = QJsonDocument::fromJson(msg.toUtf8());//转化为json文档
    //获取城市信息
    QJsonObject obj = json.object();
    city = obj.take("regeocode").toObject().take("addressComponent").toObject().take("city").toString();

    /* 获取到城市名 发送天气请求 */
    QString cityName = city;
    QNetworkRequest  weatherGetNRequest;
    weatherGetNRequest.setUrl(QUrl(WEATHER_GET_API_URL + cityName));
    QNetworkReply *newReply = NAManager->get(weatherGetNRequest);
    connect(newReply, SIGNAL(finished()), this, SLOT(slotFinishedWeatherGetReply()));
}
五、界面美化
1、去除背景网站:
https://www.remove.bg/zh
可以去除照片的背景(最好是白底)
2、自定义按钮封装(按下可以有动画效果)
可以到哔哩哔哩上看黑马程序员2018视频有详细讲解

代码创建:
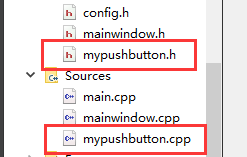
1)在工程下创建一个c++ class类,生成以下文件

2)编写代码
myPushButton.h
#ifndef MYPUSHBUTTON_H
#define MYPUSHBUTTON_H
#includemyPushButton.cpp
#include "myPushButton.h"
#include 3)自定义封装按钮使用
#include "mypushButton.h"

//自定义封装按钮定义
myPushButton *next_button=new myPushButton(":/pic/next.png","",40,40);
//参数1:正常图片 参数2 按下后图片(可不填)参数3、4:按钮大小
next_button->setParent(this);//s设置父亲
next_button->move(140,400);//移动位置到140,400

//按钮下处理
connect(next_button,&myPushButton::clicked,[=](){

next_button->zoom1();//弹跳动画
next_button->zoom2();//回弹
//按下要执行的动作

});
3、进度条样式
普通进度条样式
美化后的进度条样式

进度条样式利用QSS技术(QT StyleSheet)
//歌曲播放进度条样式
#define MEDIASLIDER_STYLE  "QSlider{\
	border-color: #bcbcbc;\
	}\
	QSlider::groove:horizontal {\
	border: 1px solid #999999;\
	height: 1px;\
	margin: 0px 0; \
	left: 5px; right: 5px;\
	}\
	QSlider::handle:horizontal {\
	border: 0px ;\
	border-image:  url(:icon/Resource/icon/handle.png);\
	width: 20px; \
	margin: -10px -7px -10px -7px; \
	} \
	QSlider::add-page:horizontal{\
	background: qlineargradient(spread:pad, x1:0, y1:1, x2:0, y2:0, stop:0 #bcbcbc, stop:0.25 #bcbcbc, stop:0.5 #bcbcbc, stop:1 #bcbcbc); \
	}\
	QSlider::sub-page:horizontal{ \
	background: qlineargradient(spread:pad, x1:0, y1:1, x2:0, y2:0, stop:0 #439cf3, stop:0.25 #439cf3, stop:0.5 #439cf3, stop:1 #439cf3); \
	}"
把样式设置到进度条上,就可以达到想要的效果,如果效果不理想可以深入学习QSS语法,QSS帮助文档:https://doc.qt.io/qt-5/stylesheet-syntax.html#style-rules


