Avalon 与 Windows 窗体的互操作性
此控件的目的是显示图像。为此,此控件将继承自 System.Windows.Controls.Image。在 Visual Studio 中,我们使用 Avalon Control Library 模板创建一个类型为 Avalon 的新项目。为简单起见,附带的代码中已将默认类 CustomControl1 重命名为 ImageViewer.cs。下面是 ImageViewer 类需要的代码。
    public class ImageViewer :System.Windows.Controls.Image


    {


    protected override void OnMouseEnter(System.Windows.Input.MouseEventArgs e)


    {


    this.ImageEffect = new System.Windows.Media.ImageEffectGrayscale();


      }


    protected override void OnMouseLeave(System.Windows.Input.MouseEventArgs e)


    {


    this.ImageEffect = null;


      }


    }

在上面的代码中,我们从 System.Windows.Controls.Image 中继承了类并替代了 OnMouseEnter 和 OnMouseLeave 事件处理程序。在 OnMouseEnter 中,我们为图像应用灰度效果。(System.Windows.Media 命名空间中还有许多效果可以应用于图像。)在 OnMouseLeave 中,我们通过将 ImageEffect 设置为空来恢复到原始图像。下面的图 1 显示的是未应用任何效果的加载图像,图 2 显示的是当鼠标指针进入图像区域时应用 ImageEffectGrayScale 的图像。这就是需要对图像控件执行的所有操作。

图 1:未应用任何效果的图像

图 2:应用灰度效果的图像
下一步,我们要创建第二个项目,即 Windows 窗体应用程序。这个应用程序用于托管刚才创建的 Avalon 控件。为此,我们使用 Windows Application 模板创建一个类型为 Windows 的新项目。为了托管 Avalon 控件,我们需要在项目中引用刚才创建的 Avalon 控件项目以及某些 Avalon 库。除了引用项目外,还引用以下四个库:
| 名称 | 说明 |
| WindowsBase.dll |
包括命名空间,;例如 System.ComponentModel、System.Threading、System.Windows 和 System.Windows.Media 等。这些命名空间中的类为线程(一个 3x3 矩阵)和 UIContext 提供服务。我们将从这个库中使用 UIContext,下文将对此进行介绍。 |
| WindowsFormsIntegration.dll |
这个库包含一个命名空间,即 System.Windows.Forms.Integration。此命名空间中的类(例如 ElementHost 和 WindowsFormsHost)提供 Avalon 的互操作功能。可下载代码中既使用了 WindowsFormsHost 又使用了 ElementHost,下文将进行解释。 |
| PresentationCore.dll |
顾名思义,这个库提供 Avalon 所需的核心表示基础结构。我们在上文中看到的 ImageGrayEffect 位于 System.Windows.Media 命名空间中,而这个命名空间又位于这个库中。这个库还提供动画和绘制三维对象所需的类。 |
| PresentationFramework.dll |
这个库包含创建 Avalon 控件、Avalon 文档、形状等所需的几百个类。此 dll 中的类还提供对绑定和安全性的支持。 |
以上概述内容很粗略。这些库提供了编写 Avalon 应用程序所需的大多数构造块。本文无法述及所有类。
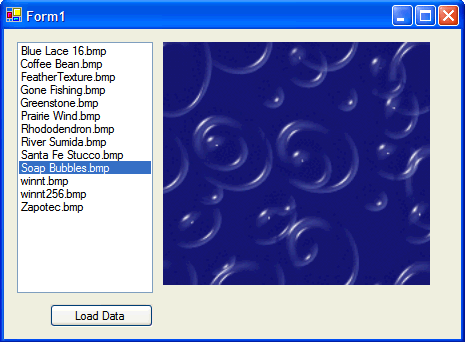
对于用户界面,我们需要 TextBox、ListBox 和 Panel。图 3 显示了用户界面应该具有的外观。

图 3:带有 ListBox、Button 和 ImageViewer 的 Windows 窗体
现在,我们的 Windows 窗体应用程序需要一些专用成员,如下所示:
    partial class Form1 :Form


    {


    private AvalonControls.ImageViewer imageViewer;


    private System.Windows.Forms.Integration.ElementHost host;


    private System.Threading.UIContext context;


    private System.Windows.HwndDispatcher dispatcher;


    private string[] _Files;


    }

刚才在窗体中增添的面板将用作 Avalon 控件的容器。
在 Form1_load 方法中,添加以下代码:
    private void Form1_Load(object sender, EventArgs e)


    {


    context = new System.Threading.UIContext();


    dispatcher = new System.Windows.HwndDispatcher();


    dispatcher.RegisterContext(context);


    //进入上下文并添加调度程序


    context.Enter();


    dispatcher.Attach();


    host = new System.Windows.Forms.Integration.ElementHost();


    panel1.Controls.Add(host);


    host.Dock = DockStyle.Fill;


    imageViewer = new AvalonControls.ImageViewer();


    host.AddChild(imageViewer);


    }

在 Form_Load 的第一行,我们将上下文对象初始化为 UIContext 的新实例。什么是 UIContext?为什么需要它?答案是:为了理解 UIContext,我们继续看下一行,在这一行中我们创建了一个新的 HwndDispatcher。从 Win32Dispatcher 继承的 HwndDispatcher 是 Win32 消息泵的调度程序。调度程序主要处理从消息泵发送给应用程序的消息。在以前的 Windows 编程中,此功能一般由 WndProc 方法提供。HwndDispatcher 使您无需再担心如何处理来自泵的消息。在接下来的代码中,我们注册了上下文,这意味着调度程序将只为已创建的上下文调度消息,而不会为在其中创建窗体的默认上下文调度消息。还需要一个上下文的原因在于,Avalon 处理线程的方式不同于 Windows 窗体应用程序。Windows 窗体下的 BeginInvoke 方法原来属于控件,现在属于 UIContext,因此 UIContext 现在异步处理代理的执行。所以,在本例中,UIContext 满足了处理与 Avalon 控件相关的线程的需要。
下面将进入上下文并附加调度程序。通过附加调度程序,我们告诉调度程序开始监视上下文并负责处理传入消息。然后我们将宿主对象初始化为 ElementHost 的实例。ElementHost 位于 System.Windows.Forms.Integration 命名空间下面的 windowsformsintegration.dll 中。此命名空间中的类提供 Windows 窗体和 Avalon 应用程序集成的功能。ElementHost 实际上是一个 Windows 控件,使我们可以托管 Avalon 控件。它充当 Avalon 控件的容器,还为处理托管控件的事件和属性提供了一种最简便的方法。
然后我们将 ElementHost 控件添加到面板中,并将其靠接属性设置为 Fill。然后,我们创建 ImageViewer 的实例,并将其添加到 ElementHost 中。通过对 ElementHost 调用 AddChild 方法,我们将一个控件添加到它的 Controls 集合中。这表示我们可以在同一个 ElementHost 中添加多个控件。
下一步是添加一些代码,使我们通过单击按钮即可加载数据,双击列表框即可显示数据。使用下面的代码,我们可以在按钮上发生 Click 事件时加载 ListBox。
    private void btnLoadData_Click(object sender, EventArgs e)


    {


    Files = Directory.GetFiles(


    System.Environment.ExpandEnvironmentVariables("%WinDir%"), "*.bmp");


    foreach (string file in _Files)


    {


    lstData.Items.Add(System.IO.Path.GetFileName(file));


      }


    }

下面的代码将在 Avalon 控件上显示图像。这段代码在 ListBox 上发生 DoubleClick 事件时执行。
    private void lstData_DoubleClick(object sender, EventArgs e)


    {


    if (lstData.Items.Count > 0)


    {


    System.Windows.Media.ImageData imageData = new


    System.Windows.Media.ImageData(


    new Uri(_Files[lstData.SelectedIndex]));


    imageViewer.Source = imageData;


    imageViewer.Height = new System.Windows.Length(


    Convert.ToDouble(imageViewer.Source.Height));


    imageViewer.Width = new


    System.Windows.Length(


    Convert.ToDouble(imageViewer.Source.Width));


      }

至此,我们就创建了一个托管 Avalon 控件的 Windows 窗体应用程序。最初加载图像时使用的是默认颜色,如果将鼠标指针移到图像上,将应用灰度效果。

图 4:在 Avalon 控件上显示图像的 Windows 窗体
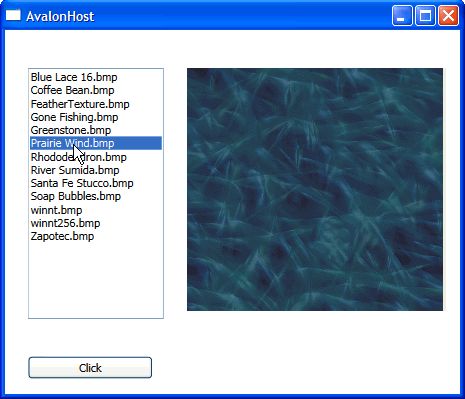
到目前为止,我们已创建了一个 Avalon 控件,并将其托管到 Windows 窗体应用程序中。现在我们要执行相反的操作,即,使用 XAML 创建一个 Windows 控件并将其托管到 Avalon 应用程序中。控件和应用程序将再次执行同样的操作,用户界面将如图 5 所示。
首先,我们创建 Windows 控件。我们使用类型为 Windows,模板为 Windows Control Library 的新项目创建 Windows 控件。为了简单起见,我们还将类命名为 ImageViewer。这个类应类似于以下内容:
    public class ImageViewer :System.Windows.Forms.PictureBox


    {


    public ImageViewer()


    {


      }


    }

在先前的 Avalon 控件中,我们应用了灰度效果;回忆一下,我们是通过创建 ImageEffectGrayscale 对象的实例来完成此操作的。要使 Windows 控件具有类似的效果,我们需要编写大量代码。这里不介绍如何编写这些代码,因为这不是本文的主旨。本文附带的代码显示了编写代码的一种方法。
现在 Windows 控件已经就绪,下面我们介绍关键的部分,即将这个控件托管到 Avalon 应用程序中。
Avalon 应用程序
为了开发 Avalon 应用程序,已经创建了类型为 Avalon,模板为 Avalon Application 的新项目。Visual Studio 在这个项目中创建了 MyApp.XAML 和 Window1.XAML 文件。我们就是在 Window1.XAML 中创建用户界面。编写 UI 代码之前,我们需要添加所需的引用。我们已经添加了 System.Windows.Forms dll 的引用和 WindowsControl 项目的引用。
我们使用 Grid 和 FlowPannel 创建图 5 所示的用户界面。部分 XAML 代码将在下文中进行解释。下面是用户界面的代码。
    <?Mapping XmlNamespace="wfh" ClrNamespace="System.Windows.Forms.Integration" Assembly="WindowsFormsIntegration"?>


    <?Mapping XmlNamespace="wcl" ClrNamespace="WindowsControls" Assembly="WindowsControls"?>


    <Window def:Class="AvalonHost.Window1"


    xmlns="http://schemas.microsoft.com/2003/xaml"


    xmlns:def="Definition"


    xmlns:wfh="wfh"


    xmlns:wcl="wcl"


    Text="AvalonHost"


    Width="465"


    Height="400">


    <Grid>


    <ColumnDefinition Width="5%"/>


    <ColumnDefinition Width="35%"/>


    <ColumnDefinition Width="60%"/>


    <RowDefinition Height="50"/>


    <RowDefinition Height="300"/>


    <RowDefinition Height="50"/>


    <FlowPanel Grid.Row="1" Grid.Column="1">


    <ListBox ID="lstData" Width="136" Height="251"


    PreviewMouseDoubleClick="lstDataDoubleClick" />


    </FlowPanel>


    <FlowPanel Grid.Row="2" Grid.Column="1">


    <Button ID="btnLoadData" Content="Click" Click="ButtonClick" />


    </FlowPanel>


    <FlowPanel ID="HostPanel" Grid.Row="1"


    Grid.Column="2" Width="267" Height="243">


    <wfh:WindowsFormsHost ID="windowsFormsHost">


    <wfh:WindowsFormsHost.Controls>


    <wcl:ImageViewer Name="imageViewer" def:ID="imageViewer"/>


    </wfh:WindowsFormsHost.Controls>


    </wfh:WindowsFormsHost>


    </FlowPanel>


    </Grid>


    </Window>


图 5:带有 ListBox、Button 和 WindowsFormsHost 的 Avalon 窗体
在 Window1.xaml 的顶部,有这样两条声明:
    <?Mapping XmlNamespace="wfh"


    ClrNamespace="System.Windows.Forms.Integration"


    Assembly="WindowsFormsIntegration"?>


    <?Mapping XmlNamespace="wcl"


    ClrNamespace="WindowsControls"


    Assembly="WindowsControls"?>

这是 System.Windows.Forms.Integration 和 WindowsControls 的命名空间声明。如前文所述,System.Windows.Forms.Integeration 命名空间提供用来集成 Windows 窗体和 Avalon 应用程序的类。要托管 Windows 控件,我们需要一个 WindowsFormsHost 对象。下面的代码将创建此对象并将其放置到 XAML 中。
    <FlowPanel ID="HostPanel" Grid.Row="1"


    Grid.Column="2" Width="267" Height="243">


    <wfh:WindowsFormsHost ID="windowsFormsHost">


    <wfh:WindowsFormsHost.Controls>


    <wcl:ImageViewer Name="imageViewer" def:ID="imageViewer"/>


    </wfh:WindowsFormsHost.Controls>


    </wfh:WindowsFormsHost>


    </FlowPanel>

我们已经将 ImageViewer 放置到 WindowsFormsHost 中。我们可以在内含代码的 C# 文件中完成此操作,但本文仍然使用 XAML 方法。
下面我们将添加 ListBox 和 Button,还添加双击时加载数据并显示图像的代码。我们将在 Window1.xaml.cs 文件中添加这段代码,此文件是 Window1.xaml 的内含代码文件。这段代码类似于上文中为 Windows 应用程序编写的代码。唯一的不同之处在于在控件上显示图像的代码:
    private void lstDataDoubleClick(object sender, EventArgs e)


    {


    System.Drawing.Image image =


    System.Drawing.Image.FromFile(_Files[lstData.SelectedIndex]);


    imageViewer.Image = image;


    imageViewer.Height = image.Height;


    imageViewer.Width = image.Width;


    }

最后三个语句基本上只设置图像属性以及 ImageViewer 控件的高度和宽度属性。编译并运行项目。您会发现单击按钮时,将在列表框中加载一个列表;双击列表框中的项目时,将在 ImageViewer 控件上显示一个图像,如图 6 所示。

图 6:使用 WindowsFormsHost 控件显示图像的 Avalon 应用程序
虽然上文已经说明了如何在 Windows 窗体和 Avalon 应用程序之间提供互操作性,但还有一些事项需要注意。只有托管的代码数量适当时,Windows 窗体才能获得最好的互操作性。如果只托管少量代码,您会发现编写互操作性代码的时间比编写应用程序的时间还要多。通常最理想的情况是,要托管的对象是最终用户易于理解的自包含 UI 块(例如完整的对话框)或大型控件(例如 DataGridView 或 UserControl)。
WindowsFormsHost 与其他 Avalon FrameworkElement 的行为基本相同,但在输出(图形和图像)和输入(鼠标和键盘)方面存在一些较大的差异。输出行为方面的差异包括:
| • | WindowsFormsHost 不能旋转、缩放、扭曲或受转换的影响。 |
| • | WindowsFormsHost 不支持 Opacity 属性 (aka alpha blending)。如果 WindowsFormsHost 中的内容执行包含 alpha 的 System.Drawing 操作,那当然很好,但是 WindowsFormsHost 本身只支持 Opacity = 100%,并且只能包含在 Opacity = 100% 的其他元素中。 |
| • | WindowsFormsHost 会出现在同一个顶层窗口中的其他 Avalon 元素的上面。(但请注意,菜单、工具提示和组合框下拉列表是单独的顶层窗口,因此它们应该能够与 WindowsFormsHost 一起运行。) |
| • | WindowsFormsHost 不受其父 UIElement 的剪辑区域的限制。 |
输入行为方面的差异包括:
| • | 将鼠标指针放在 WindowsFormsHost 上时,不会发生 Avalon 鼠标事件,而 Avalon 的 IsMouseOver 属性将返回 false。 |
| • | 当 WindowsFormsHost 具有键盘焦点时,不会发生 Avalon 键盘事件,而 Avalon 的 IsFocusWithin 属性将返回 false。 |
| • | 当焦点位于 WindowsFormsHost 中时,转到 WindowsFormsHost 中的另外一个控件时不会发生 Avalon GotFocus/LostFocus 事件。 |
精通 Win32 的读者可能会发现上述差异的原因在于 Windows 窗体和 Avalon 使用 hwnd 的方式。每个 Windows 窗体控件都有自己的 hwnd,但同一个顶层窗口中的 Avalon 元素共享一个 hwnd。因为 WindowsFormsHost 是一个单独的 hwnd,所以只能执行 hwnd 可以执行的操作,而这些操作不包括旋转、缩放、不透明等。