【玩转yolov5】来自茱丽叶的letterbox
数据集中的图片一般为长方形,当模型输入为正方形时直接将长方形图片resize为正方形会使得图片失真,采用letterbox(啥意思?邮箱盒子!)通过填充边界(通常是灰色填充)的方式来保持原始图片的长宽比例,同时又满足模型正方形输入的需要。这里以我做训练时使用的一张bdd100k中的图片为例直观感受一下即可。
import cv2
import matplotlib as plt
import numpy as np


img_size = 640 #yolov5默认输入图片尺寸640x640
augment = True #代码中会要用到的增量参数
path = path="/home/zw/zuosi/projects/yolov5-v4.0/diamond_20210119/images/train/20e2659a-2e3fb6de.jpg" #我选择的一张bdd100k的图片
先调用yolov5中的load_image函数加载图片。
def load_image(path):
    img = cv2.imread(path)  # BGR
    assert img is not None, 'Image Not Found ' + path
    h0, w0 = img.shape[:2]  # orig hw
    #5/10 py2:0, py3:0.2
    #python3中数字的除法运算默认使用浮点数运算,如果notebook用的py2得强制转换一下
    r = img_size / float(max(h0, w0))  # resize image to img_size
    if r != 1:  # always resize down, only resize up if training with augmentation
        interp = cv2.INTER_AREA if r < 1 and not augment else cv2.INTER_LINEAR
        #保持宽高比的情况下,长边会被resize成img_size大小
        img = cv2.resize(img, (int(w0 * r), int(h0 * r)), interpolation=interp)
    return img, (h0, w0), img.shape[:2]  # img, hw_original, hw_resized
运行一下看看load_image的结果。
img,(h0,w0),(h,w) = load_image(path)
print((h0,w0),(h,w))
((375, 1242), (193, 640))
(h0,w0)表示图片原始的高和宽,(h,w)表示图片被resize之后的宽和高。resize为多少呢?load_image代码中有说明,在保持宽高比和原始图片一致的情况下,将长边resize为模型输入的尺寸即img_size。所以,原始高宽为(375,1242)的图片被resize成为了(193,640)。img即为resize之后的图片。接下来将这个图片送入到letter_box中做边缘填充。
def letterbox(img, new_shape=(416, 416), color=(114, 114, 114), auto=True, scaleFill=False, scaleup=True):
    # Resize image to a 32-pixel-multiple rectangle https://github.com/ultralytics/yolov3/issues/232
    shape = img.shape[:2]  # current shape [height, width]
    if isinstance(new_shape, int):
        new_shape = (new_shape, new_shape)

    # Scale ratio (new / old)
    r = min(new_shape[0] / shape[0], new_shape[1] / shape[1])
    if not scaleup:  # only scale down, do not scale up (for better test mAP)
        r = min(r, 1.0)

    # Compute padding,计算padding的像素大小
    ratio = r, r  # width, height ratios
    new_unpad = int(round(shape[1] * r)), int(round(shape[0] * r))

    dw, dh = new_shape[1] - new_unpad[0], new_shape[0] - new_unpad[1]  # wh padding
    if auto:  # minimum rectangle
        dw, dh = np.mod(dw, 64), np.mod(dh, 64)  # wh padding
    elif scaleFill:  # stretch
        dw, dh = 0.0, 0.0
        new_unpad = new_shape
        ratio = new_shape[0] / shape[1], new_shape[1] / shape[0]  # width, height ratios

    dw /= 2  # divide padding into 2 sides
    dh /= 2

    if shape[::-1] != new_unpad:  # resize
        img = cv2.resize(img, new_unpad, interpolation=cv2.INTER_LINEAR)
    top, bottom = int(round(dh - 0.1)), int(round(dh + 0.1))
    left, right = int(round(dw - 0.1)), int(round(dw + 0.1))
    img = cv2.copyMakeBorder(img, top, bottom, left, right, cv2.BORDER_CONSTANT, value=color)  # add border
    return img, ratio, (dw, dh)
再运行一下。
img2,ratio,pad = letterbox(img,img_size,auto=False,scaleup=augment)
print(img2.shape,ratio,pad)
((639, 640, 3), (1, 1), (0, 223))
img2为填充完子之后的图片,输入img尺寸为(193,640)现在填充后变成了(639,640),已经是一个正方形了。(0,223)表示要填充的高和宽的像素值。最后看一下效果图。
import matplotlib.pyplot as plt
#color = sns.color_palette()

# 图形出现在Notebook里而不是新窗口
%matplotlib inline
width,height,_=img2.shape
plt.figure(figsize=(width/100.,height/100.))
img2 = cv2.cvtColor(img2,cv2.COLOR_BGR2RGB)
plt.imshow(img2)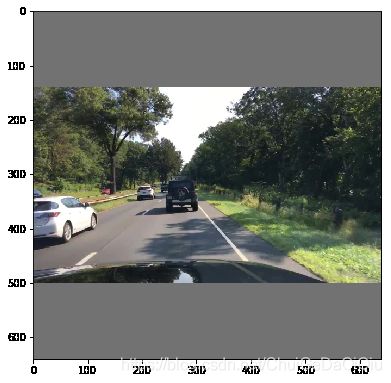
嗯,确实是像把一个图片装在了一个信封里面了。