Scrapy爬取前程无忧
一、确定爬取内容并创建mysql表
1、确定要爬取的url
通过观察可以发现url为
https://search.51job.com/list/000000,000000,0000,32,9,99,+,2,xxxx.html
只要修改其中的xxxx,即可实现多网页爬取
2、前程无忧的网页数据动态获取json数据,并由js变量接收,然后显示在网页中,因此爬取时需要解析script标签中的变量

3、确定爬取字段,然后创建mysql表
mysql表结构如下:

二、scrapy项目爬取
(一)、准备工作:
1、执行scrapy startproject qcwy,创建scrapy工程
2、执行scrapy genspider qcwyCrawler www.xxx.com,创建爬虫文件
(二)、更改项目配置文件settings.py:
# Scrapy settings for qcwy project
#
# For simplicity, this file contains only settings considered important or
# commonly used. You can find more settings consulting the documentation:
#
#     https://docs.scrapy.org/en/latest/topics/settings.html
#     https://docs.scrapy.org/en/latest/topics/downloader-middleware.html
#     https://docs.scrapy.org/en/latest/topics/spider-middleware.html
from fake_useragent import UserAgent

BOT_NAME = 'qcwy'

SPIDER_MODULES = ['qcwy.spiders']
NEWSPIDER_MODULE = 'qcwy.spiders'

# Crawl responsibly by identifying yourself (and your website) on the user-agent
USER_AGENT = UserAgent().random  # 生成随机请求头

# Obey robots.txt rules
ROBOTSTXT_OBEY = False  # 不遵守robot协议
LOG_LEVEL = 'ERROR'  # 只打印error级别的日志

ITEM_PIPELINES = {

    'qcwy.pipelines.QcwyPipeline': 300,
}  # 开启爬虫管道
(三)、更改items.py文件,确定爬取字段
# Define here the models for your scraped items
#
# See documentation in:
# https://docs.scrapy.org/en/latest/topics/items.html

import scrapy


class QcwyItem(scrapy.Item):
    # define the fields for your item here like:
    # name = scrapy.Field()
    company = scrapy.Field()
    job_name = scrapy.Field()
    salary = scrapy.Field()
    requirement = scrapy.Field()
    welfare = scrapy.Field()
(四)、更改qcwyCrawler.py文件,编写爬虫代码
import scrapy
import json
from qcwy.items import QcwyItem


class QcwycrawlerSpider(scrapy.Spider):
    name = 'qcwyCrawler'
    # allowed_domains = ['www.xxx.com']
    start_urls = []  # start_urls列表中的url会被scrapy自动请求

    def __init__(self, **kwargs):
        super().__init__(**kwargs)
        url = 'https://search.51job.com/list/000000,000000,0000,32,9,99,+,2,{}.html'  # 生成要爬取的网址
        for i in range(1, 1001):
            self.start_urls.append(url.format(i))

    def parse(self, response): # 利用xpath和json解析爬取到的数据
        json_str = response.xpath('/html/body/script[2]/text()').extract_first()[29:]
        data = json.loads(json_str)
        item = QcwyItem()
        for row in data['engine_search_result']:
            item['company'] = row['company_name']
            item['job_name'] = row['job_name']
            item['salary'] = row['providesalary_text']
            item['requirement'] = ' '.join(row['attribute_text'])
            item['welfare'] = row['jobwelf']
            yield item
(五)、创建dbutil包和connection文件,编写mysql连接类
from pymysql import connect


class MysqlConnection:
    host = '127.0.0.1'
    port = 3306
    user = 'root'
    password = 'qwe12333'
    db = 'study'
    charset = 'utf8'

    @classmethod
    def getConnection(cls):
        conn = None
        try:
            conn = connect(
                host=cls.host,
                port=cls.port,
                user=cls.user,
                password=cls.password,
                db=cls.db,
                charset=cls.charset
            )
        except Exception as e:
            print(e)
        return conn

    @classmethod
    def closeConnection(cls, conn):
        if not conn:
            conn.close()
(六)、更改爬虫管道文件,将数据存入mysql表
# Define your item pipelines here
#
# Don't forget to add your pipeline to the ITEM_PIPELINES setting
# See: https://docs.scrapy.org/en/latest/topics/item-pipeline.html


# useful for handling different item types with a single interface
from itemadapter import ItemAdapter
from dbutil.connection import MysqlConnection
from time import time


class QcwyPipeline:
    def __init__(self):
        self.start_time = time()
        self.conn = MysqlConnection.getConnection()
        self.sql = 'insert into qcwy values(null ,%s, %s, %s, %s, %s);'
        self.count = 0

    def process_item(self, item, spider):
        self.cursor = self.conn.cursor()
        company = item['company']
        job_name = item['job_name']
        salary = item['salary']
        requirement = item['requirement']
        welfare = item['welfare']
        print('{}: {}'.format(company, job_name))
        self.count += self.cursor.execute(self.sql, (company, job_name, salary, requirement, welfare))

    def close_spider(self, spider):
        if self.cursor:
            self.cursor.close()
        self.conn.commit()
        MysqlConnection.closeConnection(self.conn)
        print('总共爬取{}条记录,耗时:{}秒'.format(self.count, time() - self.start_time))
(七)、编写main.py文件,用于启动scrapy项目
from scrapy import cmdline

cmdline.execute('scrapy crawl qcwyCrawler'.split())
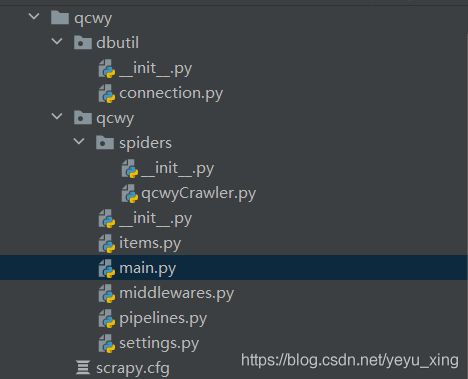
创建好的项目结构如下所示:
运行结果:

