【Spring Cloud】【Hystrix】Feign下Hystrix的简单熔断测试
一、引言
1. 背景
分布式系统环境下,服务间类似依赖非常常见,一个业务调用通常依赖多个基础服务。如下图,对于同步调用,当库存服务不可用时,商品服务请求线程被阻塞,当有大批量请求调用库存服务时,最终可能导致整个商品服务资源耗尽,无法继续对外提供服务。并且这种不可用可能沿请求调用链向上传递,这种现象被称为雪崩效应。
2. 简介
Hystrix是Netlifx开源的一款容错框架,防雪崩利器,具备服务降级,服务熔断,依赖隔离,监控(Hystrix Dashboard)等功能。
二、环境准备
- IntelliJ IDEA
- Maven 3.2+
- JDK 1.8 or later
三、Hystrix项目
在正式开启Hystrix项目之前,请先根据我之前写的【Spring Cloud】【Feign】微服务之服务调用者搭建。将Eureka项目,OrderService项目搭建好,同时了解一下Feign。本文的Hystrix项目搭建在Feign项目的基础上实现。
为了体现熔断的效果,要模拟多个service,因此将OrderService项目再复制两份,总共三个OrderService项目:

这里举例OrderService1。它的MicroServiceOrderService1Application 类实现如下:
@EnableDiscoveryClient
@RestController
@SpringBootApplication
public class MicroServiceOrderService1Application {

    public static void main(String[] args) {

        SpringApplication.run(MicroServiceOrderService1Application.class, args);
    }
    @RequestMapping("/hello")
    public String hello () {

        return "Hello , Spring Cloud Order Service 1 .";
    }
}
application.properties文件如下:
spring.application.name=OrderMicroService
server.port=8001
eureka.client.serviceUrl.defaultZone=http://localhost:8761/eureka/
#register service
eureka.client.register-with-eureka=true
eureka.client.fetch-registry=false
其他两个项目跟OrderService1的不同在于:
	//OrderService2
    public String hello () {

        return "Hello , Spring Cloud Order Service 2 .";
    }
    //OrderService3
    public String hello () {

        return "Hello , Spring Cloud Order Service 3 .";
    }
server.port=8002 #OrderService2
server.port=8003 #OrderService3
1. 创建项目
使用IDEA创建项目,所需的依赖入下:
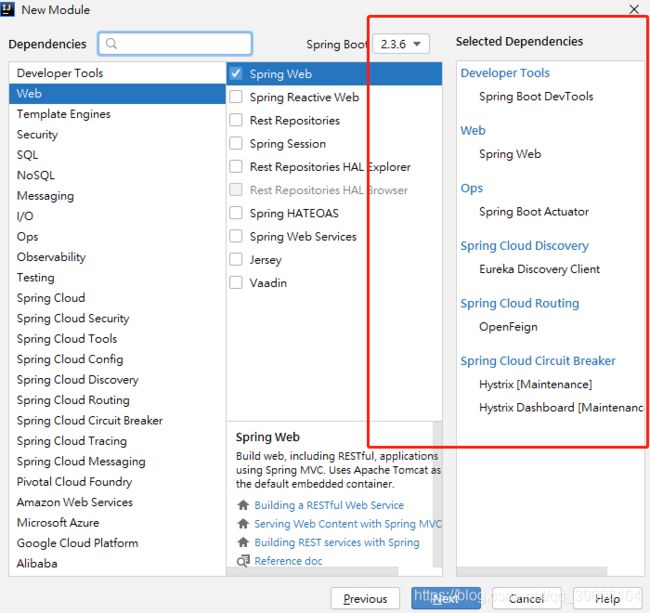
这里有个actuator依赖,当用Hystrix查看流内容时需要它。Dashboard是Hystrix看板。
完整的pom文件如下:
"1.0" encoding="UTF-8"?>
"http://maven.apache.org/POM/4.0.0" xmlns:xsi="http://www.w3.org/2001/XMLSchema-instance"
         xsi:schemaLocation="http://maven.apache.org/POM/4.0.0 https://maven.apache.org/xsd/maven-4.0.0.xsd">
    4.0.0</modelVersion>

        org.springframework.boot</groupId>
        spring-boot-starter-parent</artifactId>
        2.3.6.RELEASE</version>
        /> <!-- lookup parent from repository -->
    </parent>
    com.alibaba</groupId>
    taobao</artifactId>
    1.0.0</version>
    MicroServiceFeignHystrix</name>
    Demo project for Spring Boot</description>


        .version>1.8</java.version>
        -cloud.version>Hoxton.SR9</spring-cloud.version>
    </properties>


            org.springframework.boot</groupId>
            spring-boot-starter-web</artifactId>
        </dependency>

            org.springframework.cloud</groupId>
            spring-cloud-starter-netflix-eureka-client</artifactId>
        </dependency>

            org.springframework.cloud</groupId>
            spring-cloud-starter-netflix-hystrix</artifactId>
        </dependency>

            org.springframework.cloud</groupId>
            spring-cloud-starter-netflix-hystrix-dashboard</artifactId>
        </dependency>

            org.springframework.cloud</groupId>
            spring-cloud-starter-openfeign</artifactId>
        </dependency>

            org.springframework.boot</groupId>
            spring-boot-starter-actuator</artifactId>
        </dependency>

            org.springframework.boot</groupId>
            spring-boot-devtools</artifactId>
            runtime</scope>
            true</optional>
        </dependency>

            org.springframework.boot</groupId>
            spring-boot-starter-test</artifactId>
            test</scope>


                    org.junit.vintage</groupId>
                    junit-vintage-engine</artifactId>
                </exclusion>
            </exclusions>
        </dependency>
    </dependencies>


                org.springframework.cloud</groupId>
                spring-cloud-dependencies</artifactId>
                ${
     spring-cloud.version}</version>
                <type>pom</type>
                import</scope>
            </dependency>
        </dependencies>
    </dependencyManagement>


                org.springframework.boot</groupId>
                spring-boot-maven-plugin</artifactId>
            </plugin>
        </plugins>
    </build>

</project>
2. 添加配置
Hystrix项目的application.properties文件如下:
spring.application.name=FeignHystrixClient
server.port=9001
eureka.client.serviceUrl.defaultZone=http://localhost:8761/eureka/
#register service
eureka.client.register-with-eureka=true
eureka.client.fetch-registry=true

#Hystrix
feign.hystrix.enabled=true
hystrix.metrics.polling-interval-ms=2000
hystrix.metrics.enabled=true
spring.cloud.circuitbreaker.hystrix.enabled=true
#允许展示监控服务器
hystrix.dashboard.proxy-stream-allow-list=localhost,192.168.XX.X
#监控数据源要暴露地址
management.endpoints.web.exposure.include=*
允许展示监控服务器的IP地址得是你本机的IP地址。
3. 添加注解
我们的Hystrix项目是在Feign项目的基础上搭建的。目录结构如图:
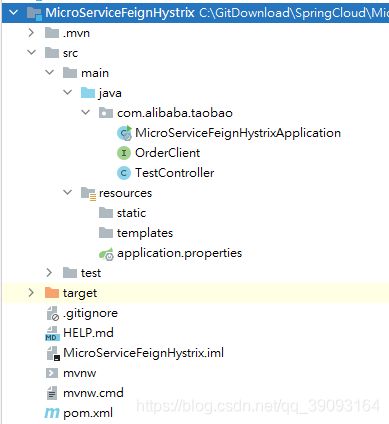
在MicroServiceFeignHystrixApplication类中添加两个注解@EnableHystrix和@EnableHystrixDashboard。
@EnableHystrix
@EnableHystrixDashboard
@EnableFeignClients
@EnableEurekaClient
@SpringBootApplication
public class MicroServiceFeignHystrixApplication {

    public static void main(String[] args) {

        SpringApplication.run(MicroServiceFeignHystrixApplication.class, args);
    }
}
在TestController 类里面添加@HystrixCommand。
fallbackMethod = "fallbackMethod"表示触发熔断后执行的方法,返回值要和hello()方法一样是String类型。因此我写了一个fallbackMethod() 方法。
commandProperties 中是对Hystrix的一些配置,这里我简单配置熔断超时的时间为2000ms。还有很多关于Hystrix的配置,但本文恕不赘述。
@RestController
public class TestController {

    @Autowired
    OrderClient orderClient;

    //timeoutInMilliseconds:设置熔断超时的时间
    @HystrixCommand(fallbackMethod = "fallbackMethod", commandProperties = {

                    @HystrixProperty(name = "execution.isolation.thread.timeoutInMilliseconds", value = "2000")})

    public String fallbackMethod() {

        return "Spring Cloud Hystrix Circuit Breaker .";
    }

    @RequestMapping("/test")
    public String hello(){

        String result = orderClient.hello();
        return result;
    }
}
到这里Hystrix项目的配置也就完成了,但是注意我们的熔断触发条件是超过2000ms,那么我们怎么触发这个熔断条件呢?
方法是在其中一个OrderService上配置休眠2000ms,也就达成目的啦。因此我在MicroServiceOrderService3Application类中对hello()方法添加了Thread.sleep(2000)。
	//MicroServiceOrderService3Application
    @RequestMapping("/hello")
    public String hello () throws InterruptedException {

        Thread.sleep(2000);
        return "Hello , Spring Cloud Order Service 3 .";
    }
4. 运行
接下来就把五个项目(Eureka,OrderService*3,Hystrix)都运行起来。
首先我们打开:http://localhost:8761/,可以看到我们所启动的四个项目,OrderService服务有三个端口不同的Instance。
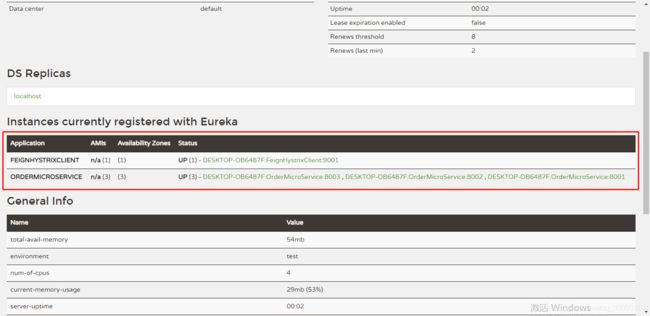
接着打开Hystrix的网站:http://localhost:9001/hystrix,可以看到他给了我们一个监控数据流的网址。
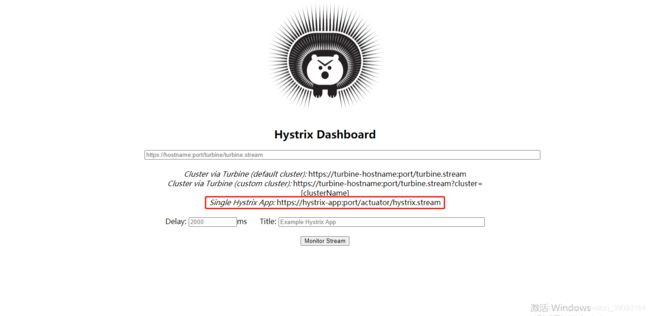
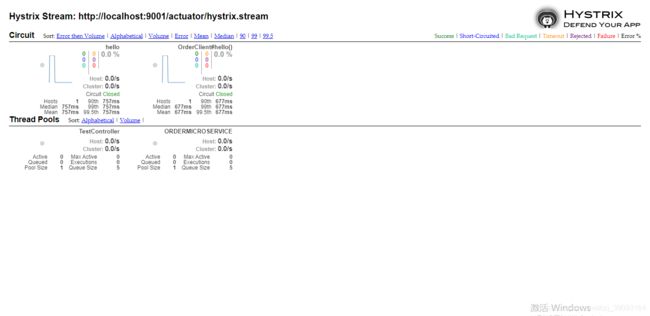
我们把地址:http://localhost:9001/actuator/hystrix.stream输入到最上面的文本框中,点击 Monitor Stream 后会弹出如下页面,此时是没有数据的。

我们打开我们的服务调用地址:http://localhost:9001/test,再回到http://localhost:9001/actuator/hystrix.stream就可以看到如下页面,有数据波动了。
5. 熔断测试
刷新几次http://localhost:9001/test,就会发现1,2是正常的,但是碰到3就会提示:Spring Cloud Hystrix Circuit Breaker .熔断测试成功

参考:Circuit Breaker: Spring Cloud Circuit Breaker With Hystrix
Hystrix原理与实战(文章略长)