Android--支付宝沙箱集成(详细图解)
目录
- 效果图
- 关于官方的Demo
-
- 进入开发者平台
- 下载他的沙箱版支付宝
- 下载官方给的SDK
- 导入官方给的Demo
- 导入SDK
- 修改APPID、PID、TARGET_ID
- RSA2_PRIVATE问题也就是这个沙箱的公钥和私钥
- 最后加入这条语句EnvUtils.setEnv(EnvUtils.EnvEnum.SANDBOX);在onCreate()方法里面
- 效果图的代码
-
- activity布局文件
- MainActivity文件
- 有两处改动
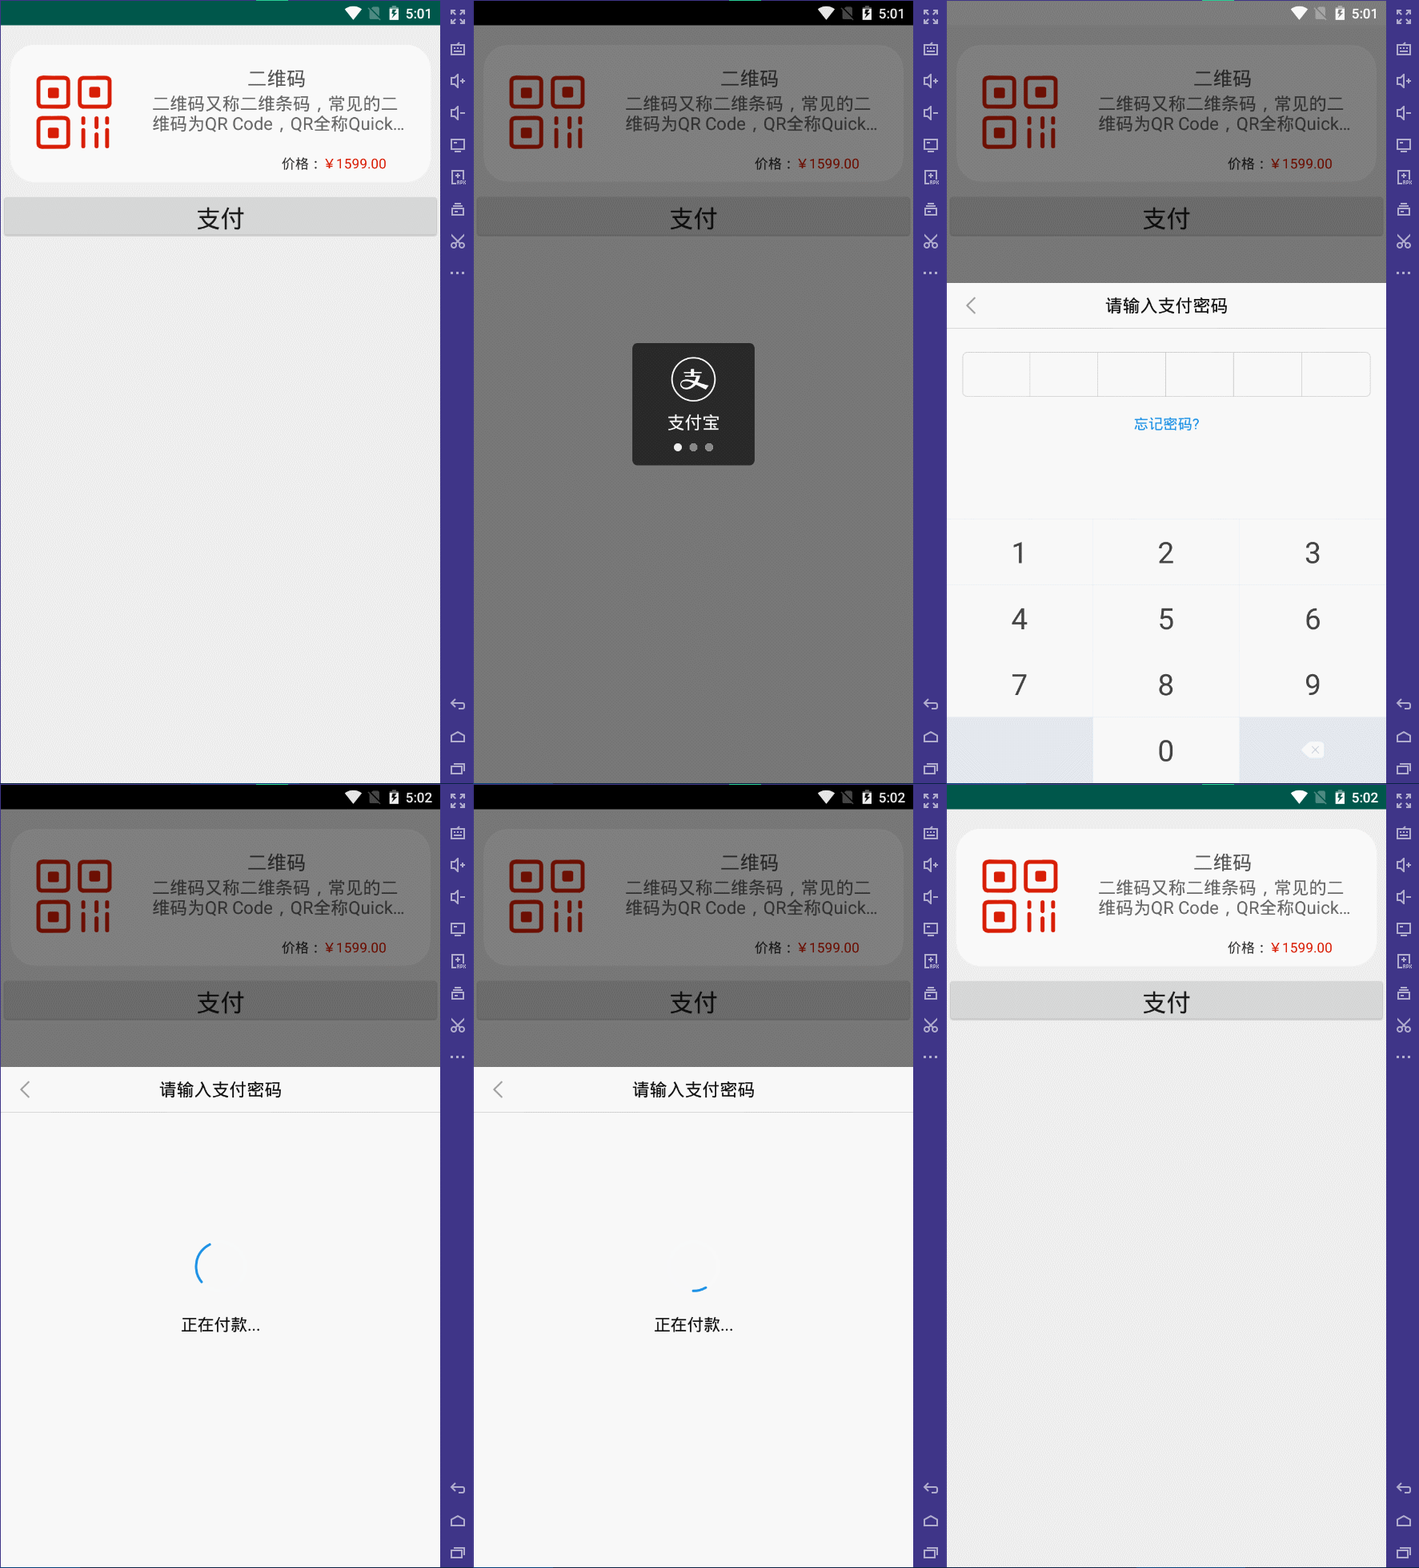
效果图
关于官方的Demo
这里我们先跑一个官方给的demo试试
进入开发者平台
沙箱应用
创建一个沙箱应用


关键信息:APPID、UID、商家账号
下载他的沙箱版支付宝
如果是在模拟器运行的代码记得把这个沙箱版安装在模拟器里面

下载完成之后,可以登录(账号在上面截图的位置,每个人创建的应用不同账号也不同)进去看看,也给以试着往里面加钱,最大可以加999999999…吧…好像,要是真的就好了。。。
下载官方给的SDK
下载地址

下载解压后有几个文件(和以前的老版不一样,这个坑…老版教程不适用)

Android_Demo这个文件夹打开后的文件直接导入在Android studio里面打开
导入官方给的Demo
文件结构如下图

然后复制Android_SDK这个文件夹下的aar文件

导入SDK
指导文档

给出了新版SDK也就是后缀为aar文件和之前老版jar文件的导入区别,跟着文档来,记录一下:下面这个语句要改一下,因为文档的name和自己下的sdk版本名称可能不一致导致报错,最后同步一下项目(我的和你的版本可能也不一样,自己对着自己的版本改)
// 添加下面的内容
    implementation (name: 'alipaysdk-15.8.00.201112210139', ext: 'aar')
修改APPID、PID、TARGET_ID
RSA2_PRIVATE问题也就是这个沙箱的公钥和私钥


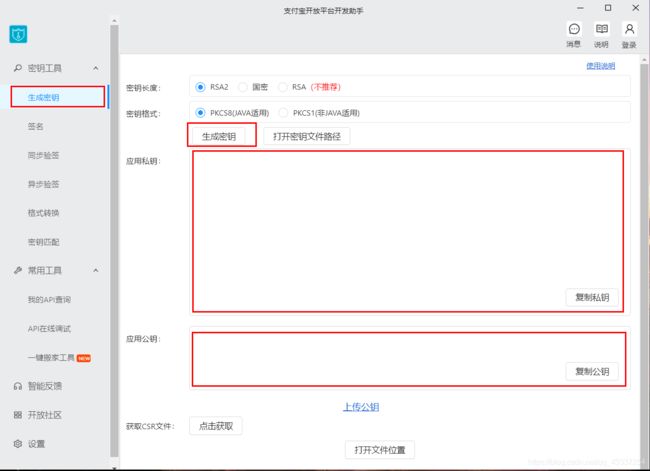
这个要从这个软件里面获取
下载密钥工具

下载后打开工具

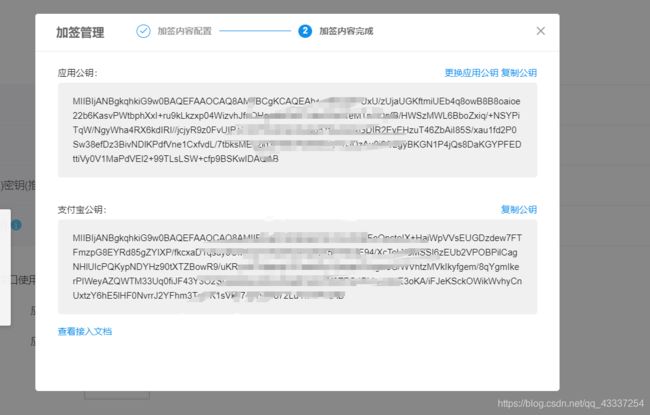
将生成的应用公钥复制到之前的沙箱应用管理里面

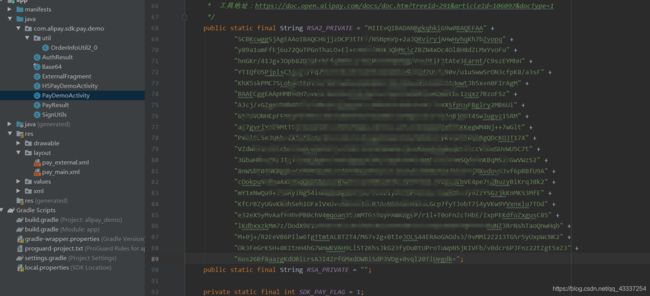
再复制之前工具生成的私钥放进代码里面
看文档好像是说的2048字节长度

最后加入这条语句EnvUtils.setEnv(EnvUtils.EnvEnum.SANDBOX);在onCreate()方法里面
效果图的代码
SDK导入方式和前面说的一样,再然后就是将官方给的demo里面的这几个文件复制进自己项目

activity布局文件
<androidx.constraintlayout.widget.ConstraintLayout xmlns:android="http://schemas.android.com/apk/res/android"
    xmlns:app="http://schemas.android.com/apk/res-auto"
    xmlns:tools="http://schemas.android.com/tools"
    android:layout_width="match_parent"
    android:layout_height="match_parent"
    tools:context="com.example.newapplication.MainActivity">

    <androidx.constraintlayout.widget.ConstraintLayout
        android:id="@+id/constraintLayout"
        android:layout_width="match_parent"
        android:layout_height="140dp"
        android:layout_marginStart="10dp"
        android:layout_marginLeft="10dp"
        android:layout_marginTop="20dp"
        android:layout_marginEnd="10dp"
        android:layout_marginRight="10dp"
        android:background="@drawable/activity_search_tv_shape"
        app:layout_constraintEnd_toEndOf="parent"
        app:layout_constraintStart_toStartOf="parent"
        app:layout_constraintTop_toTopOf="parent">

        <ImageView
            android:id="@+id/imageView"
            android:layout_width="100dp"
            android:layout_height="100dp"
            android:layout_marginStart="15dp"
            android:layout_marginLeft="15dp"
            android:src="@drawable/ma"
            app:layout_constraintBottom_toBottomOf="parent"
            app:layout_constraintStart_toStartOf="parent"
            app:layout_constraintTop_toTopOf="parent" />

        <TextView
            android:id="@+id/textView"
            android:layout_width="wrap_content"
            android:layout_height="wrap_content"
            android:text="二维码"
            android:textColor="#555555"
            android:textSize="20sp"
            app:layout_constraintEnd_toEndOf="parent"
            app:layout_constraintStart_toEndOf="@+id/imageView"
            app:layout_constraintTop_toTopOf="@+id/imageView" />

        <TextView
            android:id="@+id/textView2"
            android:layout_width="260dp"
            android:layout_height="wrap_content"
            android:layout_marginStart="5dp"

            android:layout_marginLeft="5dp"
            android:ellipsize="end"
            android:lines="2"
            android:text="二维码又称二维条码,常见的二维码为QR Code,QR全称Quick Response,是一个近几年来移动设备上超流行的一种编码方式,它比传统的Bar Code条形码能存更多的信息,也能表示更多的数据类型"
            android:textColor="#666666"
            android:textSize="18sp"
            app:layout_constraintEnd_toEndOf="parent"
            app:layout_constraintStart_toEndOf="@+id/imageView"
            app:layout_constraintTop_toBottomOf="@+id/textView" />

        <TextView
            android:id="@+id/textView3"
            android:layout_width="wrap_content"
            android:layout_height="wrap_content"
            android:text="价格:"
            android:textColor="#333333"
            app:layout_constraintBottom_toBottomOf="parent"
            app:layout_constraintEnd_toStartOf="@+id/price"
            app:layout_constraintTop_toBottomOf="@+id/textView2"
            app:layout_constraintVertical_bias="0.65999997" />

        <TextView
            android:id="@+id/price"
            android:layout_width="wrap_content"
            android:layout_height="wrap_content"
            android:layout_marginEnd="20dp"
            android:layout_marginRight="20dp"
            android:text="¥1599.00"
            android:textColor="#D81E06"
            app:layout_constraintBottom_toBottomOf="@+id/textView3"
            app:layout_constraintEnd_toEndOf="@+id/textView2"
            app:layout_constraintTop_toTopOf="@+id/textView3"
            app:layout_constraintVertical_bias="0.0" />
    androidx.constraintlayout.widget.ConstraintLayout>

    <Button
        android:id="@+id/button"
        android:layout_width="match_parent"
        android:layout_height="50dp"
        android:layout_marginTop="10dp"
        android:text="支付"
        android:textSize="25sp"
        app:layout_constraintEnd_toEndOf="parent"
        app:layout_constraintStart_toStartOf="parent"
        app:layout_constraintTop_toBottomOf="@+id/constraintLayout" />


androidx.constraintlayout.widget.ConstraintLayout>
MainActivity文件
package com.example.newapplication;

import androidx.appcompat.app.AppCompatActivity;

import android.annotation.SuppressLint;
import android.app.AlertDialog;
import android.content.Context;
import android.content.DialogInterface;
import android.os.Bundle;
import android.os.Handler;
import android.os.Message;
import android.text.TextUtils;
import android.util.Log;
import android.view.LayoutInflater;
import android.view.View;
import android.view.ViewGroup;
import android.widget.Button;
import android.widget.LinearLayout;
import android.widget.TextView;
import android.widget.Toast;

import com.alipay.sdk.app.EnvUtils;
import com.alipay.sdk.app.PayTask;

import java.util.Map;

public class MainActivity extends AppCompatActivity {

    /**
     * 用于支付宝支付业务的入参 app_id。
     */
    public static final String APPID = "202100011******4";//参数都填自己的

    /**
     * 用于支付宝账户登录授权业务的入参 pid。
     */
    public static final String PID = "208862195******4";

    /**
     * 用于支付宝账户登录授权业务的入参 target_id。
     */
    public static final String TARGET_ID = "lvuk******.com";

    /**
     *  pkcs8 格式的商户私钥。
     *
     * 	如下私钥,RSA2_PRIVATE 或者 RSA_PRIVATE 只需要填入一个,如果两个都设置了,本 Demo 将优先
     * 	使用 RSA2_PRIVATE。RSA2_PRIVATE 可以保证商户交易在更加安全的环境下进行,建议商户使用
     * 	RSA2_PRIVATE。
     *
     * 	建议使用支付宝提供的公私钥生成工具生成和获取 RSA2_PRIVATE。
     * 	工具地址:https://doc.open.alipay.com/docs/doc.htm?treeId=291&articleId=106097&docType=1
     */
    public static final String RSA2_PRIVATE = "填自己工具生成的私钥";
    public static final String RSA_PRIVATE = "";//不用填

    private static final int SDK_PAY_FLAG = 1;
    private static final int SDK_AUTH_FLAG = 2;
    @SuppressLint("HandlerLeak")
    private Handler mHandler = new Handler() {

        @SuppressWarnings("unused")
        public void handleMessage(Message msg) {

            switch (msg.what) {

                case SDK_PAY_FLAG: {

                    @SuppressWarnings("unchecked")
                    PayResult payResult = new PayResult((Map<String, String>) msg.obj);
                    /**
                     * 对于支付结果,请商户依赖服务端的异步通知结果。同步通知结果,仅作为支付结束的通知。
                     */
                    String resultInfo = payResult.getResult();// 同步返回需要验证的信息
                    String resultStatus = payResult.getResultStatus();
                    // 判断resultStatus 为9000则代表支付成功
                    if (TextUtils.equals(resultStatus, "9000")) {

                        // 该笔订单是否真实支付成功,需要依赖服务端的异步通知。
                        showAlert(MainActivity.this, getString(R.string.pay_success) + payResult);
                    } else {

                        // 该笔订单真实的支付结果,需要依赖服务端的异步通知。
                        showAlert(MainActivity.this, getString(R.string.pay_failed) + payResult);
                    }
                    break;
                }
                case SDK_AUTH_FLAG: {

                    @SuppressWarnings("unchecked")
                    AuthResult authResult = new AuthResult((Map<String, String>) msg.obj, true);
                    String resultStatus = authResult.getResultStatus();

                    // 判断resultStatus 为“9000”且result_code
                    // 为“200”则代表授权成功,具体状态码代表含义可参考授权接口文档
                    if (TextUtils.equals(resultStatus, "9000") && TextUtils.equals(authResult.getResultCode(), "200")) {

                        // 获取alipay_open_id,调支付时作为参数extern_token 的value
                        // 传入,则支付账户为该授权账户
                        showAlert(MainActivity.this, getString(R.string.auth_success) + authResult);
                    } else {

                        // 其他状态值则为授权失败
                        showAlert(MainActivity.this, getString(R.string.auth_failed) + authResult);
                    }
                    break;
                }
                default:
                    break;
            }
        };
    };


    @Override
    protected void onCreate(Bundle savedInstanceState) {

        EnvUtils.setEnv(EnvUtils.EnvEnum.SANDBOX);
        super.onCreate(savedInstanceState);
        setContentView(R.layout.activity_main);

        Button button = findViewById(R.id.button);
        button.setOnClickListener(new View.OnClickListener() {

            @Override
            public void onClick(View v) {

                payV2(v);
            }
        });
    }


    /**
     * 支付宝支付业务示例
     */
    public void payV2(View v) {

        if (TextUtils.isEmpty(APPID) || (TextUtils.isEmpty(RSA2_PRIVATE) && TextUtils.isEmpty(RSA_PRIVATE))) {

            showAlert(this, getString(R.string.error_missing_appid_rsa_private));
            return;
        }

        /*
         * 这里只是为了方便直接向商户展示支付宝的整个支付流程;所以Demo中加签过程直接放在客户端完成;
         * 真实App里,privateKey等数据严禁放在客户端,加签过程务必要放在服务端完成;
         * 防止商户私密数据泄露,造成不必要的资金损失,及面临各种安全风险;
         *
         * orderInfo 的获取必须来自服务端;
         */
        boolean rsa2 = (RSA2_PRIVATE.length() > 0);

        Map<String, String> params = OrderInfoUtil2_0.buildOrderParamMap(APPID, rsa2,"1599.00");
        String orderParam = OrderInfoUtil2_0.buildOrderParam(params);

        String privateKey = rsa2 ? RSA2_PRIVATE : RSA_PRIVATE;
        String sign = OrderInfoUtil2_0.getSign(params, privateKey, rsa2);
        final String orderInfo = orderParam + "&" + sign;

        final Runnable payRunnable = new Runnable() {


            @Override
            public void run() {

                PayTask alipay = new PayTask(MainActivity.this);
                Map<String, String> result = alipay.payV2(orderInfo, true);
                Log.i("msp", result.toString());

                Message msg = new Message();
                msg.what = SDK_PAY_FLAG;
                msg.obj = result;
                mHandler.sendMessage(msg);
            }
        };

        // 必须异步调用
        Thread payThread = new Thread(payRunnable);
        payThread.start();
    }
    private static void showAlert(Context ctx, String info) {

        showAlert(ctx, info, null);
    }

    private static void showAlert(Context ctx, String info, DialogInterface.OnDismissListener onDismiss) {

        new AlertDialog.Builder(ctx)
                .setMessage(info)
                .setPositiveButton(R.string.confirm, null)
                .show();
    }

    private static void showToast(Context ctx, String msg) {

        Toast.makeText(ctx, msg, Toast.LENGTH_LONG).show();
    }

    private static String bundleToString(Bundle bundle) {

        if (bundle == null) {

            return "null";
        }
        final StringBuilder sb = new StringBuilder();
        for (String key: bundle.keySet()) {

            sb.append(key).append("=>").append(bundle.get(key)).append("\n");
        }
        return sb.toString();
    }
}
有两处改动
string.xml文件改一下(从官方Demo复制)

改一下刚刚从demo复制的OrderInfoUtil2_0类下的方法,根据需要自己改(订单的构造方法)

就这样集成完毕!!!


