硬件平台:
win10 x64
Visual Studio 2019
Intel Realsense SDK 2.0
这是在官网上下载的例程,默认安装在C盘,include是头文件,samples是例子
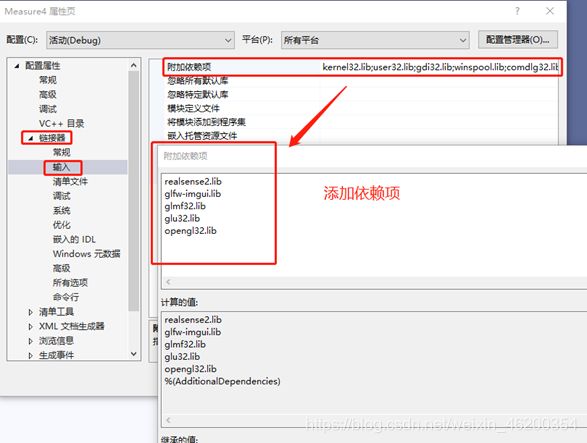
先说明:Hello第一个例子添加的依赖项只需要realsense2.lib就行,其他的例程则需要添加更多的依赖项,否则会报错
在VS新建工程这里坑比较多,以下是手把手教建工程,如果已经配置成功的可略过不看哦~
1.环境变量配置(设置完之后,建议电脑重启一下,不过问题不大,看实际情况)
电脑——属性——高级系统设置——环境变量——系统变量——Path——如下图:
2.打开vs,新建一个工程,我把这个工程放在E盘,然后在解决方案资源管理器,右键打开属性
引入头文件和库目录+添加依赖项,完成一切后,连上相机就可以啦~
大量的头文件和依赖项,没有的话,靠一个main函数跑不了,路径什么的一定要设置好才行,不过每次新建都得引入一次是真的烦人,可以试下在其他的环境下跑吧。
本教程介绍了使用深度数据测量现实距离的简单方法。
注意:测量真实对象的尺寸是深度相机的明显应用之一。
该示例并不是要成为合适的度量工具,而是要展示关键概念。
使用更好的算法,可以大大提高测量结果。
在本教程中,您将学习如何:
在空间上使颜色流与深度对齐(与rs-align中的深度与颜色对齐相反)
利用后处理来处理丢失或嘈杂的深度数据
在2D像素和3D空间中的点之间转换
利用多核来并行化数据流
使用OpenGL在深度上方叠加颜色
#include
#include
#include "example.hpp"
#include
//#include //该头文件包含M_PI的定义
#include
#include
#include
#include
#include
#include
#define _USE_MATH_DEFINES
#define M_PI 3.14159265358979323846 // pi
using pixel = std::pair<int, int>;
//Distance 3D 用于计算两个像素之间的真实3D距离
float dist_3d(const rs2::depth_frame& frame, pixel u, pixel v);
//Toggle helper类将用于渲染两个按钮
//控制尺子的边缘
struct toggle
{
toggle() : x(0.f), y(0.f) {
}
toggle(float xl, float yl)
: x(std::min(std::max(xl, 0.f), 1.f)),
y(std::min(std::max(yl, 0.f), 1.f))
{
}
//从[0,1]空间移动到特定帧的像素空间
pixel get_pixel(rs2::depth_frame frm) const
{
int px = x * frm.get_width();
int py = y * frm.get_height();
return{
px, py };
}
void render(const window& app)
{
glColor4f(0.f, 0.0f, 0.0f, 0.2f);
render_circle(app, 10);
render_circle(app, 8);
glColor4f(1.f, 0.9f, 1.0f, 1.f);
render_circle(app, 6);
}
void render_circle(const window& app, float r)
{
const float segments = 16;
glBegin(GL_TRIANGLE_STRIP);
for (auto i = 0; i <= segments; i++)
{
auto t = 2 * M_PI * float(i) / segments;
glVertex2f(x * app.width() + cos(t) * r,
y * app.height() + sin(t) * r);
glVertex2f(x * app.width(),
y * app.height());
}
glEnd();
}
//这个辅助函数用于查找最接近鼠标光标的按钮
//因为只比较这个距离,可安全的跳过sqrt
float dist_2d(const toggle& other) const
{
return pow(x - other.x, 2) + pow(y - other.y, 2);
}
float x;
float y;
bool selected = false;
};
//在主线程和GLFW事件之间共享应用状态
struct state
{
bool mouse_down = false;
toggle ruler_start;
toggle ruler_end;
};
//注册UI事件的helper函数
void register_glfw_callbacks(window& app, state& app_state);
// Simple distance是3D点之间的经典毕达哥拉斯距离
//这个距离忽略了对象的拓扑结构,并且可以通过两者
//通过空气和固体
void render_simple_distance(const rs2::depth_frame& depth,
const state& s,
const window& app);
int main(int argc, char* argv[]) try
{
//颜色和深度帧的OpenGL纹理t
texture depth_image, color_image;
/
//深度处理管道
//着色器用于可视化深度数据
rs2::colorizer color_map;
//使用黑到白的彩色地图
color_map.set_option(RS2_OPTION_COLOR_SCHEME, 2.f);
//Decimation filter减少数据量(同时保留最好的样本)
rs2::decimation_filter dec;
//如果演示太慢,确保你在release中运行(-DCMAK_BUILD_TYPE=Release)
//但你也可增加下面的参数来减少深度(降低质量)
dec.set_option(RS2_OPTION_FILTER_MAGNITUDE, 2);
//定义视差域和视差域的转换
rs2::disparity_transform depth2disparity;
rs2::disparity_transform disparity2depth(false);
//定义空间滤波器(边缘保持)
rs2::spatial_filter spat;
//启用hole-filling
//填洞是一种侵略性的启发式方法,它多次得到错误的深度
//但是,这个演示程序不是用来处理漏洞的
spat.set_option(RS2_OPTION_HOLES_FILL, 5);//5是所有的0管道
//定义时间过滤器
rs2::temporal_filter temp;
//空间对齐所有流到深度视口
//(1)通常depth有更宽的FOV,只需要depth来做这个演示
//(2)不想引入新的漏洞
rs2::align align_to(RS2_STREAM_DEPTH);
//接下来,我们为深度+颜色流配置相机管道:
//声明Realsende管道,封装实际的设备和传感器
rs2::pipeline pipe;
rs2::config cfg;
//启动缺省深度
cfg.enable_stream(RS2_STREAM_DEPTH);
//对于颜色流,设置格式为RGBA
//允许在深度框架上混合颜色框架
cfg.enable_stream(RS2_STREAM_COLOR, RS2_FORMAT_RGBA8);
auto profile = pipe.start(cfg);
//我们的目标是生成没有任何孔的深度,因为这些孔将对我们的算法造成直接的问题。
//减少像素丢失的最好方法是让硬件来完成。
//D400摄像机具有我们可以利用的高密度预设。
auto sensor = profile.get_device().first<rs2::depth_sensor>();
//将设备调至D400立体相机的高精度预设置值
if (sensor && sensor.is<rs2::depth_stereo_sensor>())
{
sensor.set_option(RS2_OPTION_VISUAL_PRESET, RS2_RS400_VISUAL_PRESET_HIGH_ACCURACY);
}
auto stream = profile.get_stream(RS2_STREAM_DEPTH).as<rs2::video_stream_profile>();
//创建一个简单的OpenGL窗口用于渲染
window app(stream.width(), stream.height(), "RealSense Measure Example");
//定义应用程序状态和定位标尺按钮
state app_state;
app_state.ruler_start = {
0.45f, 0.5f };
app_state.ruler_end = {
0.55f, 0.5f };
register_glfw_callbacks(app, app_state);
//初始化后处理后,帧将流入这个队列
rs2::frame_queue postprocessed_frames;
//bool值将通知工作线程结束
std::atomic_bool alive{
true };
//视频处理线程将从相机中获取帧,应用后处理并将结果发送给主线程进行渲染
//它接收同步的(但不是空间对齐的)对,并输出同步的和对齐的对
std::thread video_processing_thread([&]() {
while (alive)
{
//从管道中获取帧并将它们发送给处理
rs2::frameset data;
if (pipe.poll_for_frames(&data))
{
//首先使帧空间对齐
data = data.apply_filter(align_to);
//抽取将降低深度图像的结果,封闭小孔,加速算法
data = data.apply_filter(dec);
//确保远处的对象按比例过滤
data = data.apply_filter(depth2disparity);
//切换到视差域
data = data.apply_filter(spat);
//应用时间滤波
data = data.apply_filter(temp);
//如果在视差域,切换回深度
data = data.apply_filter(disparity2depth);
//应用彩色地图来显示深度
data = data.apply_filter(color_map);
//在主线程中发送结果帧
postprocessed_frames.enqueue(data);
}
}
});
rs2::frameset current_frameset;
while (app)//应用程序仍然活着?
{
//获取最新可用的后处理框架集
postprocessed_frames.poll_for_frame(¤t_frameset);
if (current_frameset)
{
auto depth = current_frameset.get_depth_frame();
auto color = current_frameset.get_color_frame();
auto colorized_depth = current_frameset.first(RS2_STREAM_DEPTH, RS2_FORMAT_RGB8);
glEnable(GL_BLEND);
//使用Alpha通道进行混合
glBlendFunc(GL_SRC_ALPHA, GL_ONE_MINUS_SRC_ALPHA);
//首先渲染彩色深度图像
depth_image.render(colorized_depth, {
0, 0, app.width(), app.height() });
//渲染颜色帧(因为我们选择了RGBA格式,FOV中的像素会显示为透明)
color_image.render(color, {
0, 0, app.width(), app.height() });
//渲染简单的毕达哥拉斯距离
render_simple_distance(depth, app_state, app);
// Render the ruler
app_state.ruler_start.render(app);
app_state.ruler_end.render(app);
glColor3f(1.f, 1.f, 1.f);
glDisable(GL_BLEND);
}
}
//通知线程完成并等待它们完成
alive = false;
video_processing_thread.join();
return EXIT_SUCCESS;
}
catch (const rs2::error& e)
{
std::cerr << "RealSense error calling " << e.get_failed_function() << "(" << e.get_failed_args() << "):\n " << e.what() << std::endl;
return EXIT_FAILURE;
}
catch (const std::exception& e)
{
std::cerr << e.what() << std::endl;
return EXIT_FAILURE;
}
/
//使用类get_distance功能可以获取以米为单位的距离depth_frame。
//get_distance过度调用可能会导致性能下降,因为编译器无法跨模块边界进行优化,因此DEPTH_UNITS直接从中读取选项depth_sensor并将其用于将原始深度像素转换为米可能是有益的。
//将所有内容放在一起会产生相当冗长的dist_3d功能:
float dist_3d(const rs2::depth_frame& frame, pixel u, pixel v)
{
float upixel[2]; // From pixel(像素)
float upoint[3]; // From point (in 3D)(点,3D)
float vpixel[2]; // To pixel
float vpoint[3]; // To point (in 3D)
//将像素复制到数组中(以匹配rsutil签名)
upixel[0] = u.first;
upixel[1] = u.second;
vpixel[0] = v.first;
vpixel[1] = v.second;
//查询帧的距离
//注意:这个可以被优化
//不建议对每个像素都调用API(因为编译器不能内联这些)
//然而,在这个例子中,它不是瓶颈之一
auto udist = frame.get_distance(upixel[0], upixel[1]);
auto vdist = frame.get_distance(vpixel[0], vpixel[1]);
//在3D中从像素到点的反投影
rs2_intrinsics intr = frame.get_profile().as<rs2::video_stream_profile>().get_intrinsics(); // Calibration data
rs2_deproject_pixel_to_point(upoint, &intr, upixel, udist);
rs2_deproject_pixel_to_point(vpoint, &intr, vpixel, vdist);
//计算两点之间的欧氏距离
return sqrt(pow(upoint[0] - vpoint[0], 2) +
pow(upoint[1] - vpoint[1], 2) +
pow(upoint[2] - vpoint[2], 2));
}
void draw_line(float x0, float y0, float x1, float y1, int width)
{
glPushAttrib(GL_ENABLE_BIT);
glLineStipple(1, 0x00ff);
glEnable(GL_LINE_STIPPLE);
glLineWidth(width);
glBegin(GL_LINE_STRIP);
glVertex2f(x0, y0);
glVertex2f(x1, y1);
glEnd();
glPopAttrib();
}
void render_simple_distance(const rs2::depth_frame& depth,
const state& s,
const window& app)
{
pixel center;
glColor4f(0.f, 0.0f, 0.0f, 0.2f);
draw_line(s.ruler_start.x * app.width(),
s.ruler_start.y * app.height(),
s.ruler_end.x * app.width(),
s.ruler_end.y * app.height(), 9);
glColor4f(0.f, 0.0f, 0.0f, 0.3f);
draw_line(s.ruler_start.x * app.width(),
s.ruler_start.y * app.height(),
s.ruler_end.x * app.width(),
s.ruler_end.y * app.height(), 7);
glColor4f(1.f, 1.0f, 1.0f, 1.f);
draw_line(s.ruler_start.x * app.width(),
s.ruler_start.y * app.height(),
s.ruler_end.x * app.width(),
s.ruler_end.y * app.height(), 3);
auto from_pixel = s.ruler_start.get_pixel(depth);
auto to_pixel = s.ruler_end.get_pixel(depth);
float air_dist = dist_3d(depth, from_pixel, to_pixel);
center.first = (from_pixel.first + to_pixel.first) / 2;
center.second = (from_pixel.second + to_pixel.second) / 2;
std::stringstream ss;
ss << int(air_dist * 100) << " cm";
auto str = ss.str();
auto x = (float(center.first) / depth.get_width()) * app.width() + 15;
auto y = (float(center.second) / depth.get_height()) * app.height() + 15;
auto w = stb_easy_font_width((char*)str.c_str());
//为文本标签绘制黑色背景
glColor4f(0.f, 0.f, 0.f, 0.4f);
glBegin(GL_TRIANGLES);
glVertex2f(x - 3, y - 10);
glVertex2f(x + w + 2, y - 10);
glVertex2f(x + w + 2, y + 2);
glVertex2f(x - 3, y + 2);
glVertex2f(x - 3, y - 10);
glEnd();
//绘制白色文本标签
glColor4f(1.f, 1.f, 1.f, 1.f);
draw_text(x, y, str.c_str());
}
//实现按钮的拖放行为:
void register_glfw_callbacks(window& app, state& app_state)
{
app.on_left_mouse = [&](bool pressed)
{
app_state.mouse_down = pressed;
};
app.on_mouse_move = [&](double x, double y)
{
toggle cursor{
float(x) / app.width(), float(y) / app.height() };
std::vector<toggle*> toggles{
&app_state.ruler_start,
&app_state.ruler_end };
if (app_state.mouse_down)
{
toggle* best = toggles.front();
for (auto&& t : toggles)
{
if (t->dist_2d(cursor) < best->dist_2d(cursor))
{
best = t;
}
}
best->selected = true;
}
else
{
for (auto&& t : toggles) t->selected = false;
}
for (auto&& t : toggles)
{
if (t->selected) *t = cursor;
}
};
}
我们使用glBlendFunc颜色Alpha通道在深度上叠加对齐颜色(流必须具有一定格式RGBA才能正常工作)。
此示例说明了一个简短而复杂的处理流程。每个线程的速率略有不同,它们都需要同步但彼此之间不必阻塞。
这是通过使用线程安全frame_queue的作为同步原语和rs2::frame引用计数来跨线程进行对象生存期管理来实现的。
注释可能表达的不太准确,可去官网下载源码,自己翻译~
第一次写,主要是想让大家遇见这么没有什么技术性可言的坑时能顺利跳过~