libfacedetection库的配置及使用——内涵(cmake编译libfacedetection库)

前言

关于libfacedetection库的配置及使用,以及用cmake来编译第三方开源库

一、libfacedetection库是什么?

1.1、libfacedetection库的定义:

       这是一个基于cnn的图像人脸检测开源库。CNN 模型已转换为 C 源文件中的静态变量。源代码不依赖于任何其他库。您需要的只是一个C++编译器。您可以使用一个数据库的编译器在 Windows、Linux、ARM 和任何平台C++源代码。

1.2、如何使用libfacedetection库:

       将目录 src/ 中的文件复制到项目中,并将它们编译为项目中的其他文件。源代码以标准 C/C++。应在支持 C/C++ 的任何平台上编译。

1.3、获libfacedetection安装包的渠道:

       在这个链接中,我们能看到libfacedetection库的所有内容,并下载、解压:https://github.com/ShiqiYu/libfacedetection
下载方式如下:
libfacedetection库的配置及使用——内涵(cmake编译libfacedetection库)_第1张图片

二、在vs2019中配置libfacedetection库:

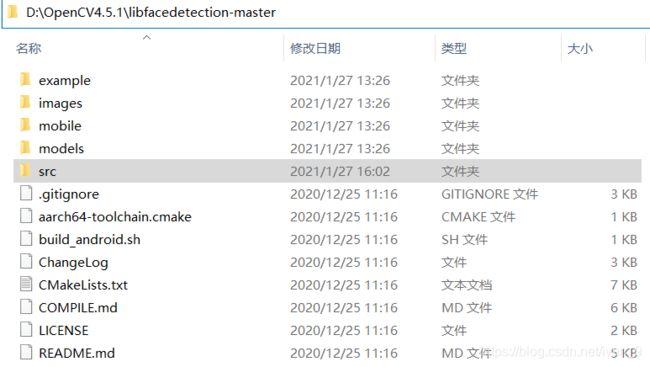
2.1、打开你的libfecetection解压的文件夹:

libfacedetection库的配置及使用——内涵(cmake编译libfacedetection库)_第2张图片

2.1、打开vs中的项目文件夹:

libfacedetection库的配置及使用——内涵(cmake编译libfacedetection库)_第3张图片

2.2、找到libfacedetection解压包的目录,将 src 文件夹复制到项目中:

libfacedetection库的配置及使用——内涵(cmake编译libfacedetection库)_第4张图片

2.3、在vs编译环境中,将它们编译为项目中的其他文件:

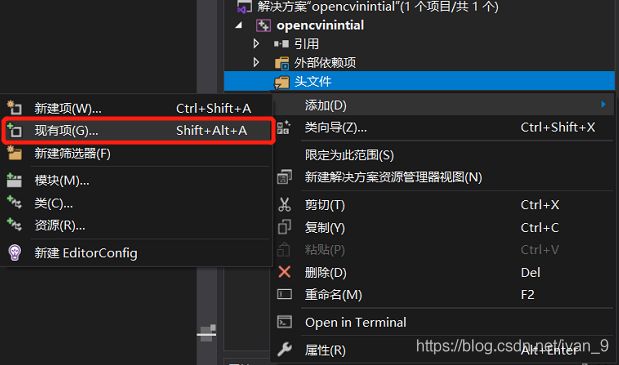
2.3.1、在 头文件 中添加现有项facedetectcnn.h:

libfacedetection库的配置及使用——内涵(cmake编译libfacedetection库)_第5张图片

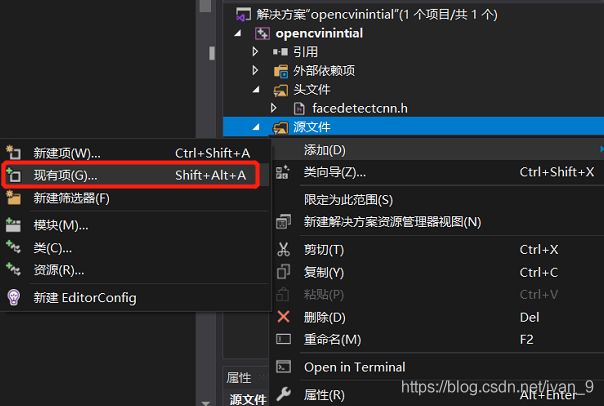
2.3.2、在 源文件 中添加现有项:facedetectcnn.cpp、 facedetectcnn-int8data.cpp、 facedetectcnn-model.cpp

libfacedetection库的配置及使用——内涵(cmake编译libfacedetection库)_第6张图片

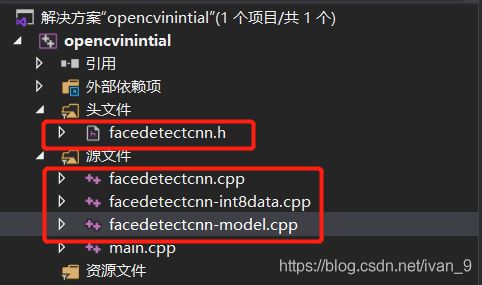
2.3.3、这四个文件都在 src 文件夹中,添加完成如下:

libfacedetection库的配置及使用——内涵(cmake编译libfacedetection库)_第7张图片

三、在vs2019中使用libfacedetection库:

3.1、首先,我们打开文件 detect-iamge.cpp

libfacedetection库的配置及使用——内涵(cmake编译libfacedetection库)_第8张图片

3.2、其次,修改 detect-iamge.cpp 的文件内容为:

3.2.1、 代码块

#include 
#include 
#include 
#define DETECT_BUFFER_SIZE 0x20000 //定义缓冲区大小
#define FACEDETECTION_EXPORT

using namespace std;
using namespace cv;
int main() {
     
	Mat src, dst;
	src = imread("D:\\Myfile\\素材照片\\opencv素材照片\\7.jpg");  //导入需要识别的图像	
	if (!src.data) {
     	//若不存在就返回 could not load your image!
		cout << "could not load your image!" << endl;
		return 0;
	}
	//pBuffer用来检测人脸
	unsigned char* pBuffer = new unsigned char[DETECT_BUFFER_SIZE];  //multiple threads
	//是多线程时,要分配内存空间
	if (!pBuffer) {
      //如果无法分配内存,就返回could not alloc buffer!
		cout << "could not alloc buffer!" << endl;
		return 0;
	}
	dst = src.clone();	//将src原图像复制给dst
	TickMeter myClock;	//计时器
	myClock.start();
	int* pResults = NULL; //用来检测人脸
	pResults = facedetect_cnn(pBuffer, (unsigned char*)(src.ptr(0)), src.cols, src.rows, src.step);
	//利用facedetect_cnn函数来获取人脸,用于存储人脸检测结果的缓冲存储器!其大小必须为0x20000字节
	//facedetect_cnn函数识别的图像必须为BGR三通道的图像,而非rgb图像
	myClock.stop();
	cout << myClock.getTimeSec() << "s" << endl;	//输出检测人脸耗费时长
	for (int i = 0; i < (pResults ? (*pResults) : 0); i++) {
     
		//如果pResult为NULL,即pResult没有检测到人脸,就返回0,for循环结束
		short* p = ((short*)(pResults + 1)) + (142 * i);
		//p指针用来指向
		int confidence = p[0];
		int x = p[1];
		int y = p[2];
		int w = p[3];
		int h = p[4];
		//显示脸的分数。其范围为[0-100]
		char sScore[256];
		snprintf(sScore, 256, "%d", confidence);
		/*从给定位置加载数据,转换为字符串等价版本,并将结果写入各种池。
			1) 写结果到 stdout 。2) 写结果到文件流 stream 。3) 写结果到字符串 buffer 。
			4) 写结果到字符串 buffer 。至多写 buf_size - 1 个字符。产生的字符串会以空字符终止,除非 buf_size 为零。
			若buf_size为零,则不写入任何内容,且buffer可以是空指针,然而依旧计算返回值(会写入的字符数,不包含空终止符)并返回。
			若调用 sprintf 或 snprintf 导致在重叠的对象间发生复制,则行为未定义。
			(例如 sprintf(buf, "%s text", buf); )*/
		putText(dst, sScore, Point(x, y - 3), FONT_HERSHEY_SIMPLEX, 0.5, Scalar(0, 255, 0), 1);
		//计算文本字符串的宽度和高度。
		//把脸用矩形画出来
		rectangle(dst, Rect(x, y, w, h), Scalar(0, 255, 0), 2);
		//画五个不同颜色的面部标志
		circle(dst, Point(p[5], p[5 + 1]), 1, Scalar(255, 0, 0), 2);
		circle(dst, Point(p[5 + 4], p[5 + 5]), 1, Scalar(0, 255, 0), 2);
		circle(dst, Point(p[5 + 6], p[5 + 7]), 1, Scalar(255, 0, 255), 2);
		circle(dst, Point(p[5 + 8], p[5 + 9]), 1, Scalar(0, 255, 255), 2);
		//circle()绘制简单或粗椭圆弧或填充椭圆扇区。
		/*
		Point类的实例可以与C结构、CvPoint和CvPoint2D32f互换。
		还有一个cast操作符将点坐标转换为指定的类型。
		从浮点坐标到整数坐标的转换是通过舍入完成的。
		通常,转换对每个坐标都使用此操作。
		*/
	}

	namedWindow("output_detect_image", WINDOW_AUTOSIZE);
	imshow("output_detect_image", dst);	//输出识别后的图像

	waitKey(0);
	return 0;
}


3.3、当我们将代码写完后,会发现有错误:

在这里插入图片描述
在这里插入图片描述
我们打开 facedetectcnn.h 的错误内容, 并修改.

3.4、第一种方法:用 cmake 编译第三方库的源代码,获取 facedetection_export.h文件:

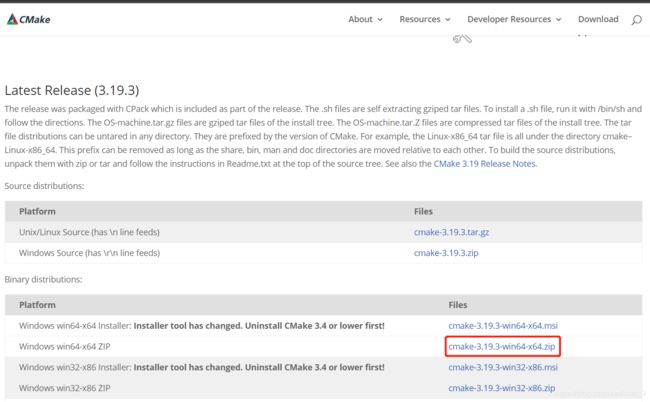
3.4.1、cmake官方下载地址:https://cmake.org/download/

libfacedetection库的配置及使用——内涵(cmake编译libfacedetection库)_第9张图片

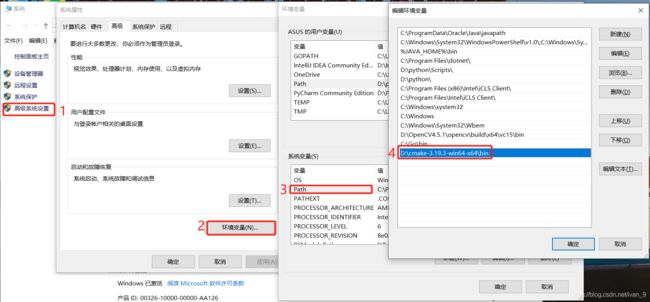
3.4.2、配置cmake的环境变量:

libfacedetection库的配置及使用——内涵(cmake编译libfacedetection库)_第10张图片
在cmd中输入cmake,检查是否配置完成:

libfacedetection库的配置及使用——内涵(cmake编译libfacedetection库)_第11张图片

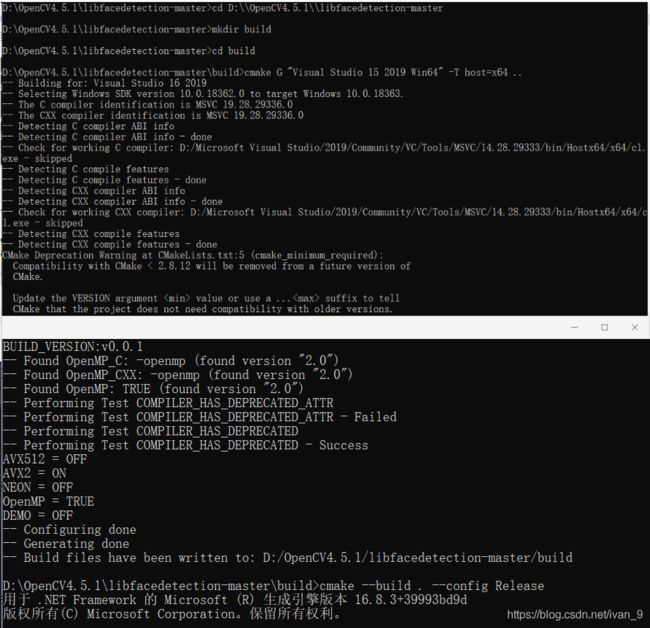
3.4.3、打开命令窗口(cmd)输入:

cd D:\\OpenCV4.5.1\\libfacedetection-master
mkdir build
cdbuild
cmake G "Visual Studio 15 2019 Win64" -T host=x64 ..
cmake --build . --config Release
输入时不能省略一个符号。
执行完后的结果:

libfacedetection库的配置及使用——内涵(cmake编译libfacedetection库)_第12张图片

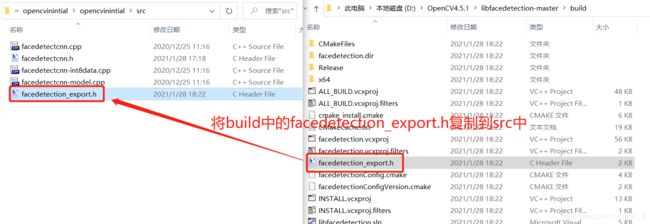
3.4.4、将build中的 facedetection_export.h 复制到 src 文件夹中:

libfacedetection库的配置及使用——内涵(cmake编译libfacedetection库)_第13张图片

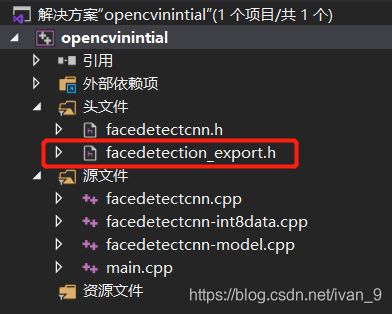
3.4.5、将 facedetection_export.h 导入到vs2019所建立的项目头文件中:

libfacedetection库的配置及使用——内涵(cmake编译libfacedetection库)_第14张图片

3.4.6、问题解决如下:

libfacedetection库的配置及使用——内涵(cmake编译libfacedetection库)_第15张图片

3.4.7、注意事项:

1)facedetection_export.h 是运行cmake之后产生出来的
2)先用cmake编译本项目,然后把生成的 facedetection_export.h 和源码一起复制到其它项目。
3)增加 facedetection_export.h 文件,在其中定义宏 FACEDETECTION_EXPORT
		#define FACEDETECTION_EXPORT

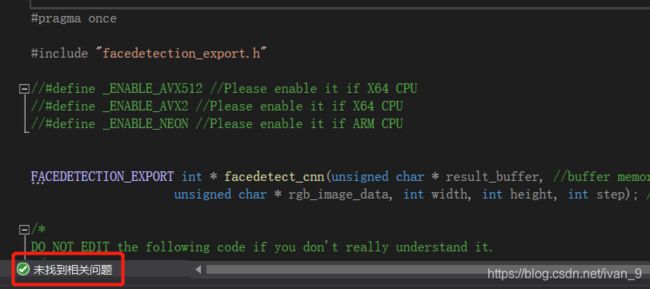
3.5、第二种方法(不建议):直接注释 #include “facedetection_export.h” ;删除 FACEDETECTION_EXPORT

效果如下:

libfacedetection库的配置及使用——内涵(cmake编译libfacedetection库)_第16张图片

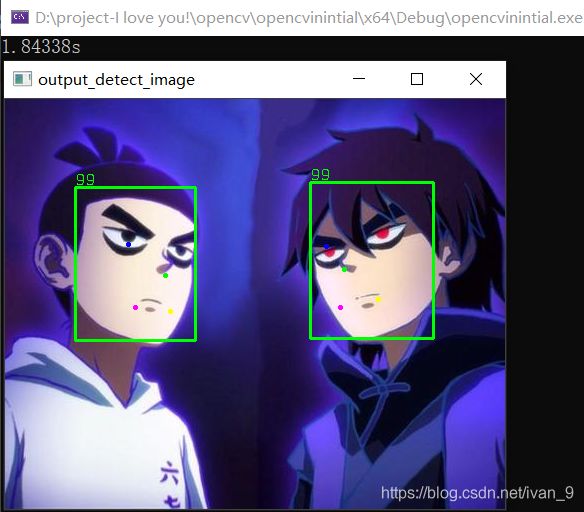
3.6、运行结果:

libfacedetection库的配置及使用——内涵(cmake编译libfacedetection库)_第17张图片
我们换一张图片,看看这个帅男人:
libfacedetection库的配置及使用——内涵(cmake编译libfacedetection库)_第18张图片

四、基于 CNN 的 Windows 人脸检测

方法 时间 Fps 时间 Fps
X64 X64 X64
单线程 单线程 多线程
cnn (CPU, 640x480) 58.03毫秒 17.23 13.85毫秒 72.20
cnn (CPU, 320x240) 14.18毫秒 70.51 3.38 毫秒 296.21
cnn (CPU, 160x120) 3.25 毫秒 308.15 0.82毫秒 1226.56
cnn (CPU, 128x96) 2.11毫秒 474.38 0.52毫秒 1929.60

最小面尺寸 ±10x10
英特尔(R)核心(TM) i7-1065G7 CPU = 1.3GHz

总结:

本文讲述了libfacedetection库的定义及安装,在vs2019中配置;
讲述了如何用cmake来编译第三方开源库。

参考来源

https://github.com/ShiqiYu/libfacedetection#cnn-based-face-detection-on-windows

如有疑问,请留言!
如有错误,敬请指教!
你可能感兴趣的:(opencv,opencv,c++,人脸识别)