Android studio 多个so库配置 ffmpeg库配置 cmake编译
这里要以ffmpeg的so库配置为例,ffmpeg需要jni开发环境支持,想要了解Android Studio 的jni环境配置请到这里查看。如果想要下载ffmpeg编译好的so库请到这里下载。
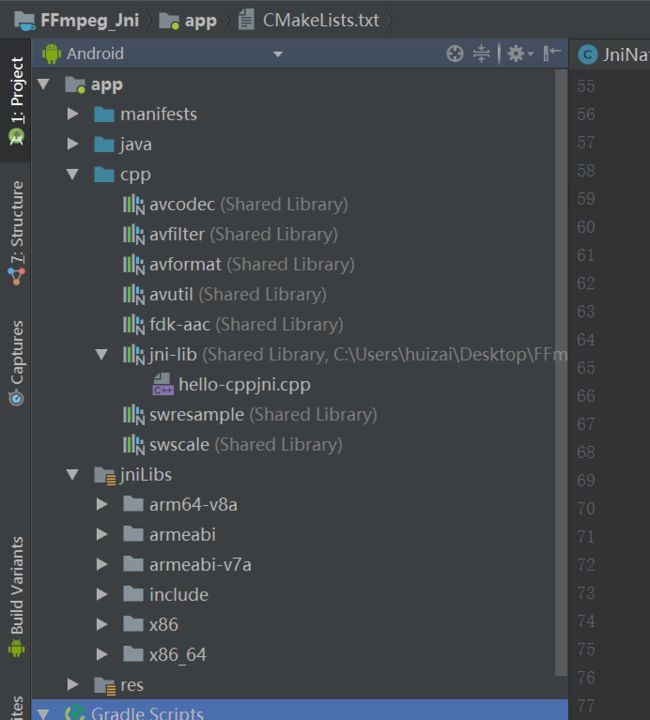
现在就在这篇文章配置好的环境基础上进行ffmpeg的so库配置, 如图把ffmpeg的so库文件拷贝到app/libs目录下面:

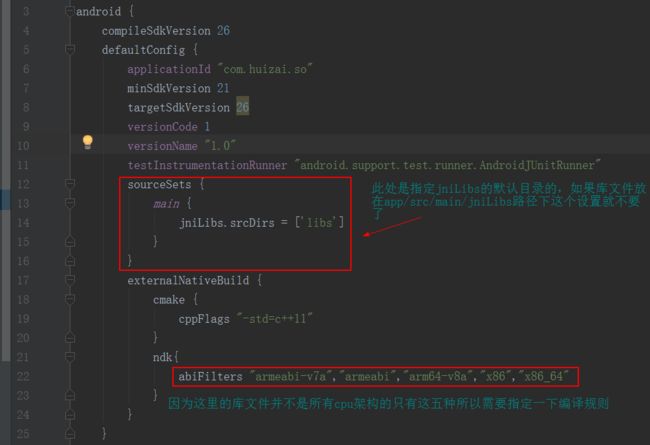
这里有arm64-v8a,armeabi,armabi-v7a,x86,x86_64这几个cpu架构支持库文件。配置app:build.gradle:

sourceSets {
    main {
        jniLibs.srcDirs = ['libs']
    }
}
externalNativeBuild {
    cmake {
        cppFlags "-std=c++11"
    }
    ndk{
        abiFilters "armeabi-v7a","armeabi","arm64-v8a","x86","x86_64"
    }
}
下面比较中要,配置cmake,打开CMakeLists.text:

要对比上面Project图片展示的库文件路径,其他地方没什么说的,直接全部代码:
cmake_minimum_required(VERSION 3.4.1)

include_directories(
    ${CMAKE_SOURCE_DIR}/src/main/cpp/include #h文件目录
    ${CMAKE_SOURCE_DIR}/libs/include
)
add_library(
            avcodec
            SHARED
            IMPORTED
            )
add_library(
            avfilter
            SHARED
            IMPORTED
             )
add_library(
            avformat
            SHARED
            IMPORTED
            )
add_library(
            avutil
            SHARED
            IMPORTED
            )
add_library(
            swresample
            SHARED
            IMPORTED
            )
add_library(
            swscale
            SHARED
            IMPORTED
            )
add_library(
            fdk-aac
            SHARED
            IMPORTED
            )
add_library( # Sets the name of the library.
             jni-lib                        #c/cpp代码将要编译成为so库的名称,java代码加载库文件要用这个名称
             SHARED
             src/main/cpp/hello-cppjni.cpp  #cpp代码文件路径 这里可以随意添加c、c++文件
              )
set_target_properties(
    avcodec
    PROPERTIES IMPORTED_LOCATION
    ${CMAKE_SOURCE_DIR}/libs/${ANDROID_ABI}/libavcodec.so
    )
set_target_properties(
        avfilter
        PROPERTIES IMPORTED_LOCATION
        ${CMAKE_SOURCE_DIR}/libs/${ANDROID_ABI}/libavfilter.so
        )
set_target_properties(
            avformat
            PROPERTIES IMPORTED_LOCATION
            ${CMAKE_SOURCE_DIR}/libs/${ANDROID_ABI}/libavformat.so
            )
set_target_properties(
            avutil
            PROPERTIES IMPORTED_LOCATION
            ${CMAKE_SOURCE_DIR}/libs/${ANDROID_ABI}/libavutil.so
            )
set_target_properties(
            swresample
            PROPERTIES IMPORTED_LOCATION
            ${CMAKE_SOURCE_DIR}/libs/${ANDROID_ABI}/libswresample.so
             )
set_target_properties(
            swscale
            PROPERTIES IMPORTED_LOCATION
            ${CMAKE_SOURCE_DIR}/libs/${ANDROID_ABI}/libswscale.so
             )
set_target_properties(
            fdk-aac
            PROPERTIES IMPORTED_LOCATION
            ${CMAKE_SOURCE_DIR}/libs/${ANDROID_ABI}/libfdk-aac.so
             )
find_library( # Sets the name of the path variable.
              log-lib
              # Specifies the name of the NDK library that
              # you want CMake to locate.
              log )
target_link_libraries( # Specifies the target library.
                     jni-lib
                     fdk-aac
                     avcodec
                     avfilter
                     avformat
                     avutil
                     swresample
                     swscale
                     ${log-lib}#这个是打印jni调试log要用到的库文件这里添加进来,最后打印视频时长就是用这个库打印
                     )
此时编译应该能够成功了,编译成功后再切换到Android项目结构,长这个样子:

下面写代码测试:
在cpp文件当中加入测试函数,此时cpp文件内容是这样子:
#include 往Java,JniNative当中代码当中加入测试方法,添加加载库文件:
package com.huizai.ffmpeg;

/**
 * Created by huizai on 2017/11/16.
 */

public class JniNative {


    static{
        System.loadLibrary("jni-lib");
        System.loadLibrary("avcodec");
        System.loadLibrary("avfilter");
        System.loadLibrary("avformat");
        System.loadLibrary("avutil");
        System.loadLibrary("swresample");
        System.loadLibrary("swscale");
        System.loadLibrary("fdk-aac");
    }
    public static native int JniCppAdd(int a,int b);
    public static native int JniCppSub(int a,int b);
    public static native int FFmpegTest(String input,String output);
}
在MainActivity里面重写onResume方法测试ffmpeg:
@Override
    protected void onResume() {
        super.onResume();
        int REQUEST_EXTERNAL_STORAGE = 1;
        String[] PERMISSIONS_STORAGE = {
                Manifest.permission.READ_EXTERNAL_STORAGE,
                Manifest.permission.WRITE_EXTERNAL_STORAGE
        };
        int permission = ActivityCompat.checkSelfPermission(MainActivity.this, Manifest.permission.WRITE_EXTERNAL_STORAGE);
        if (permission != PackageManager.PERMISSION_GRANTED) {
            // We don't have permission so prompt the user
            ActivityCompat.requestPermissions(
                    MainActivity.this,
                    PERMISSIONS_STORAGE,
                    REQUEST_EXTERNAL_STORAGE
            );
        }
        String input = new File(Environment.getExternalStorageDirectory(),"video.mp4").getAbsolutePath();
        JniNative.FFmpegTest(input,"");
    }
AndroidManifest.xml里面申请权限:
<uses-permission android:name="android.permission.WRITE_EXTERNAL_STORAGE" />
    <uses-permission android:name="android.permission.READ_EXTERNAL_STORAGE" />
其中下面这一坨,是动态请求文件访问权限的,高版本android系统只在AndroidManifest.xml里面申请权限已经不好用了:

此时往手机根目录里面放一个video.mp4文件,真机运行会有会有文件访问询问,同意即可。
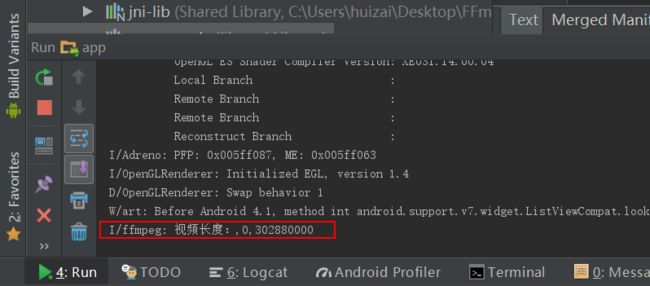
此时用ffmpeg库读取视频文件长度就成功了,得到视频长度打印:

后续就可以正常进行ffmpeg开发了。
最后给大家一个android ffmpeg so库文件下载地址,也就是这个文章中用的库文件,因为csdn强制要求至少要2个积分才能下载,并不能设置免积分下载,我也很清楚大家看到要几分才能下载的心情,但是没办法。
下载地址:http://download.csdn.net/download/m0_37677536/10123197
或者大家给我留下邮箱我看到了发过去。
新版so库下载:
http://download.csdn.net/download/m0_37677536/10241575
新版的支持的格式更多,但是目录结构跟文章中的不一样,需要调整,还有cpu架构也不一样需要配置cmake编译。