树莓派+opencv+百度aip实现人脸识别并发置邮箱
前言:最近一直在探索机器视觉这一块,用了用百度的人脸对比,确实是大平台的识别率确实是高,兼容性,平台移植性都挺好,正好配合opencv+树莓派,实现人脸识别,准确率挺高的。
1.树莓派安装上opencv
刚开始,我用的树莓派4b,用pip命令安装老是报错,换了源也不管用最后还是找了一个不错的文章才找着解决方法文章最后附上链接
我用的就是先用浏览器下载whl包,然后在树莓派上离线安装
下载地址:https://www.piwheels.org/simple/opencv-python/opencv_python-3.4.3.18-cp37-cp37m-linux_armv7l.whl
sudo pip3 install opencv_python-3.4.3.18-cp37-cp37m-linux_armv7l.whl
然后import cv2 测试一下,ok
2.下载百度aip并修改编码
一般按照官方文档,会出现编码错误的 问题mac系统上我没测试过,Linux和win上直接用pip下百度的aip会出项编码的问题这时我们通过在json里的encoder.py文件就可以解决问题
sudo pip3 install baidu-aip
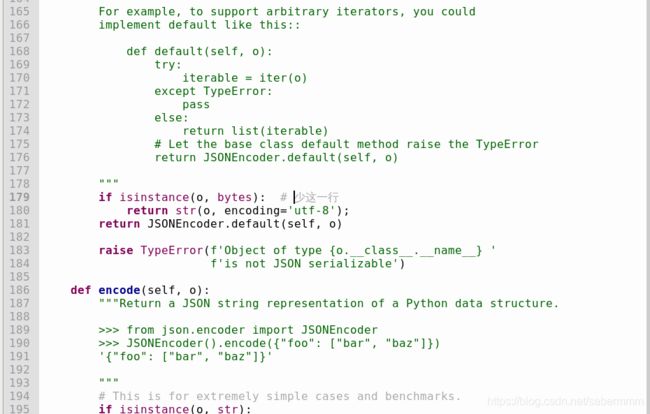
下载完之后在python json文件夹里找到encoder.py文件在179行添加上一行代码
if isinstance(o, bytes):  # 少这一行
	return str(o, encoding='utf-8');
return JSONEncoder.default(self, o)
添加完成后应该是如图所示,保存即可

接下来就可以正常使用百度的aip了,到百度智能云上注册个账号弄一个人脸库,具体看官方的说明文档此处省略。
3.邮箱发送需要用的库安装smtplib
sudo pip3 install smtplib email
由于此处不是文章的主要内容直接附上测试代码
import datetime as dt
from email.mime.text import MIMEText

mailserver = "**********"  #邮箱服务器地址
username_send = '****************'  #邮箱用户名
password = '***********'   #邮箱密码:需要使用授权码
username_recv = '**************'  #收件人,多个收件人用逗号隔开

def emil_send(text,score,now_time):
    mail = MIMEText("人员:"+text+"发现时间:"+now_time+"相似度:"+score)
    mail['Subject'] = '人脸识别发现情况!'
    mail['From'] = username_send  #发件人,注意这里,一定和smtp.sendmail参数一致,否则会报错
    mail['To'] = username_recv  #收件人;[]里的三个是固定写法
    smtp = smtplib.SMTP(mailserver,port=25) # 连接邮箱服务器,smtp的端口号是25
    # smtp=smtplib.SMTP_SSL('smtp.qq.com',port=465) #QQ邮箱的服务器和端口号
    try:
        smtp.login(username_send,password)  #登录邮箱
        smtp.sendmail(username_send,username_recv,mail.as_string())# 参数分别是发送者,接收者,第三个是把上面的发送邮件的内容变成字符串
        smtp.quit() # 发送完毕后退出smtp
        print("发送完毕")
    except:
        print("发送失败")
4.具体实现过程,首先通过opencv读取树莓派的usb摄像头里的视频,这里我是用的usb摄像头不是树莓派官方摄像头,用法大同小异没什么区别,通过opencv已经训练好的face检测的数据集haarcascade_frontalface_default.xml
我的放在/usr/local/lib/python3.7/dist-packages/cv2/data/haarcascade_frontalface_default.xml目录下没有的我也附上链接https://pan.baidu.com/s/11xjhBVmrlpNK8OC00uyqrw 提取码:dtyb
跟我放在一样的目录上就行
cam = cv2.VideoCapture(0)
cam.set(3, 640) # set video width
cam.set(4, 480) # set video height
face_detector = cv2.CascadeClassifier('/usr/local/lib/python3.7/dist-packages/cv2/data/haarcascade_frontalface_default.xml'
获取和初始化级联分类器之后
count2=0
def face_search(filepath):#人脸库搜索
    global count2
    with open(filepath, 'rb') as fp:
        image=base64.b64encode(fp.read())
    imageType="BASE64"
    groupIdList="ge"
    result=client1.search(image,imageType,groupIdList)
    #print(result)            #打印出所有信息
    if(str(result['error_code'])=="0"):
        now_time = dt.datetime.now().strftime('%F %T')
        print("时间戳:" + str(result['timestamp']))
        print("用户组:" + str(result['result']['user_list'][0]['group_id']))
        print("用户:" + str(result['result']['user_list'][0]['user_id']))
        print("相似度:" + str(result['result']['user_list'][0]['score']))  # 打印出相似度其他信息类似
        print("时间:"+now_time)
        if(int(result['result']['user_list'][0]['score'])>70):
            print("OK!")
            if(count2==0):
                emil_send(str(result['result']['user_list'][0]['user_id']), str(result['result']['user_list'][0['score']),now_time)
                count2=count2+1
        else:
            count2=0
            # img = cv2.imread("./huancun/output.jpg").copy()
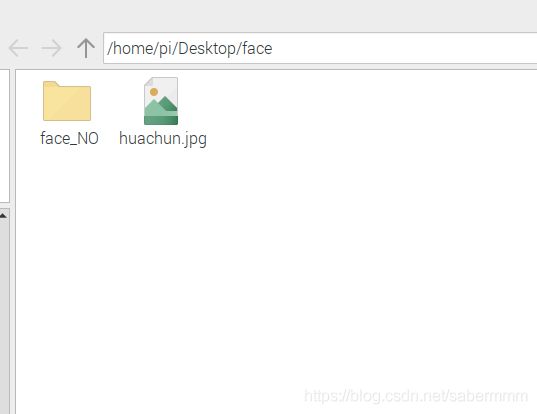
            # cv2.imwrite('/home/pi/Desktop/face/face_NO/'+str(result['timestamp'])+'.jpg', img)
            print("NO!")
            # print("已保存!")
    else:
        print("错误代码;" + str(result['error_code']))  # 打印错误代码如果是0则正确
人脸搜索的的代码,这里识别相似度大于70的就认为是发现目标,就会调用emil_send()方法发送到邮箱,如果相似率低的就会保存起来
完整代码:
import cv2
import base64
from aip import AipFace

import smtplib
import datetime as dt
from email.mime.text import MIMEText
#apk
APP_ID1 = ""
API_KEY1 = ''
SECRET_KEY1 = ''
client1 = AipFace(APP_ID1, API_KEY1, SECRET_KEY1)
#


mailserver = ""  #邮箱服务器地址
username_send = ''  #邮箱用户名
password = ''   #邮箱密码:需要使用授权码
username_recv = ''  #收件人,多个收件人用逗号隔开

cam = cv2.VideoCapture(url)
cam.set(3, 640) # set video width
cam.set(4, 480) # set video height
face_detector = cv2.CascadeClassifier(cv2.data.haarcascades+'haarcascade_frontalface_default.xml')
# For each person, enter one numeric face id
print("\n sousuozhong ...")
# Initialize individual sampling face count
count = 0
count2 = 0
def face_search(filepath):#人脸库搜索  222207
    global count2
    with open(filepath, 'rb') as fp:
        image=base64.b64encode(fp.read())
    imageType="BASE64"
    groupIdList="ge"
    result=client1.search(image,imageType,groupIdList)
    #print(result)            #打印出所有信息
    if(str(result['error_code'])=="0"):
        now_time = dt.datetime.now().strftime('%F %T')
        print("时间戳:" + str(result['timestamp']))
        print("用户组:" + str(result['result']['user_list'][0]['group_id']))
        print("用户:" + str(result['result']['user_list'][0]['user_id']))
        print("相似度:" + str(result['result']['user_list'][0]['score']))  # 打印出相似度其他信息类似
        print("时间:"+now_time)
        if(int(result['result']['user_list'][0]['score'])>70):
            print("OK!")
            if(count2==0):
                emil_send(str(result['result']['user_list'][0]['user_id']), str(result['result']['user_list'][0['score']),now_time)
                count2=count2+1
        else:
            count2=0
            # img = cv2.imread("./huancun/output.jpg").copy()
            # cv2.imwrite('/home/pi/Desktop/face/face_NO/'+str(result['timestamp'])+'.jpg', img)
            print("NO!")
            # print("已保存!")
    else:
        print("错误代码;" + str(result['error_code']))  # 打印错误代码如果是0则正确
def emil_send(text,score,now_time):
    mail = MIMEText("人员:"+text+"发现时间:"+now_time+"相似度:"+score)
    mail['Subject'] = '人脸识别发现情况!'
    mail['From'] = username_send  #发件人,注意这里,一定和smtp.sendmail参数一致,否则会报错
    mail['To'] = username_recv  #收件人;[]里的三个是固定写法
    smtp = smtplib.SMTP(mailserver,port=25) # 连接邮箱服务器,smtp的端口号是25
    try:
        smtp.login(username_send,password)  #登录邮箱
        smtp.sendmail(username_send,username_recv,mail.as_string())
        smtp.quit() # 发送完毕后退出smtp
        print("发送完毕")
    except:
        print("发送失败")


#face_search('face/ll.jpg')
while(True):
    ret, img = cam.read()
    #img = cv2.flip(img,1,-1) # flip video image vertically
    gray = cv2.cvtColor(img, cv2.COLOR_BGR2GRAY)
    cv2.imshow('image1', img)
    faces = face_detector.detectMultiScale(gray, 1.3, 5)

    for (x,y,w,h) in faces:
        cv2.rectangle(img, (x,y), (x+w,y+h), (255,0,0), 2)
        count += 1

        # Save the captured image into the datasets foldernew NED
        cv2.imwrite("./huancun/output.jpg", gray[y:y+h,x:x+w])
        face_search("./huancun/output.jpg")
        #cv2.imshow('image2', img)

    k = cv2.waitKey(100) & 0xff # Press 'ESC' for exiting video
    if k == 27:
        break
#    elif count >= 30: # Take 30 face sample and stop video
#         break

# Do a bit of cleanup
print("\n >>end<<")
cam.release()
cv2.destroyAllWindows()
最终效果图:


具体效果可根据自己的需求更改,opencv的级联分类器有好多训练好的模型数据,相对来说比较好用,搜索到脸部截取下来,再用百度的aip搜索,可靠性还是非常高的毕竟大平台,训练数据多
结尾:本文代码部分都是原创,转载请附上链接