Android移动应用开发——第一章 layout and basic UI
Task 1-1
题目
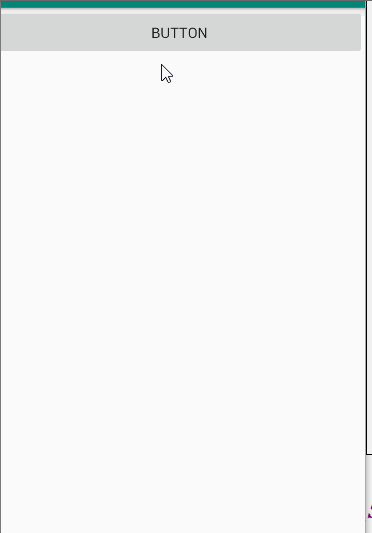
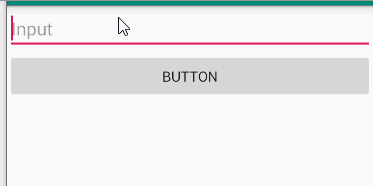
Make an app with 2 components. The root layout is a LinearLayout. The 1st component shows your name and ID. The 2nd component a Button. Click the Button will show a Toast, which shows your name and ID.
演示
分析
本任务主要实现的是点击按钮,会弹出一个弹框Toast
1、Toast

- Context context 上下文参数
- CharSequence text 要显示的内容
- int duration 持续时间,一般为Toast.LENGTH_SHORT/Toast.LENGTH_LONG
2、注意Toast必须要加show() 否则无法正常显示
代码
public class MainActivity extends AppCompatActivity {


    @Override
    protected void onCreate(Bundle savedInstanceState) {

        super.onCreate(savedInstanceState);
        setContentView(R.layout.my_main);
        Button bt = findViewById(R.id.button);
        bt.setOnClickListener(new View.OnClickListener() {

            @Override
            public void onClick(View v) {

                Toast.makeText(MainActivity.this,"show something",Toast.LENGTH_SHORT).show();
            }
        });
    }
}
Task 1-2
题目
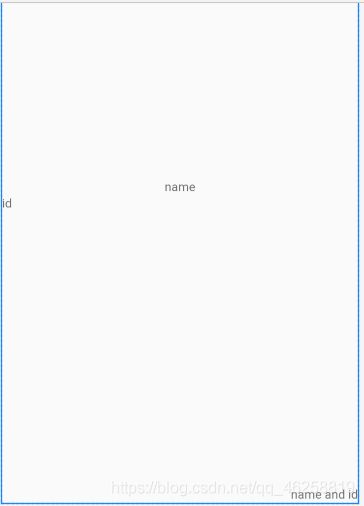
To layout 3 TextViews in the RelativeLayout. The 1st TextView shows your name and ID and aligns in the center of the screen. The 2nd TextView shows your name and aligns in the left of the screen and below the 1st screen. The 3rd TextView aligns in the bottom and right of the screen.
演示
分析
本任务涉及到的知识点:
1、RelativeLayout
常用参数:
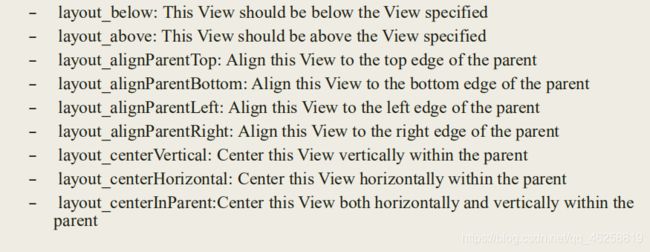
- layout_centerInParent:"true"表示在整个布局中居中(水平和垂直)
- layout_below:"@id/textview"表示在textview的下方
- layout_alignParentRight:"true"表示在布局中居右
- layout_alignParentBottom:"true"表示在布局的底部
代码
<?xml version="1.0" encoding="utf-8"?>
<RelativeLayout xmlns:android="http://schemas.android.com/apk/res/android"
    android:layout_width="match_parent" android:layout_height="match_parent">

    <TextView
        android:id="@+id/tv_name"
        android:layout_width="wrap_content"
        android:layout_height="wrap_content"
        android:layout_centerInParent="true"
        android:text="name" />

    <TextView
        android:id="@+id/tv_id"
        android:layout_width="wrap_content"
        android:layout_height="wrap_content"
        android:layout_below="@+id/tv_name"
        android:text="id" />

    <TextView
        android:id="@+id/tv_name_id"
        android:layout_width="wrap_content"
        android:layout_height="wrap_content"
        android:layout_alignParentRight="true"
        android:layout_alignParentBottom="true"
        android:text="name and id" />
</RelativeLayout>
Task 1-3
题目
Make an app with 3 components. The root layout is LinearLayout. The 1st one is a TextView shows your name and ID. It aligns in horizontal center of the first row. The 2nd one is a Button with 200dp width and aligns in the right of the 2nd row. The 3rd one is a Button with 200dp width and aligns in the left of the 3rd row, but the text in the Button aligns right
演示
分析
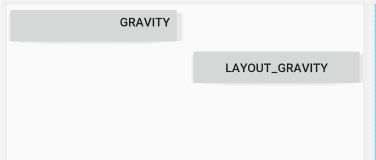
任务考察的知识点:layout_gravity 和gravity
1、layout_gravity:UI相对于整个布局文件的位置
2、gravity:文字相对于UI的位置
代码
<?xml version="1.0" encoding="utf-8"?>
<LinearLayout xmlns:android="http://schemas.android.com/apk/res/android"
    android:orientation="vertical" android:layout_width="match_parent"
    android:layout_height="match_parent">

    <Button
        android:id="@+id/button"
        android:layout_width="200dp"
        android:layout_height="wrap_content"
        android:gravity="right"
        android:text="gravity" />

    <Button
        android:id="@+id/button2"
        android:layout_width="200dp"
        android:layout_gravity="right"
        android:layout_height="wrap_content"
        android:text="layout_gravity" />
</LinearLayout>
Task 1-4
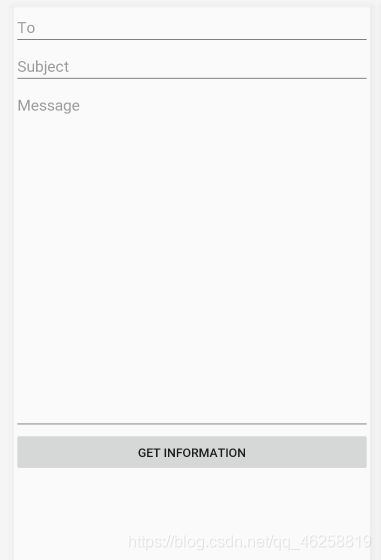
题目
The root layout is LinearLayout.
- Add 3 EditTexts, 1 Button and 1 TextView to the LinearLayout
- The Message EditText using layout_weight=“3”3) The TextView using layout_weight=“1”
- All EditTexts have android:hint attribute to show the hint message for users
- The TextView shows your name and student number
演示
分析
添加Hint属性,来设置提示文本
代码
<?xml version="1.0" encoding="utf-8"?>
<LinearLayout xmlns:android="http://schemas.android.com/apk/res/android"
    android:orientation="vertical" android:layout_width="match_parent"
    android:layout_height="match_parent">

    <EditText
        android:id="@+id/tv_to"
        android:layout_width="match_parent"
        android:layout_height="wrap_content"
        android:hint="To"
        android:inputType="textPersonName"
        android:text="" />

    <EditText
        android:id="@+id/tv_subject"
        android:layout_width="match_parent"
        android:layout_height="wrap_content"
        android:inputType="textPersonName"
        android:hint="Subject"
        android:text="" />

    <EditText
        android:id="@+id/tv_msg"
        android:layout_width="match_parent"
        android:layout_height="400dp"
        android:hint="Message"
        android:gravity="left"
        android:inputType="textPersonName"
        android:text="" />

    <Button
        android:id="@+id/button"
        android:layout_width="match_parent"
        android:layout_height="wrap_content"
        android:text="Get Information" />

</LinearLayout>
Task 1-5
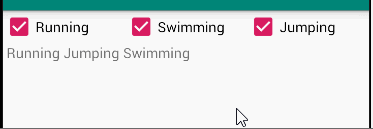
题目
The root layout is LinearLayout.
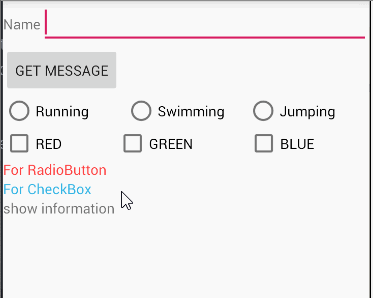
- 1 TextView in the first row, shows your name and student number;
- 3 CheckBoxes in the 2nd row;
- 1 TextView in the 3rd row, which shows the checked message when the checkboxes’s states are changed.
演示
分析
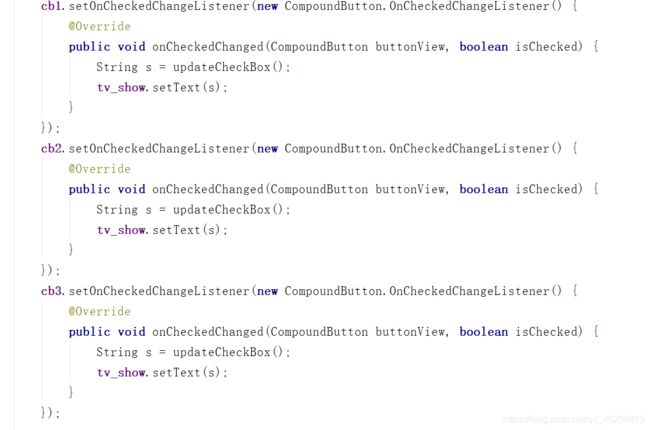
本任务主要考察的是CheckBox的使用
笨办法:
每一个checkbox都实现一次setOnCheckedChangeListener,将获取文本内容部分代码分装成一个函数updataCheckbox,如下图

优化:
使用接口CheckBox.OnCheckedChangeListener
具体内容参考该博客
代码
//仅给出最简单的实现方式,优化参考上述链接
public class MainActivity extends AppCompatActivity {

    CheckBox cb1,cb2,cb3;
    TextView tv_show;
    @Override
    protected void onCreate(Bundle savedInstanceState) {

        super.onCreate(savedInstanceState);
        setContentView(R.layout.my_main);
        cb1 = findViewById(R.id.cb_run);
        cb2 = findViewById(R.id.cb_jump);
        cb3 = findViewById(R.id.cb_swim);
        tv_show=findViewById(R.id.tv_show);
        cb1.setOnCheckedChangeListener(new CompoundButton.OnCheckedChangeListener() {

            @Override
            public void onCheckedChanged(CompoundButton buttonView, boolean isChecked) {

                String s = updateCheckBox();
                tv_show.setText(s);
            }
        });
        cb2.setOnCheckedChangeListener(new CompoundButton.OnCheckedChangeListener() {

            @Override
            public void onCheckedChanged(CompoundButton buttonView, boolean isChecked) {

                String s = updateCheckBox();
                tv_show.setText(s);
            }
        });
        cb3.setOnCheckedChangeListener(new CompoundButton.OnCheckedChangeListener() {

            @Override
            public void onCheckedChanged(CompoundButton buttonView, boolean isChecked) {

                String s = updateCheckBox();
                tv_show.setText(s);
            }
        });

    }

    private String updateCheckBox() {

        String s="";
        if (cb1.isChecked()){

            s+=" "+cb1.getText();
        }
        if (cb2.isChecked()){

            s+=" "+cb2.getText();
        }
        if (cb3.isChecked()){

            s+=" "+cb3.getText();
        }
        return s;
    }

}
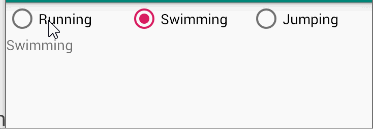
Task 1-6
题目
The root layout is LinearLayout.
- 1 TextView shows your name and student number
- 3 RadioButtons in a row enclosed with RadioGroup
- 1 TextView shows the selected information of the RadioButtons when the checked state changes.
演示
分析
本题考察的是RadioButton的使用方法
1、与CheckBox不同的是,RadioButton需要放在一个RadioGroup下,注意三个radiobutton的布局,需要需改radiogroup的orientation
2、获取radiogroup下的radiobutton,只需要findViewById即可,checkedId在方法中作为参数已经传入
代码
public class MainActivity extends AppCompatActivity {

    @Override
    protected void onCreate(Bundle savedInstanceState) {

        super.onCreate(savedInstanceState);
        setContentView(R.layout.my_main);
        RadioGroup rg = findViewById(R.id.rg);
        final TextView tv_show = findViewById(R.id.tv_show);
        rg.setOnCheckedChangeListener(new RadioGroup.OnCheckedChangeListener() {

            @Override
            public void onCheckedChanged(RadioGroup group, int checkedId) {

                RadioButton rb = findViewById(checkedId);
                tv_show.setText(rb.getText());
            }
        });
    }
}
Task 1-7
题目
Make an app with 3 components. The root layout is LinearLayout. The 1st one is a TextViewshows your name and ID. The 2nd one is an EditText with hint message “Please input your
name”. The 3rd one is a Button. The 4th one is a TextView. When the Button clicks, the TextViewshows the content of the EditText.
演示
分析
由editText、button以及textview组成,点击按钮,获取editText中文本内容并在textview中显示
代码
public class MainActivity extends AppCompatActivity {

    @Override
    protected void onCreate(Bundle savedInstanceState) {

        super.onCreate(savedInstanceState);
        setContentView(R.layout.my_main);
        final EditText et =findViewById(R.id.et);
        final TextView tv =findViewById(R.id.tv_show);
        Button bt = findViewById(R.id.button);
        bt.setOnClickListener(new View.OnClickListener() {

            @Override
            public void onClick(View v) {

                tv.setText(et.getText());
            }
        });
    }
}
Task 1-8
题目
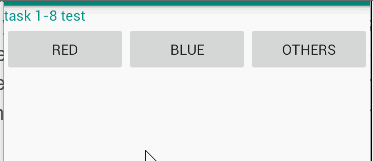
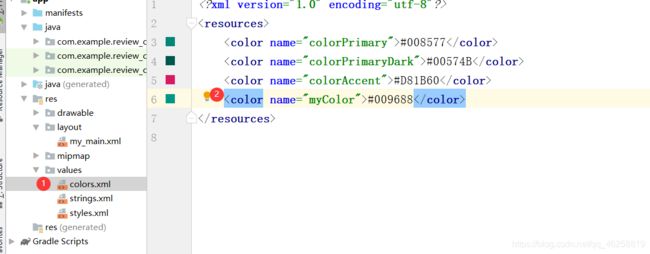
Make an app with 3 components. The root layout is LinearLayout. The 1st one is a TextView shows your name and ID. The 2nd one is a horizontal LinearLayout with 3 equal width Buttons. Click red Button, the TextView changes the text color to red. Click blue Button, the TextView changes the text color to blue. Click other Button, the TextView changes the text color to a customized color defined in res/values/colors.xml.
演示
分析
1、自定义颜色

代码
public class MainActivity extends AppCompatActivity {

    @Override
    protected void onCreate(Bundle savedInstanceState) {

        super.onCreate(savedInstanceState);
        setContentView(R.layout.my_main);
        final TextView tv =findViewById(R.id.tv_show);
        Button bt1= findViewById(R.id.bt1);
        Button bt2 = findViewById(R.id.bt2);
        Button bt3 = findViewById(R.id.bt3);
        bt1.setOnClickListener(new View.OnClickListener() {

            @Override
            public void onClick(View v) {

                tv.setTextColor(Color.RED);
            }
        });
        bt2.setOnClickListener(new View.OnClickListener() {

            @Override
            public void onClick(View v) {

                tv.setTextColor(Color.BLUE);
            }
        });
        bt3.setOnClickListener(new View.OnClickListener() {

            @Override
            public void onClick(View v) {

                tv.setTextColor(getResources().getColor(R.color.myColor));
            }
        });
    }
}
Big Task
演示
具体解析
具体解析可以参考这个博客